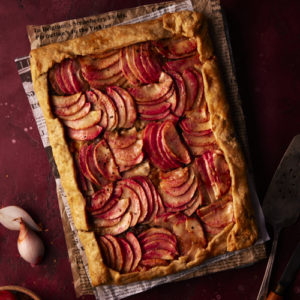
Category Archives: Pies and Tarts

Berry Brown Butter Tarts


These adorable mini raspberry tarts actually started their life as a cherry tart. It all began a few weeks ago when my brother-in-law sent me a link to this blog. The talented Rowena of Apron and Sneakers made a stunning cherry tart. As soon as cherries started rolling into the market, I bought a big box and got to work.

I had such high hopes for this tart. Fresh cherries in a tart with a brown butter filling. What could be bad? To be honest, the filling was just too sweet for me. I have discovered that I only really like cherries in their raw form. I think it’s that slight snap when you bite into a firm cherry, as it gives way to the sweet juicy fruit inside. For me, when cherries are cooked, they lose what makes them so special.

While the filling was just ok, the crust was fantastic. Buttery, slightly sweet and browned to perfection it was reminiscent of a cookie. I knew I had to make this again, but in mini form so I could maximize the crust to filling ratio. Admittedly, mini tarts are more work than one big tart, but I was convinced it would be worth it. The stands at the market this week were overflowing with raspberries and the little wild blueberries, that make me scream with joy, were just starting to arrive. The heady scent of the ripe berries filled my car and made me slightly dizzy as I drove back to the cottage.

The dough comes together really quickly. No mixer needed. Flour, sugar, vanilla, a pinch of salt and some melted butter are combined in a mixing bowl. The original recipe uses all-purpose flour but I snuck in a bit of whole wheat flour, not because I am delusional to believe that 1/4 cup of whole wheat flour will make this a healthy dessert, but because I thought it would really enhance the nuttiness of this crust. I unearthed my mini tart pans from my basement graveyard shelf of unloved and useless kitchen gadgets. The dough just pressed into the tart pans, no rolling required.

To ensure maximum crunch in the pastry, the shells are pre-baked before filling. While they are in the oven, prepare the  filling. The butter is cooked over low heat until it turns a light brown. Do not walk away when doing this. It goes from light brown to black in a flash! The smell of the brown butter is intoxicating. Brown butter gives a real depth of flavour to the filling.

Click here to print recipe for Berry Brown Butter Tarts.

The crisp tart shell shatters when you bite into it, giving way to tangy berries in a nutty brown butter filling. These are summer perfection!

Chili Hand Pies

Just the words “Hand Pie” make me smile. Could there be anything more adorable and appealing than a little pie you eat with your hands? To be honest, I’m not a huge fruit pie fan. Perhaps it’s because of my peach pie blunder.   Or maybe it’s just that if I’m going to ingest copious amounts of butter and sugar, I’d rather partner it with chocolate or caramel rather than fruit. Plus, there’s something about a fruit hand pie makes me think of McDonald’s deep-fried apple pies. Not that there’s anything wrong with that.

But stuff something savory in pastry and I’m all over it!

I was watching The Chew last week and Carla and Clinton teamed up to make Chili Hand Pies. They had way too much fun making them, and I wanted in on it. I think it would be so much fun to have the cast of The Chew over for drinks! Cooking dinner for them would be too much pressure, but I know that certainly after a few cocktails, they’d all be in my kitchen with me cooking away. Michael would be laughing while he prepared some porky goodness, Mario would be grating Parmesan Cheese over everything and Clinton would surely keep the cocktails flowing.

My sisters just read the last paragraph and I know they are thinking that I am turning into my mother, having imaginary parties with my TV friends.

Carla and Clinton did a Beef Chili. I decided to do a vegetarian version, substituting Veggie Ground Round for the beef. I also added some onions to the chili and ramped up the heat, using 3 kinds of peppers: fresh jalapeno, diced pickled jalapeno and ancho chili powder. You want the filling to be quite spicy because the pastry crust is quite mild.

The dough is made with cornmeal. They recommended cutting the butter into small slices, but I took it right from the freezer and grated it into the dry ingredients. This is a wonderfully supple dough and rolls out without any problems. I used a 5 inch tin to cut out my circles. Use whatever you have on hand. Smaller ones would also be a wonderful hors d’oeuvre. You can make the chili and the pastry a day ahead and refrigerate them separately. I rolled out all my pastry circles and stacked them between sheets of waxed paper, before chilling. That way, the next day it was all ready to assemble and bake.

Onions, garlic, red pepper, jalapeno pepper, cumin, chili powder and salt form the flavour base.

Make sure you let the chili cool before mixing in some grated cheddar.

Don’t overfill them or you will have trouble sealing them. You can simply press the edges with the tines of a fork, or get fancy and roll the edges like a rope. 

Cut a few slits so the steam can escape. 20 minutes in a 400 degree oven, and they are ready to serve.

Click here to print the recipe for Chili Hand Pies.

Rhubarb Curd Strawberry Tart and Some Surprising Discoveries

For those of you who have been following my blog for the past little while, you know that I have been suffering from some disc problems that landed me flat on my back in bed for about 8 days. I’m pleased to report that I am continuing to feel much better. But while I lay in bed, in agonizing pain, I became quite anxious about the fact that I was unable to do any of my regular forms of fitness (treadmill, elliptical, weight training and yoga).

I have come to rely on exercise as a stress reliever, as well as a way to allow me to control my weight. A mentally balanced sane person would be more concerned about the errant disc fragment lodged in her spine, pressing on the nerve that connects to her left hip flexor and quadriceps. Yet, I seemed to be more concerned about weight gain.

Surprising discovery # 1: Shockingly in the past 3 weeks I have actually lost 5 pounds! I am not quite sure how that happened. It may have something to do with muscle loss (muscle weighs more than fat) or it could have something to do with the fact that I was unable to get down the stairs to my kitchen, where we keep the food, for 9 days. Now don’t misunderstand me here.  I didn’t starve for 9 days. The lovely family members in my house did bring me food and water at regular intervals. It’s just that perhaps my regular intervals are a bit more frequent than theirs!

Again, a mentally balanced and sane person would look at this weight loss and begin planning healthy meals of quinoa, kale and lentils, so that the pounds do not creep back on. However, I saw a loss of 5 pounds and immediately started planning what I would bake and blog about next.

I knew I wanted to be seasonal and bake something with rhubarb. Of course the obligatory strawberry rhubarb pie was a possibility, but I am not really a pie lover, unless it involves coconut cream. Searching for inspiration I turned to Melissa Clark’s “Cook This Now.” And sure enough, in the May chapter, she had a recipe for a Rhubarb Curd Tart. As I read through the recipe, I made surprising discovery #2: Curds are not just for lemons anymore! You can make a curd from any fruit juice you fancy.

While I love the tangy flavour of rhubarb, I find the stringy texture a bit off-putting. Melissa had come up with a genius way to get all the tang of rhubarb, without the texture. Puree the raw rhubarb in the food processor and then strain the pulp and squeeze out the juice. Use this juice instead of lemon, in the curd. Brilliant!

For the tart crust, I wanted to try a recipe from Anna Olsen. She has a new show called Bake, on the Food Network (Canada). This week’s episode featured desserts made with Pate Sable (tender tart dough). As I watched Anna prepare the dough, I made surprising discovery #3:  A hardboiled egg yolk contributes greatly to the texture and richness of Pate Sable. This European way of making tart dough was created by French pastry chef Pierre Herme.

The final tart was perfect. The crust was reminiscent of shortbread; crumbly and just a little bit sweet with the richness of butter (and egg!). The curd plays tricks on your mind. You see the yellow curd and you think lemon, but once you take a bite your mouth immediately recognizes the tart and tangy taste of rhubarb. Balanced by the sweetness of strawberries, this is one perfect bite. I think that should Anna and Melissa ever meet, they would be quite proud of their collaboration!

The secret ingredient to the rich crust is the yolk of a hardboiled egg! Butter and icing sugar are creamed together. The hard-boiled egg gets sieved and added. Additions of vanilla extract, salt, raw egg yolk and cake and pastry flour  complete the dough. I like to roll out the dough between 2 sheets of parchment paper. Transfer to tart pan with removable bottom. If the dough cracks while transferring, don’t sweat it. It’s a forgiving dough and is easy to patch. Trim off excess dough by running the rolling-pin across the tart pan. Line with parchment paper and fill with pie weights or dried beans to bake.

While the tart is baking, prepare the curd. The idea that any juice can be turned into a curd has just blown my mind. I’m not sure why I only thought curd could be made with lemon. I guess I’m just not an out of the box kind of thinker, but now that I know, the possibilities are endless. I am planning a pomegranate curd tart for the fall! I always associate pomegranates with my mom. She used to make us strip down to our underwear and  go outside in the backyard to eat pomegranates, because the fruit stained so badly. Luckily, these days you can already buy the fruit juiced.

When making the curd, Melissa says to stand at the stove and whisk constantly for 18-20 minutes. I did not. I walked away for several minutes at a time and everything came out just fine. Although, I must admit, when I strained the curd, I did see a few bits of scrambled egg in the bottom of my strainer.

This tart would also be wonderful with fresh raspberries, but strawberries seemed like the right choice today.

Click here to print the recipe for Rhubarb Curd and Strawberry Tart.

Salted Caramel Chocolate Tarts and a very sweet Mother’s Day.

Today I am grateful for several small and large blessings! I am grateful to be relatively pain free. If you read my last post,  you, may recall that I was in bed for over 8 days with terrible back and leg pain. The MRI revealed a bulging disc which was pressing on a nerve and causing me back pain. It seems to have eased greatly and I am back on my feet again. I feel grateful for a wonderful husband who brought me an extra hot skim milk latte in bed this morning.

Although I couldn’t be in Toronto today to celebrate Mother’s Day with my mom, I am grateful to have 5 siblings all living there to celebrate with her. They gathered at my baby sister’s house and had a “friendly” game of softball. Some family members tend to get a bit competitive about these things so hopefully no one sprained a hamstring sliding into first base or got bonked on the head from being tagged out at home plate. I’m sure to get a play by play analysis very soon.

Finally, I am grateful for my sweet children. My oldest was unable to spend today with me, but he drove for over 5 hours to come home for a short visit yesterday. My middle child bought me a beautiful blue hydrangea plant and gave me a very fitting (and funny) card .

And my youngest, with the help of his sister, made me a video on YouTube, serenading me with Elvis’ “Love me Tender.” So sweet!

I made these tarts a few days ago and thought we would have them today for dessert. Unfortunately they were all gone the day I made them. Luckily I have other sweet things to satisfy me!

These tarts are the creation of Lucy Waverman, food columnist for the Globe and Mail. I have adapted the recipe somewhat.  The original recipe produced tarts that had a thin layer of caramel and then a thick layer of ganache. I doubled the caramel recipe so that the finished tarts would have a thick layer of both caramel and chocolate.I also added some salt to the caramel filling as well as a few decorative flakes on top of the ganache filling.

I made them in mini muffin tins. Not only do they look adorable, but there is no guilt at all involved in popping one (or three) of these into your mouth. The contrast in textures of this mini bite are what make it so special. Biting into the crisp flaky pastry you discover a silky smooth layer of bittersweet slightly salty caramel covered in a thick layer of chilled chocolate ganache. The ping on your tongue from a melting crystal of fleur de sel helps these tarts from being too cloyingly sweet.

Begin with making the caramel, as it needs time to cool and firm up. Sugar, water and corn syrup are boiled until a rich amber colour is reached. Finish with whipping cream and a pinch of kosher salt.

I like to roll out the pastry dough between 2 sheets of parchment paper, right after making the dough. Then I chill the rolled out dough. Be sure to roll the dough very thin (1/8 of an inch thick) for these mini tarts.

Let the tart shells cool completely before filling. I find it easiest to put the caramel filling into a disposable piping bag.

Finish off with chocolate ganache and a few flakes of fleur de sel.

Click here to print recipe for Salted Caramel Chocolate Tarts.

Peach Pie with Spelt Crust

I finally paid off a debt that had been owing for almost 27 years. I know how terrible that sounds. But let me explain. You see, I owed my husband a peach pie, well 4 peach pies if we’re going to be accurate. In the summer of 1984, I accidentally left the door of our freezer slightly ajar.  It was not until several days later that I discovered what I had done. Aside from having to throw out several hundred dollars worth of kosher meat and some mushy peas, it was not really that big a deal, in the overall scheme of life’s big tragedies.  Until I realized, that at the bottom of that freezer chest were the last peach pies my late mother-in-law had baked for my husband.  In the summer of 1983, she had baked him 12 peach pies, to be frozen and enjoyed over the long winter.  Unfortunately, she became ill and passed away in March of 1984.  At that time we still had 4 peach pies left in the freezer.  My husband could not bring himself to eat those last pies. They were to live in our freezer in perpetuity, sort of a frozen tribute to his mom.

I felt terrible and baked some peach pies right away to make up for the horrible mistake I made. He ate the pies but not with great joy. He smiled, said they were good, but I could tell that they just didn’t measure up to hims mom’s pies. Eventually I gave up because her damn pies grew more incredible with each passing year and I knew I could never bake anything to that would live up to that sainted memory.

I baked crisps, crumbles, grunts, cookies,biscotti, brownies, blondies, cakes, tarts, galettes, scones, hamentashen, rugelach, macarons and 43 kinds of bread, but never another peach pie… until this week, that is. I guess at some deep subconscious level, I still felt guilty about it. Plus, I wanted to show him how much I appreciate him. I mean, how many husbands take the time and care to roll towels for the bathroom like this? Plus, he has the fine motor skills of a surgeon and untangles my necklaces in 2 seconds flat. He always reads the instruction manuals and just last week he figured out how to get the new tamper proof cap off my toothpaste. How could I not bake this awesome guy a peach pie?

Peaches were at their early fall glory this week at our market.


I decided not to use his mom’s recipe but made a spelt crust instead, from Kim Boyce’s “Good to the Grain”. This dough uses a combination of all-purpose and spelt flours. The spelt flour adds a creamy colour and a nutty flavour to the dough. Kim uses a method known as fraisage to ensure a flaky crust. Kim explains how it works, “…you smear pea-sized pieces of fat into the flour to create alternating layers of dough and fat. During baking, the fat melts, creating steam that lifts up the layers of dough, creating a very flaky pastry.”

The peaches do need to be peeled, which adds an extra step, but is not difficult. An “X” is cut into the bottom of each peach and then they are slipped into boiling water for about 30 seconds. The skin slips off very easily after this.

The peaches are macerated with sugar for about half an hour and then the juices are strained off. I mixed in about 1/4 cup of Minute Tapioca for thickening, a tip I learned about from Cook’s Illustrated. Minute Tapioca is virtually flavorless, readily dissolves into the fruit’s exuded juices, and has a neutral texture, exhibiting none of the pastiness of flour or cornstarch. It can be found in the baking section of the supermarket.

After the top crust goes on, Kim recommends a 45 minute rest in the freezer (for the pie, not you!) to chill the dough and prevent shrinkage. Then the pie gets egg washed and sprinkled with cinnamon-sugar.

After an hour in the oven, this emerges.

The pie was met with much joy! The gesture was greatly appreciated and if he compared it to his mom’s pie, I certainly didn’t hear it, as his mouth was too full of pie.  Flaky crust, just a bit nutty from the addition of spelt flour and juicy filling, dripping down your chin, just like when you eat a really ripe peach. Really all you could ask for in a peach pie. I think my debt has been finally paid off. What will I feel guilty about now?

Click here to print the recipe for Peach Pie.