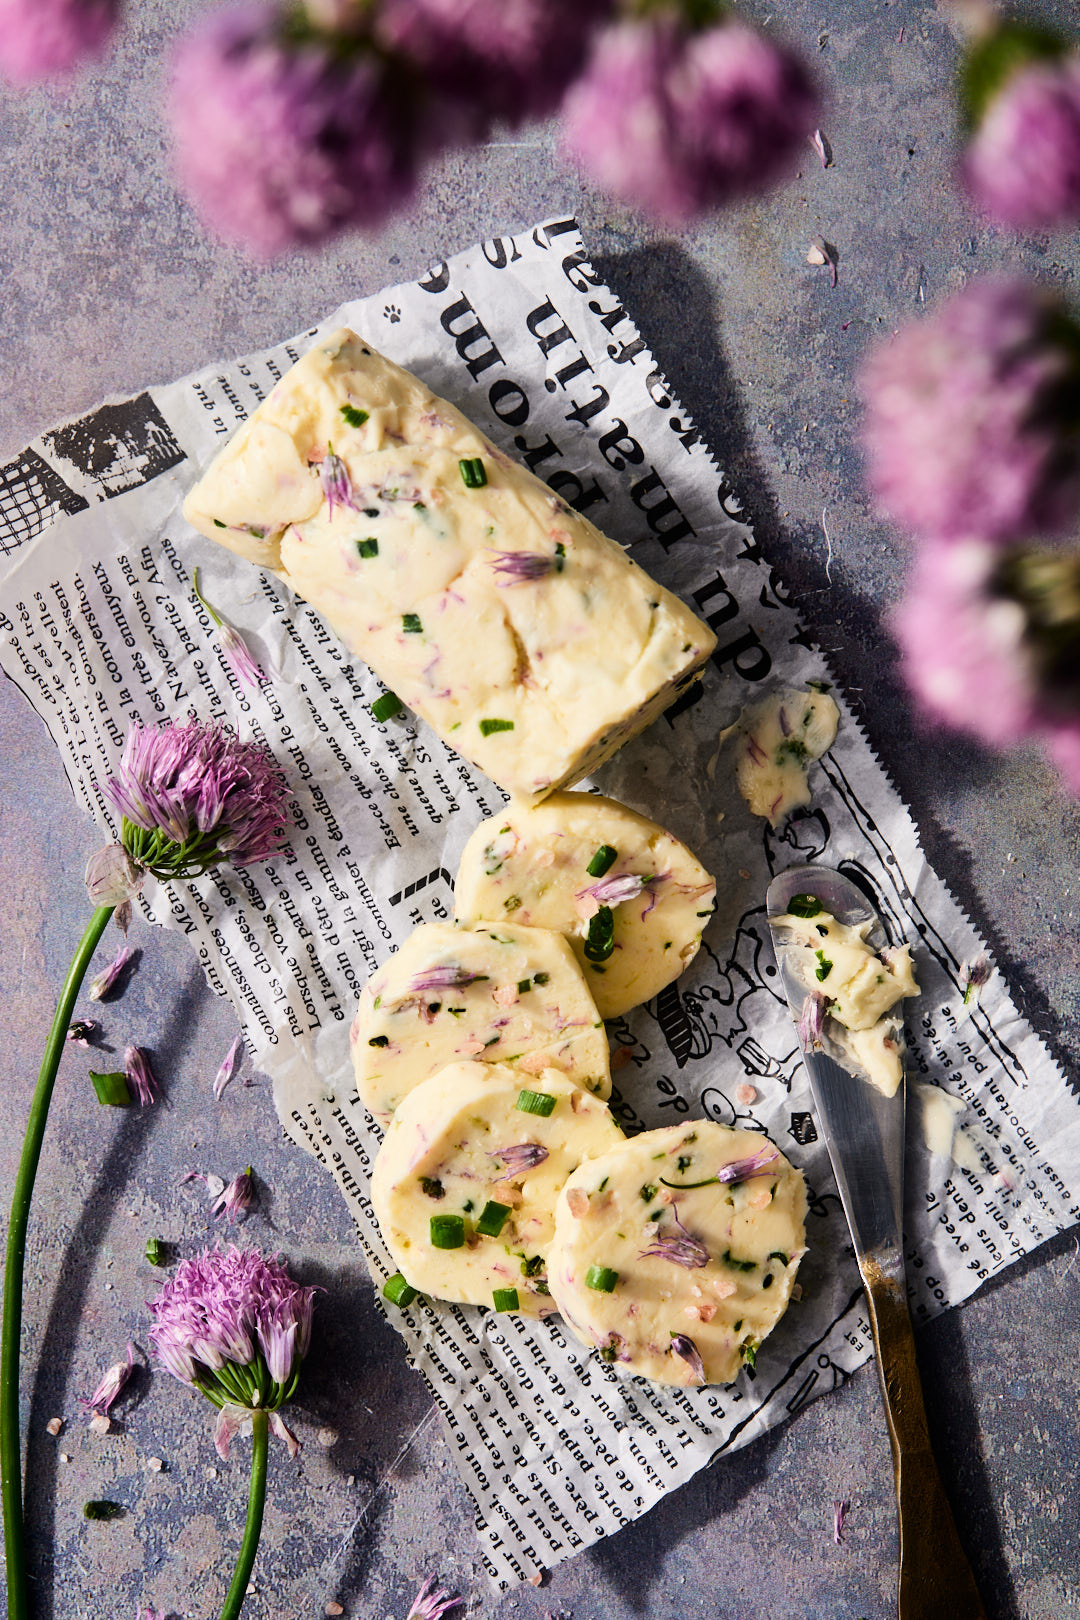
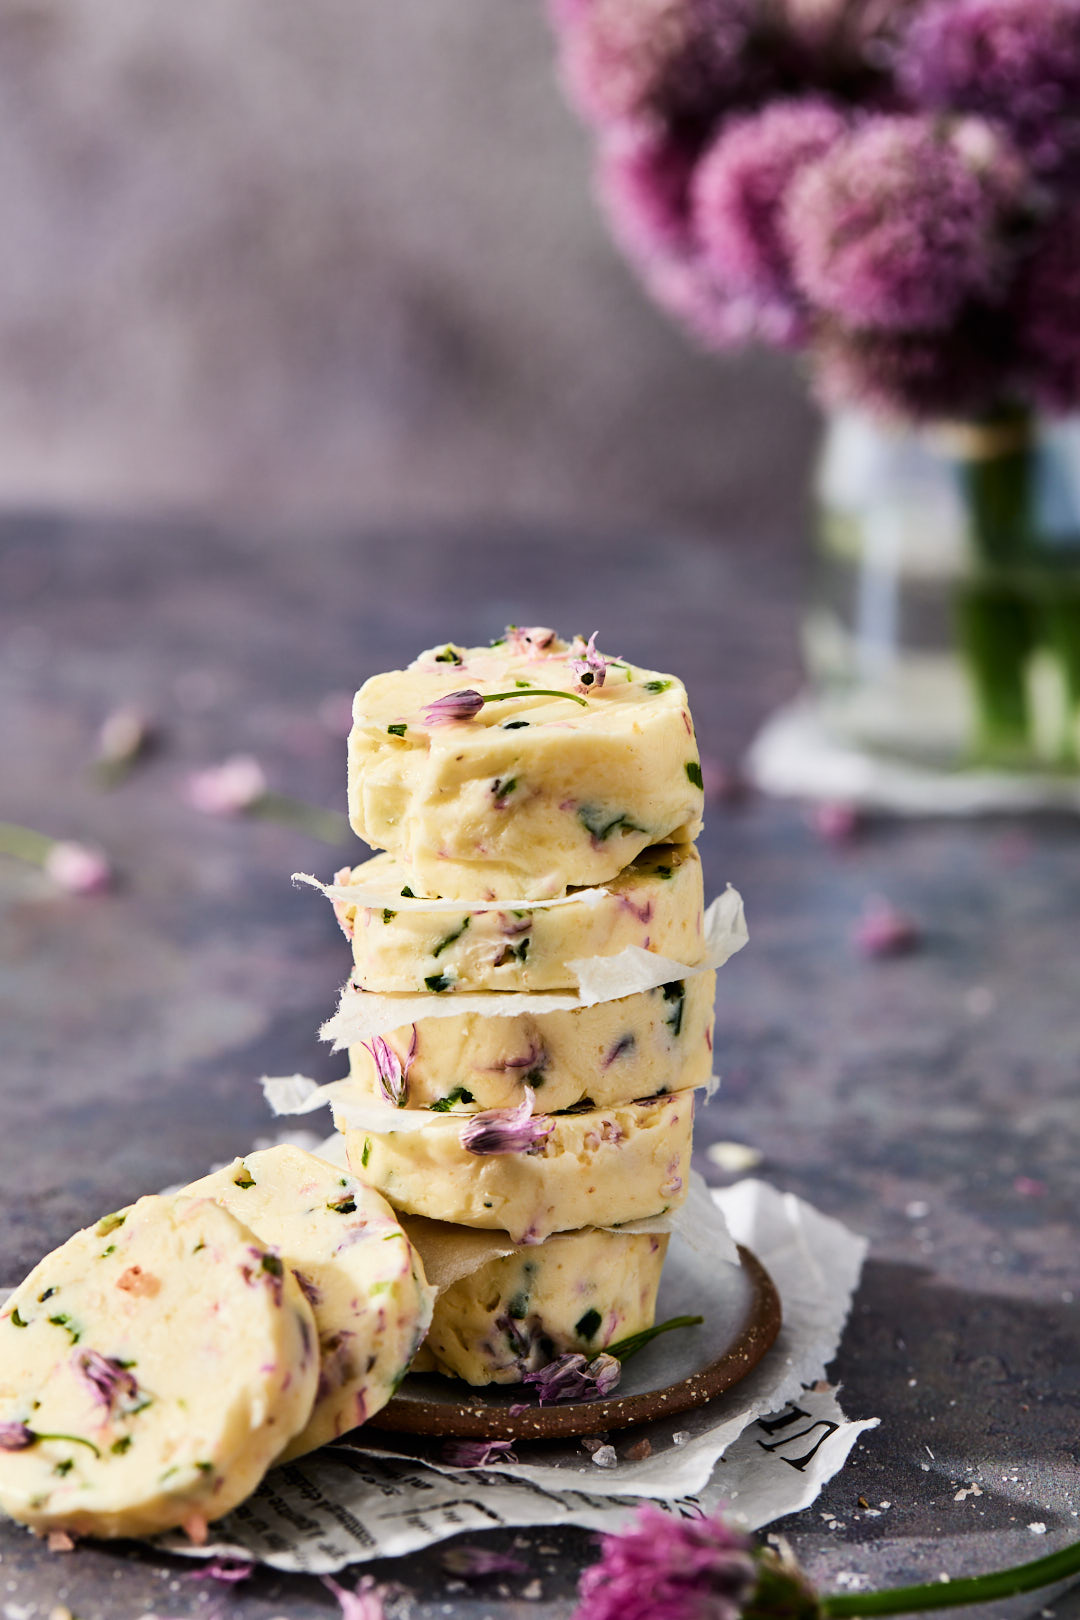
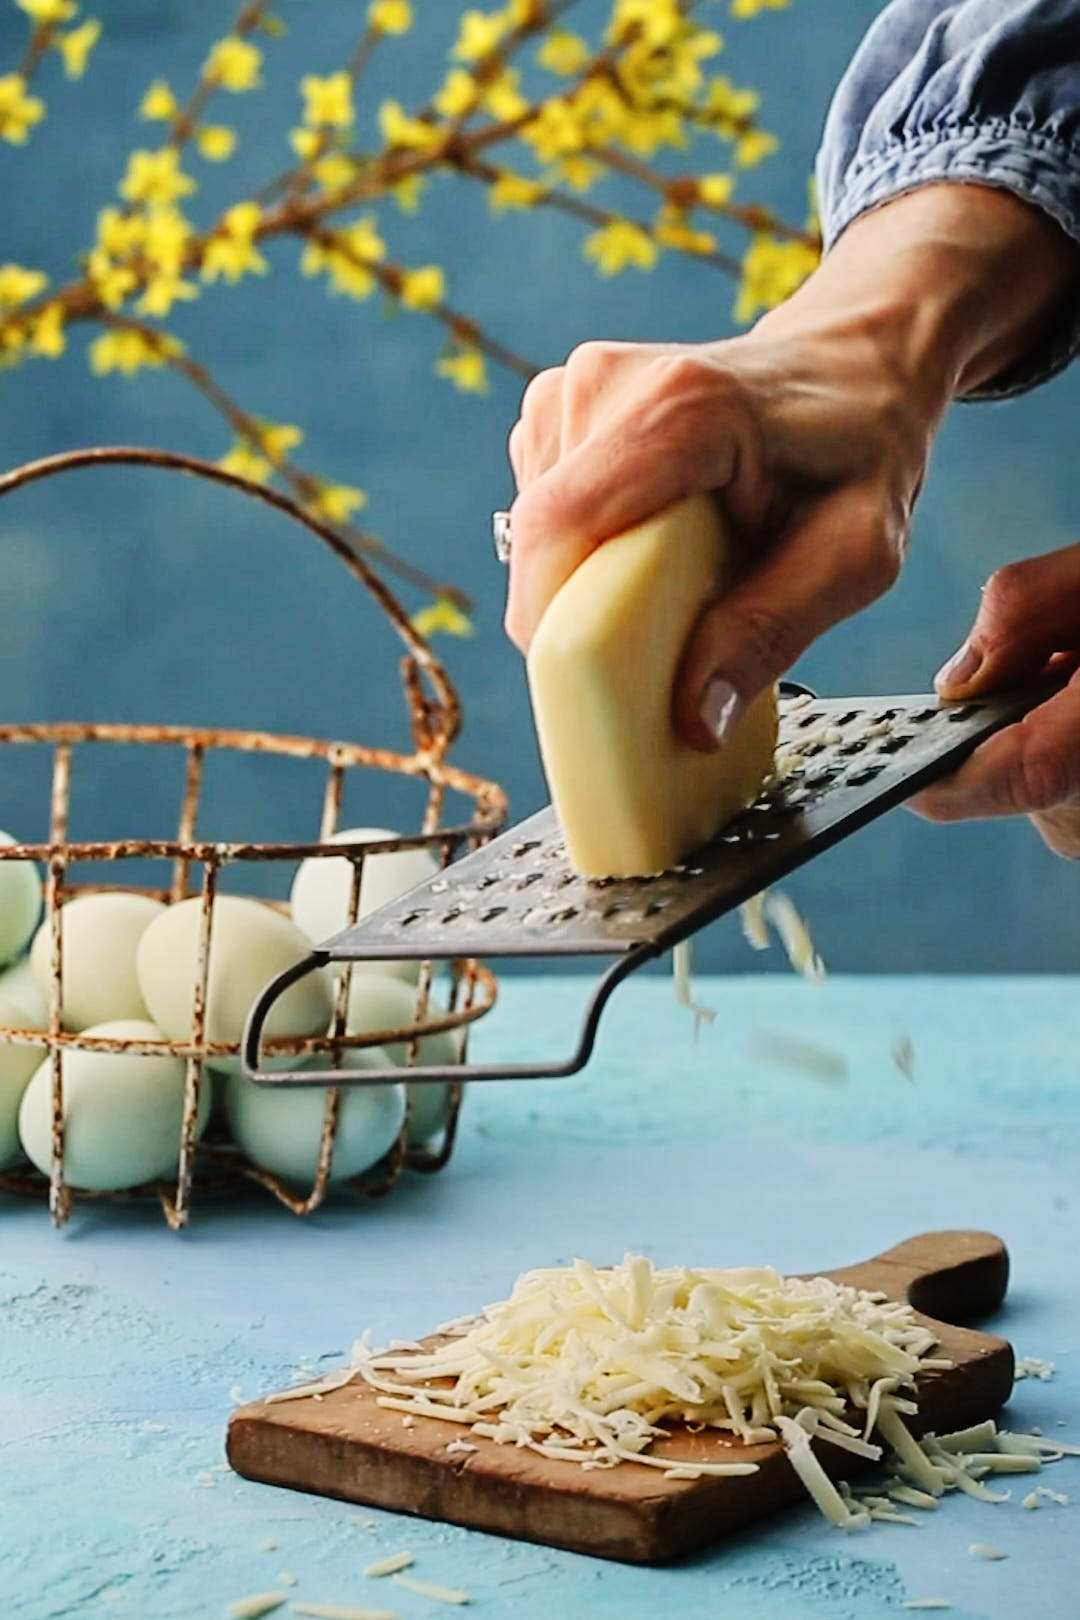
Did you guys know that chive blossoms are edible? Chives are one of the first herbs to come up in my herb garden every spring. Before I can blink, they have already started flowering. While the stems of the flowering chives are too hard to use, the flowers are gorgeous and totally edible.
When life hands you chive blossoms, make chive blossom butter. It looks fancy AF, but is quite simple to make. Watch how I do it.
Chive blossom butter keeps very well, in the freezer, for at least 2 months. Just slice off what you need. We have been putting this on salmon fillets, baked potatoes and last week, I added a bit of grated garlic and smeared it on bread before grilling for some outstanding garlic bread.
I grew up with frozen concentrate lemonade. Our favourite was the pink variety. It never occurred to me that you could make your own lemonade. But you can and you should! It’s not that difficult and it tastes so much fresher. Plus, it’s customizable.
This raspberry lemonade is the perfect balance of tart and sweet, plus that pink hue is just gorgeous. I think it would be the perfect drink to celebrate the new Barbie movie! You could add a splash of vodka or gin, or some Prosecco or soda water if you want some bubbly.
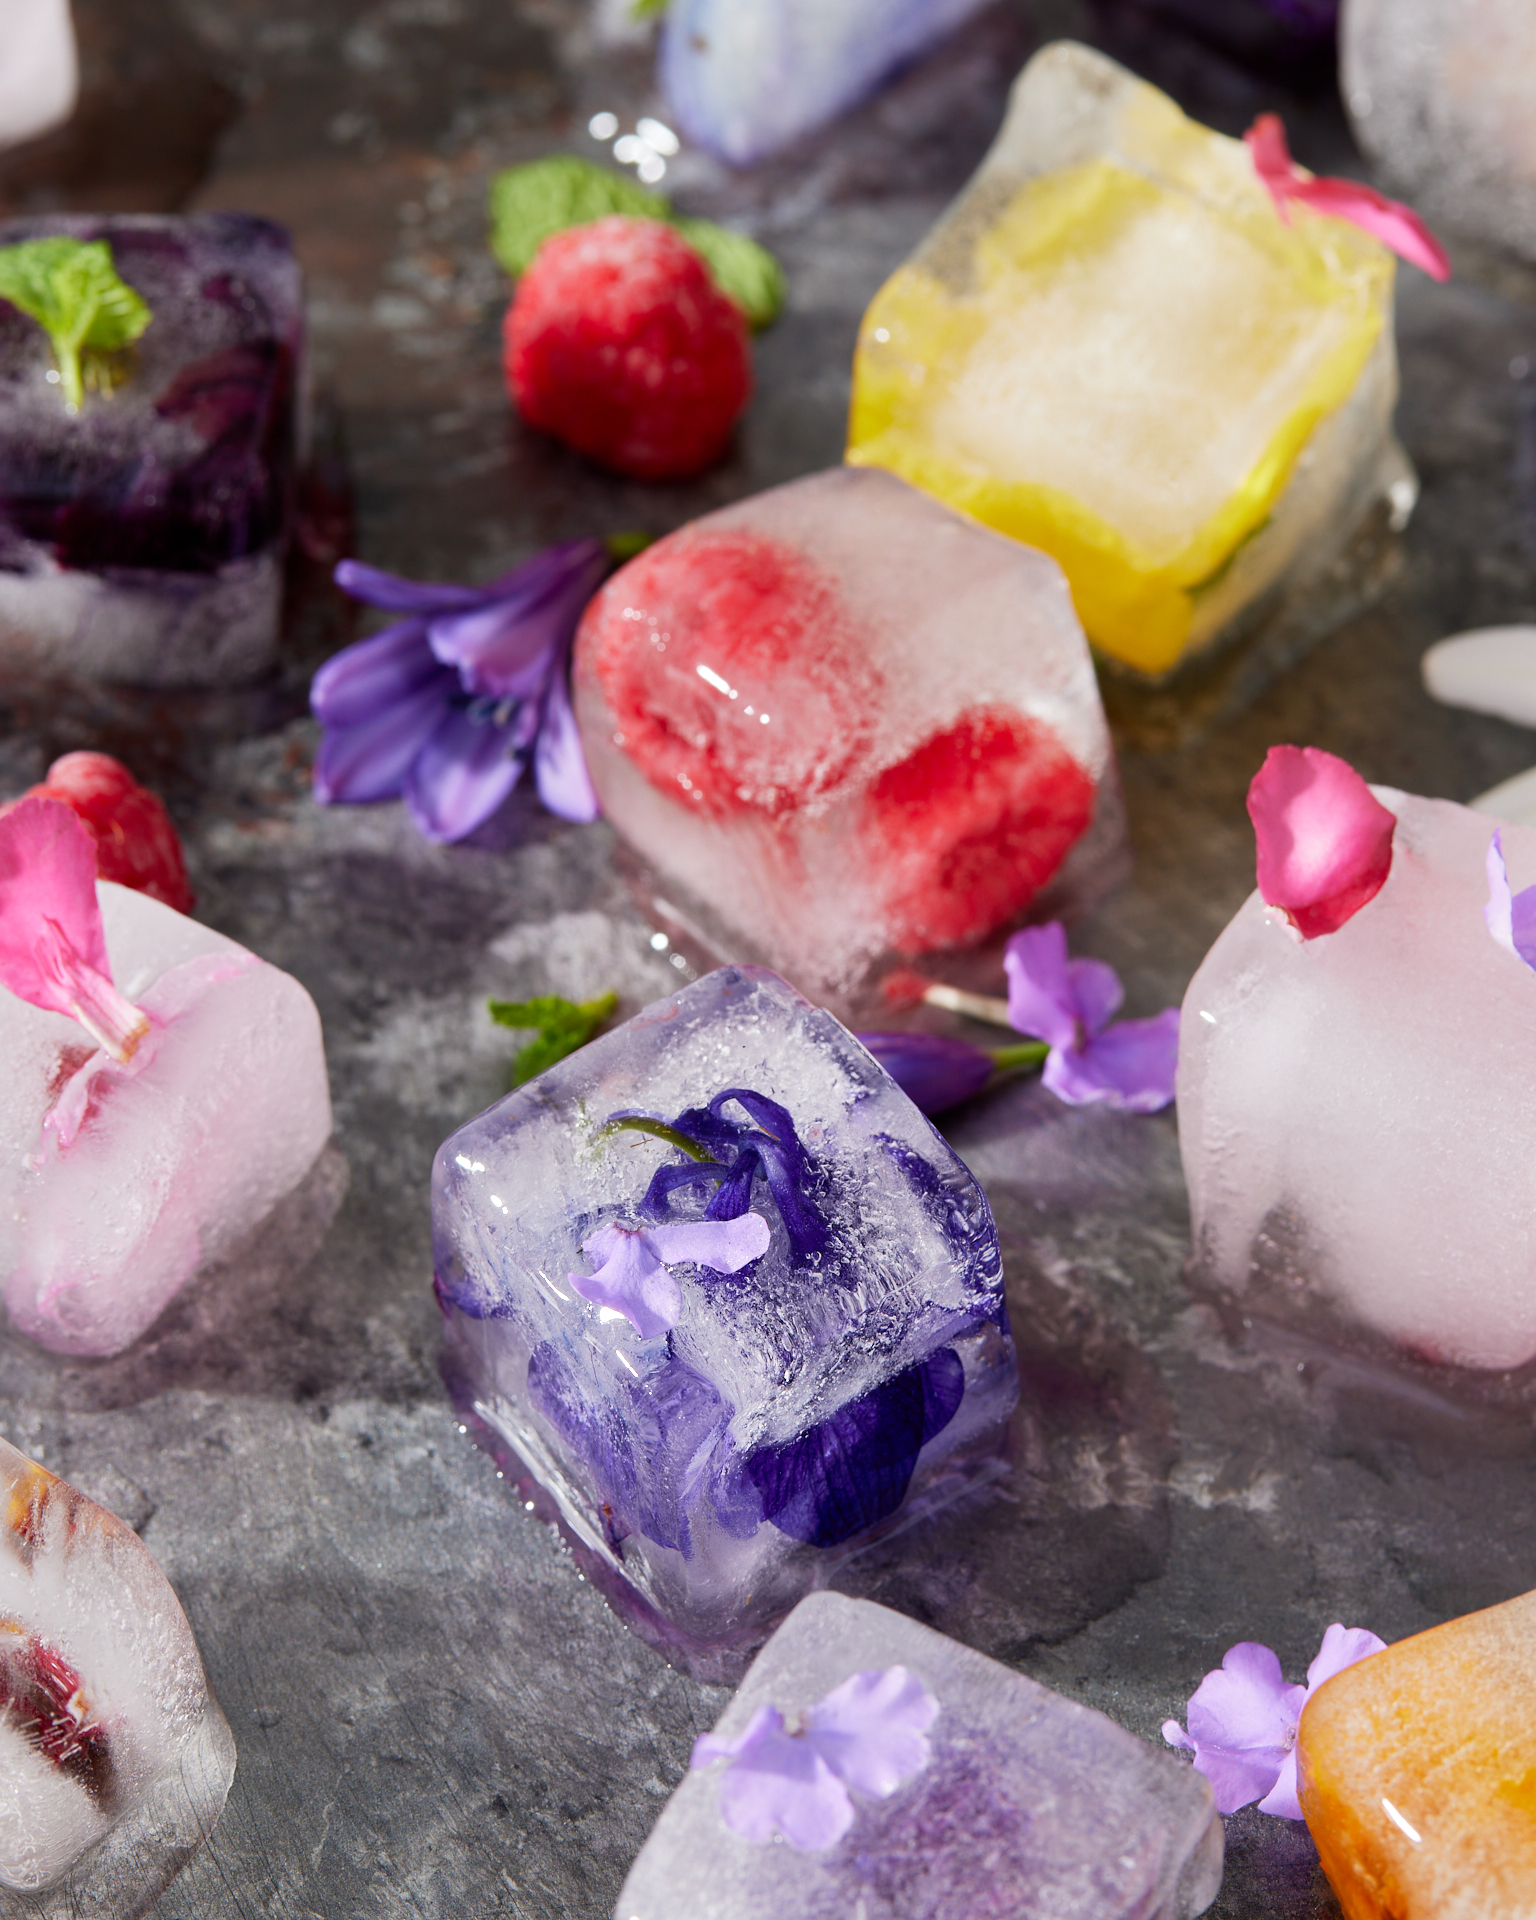
I got extra fancy and made some floral ice cubes.
Here are a few tips for success:
Make your simple syrup at least a few hours ahead so that it has time to chill.
Strain the raspberry puree. No one wants raspberry seeds in their drink.
Use fresh lemons and strain the juice after squeezing to remove all the seeds and pulp.
If you’re going to make the floral ice cubes, start with distilled water and boil and cool it. It will make clearer ice cubes than just regular tap water.
Use silicone ice cube trays. They make removal easy.
Make sure your flowers are truly edible. Go to a reliable source. I bought mine online from Ottawa Edible Flowers. Just Google for your area.
The flowers will tend to float to the top of the ice cube tray, so it is best to freeze in 2 stages. All the details are in the recipe.
You could also use fresh raspberries in the ice cube trays instead of flowers.
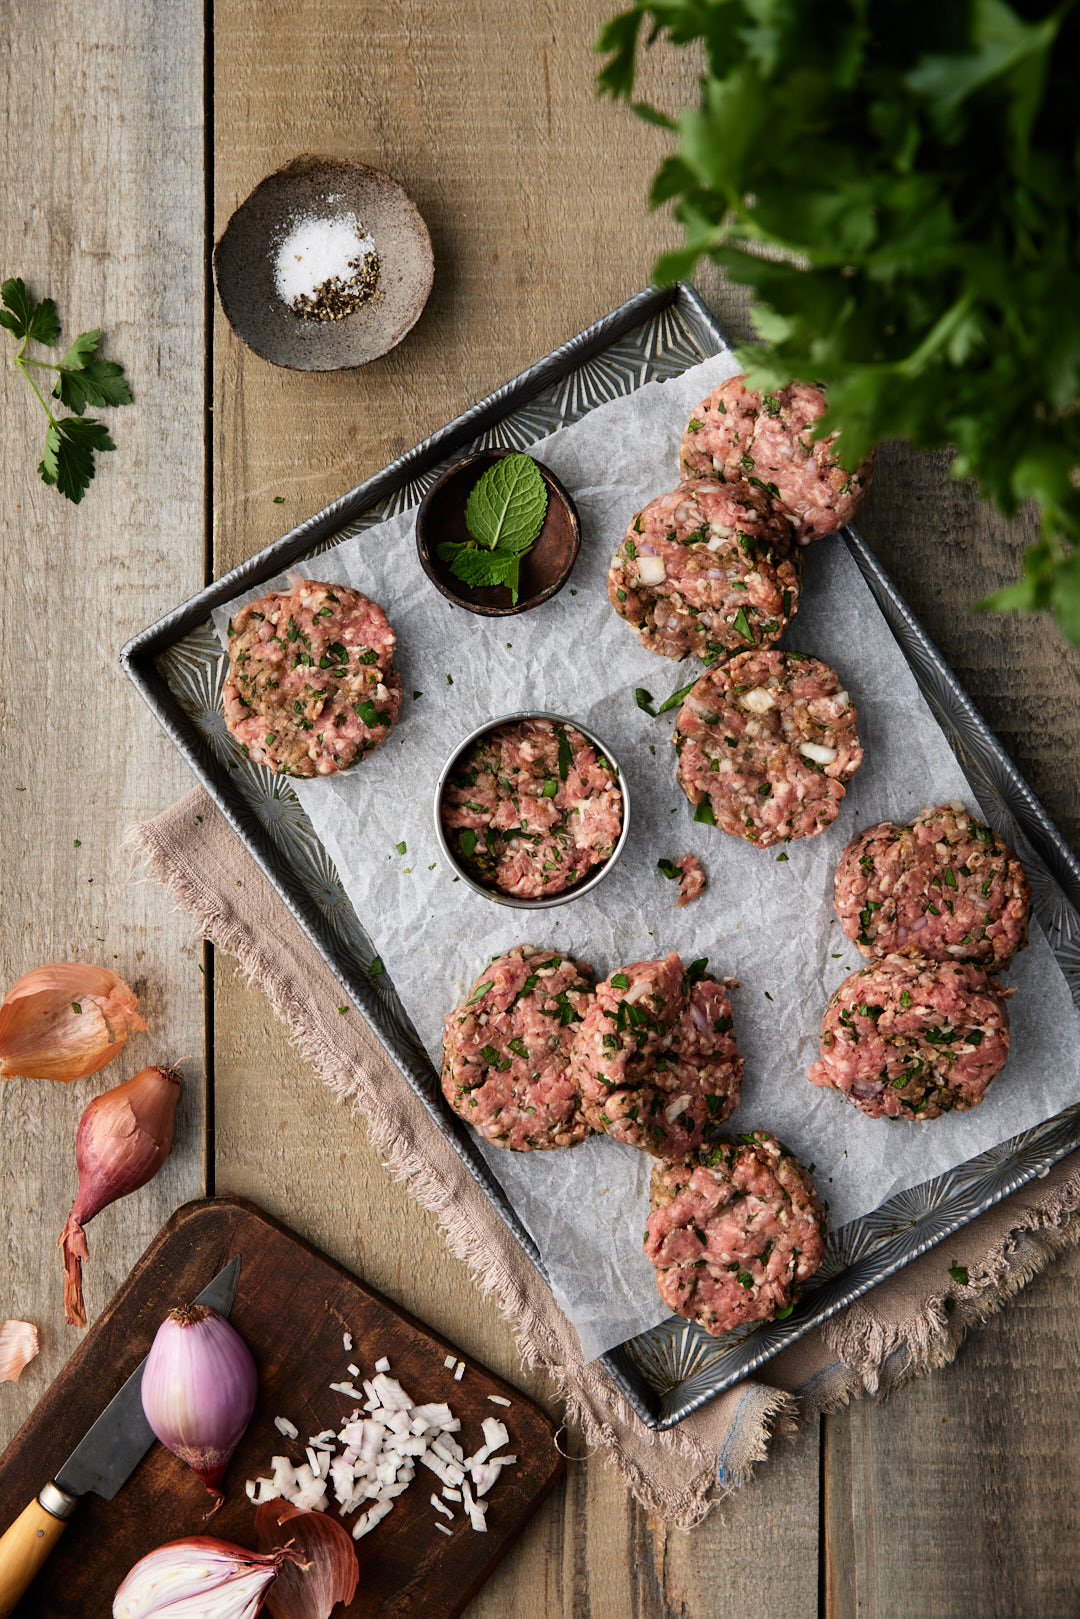
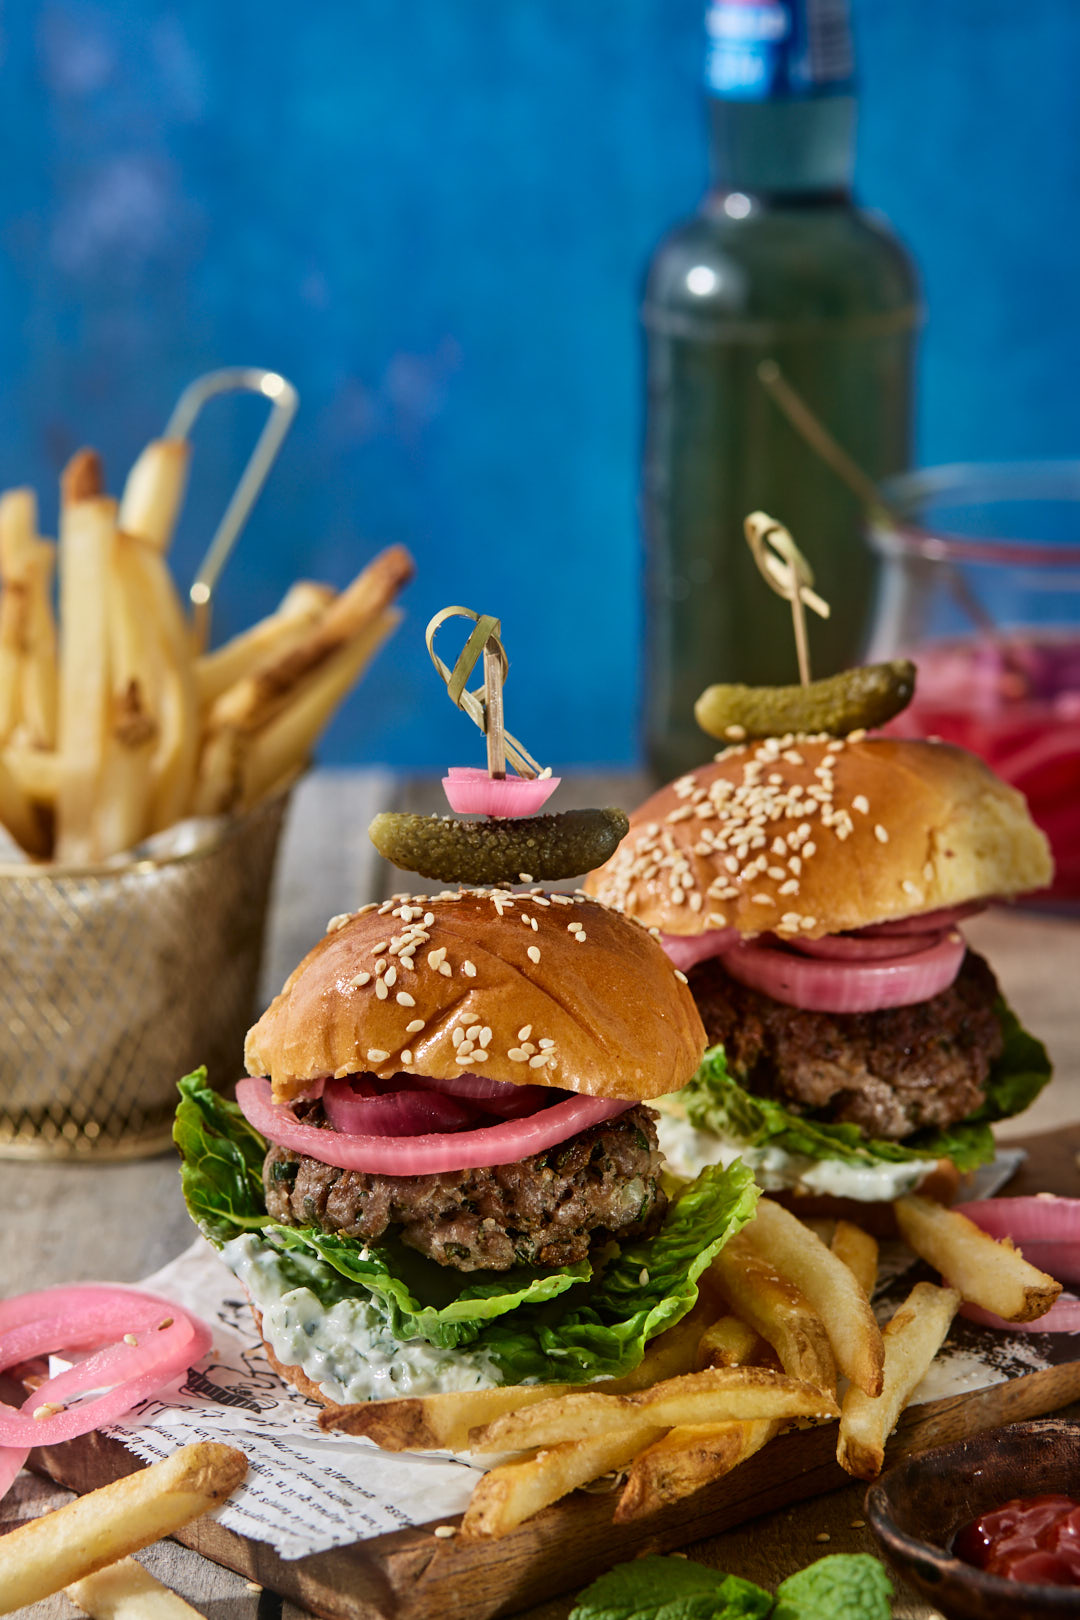
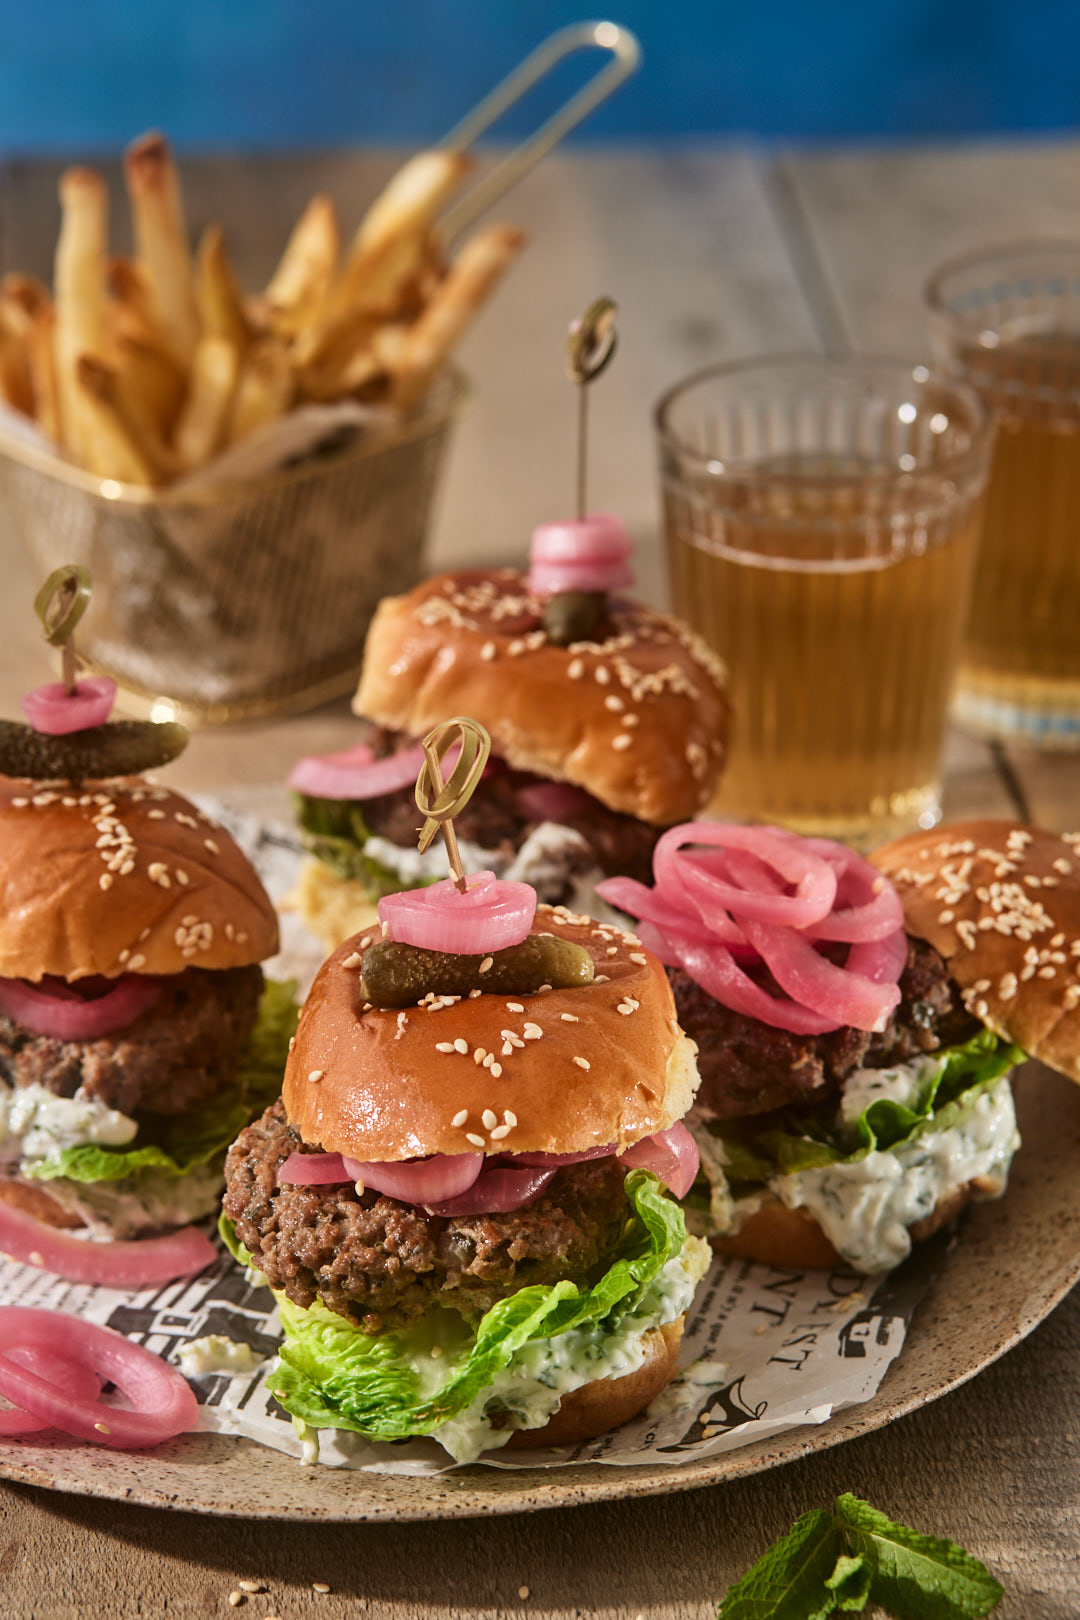
Have you ever noticed that miniature food always seems to taste better? I’ve got a delicious recipe for you today using ground lamb to make sliders. The recipe is slightly adapted from Iron Chef Geoffrey Zakarain. He made them on The Kitchen a few weeks ago and I had to try them.
These little sliders pack a big flavour punch. The ground lamb is seasoned with shallots, garlic, mint, parsley, cumin and paprika.
Here are a few tips for success:
Use a light hand when mixing everything into the ground lamb. Form your hand into a claw and use your fingers like a rake to incorporate the seasoning ingredients into the lamb. Over-mixing leads to tough burgers. According to tasting table.com, “Mixing ground beef releases myosin, which is a protein that causes muscle contraction. It’s important for burger making, as myosin binds fat and water to the meat, leading to a more tender burger. So you want to retain as much of the protein as possible — but when you mix too much and let too much myosin escape, you can be left with chewy meat.”
Salt burgers just before grilling.
I used a 2.5 inch round cookie cutter to form my sliders. But feel free to form by hand if that’s more your style.
Cook lamb burgers to an internal temperature of 135°F. Insert instant read thermometer into burger from the side, not the top, and push it until it reaches the centre of the burger.
The pickled onions can be made and stored in your fridge up to 2 weeks ahead of time. This recipe makes more than you will need, but they are great on sandwiches and in all kinds of salads.
If you prefer to keep the tzatziki sauce dairy free, look for a plain vegan yogurt or sour cream that does not contain coconut as the main protein. The coconut flavour will not work for this application. I like Tofutti brand Sour Supreme
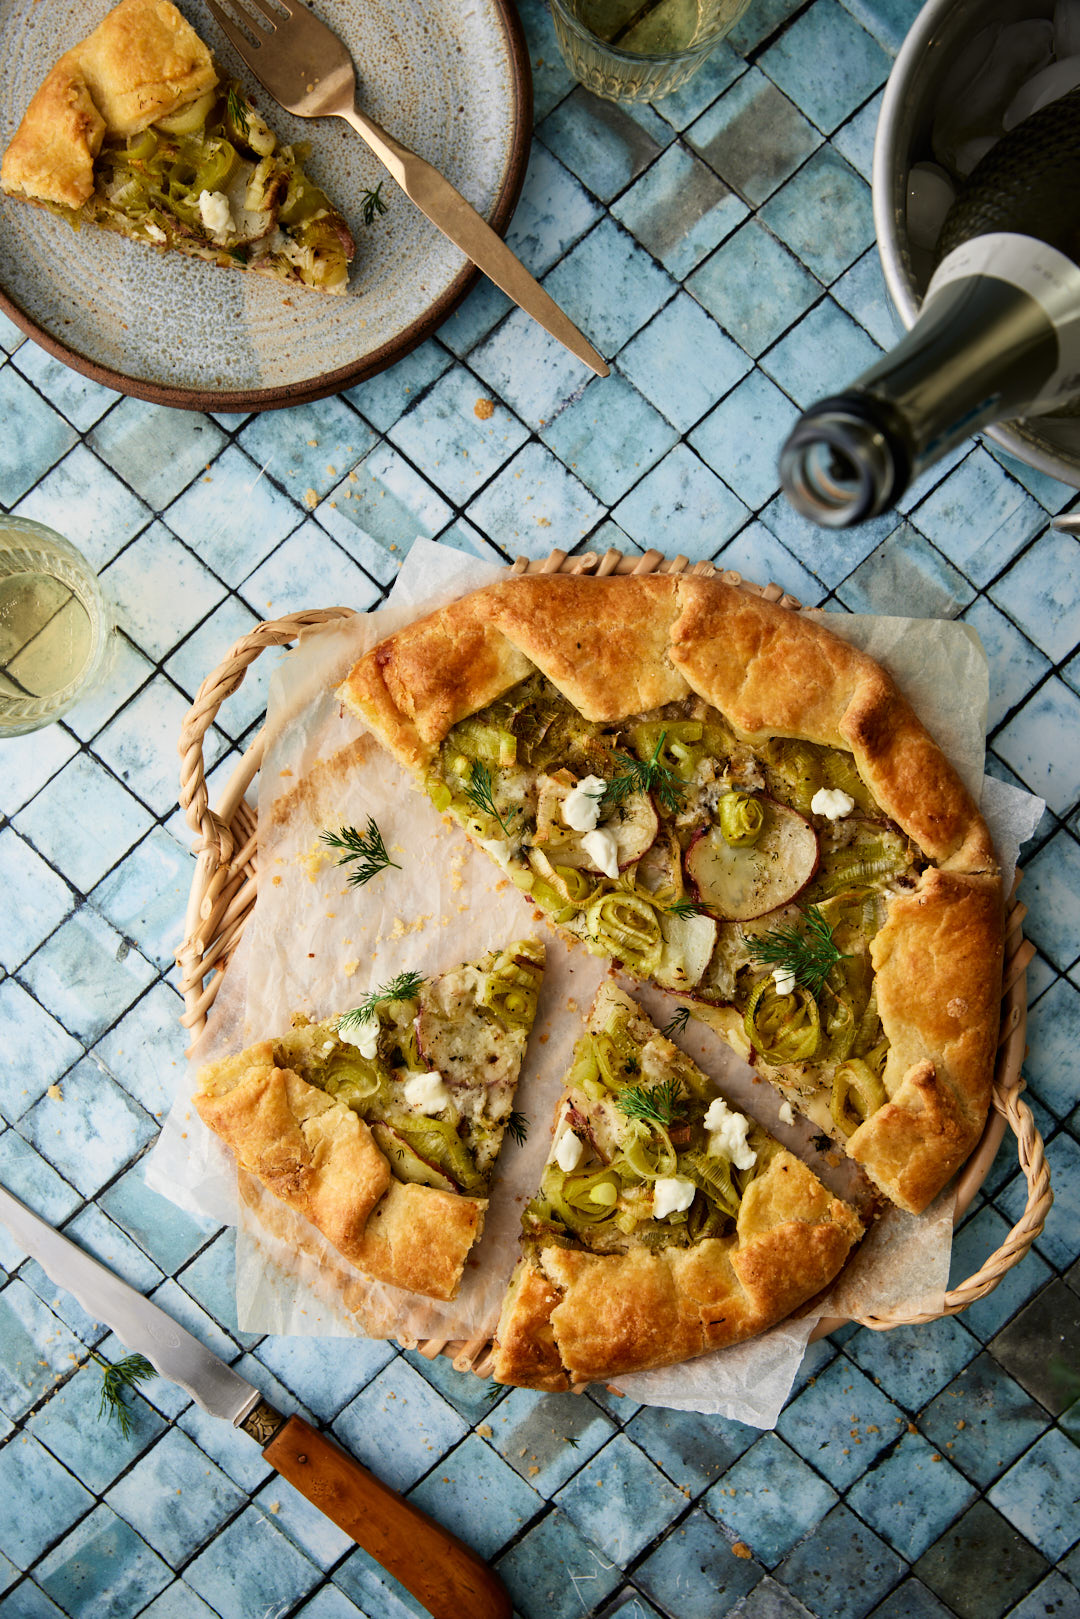
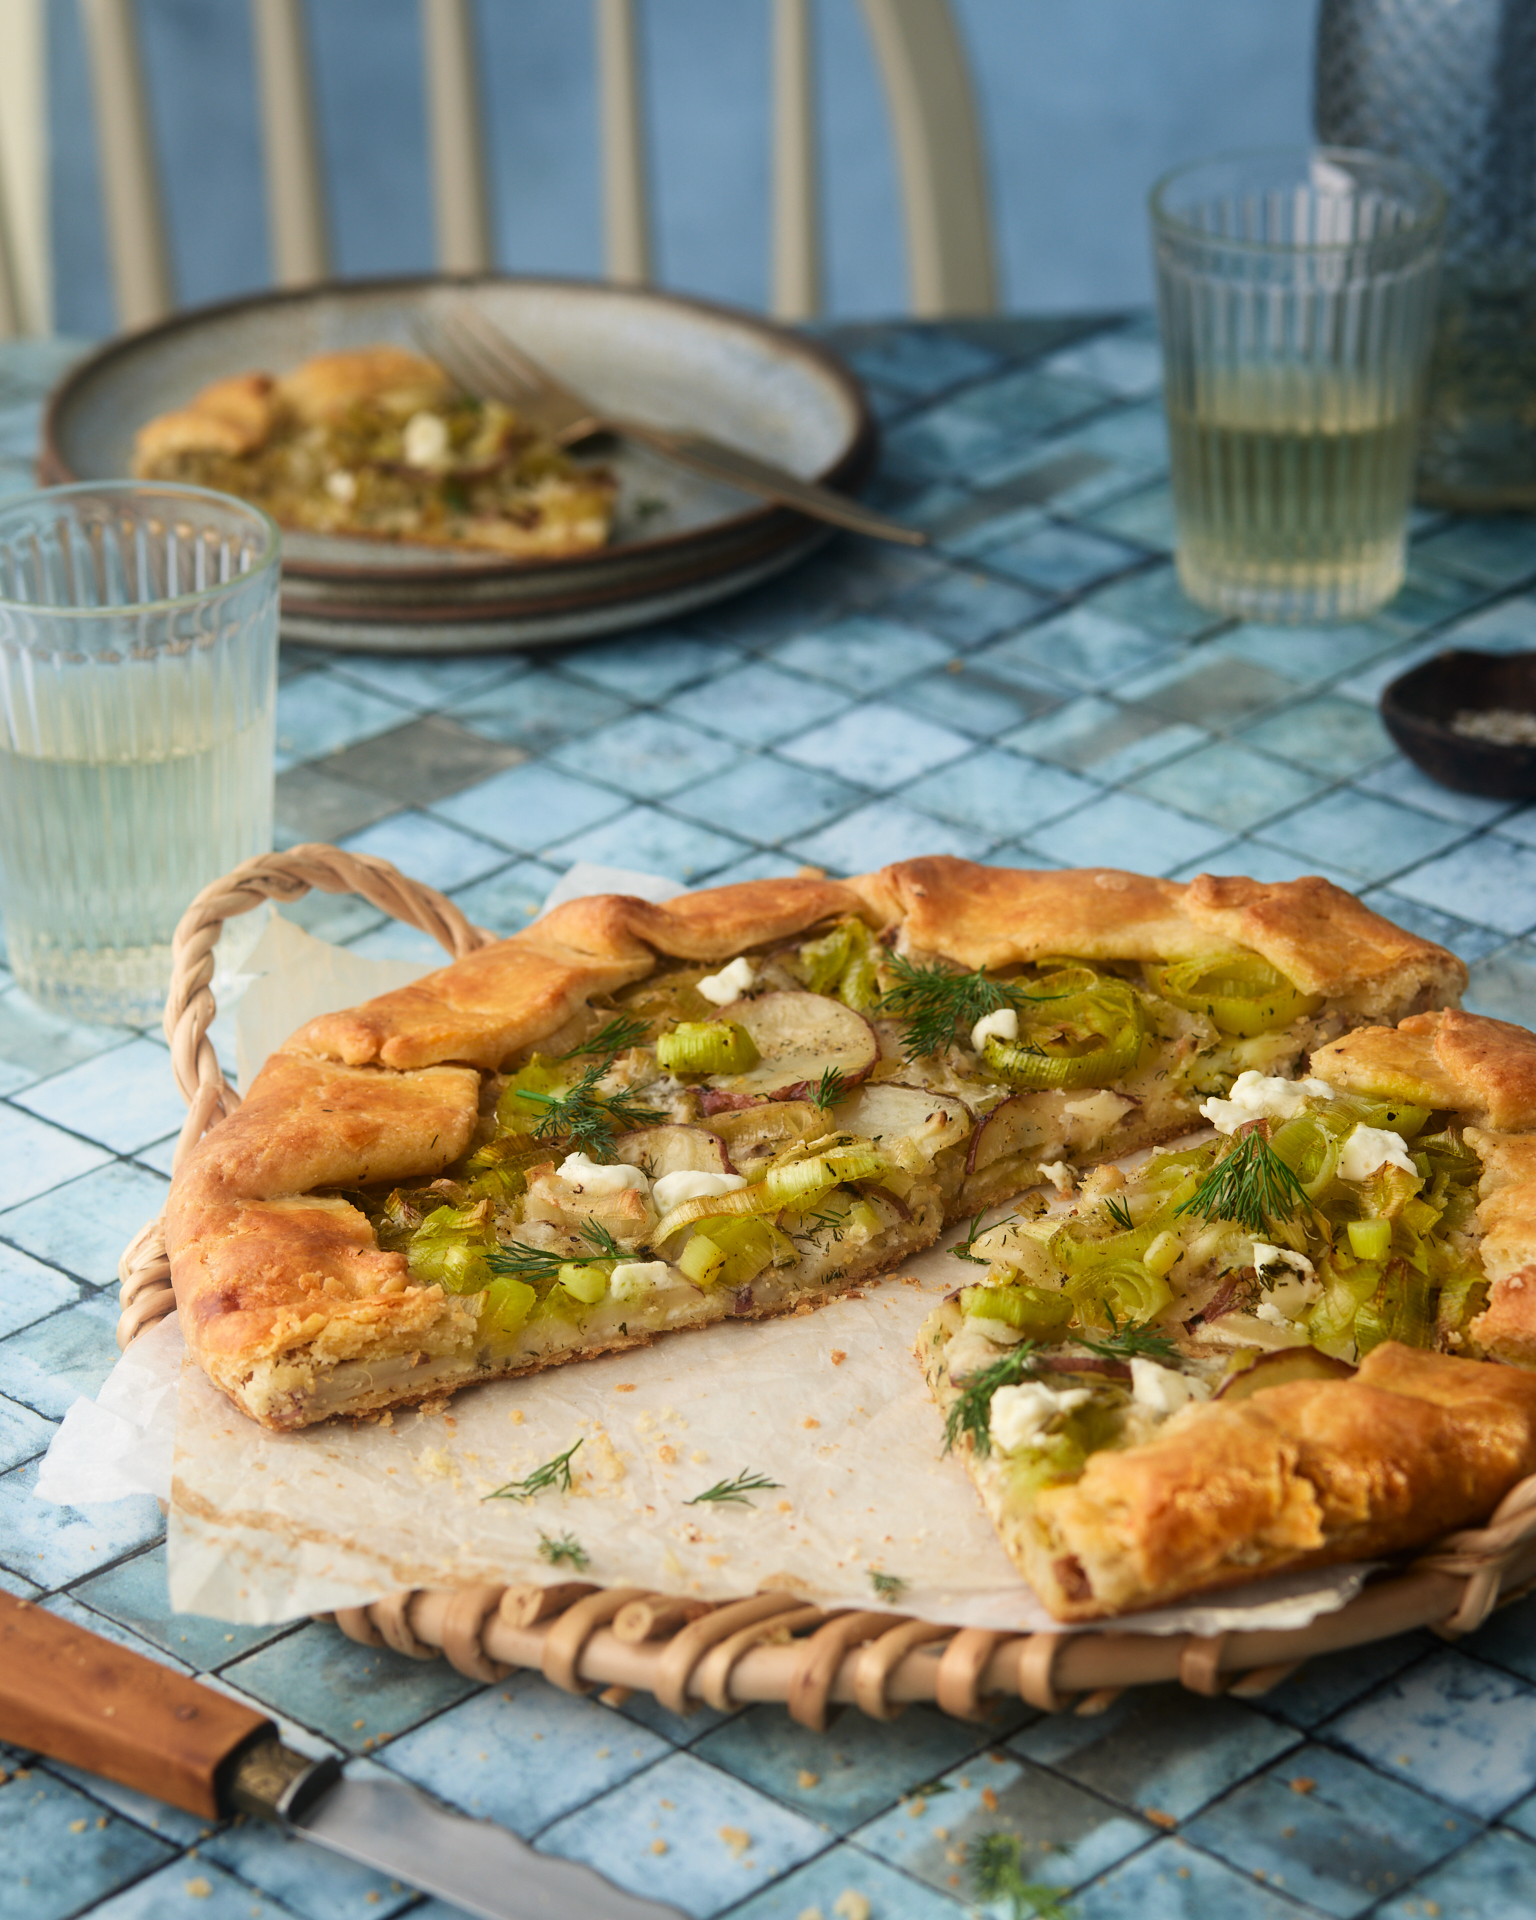
While leek and potatoes are a classic pairing for soup, they also work brilliantly together in a galette. Tangy and creamy goat cheese takes this galette to a new level of yumminess.
The dough for this galette comes together in about one minute in the food processor. It’s a very versatile recipe that can be used for both sweet and savoury galettes. I like to make the dough ahead of time, roll it out and freeze it. That way, I can make a galette any time I have a craving.
There are 2 unusual ingredients in the dough. The first is a bit of sour cream. Sour cream helps the texture of the dough stay tender and adds to the flakiness. It also adds a nice tang to the flavour. The second unusual ingredient oil cornmeal. It contributes a subtle crunch to the dough and makes this dough a dream to roll out.
Watch this galette come together:
Tips for success:
Don’t over mix the dough. Stop the food processor just before the dough rolls into a ball.
Make sure your butter is very cold and the water is ice cold.
The potatoes need to be sliced thinly and par cooked in the microwave for about 4 minutes before layering onto the galette. Raw potatoes will not cook thoroughly in the galette.
Bake in lower third of the oven. You want the bottom crust to get nice and brown. Cover top of galette with a bit of foil after 30-35 minutes of baking if the top is getting too brown.
Add a it more gruyere and goat cheese to the top of the galette for the last 5 minutes of baking time.
Garnish with fresh dill for an extra pop of colour and flavour.
This can be served hot, warm or even at room temperature. Leftovers the next day can be heated up in a 350°F oven for 5 minutes.
If you are of a certain age, you may recall when sun-dried tomatoes were ubiquitous. This was way back in the last century, mid 80’s to mid 90’s. They became so mainstream that they found their way into bagels and cream cheese, wheat thin crackers, flour tortillas and potato chips. They got abused and ultimately there was backlash and they disappeared from our pantries.
I’m on a mission to bring them back. They are little flavour bombs, packed with umami and during most of the year, when tomatoes are sadly lacking in flavour, sun dried tomatoes have a place at the table.
I learned a version of this recipe at one of my very first professional cooking jobs. I was working in an upscale take-out food shop in Toronto’s Yorkville area called Dinah’s Cupboard. I learned so much from Dinah Koo, the shop’s owner. She demanded perfection and precision. She cooked with big flavours and was a master at presentation. I am forever grateful to her for teaching me so much.
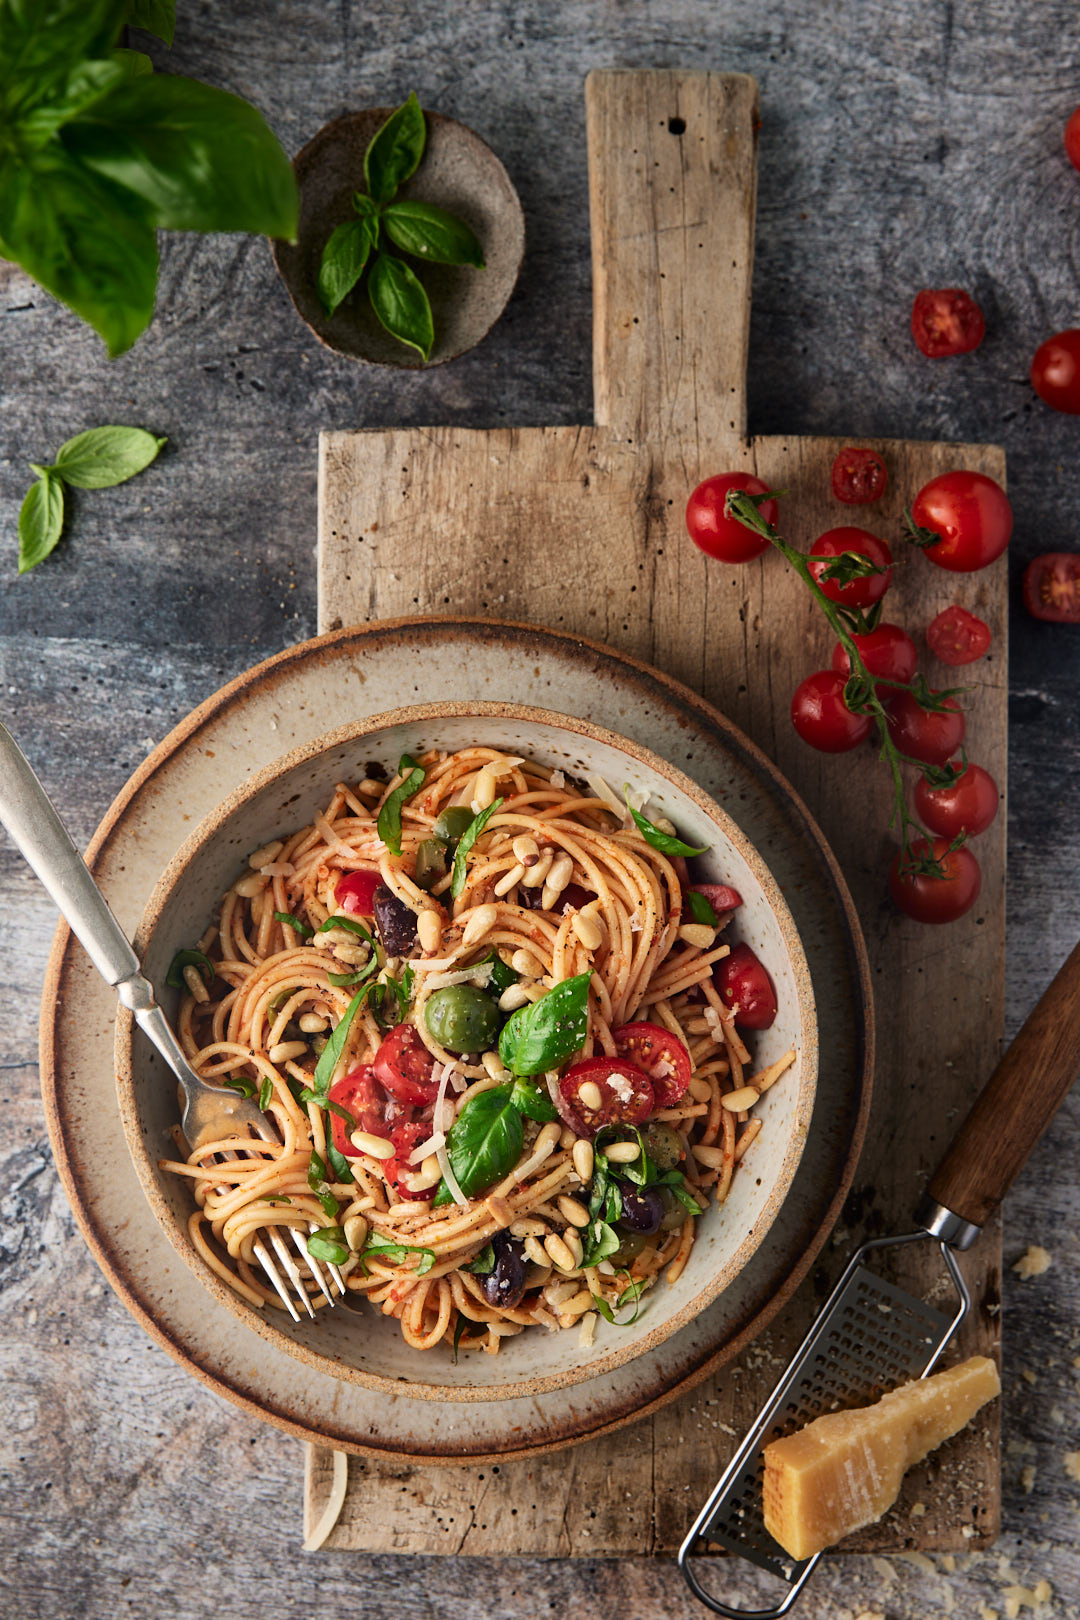
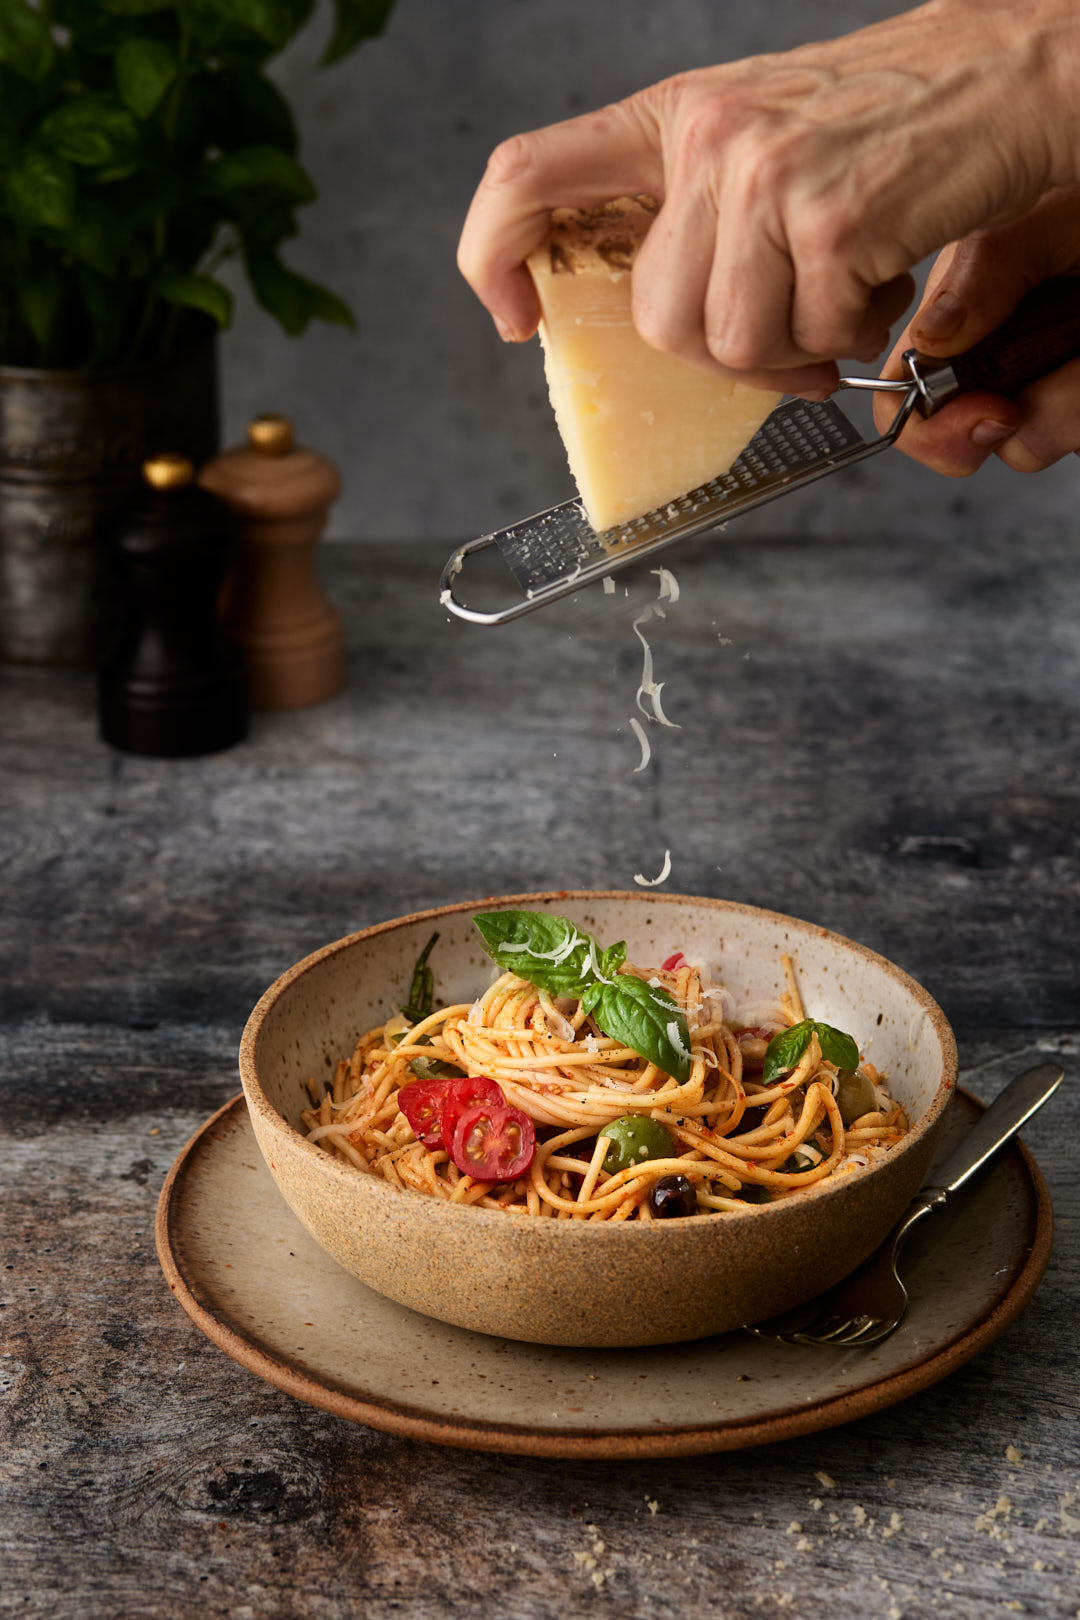
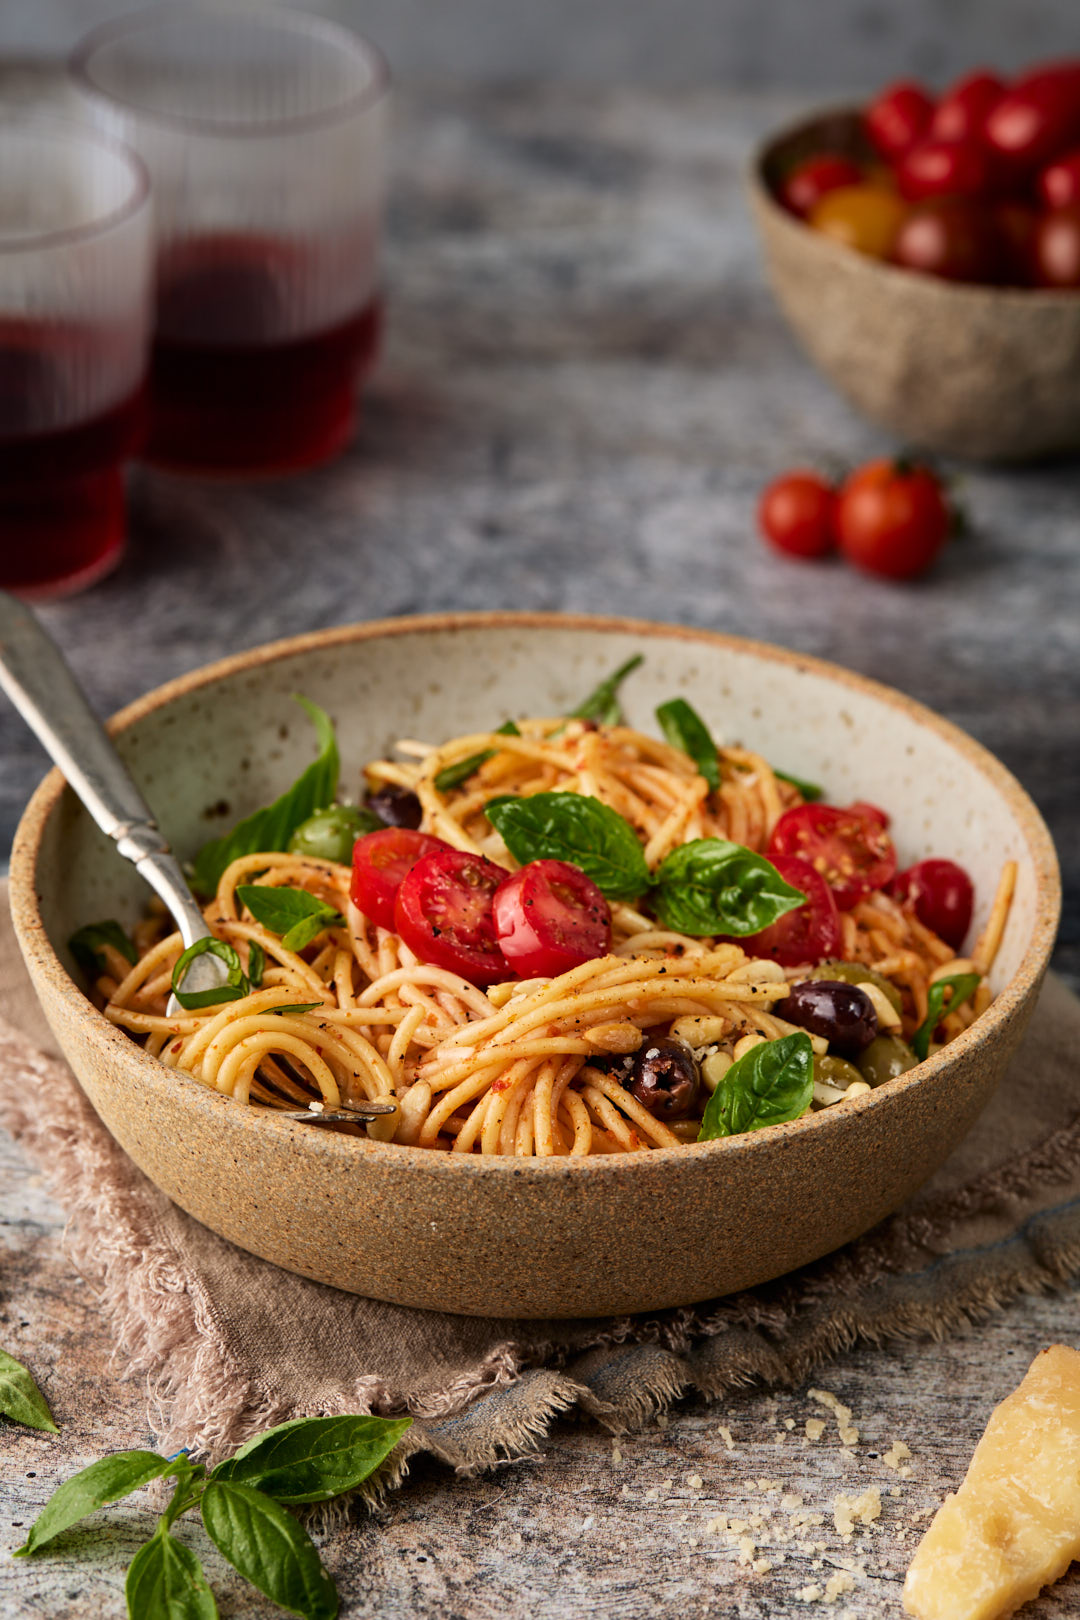
It was my job to make a vat of this cold pasta salad every morning. The original recipe called for angel hair pasta, and there were no fresh tomatoes or olives in it. It was one of the most popular items in the shop and sold out every single day. Unlike most pasta salads, which are insipid in seasoning, this salad is an umami flavour bomb, owing to the sun-dried tomatoes and asiago cheese.
My mom, all my sisters and my sister-in-law made and served this at every family get together during this era. Eventually, we all got sick of this salad and it was retired from the rotation. I made it again, last summer, for the first time in 25 years, and everyone was so excited to taste it again.
It’s a perfect dish to make ahead for entertaining. I would suggest adding the fresh basil and pine nuts just before serving, but the rest of the salad keeps very well in the fridge for several days.
Tips for success:
Cook the pasta for 2-3 minutes less than the package recommends. The spaghetti will continue to soften as it sits in the sun dried tomato pesto.
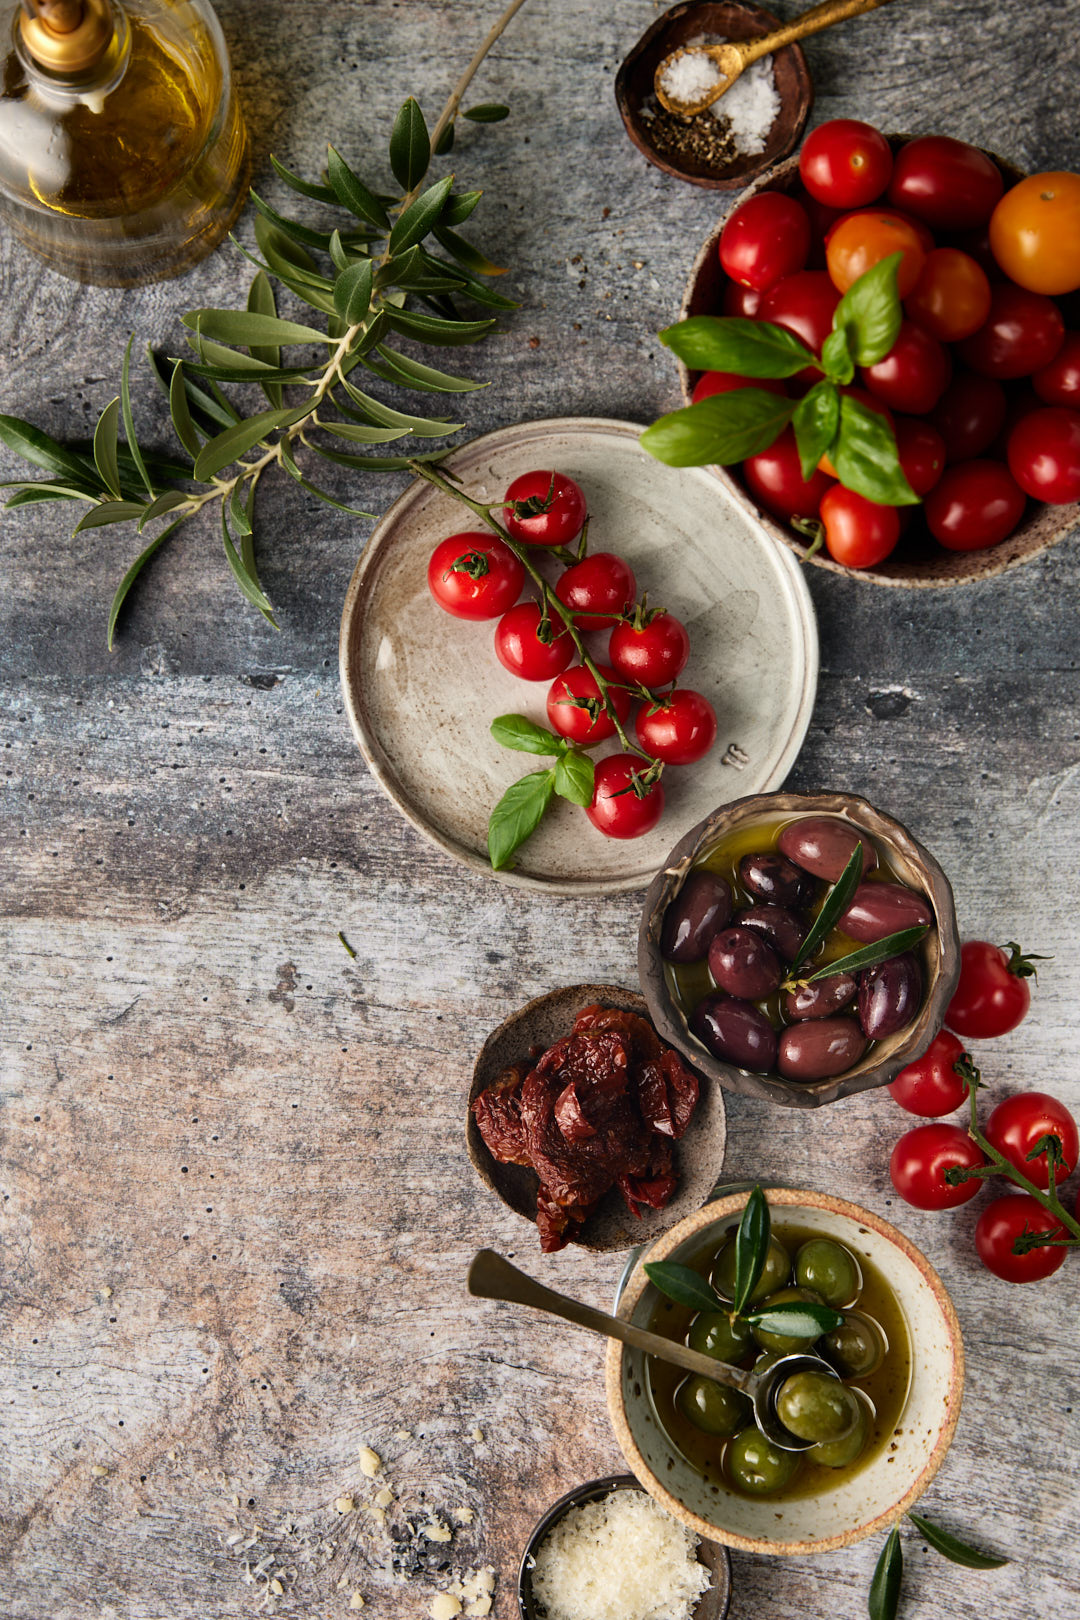
Use oil packed sun dried tomatoes for the best flavour.
Try to seek out asiago cheese. It is widely available now and has a pungent flavour that is hard to replicate.
Please, toast your pine nuts!! Untoasted nuts have the texture of sawdust and will ruin the dish.
Add fresh basil and pine nuts just before serving.
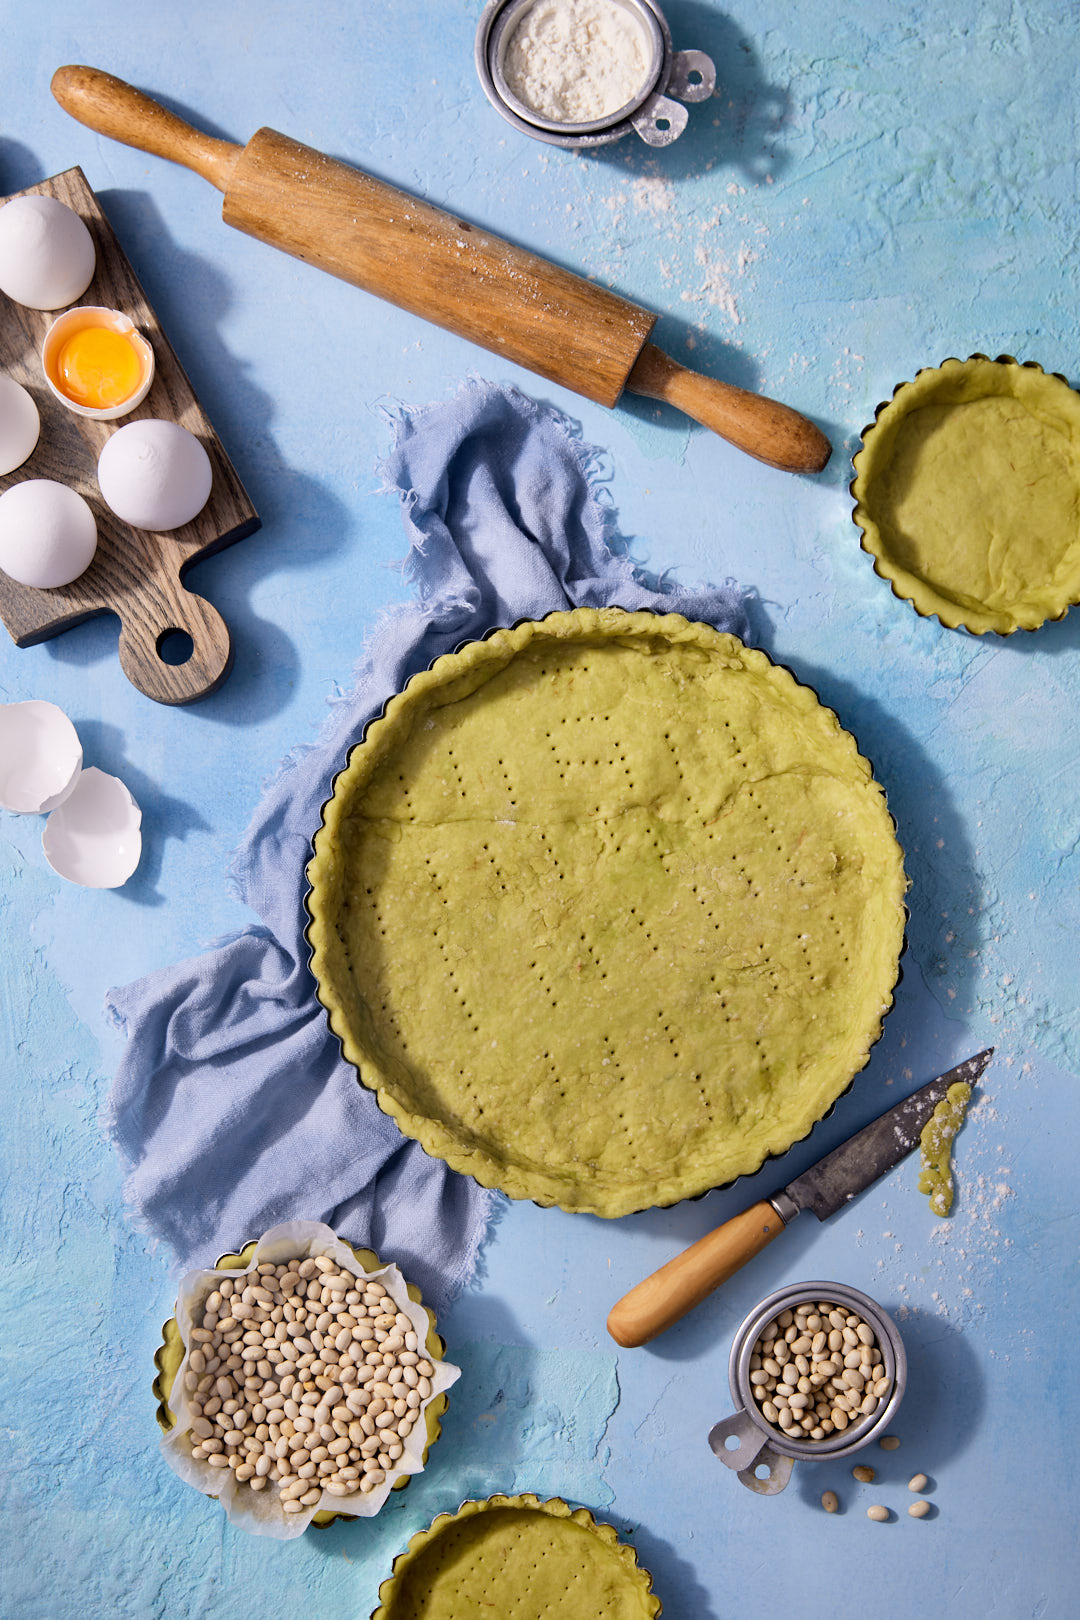
At this point in my life, I should know better than to fall for lines from cute guys with a twinkle in their eye. I’m talking about you Jamie Oliver. Through my TV screen, you smized at me, with those baby blues and told me that it was possible to use mashed avocado instead of butter in pastry dough.
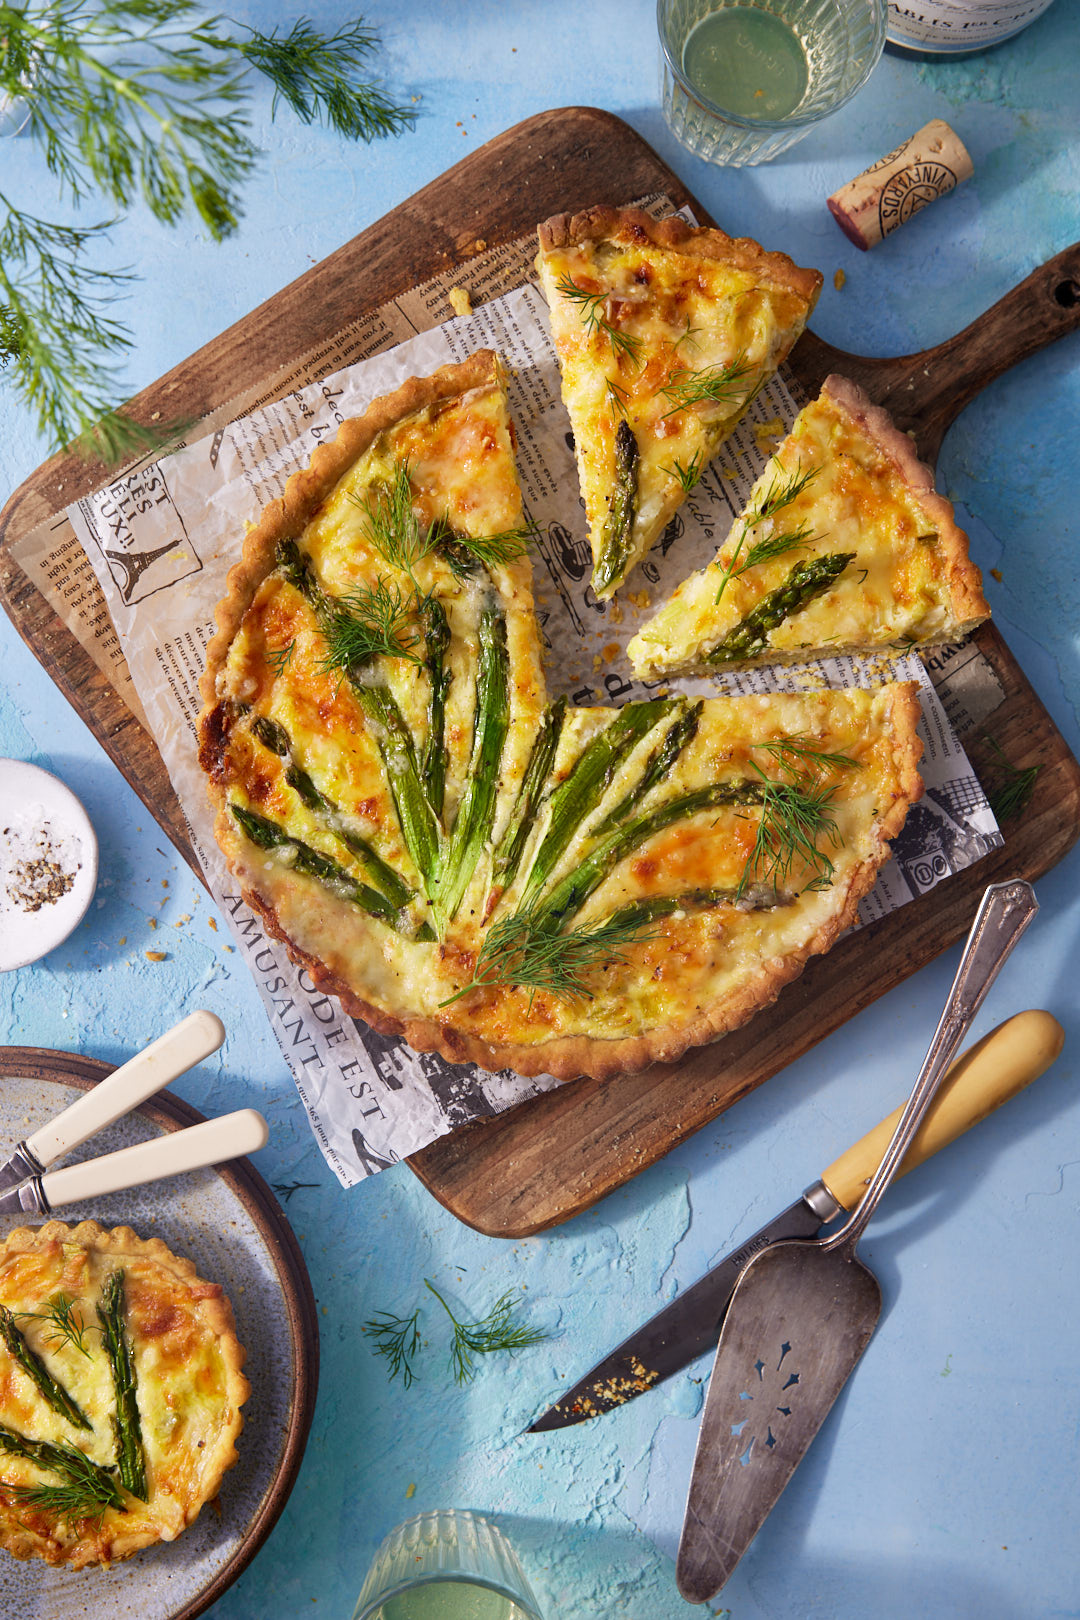
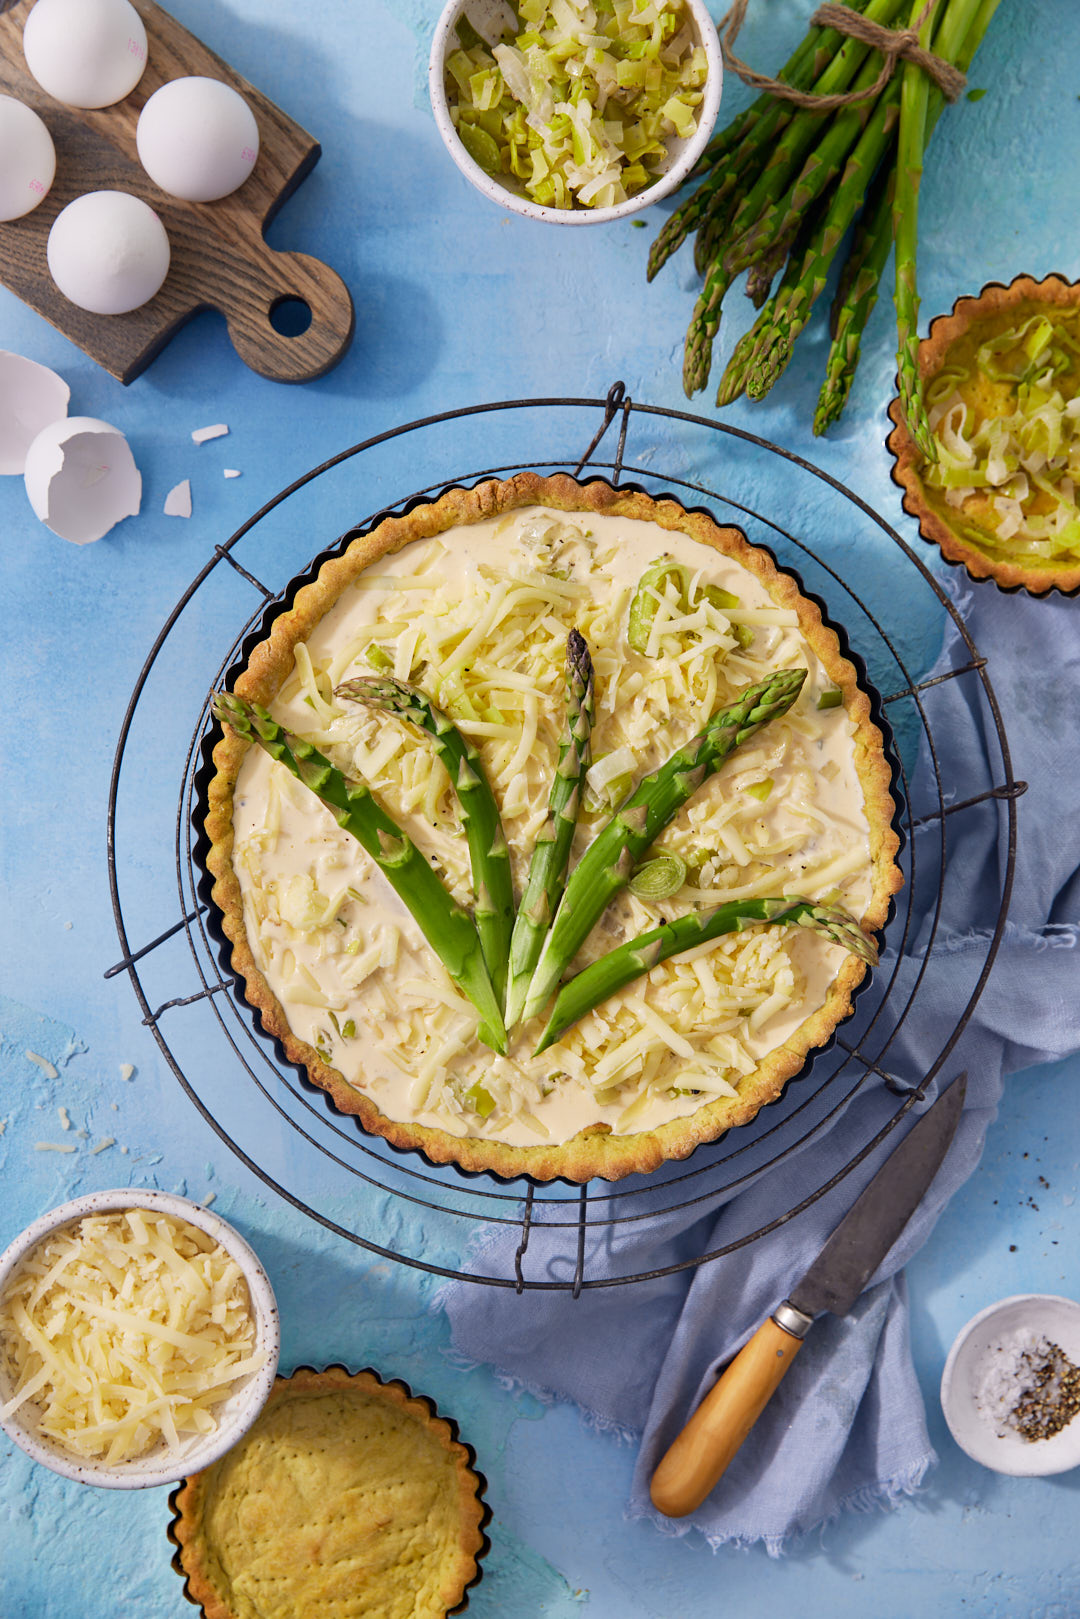
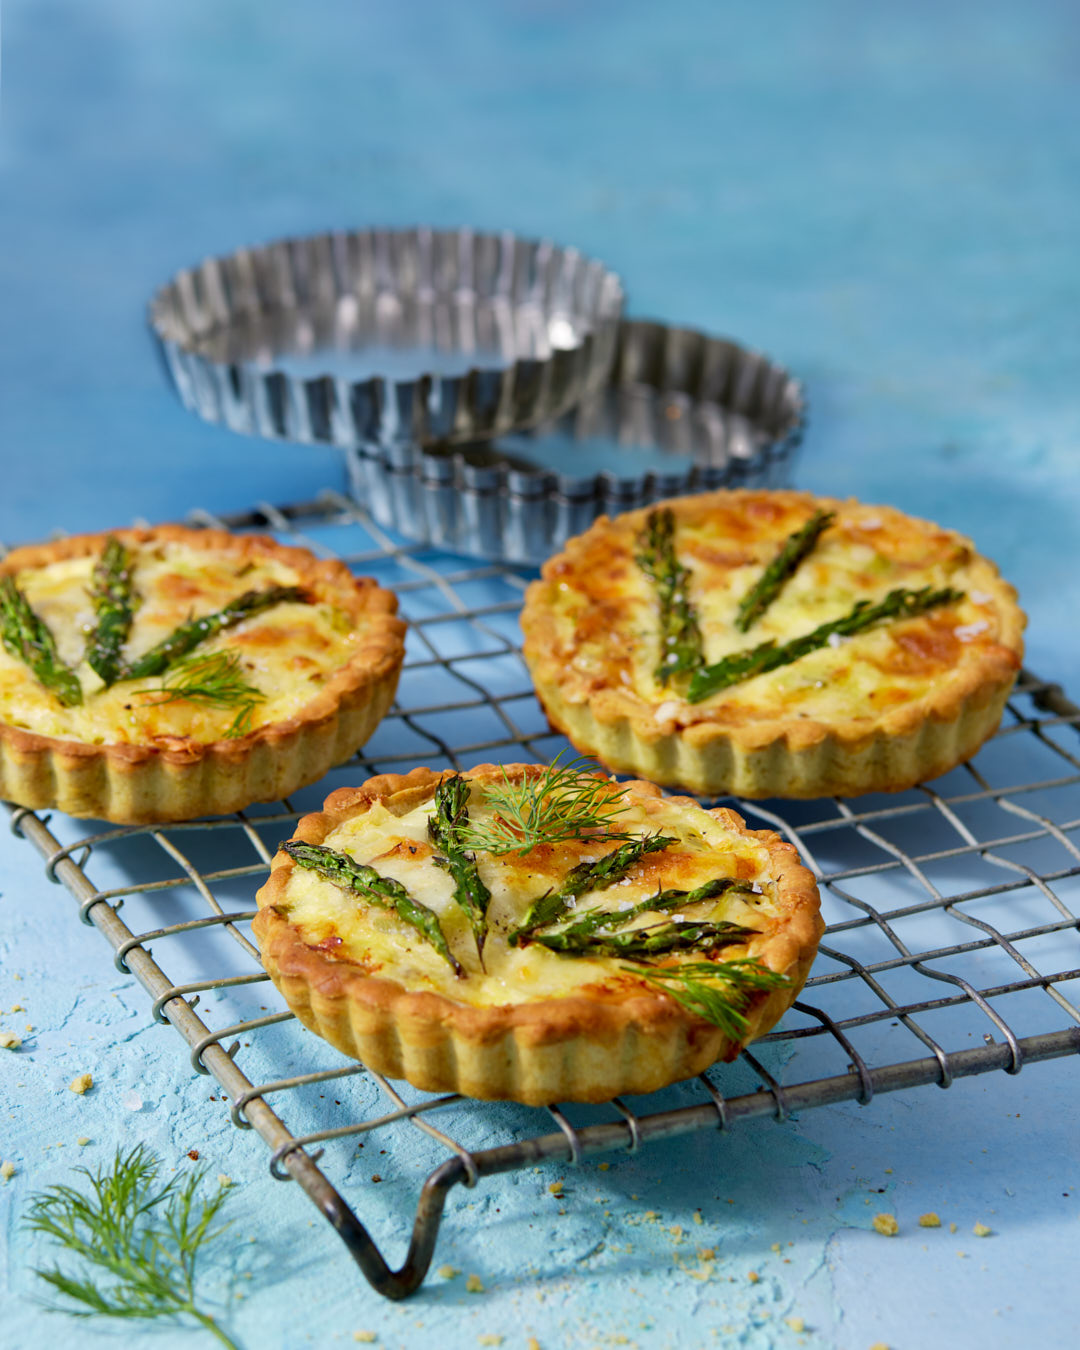
I was fascinated. Could it really be true? Avocado, like butter, has a high fat and moisture content, so it seemed plausible. Jamie made a green pea and cheddar quiche using his avocado dough. I settled on leeks, asparagus and gruyere cheese for my version.
I love the flavour of leeks. Part of the onion family, leeks have a mildly sweet flavour but much less intense than onions. They add a depth of flavour to so many savoury recipes.
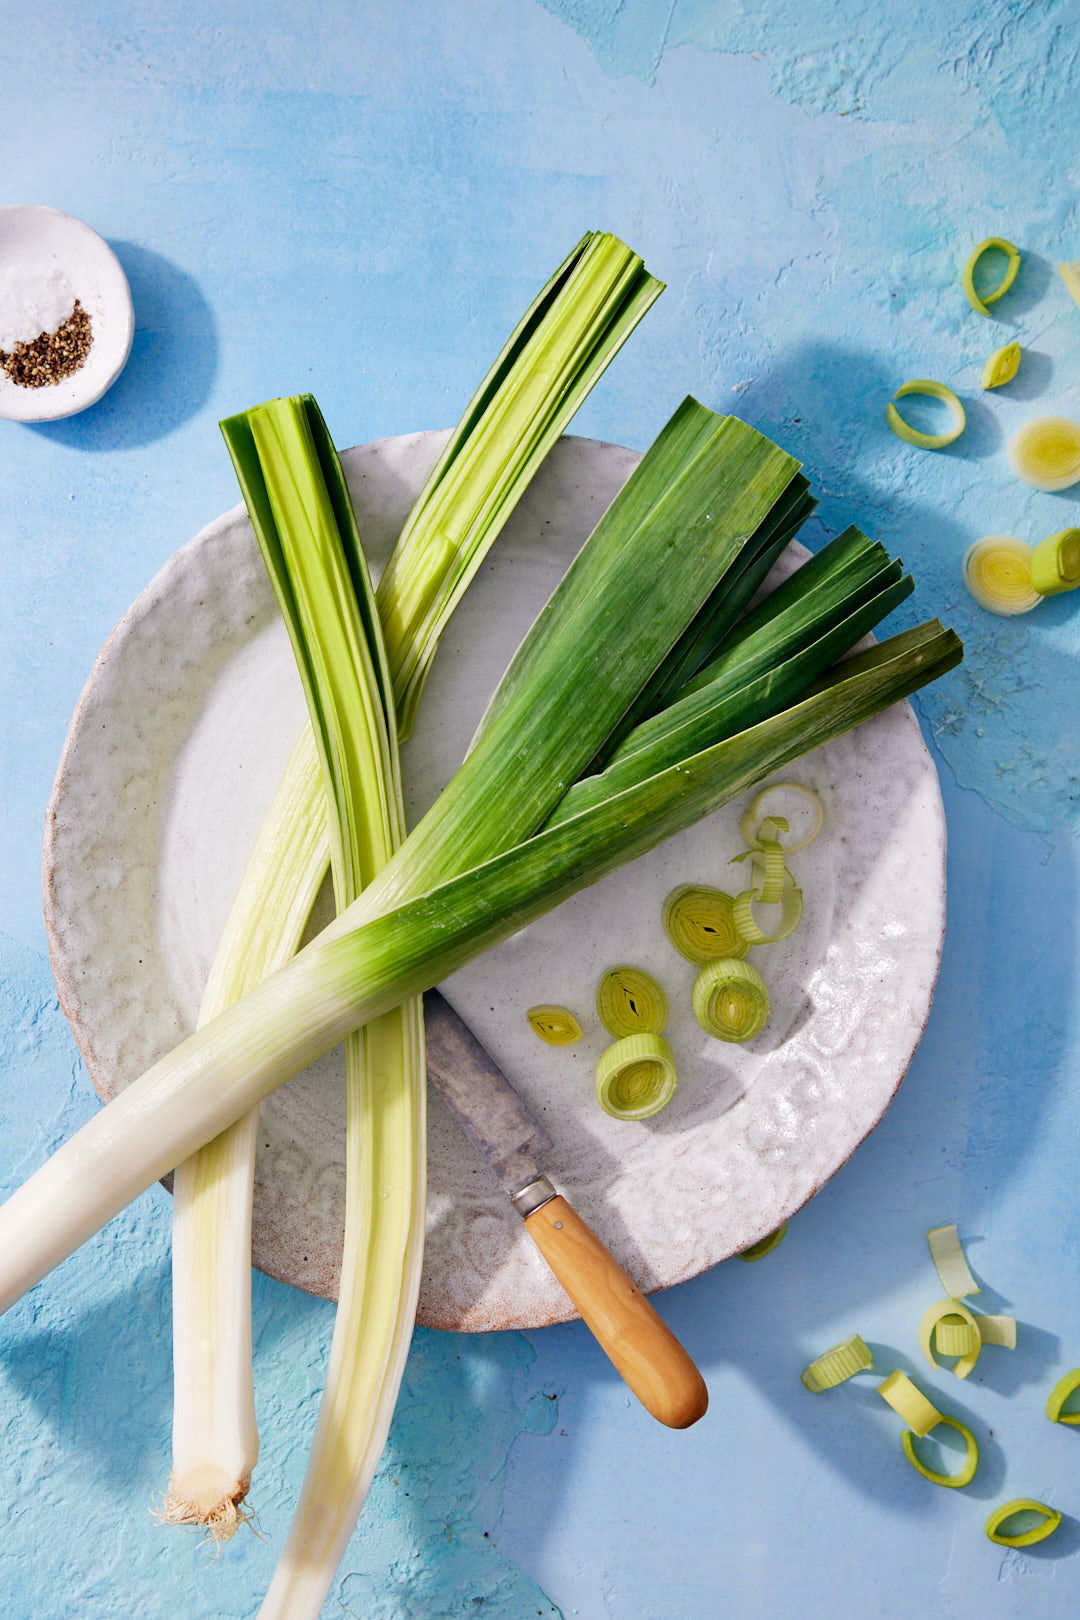
How to clean and slice leeks: Leeks can be quite sandy, so the best way to clean them is to cut them in half lengthwise. Trim off the roots and dark green leaves. The dark green leaves are too tough to use for sautéing, but they are perfect for adding to homemade chicken or vegetable stock, I put them in a zip-loc bag in the freezer and save them for the next time I make stock. Arrange the light-green/white part of the leeks cut-side down on the cutting board and slice them into thin half moons. Fill a large bowl with cold water and place the sliced leeks in the water. Swish them around and let sit for a few minutes. Scoop the leeks out of the water, leaving the sandy water behind.
Here’s how this Springtime Green Quiche comes together. Watch!
Yes, the pastry is really a vibrant green before it hits the heat of the oven, but it does get quite muted with baking.
The pastry rolled out beautifully, but to be honest, it tasted bland. Avocado, without any salt, lime juice or jalapeño, doesn’t have much flavour. I think that if you’re going to indulge in something decadent, like quiche, with eggs, cheese and cream, you should just go all out and use butter in the dough.
But the Libra in me feels compelled to make a counter argument. Changes to healthier eating are best taken in small steps. Announcing that you plan to cut all animal fats from your diet is unlikely to be sustainable for most of us. But looking for these micro moments, where we can make small changes gradually, eventually add up. If you’re looking to incorporate more plant based fats into your diet, this avocado pastry would be just fine. I’m going to give you two dough options in the recipe. Choose your own adventure. If you try the avocado dough, please let me know, in the comments, what you think!
I love the flavour of gruyere cheese in quiche, but feel free to substitute fontina or Monterey Jack or another good melting cheese. The asparagus on top makes for a beautiful presentation.
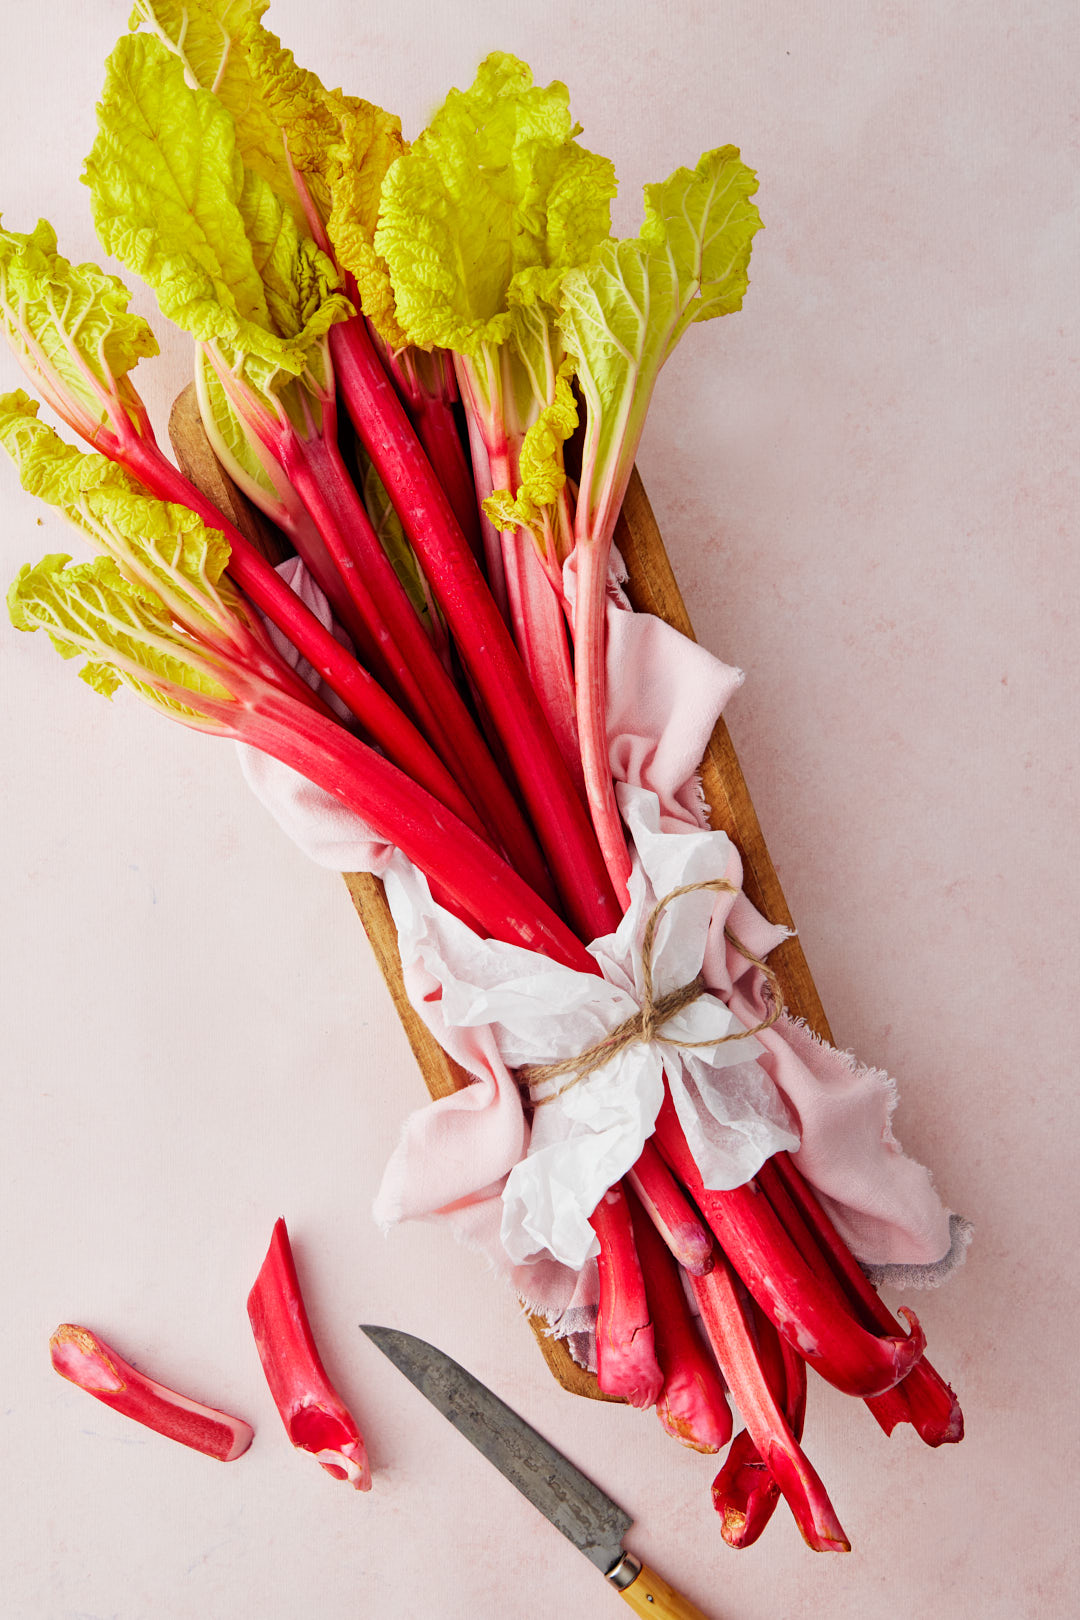
It’s the most wonderful time of the year…rhubarb season! I know it’s a polarizing ingredient, but I can’t seem to get enough of it. I must confess, I’m a rhubarb hoarder. I buy way more than I can possibly consume, and I freeze it so that I will have rhubarb all winter long.
How to freeze rhubarb: Wash the stalks and cut into 1-2 inch lengths. Line a baking sheet with parchment and arrange the cut rhubarb in a single layer. Place baking sheet in freezer until rhubarb is solidly frozen, a few hours. Transfer rhubarb to a freezer zip-loc bag.
How to use frozen rhubarb: Preheat oven to 350°F. Take equal parts of frozen rhubarb and frozen strawberries and place them on a parchment lined baking sheet. Sprinkle with 2-3 Tablespoons of sugar and roast for 20 minutes, until all soft and jammy. Mash with a fork of potato masher and transfer to a jar for storage. I like to mix it into my morning yogurt or use it as a filling for pastries, like strawberry-rhubarb hand pies. It keeps in the fridge for about 10 days.
Difference between field-grown and hot-house rhubarb: The first rhubarb to hit the market in spring is hot-house rhubarb. Hot-house rhubarb is pink in colour while field- grown is red, streaked with green. The hot house rhubarb retains that gorgeous pink colour after cooking while the field-grown turns a dull brownish colour after cooking. The final difference is the texture. Hot-house is silkier, and less stringy than the field-grown.
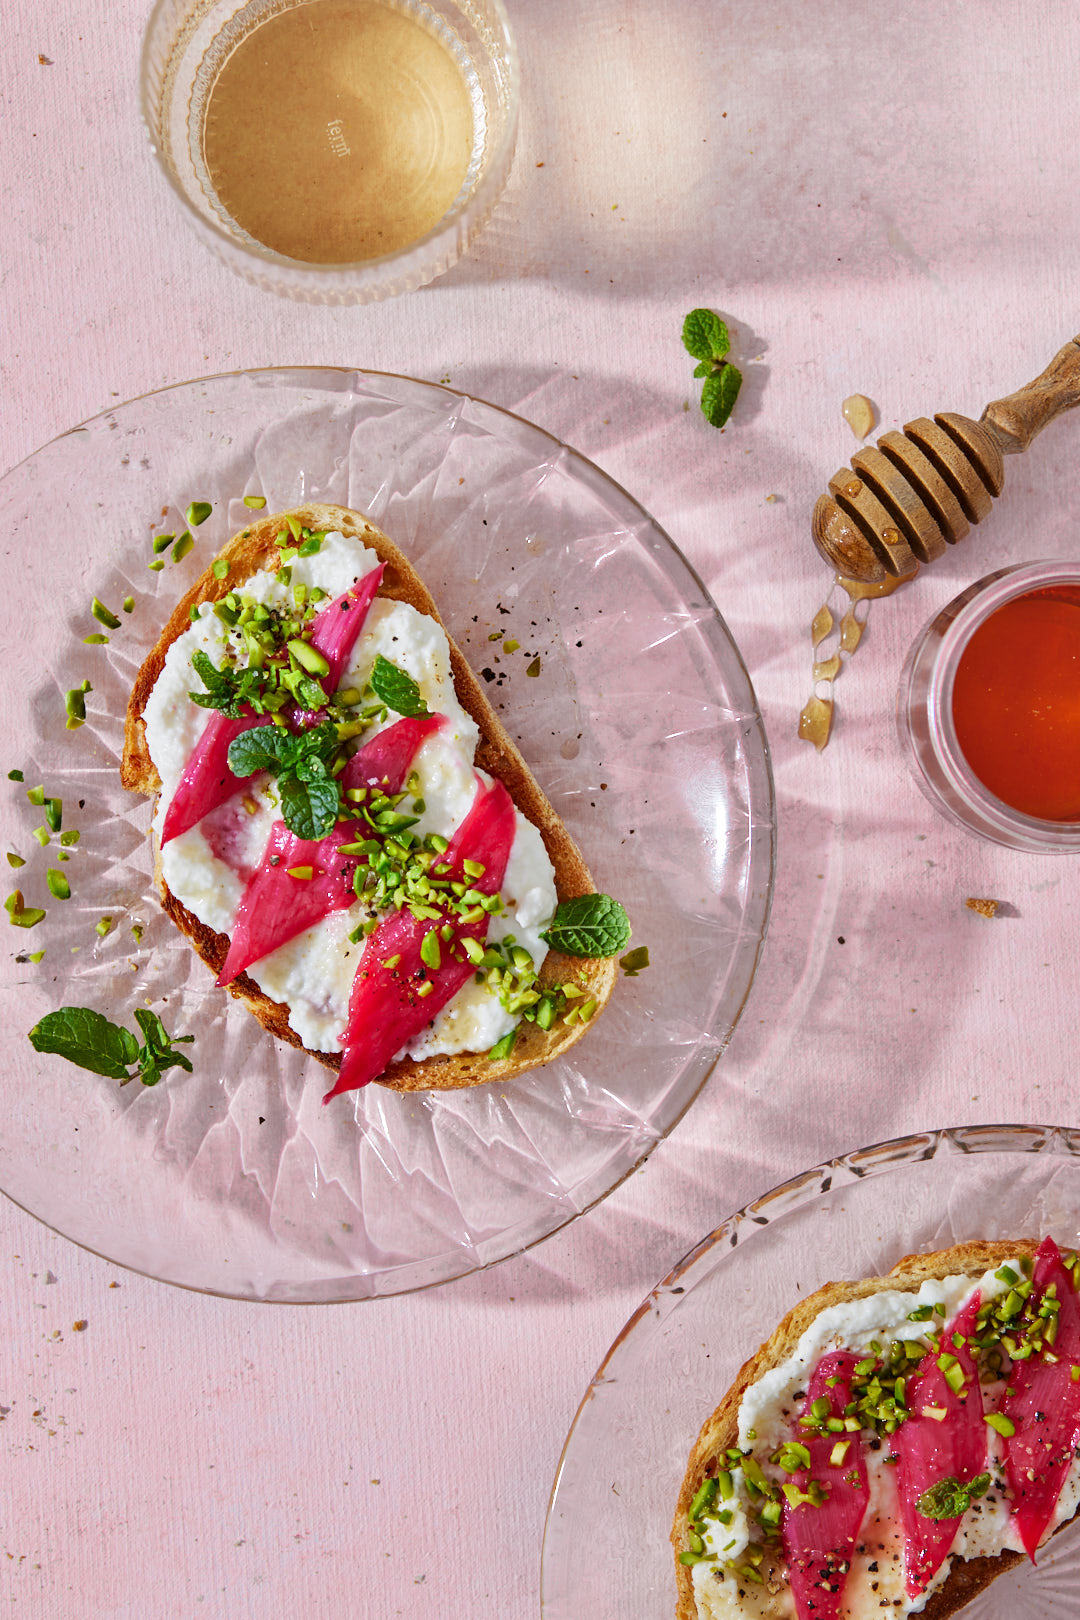
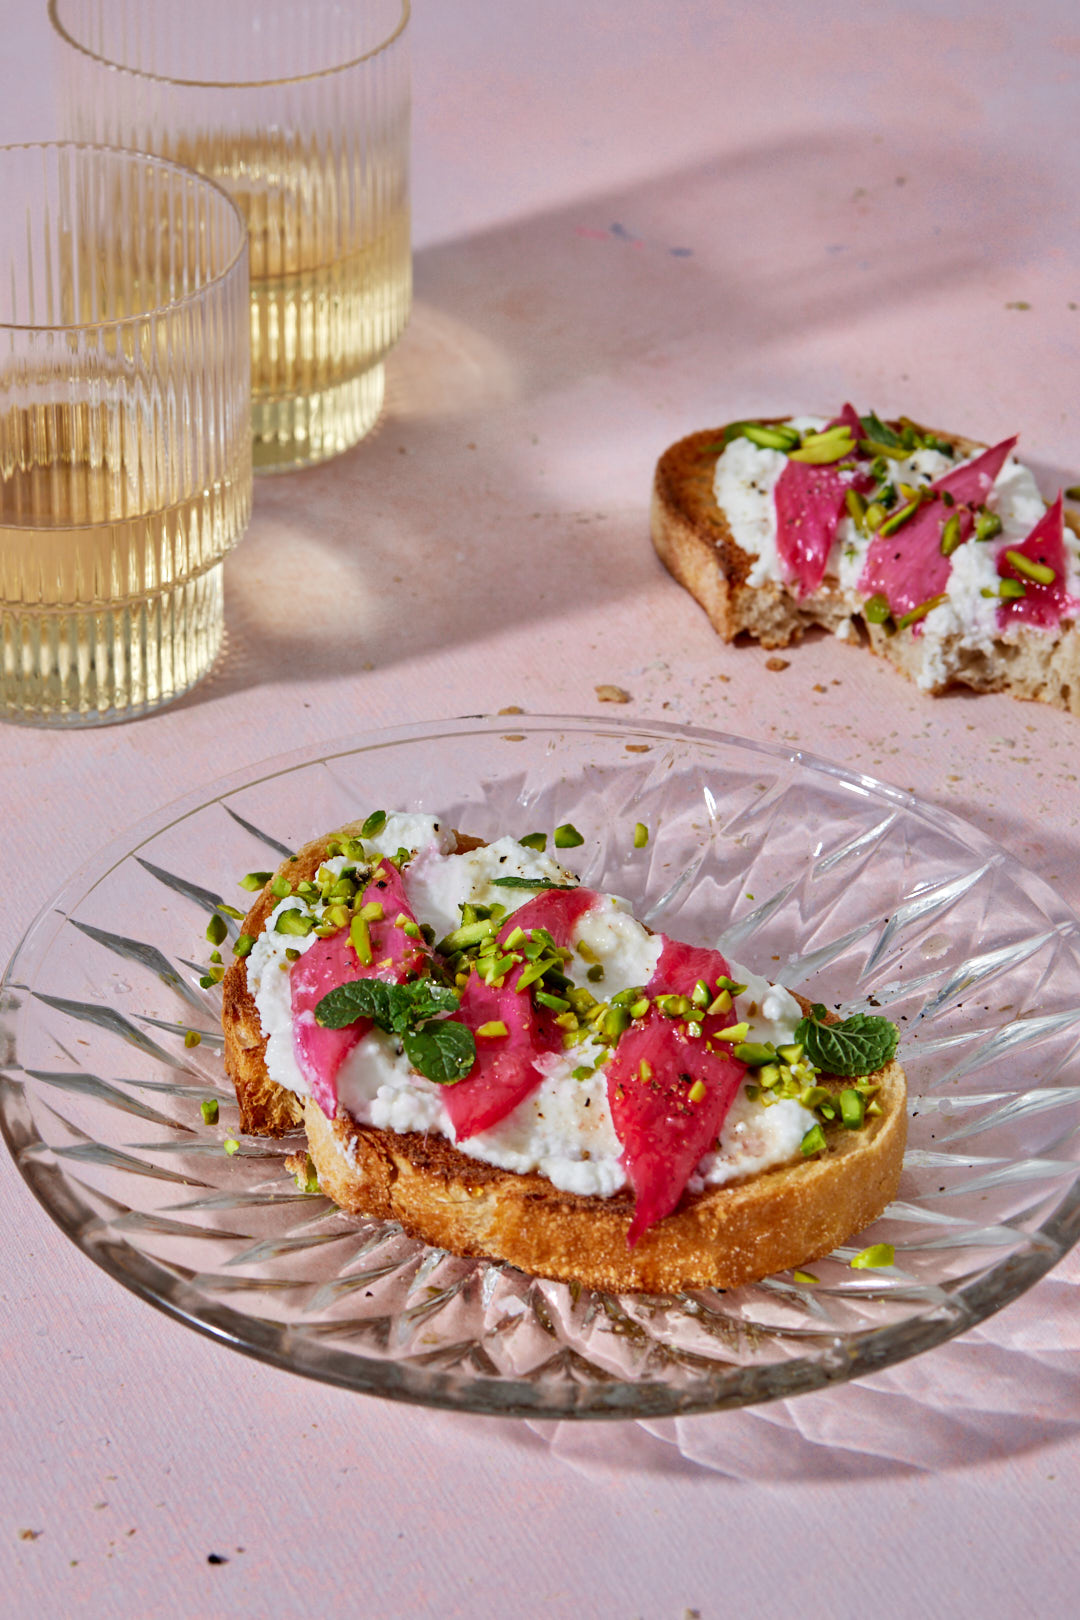
Tartine is defined as an open faced sandwich, usually on toasted bread. It has come to mean “fancy toast”, as made popular by the charming Carrie Baird, one of my favourite cheftestants on Top Chef. And if you’ve been following me for a while, you know that fancy is how we roll around here.
Today’s tartine is homemade ricotta spread onto toasted crusty bread, topped with gently roasted rhubarb. If you have never made your own ricotta, I urge you to give it a whirl. Watching milk, salt and lemon, transform into ricotta cheese is pure culinary alchemy. If you are a food nerd like me, you will find the process quite thrilling. Of course store-bought ricotta can be used. I suggest whisking it with a few tablespoons of heavy cream to get a silkier texture.
Watch this video to see how this tartine comes together:
This tartine would be delicious to serve with cocktails or with a salad for a light lunch. If I were going to have it for breakfast, I’d leave out the pickled onions and arugula and add some fresh mint. It’s eminently customizable.
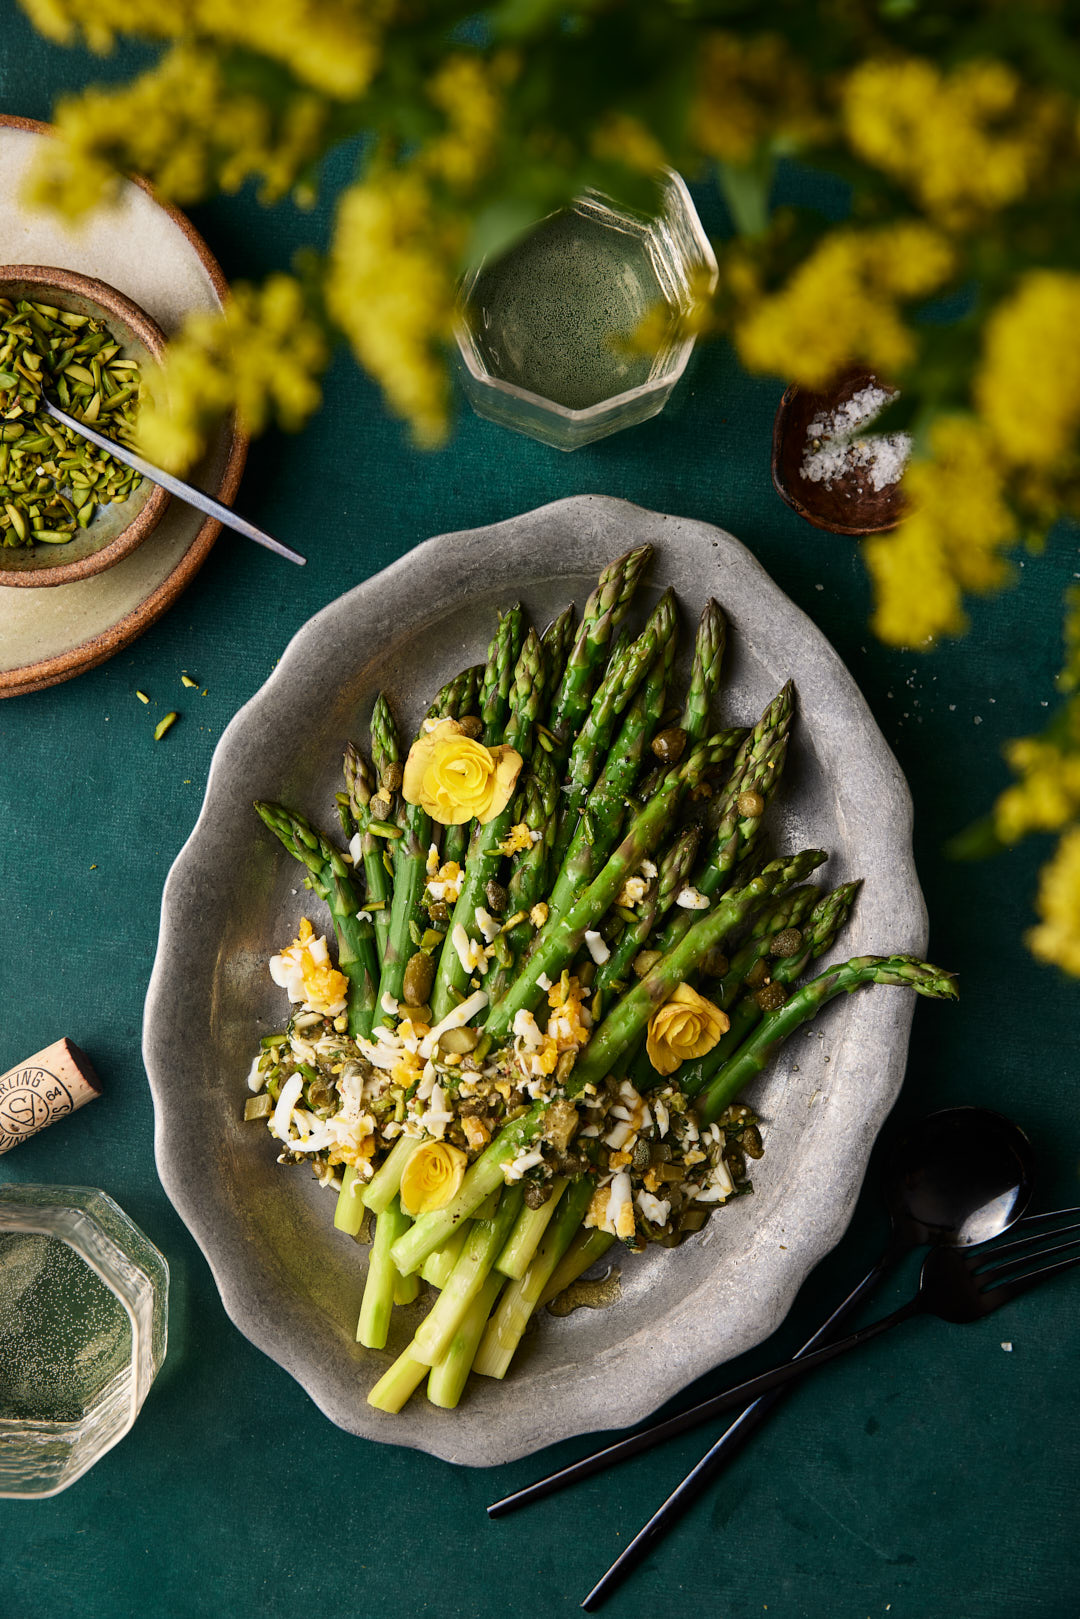
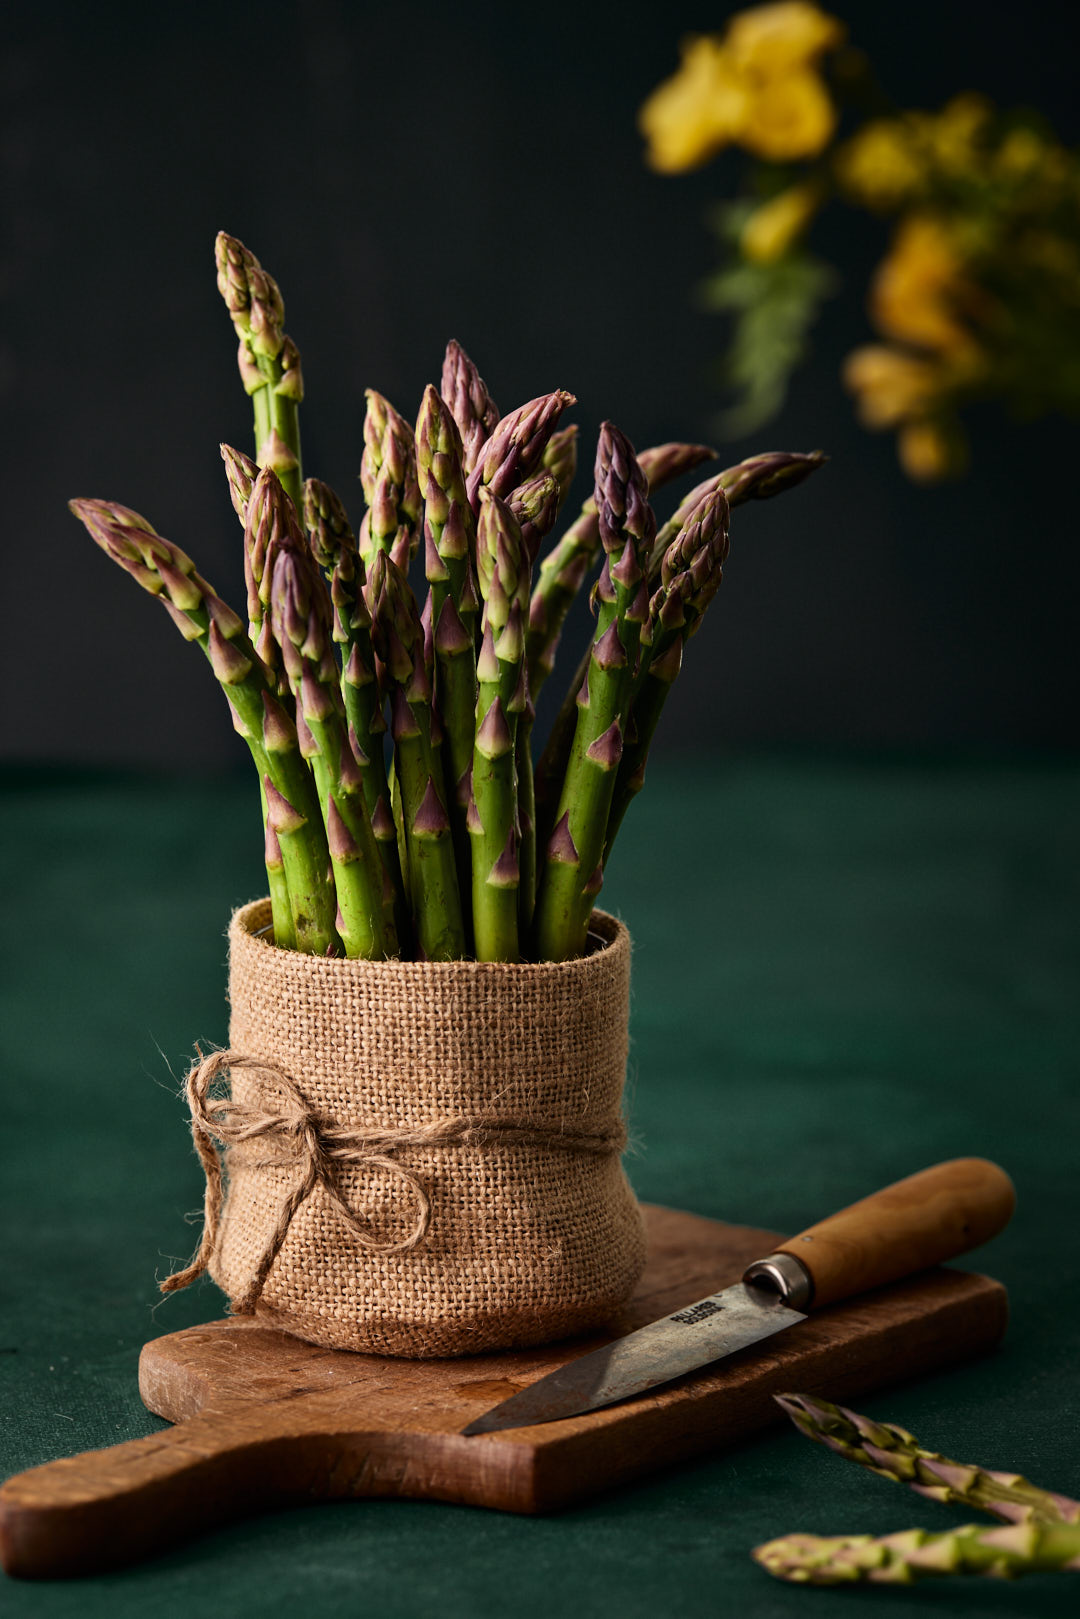
I have some very strong opinions when it comes to asparagus. I never rush to buy the early skinny asparagus. It is very weak in flavour. I’m patient and wait until the thicker stalks start appearing at the stores. These spears are sweeter and I find that the flesh is more tender.
If I’m not using the asparagus on the day I buy it, I place the bunch in a jar filled with about an inch or two of cold water, so that the ends do not dry out in the fridge. I cover the bunch loosely with a plastic bag.
There are some sources out there that will tell you that the best way to trim asparagus is the “bend and snap” technique, where you hold a piece horizontally and bend it, and it will just break off where it needs to. The problem with this method is that it depends on where and how much force you put into the bending. The results are wildly inconsistent and you end up wasting a lot of good asparagus.
I like to line up the asparagus on a cutting board and just cut off the bottom inch or so, where the green colour begins to fade to white, and the texture is a bit tougher. Then, I like to take my favourite vegetable peeler and gently peel the skin from the bottom half of each spear, to expose the lighter green and white flesh under the peel. It makes for a more aesthetically pleasing presentation (all about pretty food here) and, it is more tender to eat.
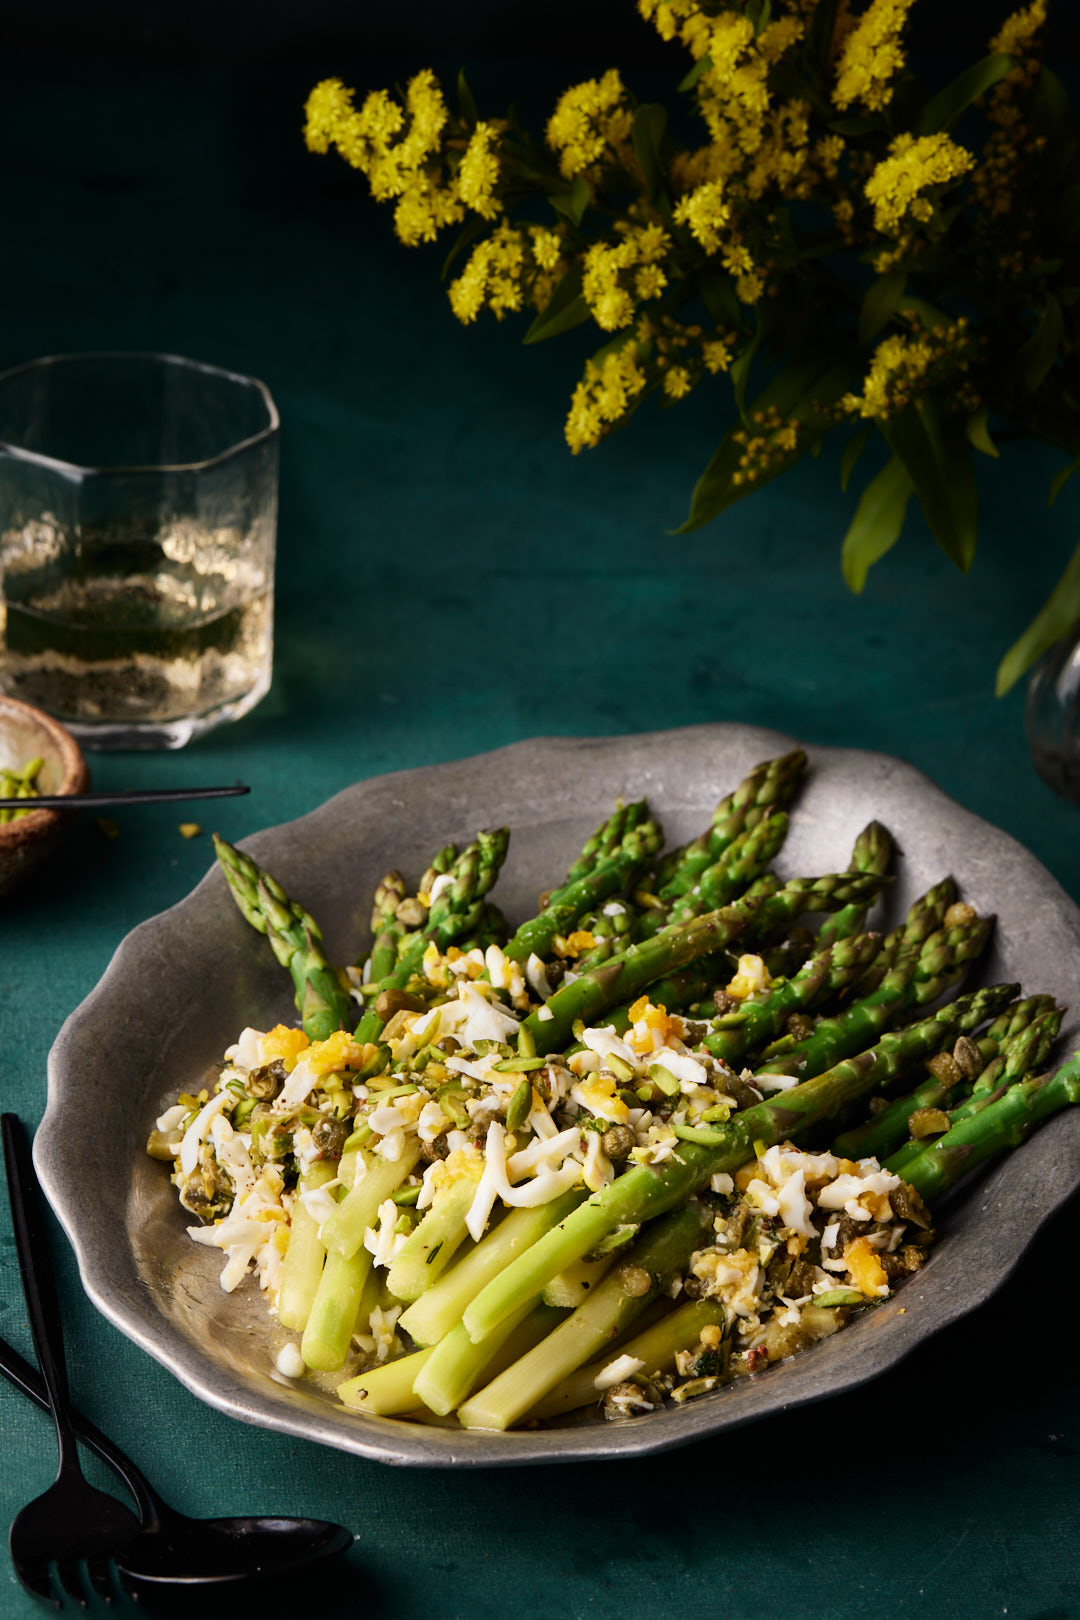
For an asparagus salad, I like to simply boil or steam the asparagus for about 2-3 minutes. Then I plunge them into ice water to set the green colour and stop the cooking.
Eggs and asparagus are a beautiful flavour pairing. Watch as the salad comes together. in this video.
This dressing would also be very delicious on broccoli, green beans or on my newest obsession, little gem lettuce. I love the texture of the grated hard boiled eggs, mixed right into the dressing. Cornichon pickles and capers really punch up the flavour and chopped pistachios add salt and crunch. It’s a perfect lunch salad.
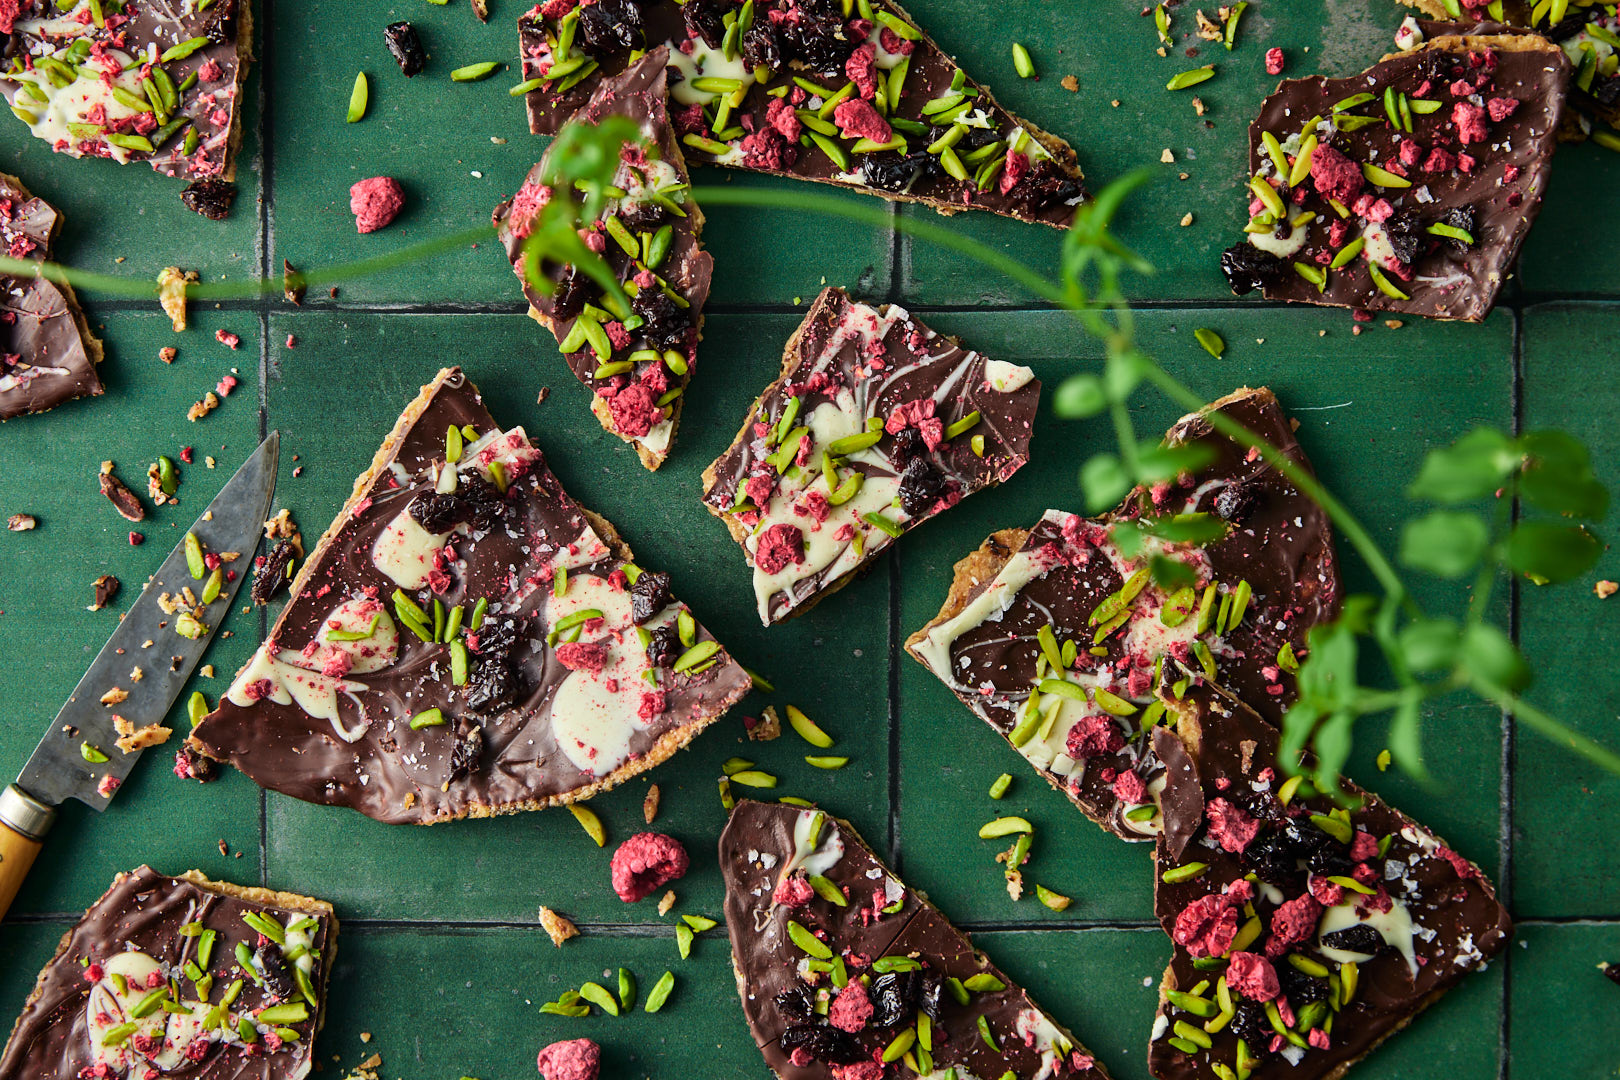
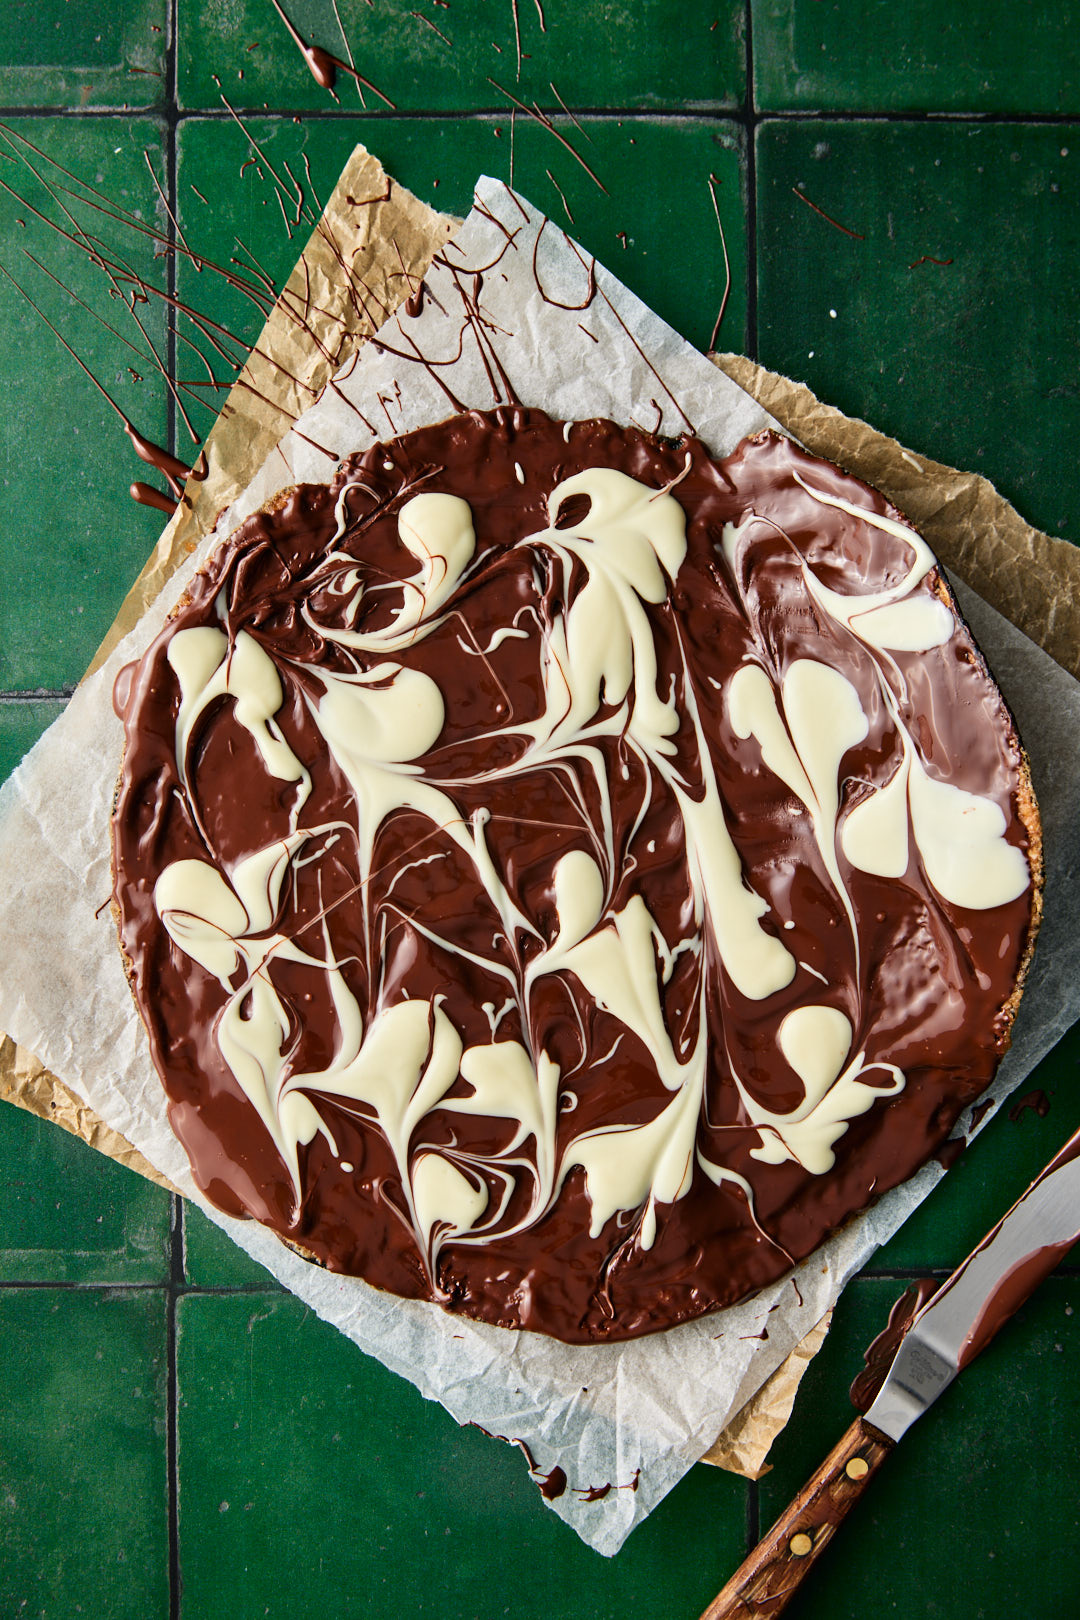
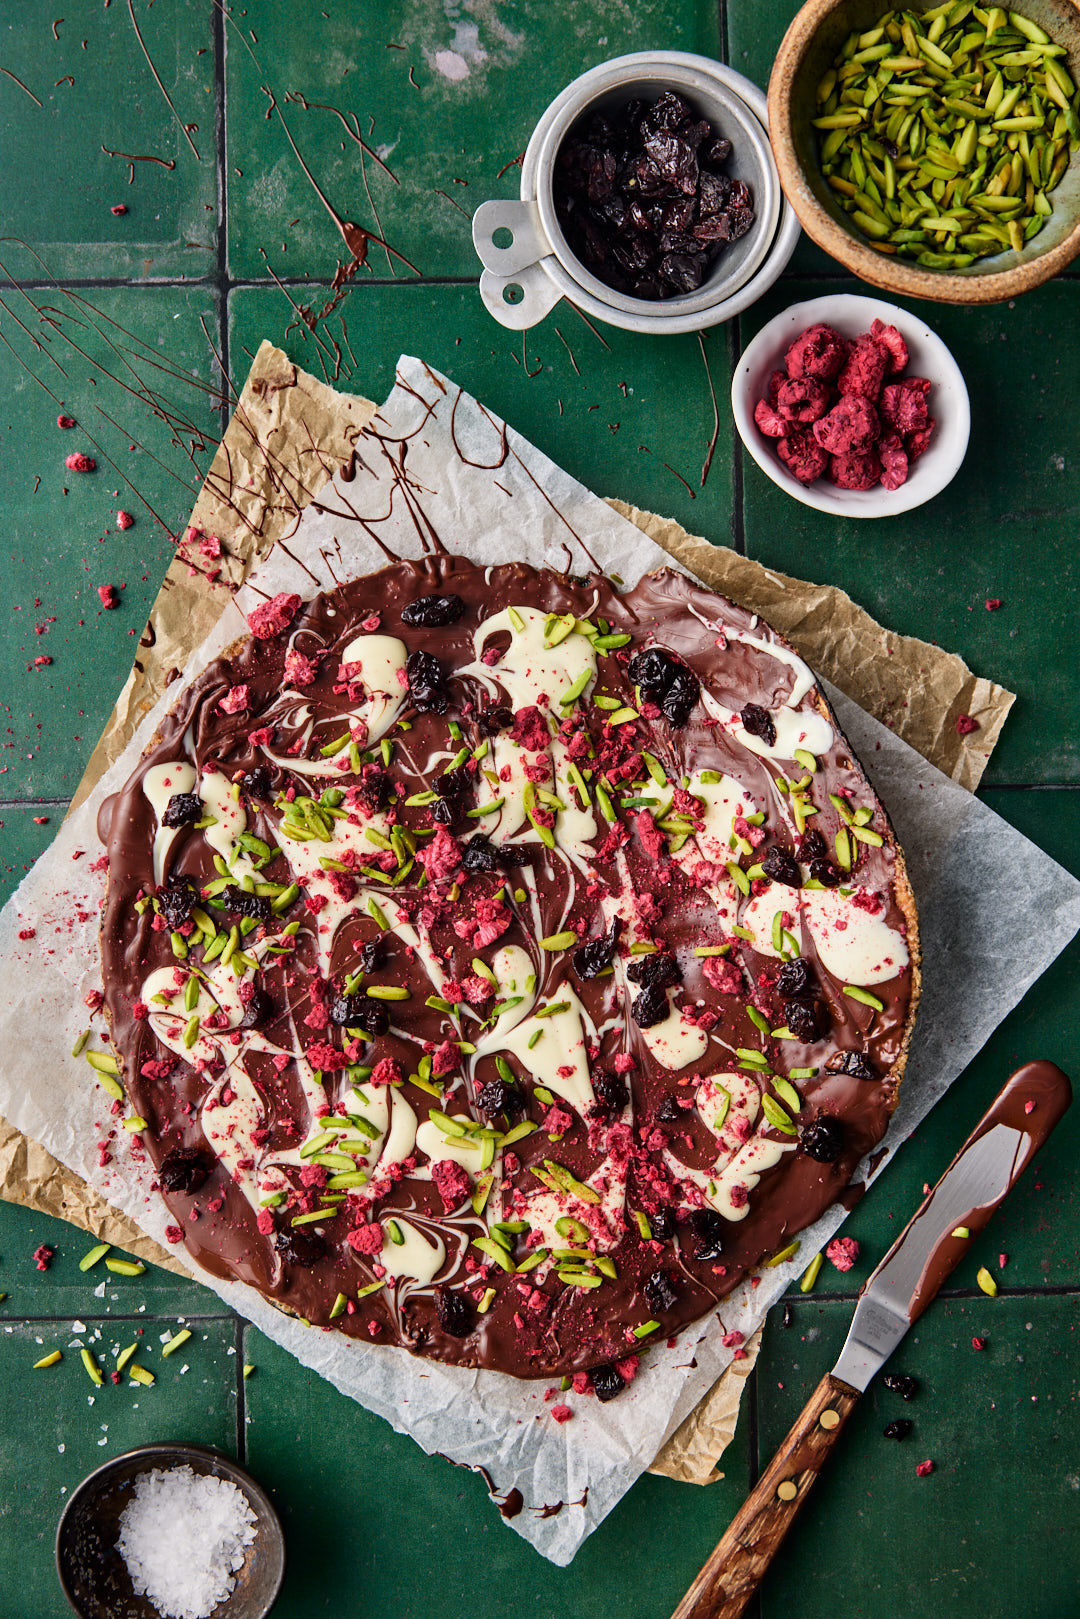
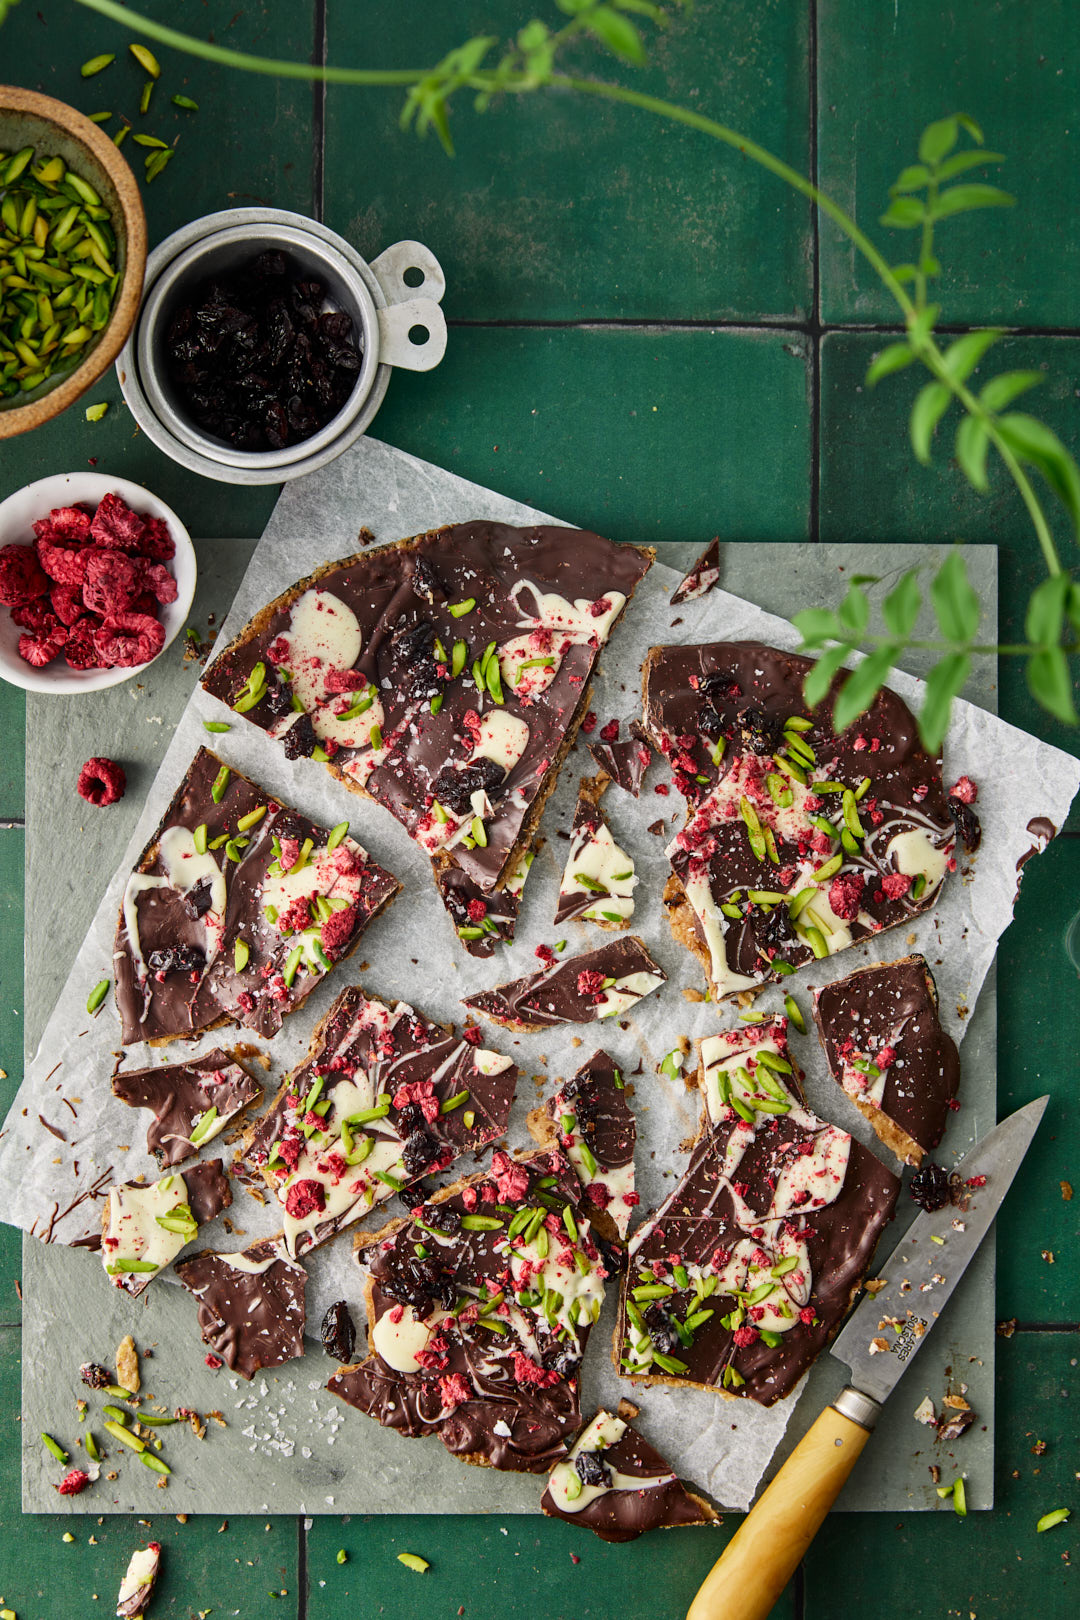
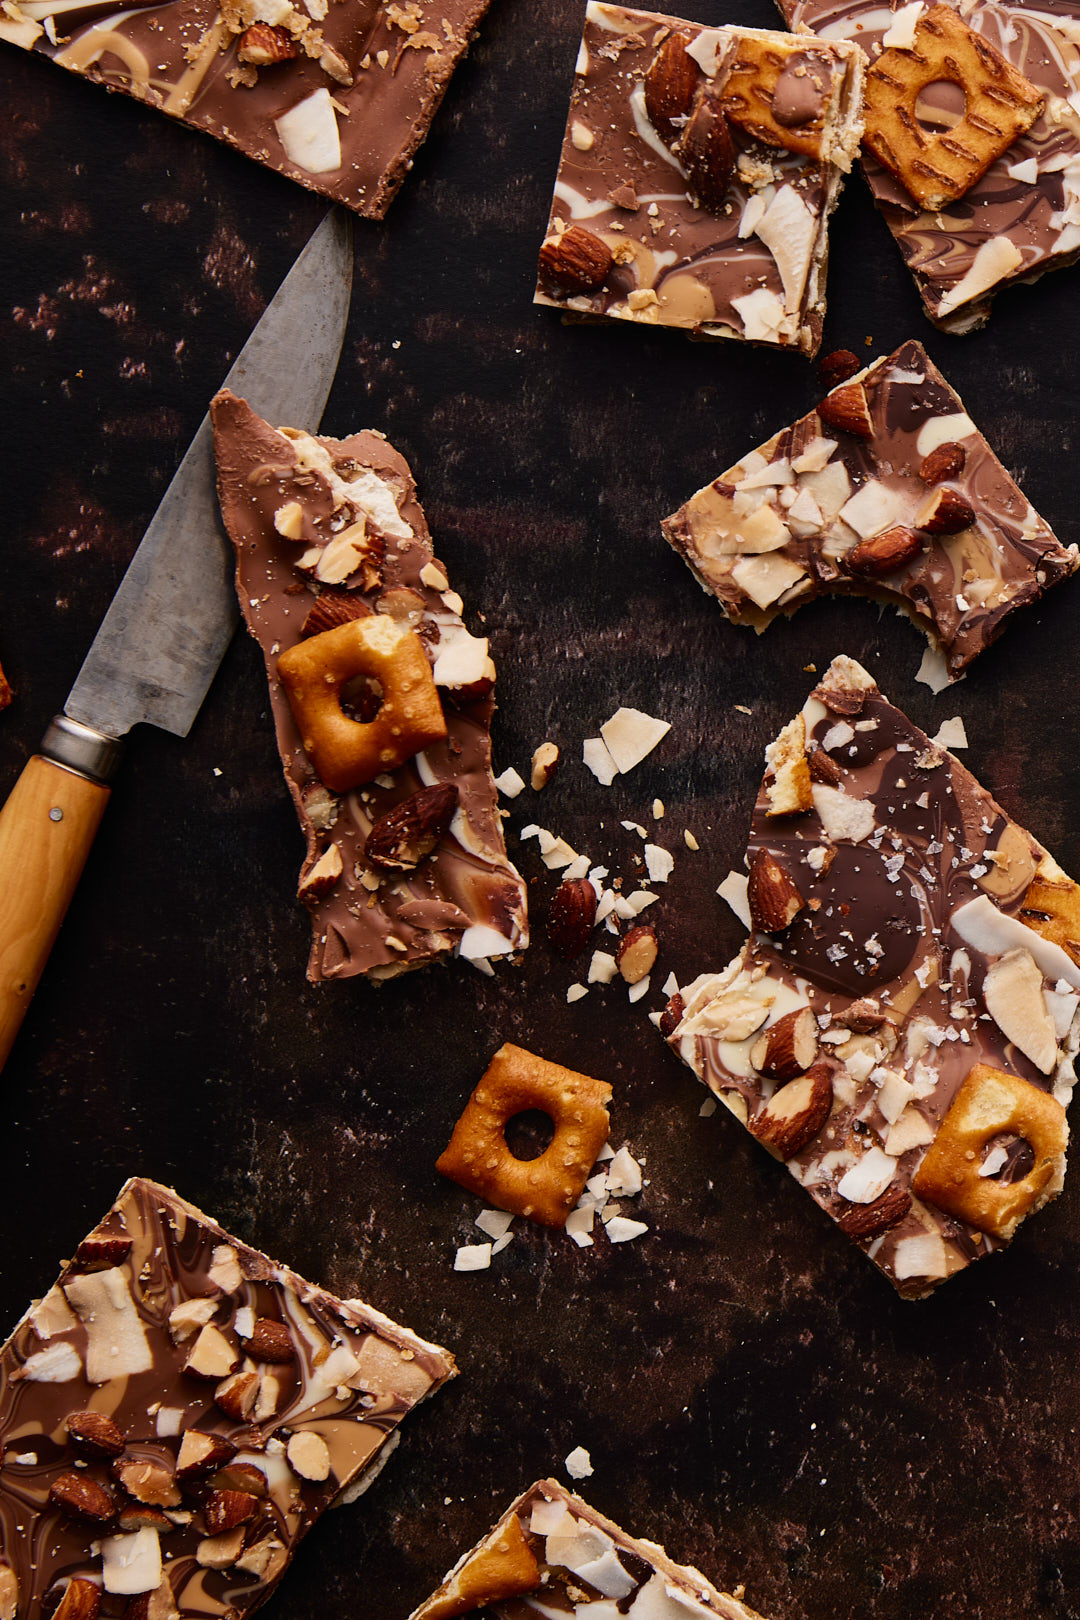
Another flavour of matzoh crunch coming at you today. We were gifted a box of round matzoh, and I wanted to create something special with them.
After the caramel coating, I topped these with a layer of bittersweet chocolate and a swirl of white chocolate.
I topped that with these gorgeous slivered green pistachios, crumbled freeze dried raspberries and tart dried cherries. A sprinkling of flaky sea salt balanced out all the flavours. This is a beautiful and sophisticated flavour profile sure to please.
This sweet & salty matzoh crunch is delicious and utterly addictive, as my husband and chief recipe taster discovered this week.
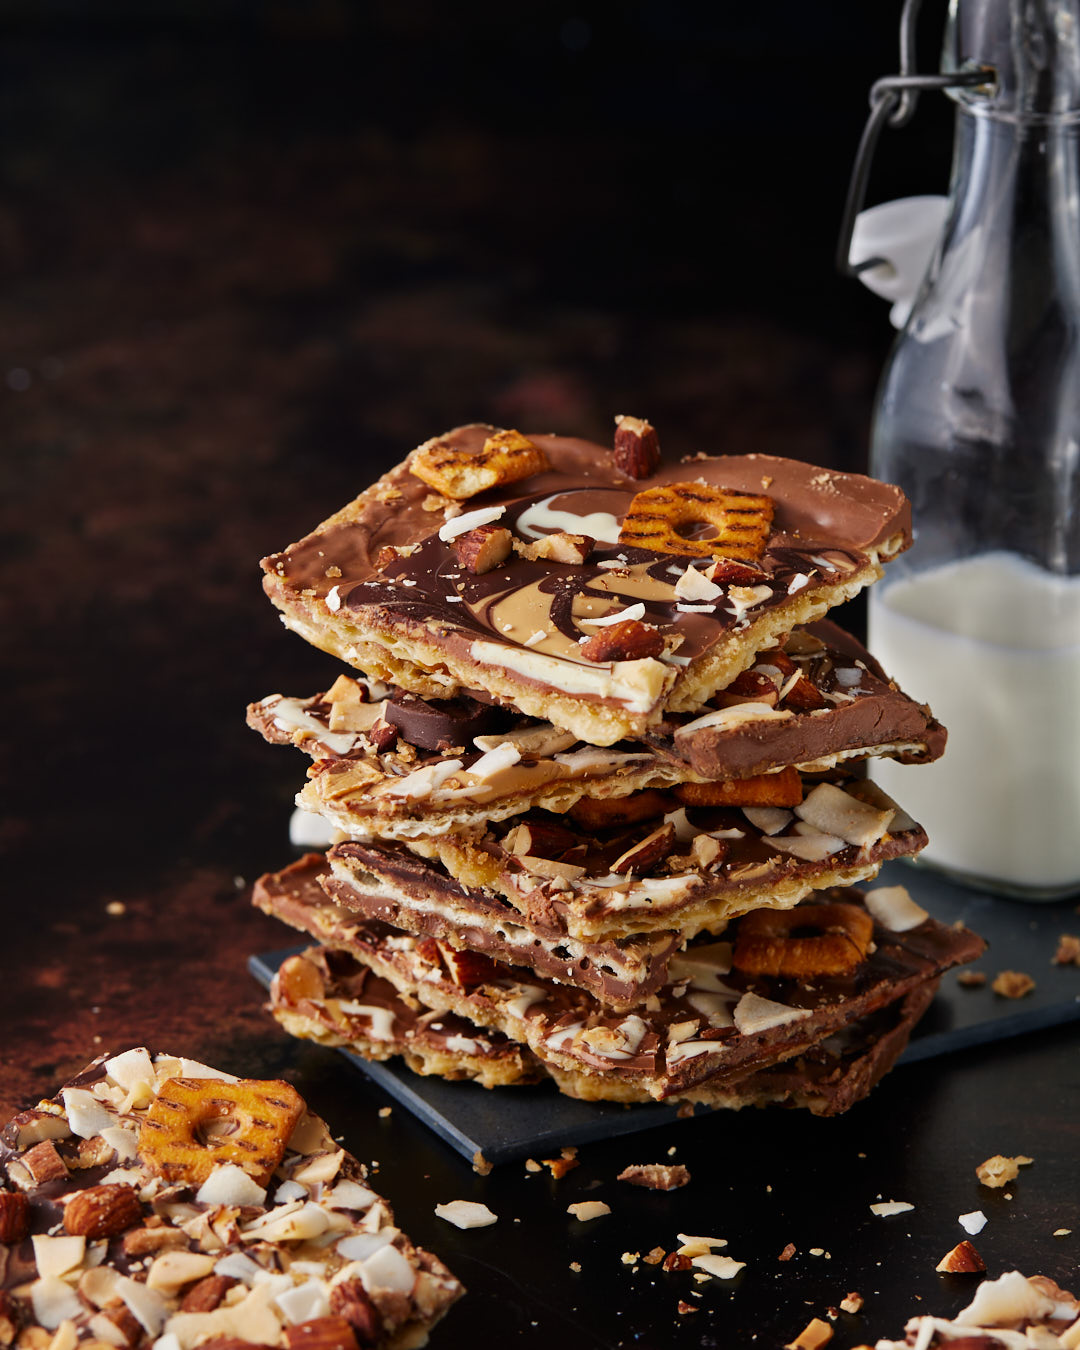
Montreal baker and cookbook author Marcy Goldman is the originator of Matzoh Crunch. The recipe is published in her first cookbook, “A Treasury of Jewish Holiday Baking”. Matzoh crunch is essentially a layer of matzoh covered in brown sugar-butter caramel and topped with a blanket of melted dark chocolate.
This is my adaptation of her recipe. I have elevated matzoh crunch to the next level, by sprinkling on salted toasted almonds, Passover pretzel thins and toasted coconut flakes. I used a total of 4 different kinds of chocolate for this over the top confection. A base of milk chocolate, and then decorative swirls of white, blonde and bittersweet chocolate. It’s fancy AF.
Watch the video to see how it all comes together.
As with anything you bake, if you start with top quality ingredients, you will yield a better outcome. Most recipes I have seen for matzoh crunch call for melted chocolate chips as the top layer. The problem is that chocolate chips are not formulated to melt smoothly. They contain less cocoa butter so that they hold their shape. This is great for chocolate chip cookies, but not so great when you want a velvety smooth coating. So start with a good quality chocolate that is meant for melting. I love Valrhona. I order it online from Vanilla Food Company.
Blonde chocolate, is a more recent addition to the chocolate family. It is essentially caramelized white chocolate. You could make your own, or buy Valrhona’s which is marketed under “Dulcey“. This is not a Valrhona sponsored post, I just really love their chocolate!
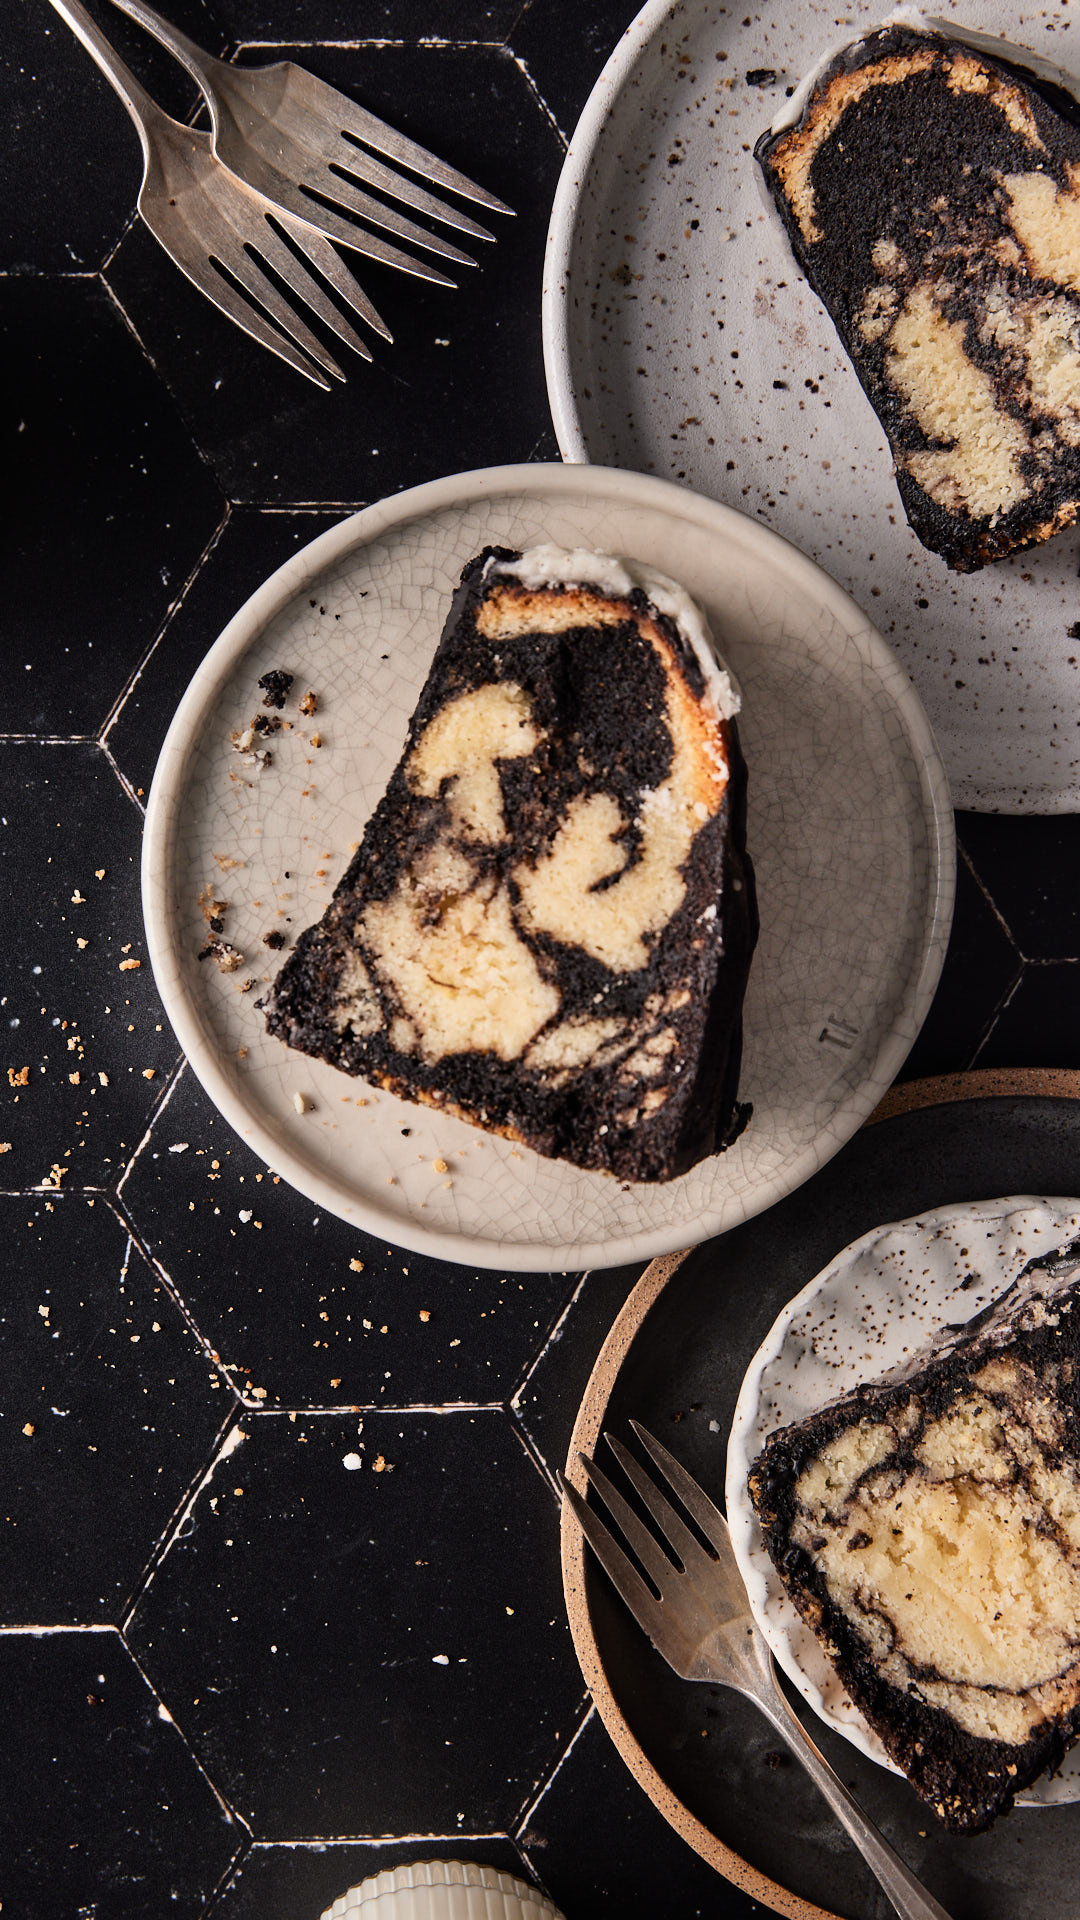
I have amassed quite a collection of Bundt pans. My cake decorating skills are rudimentary at best, but with a Bundt pan, the pretty work is all done for you. Just finish with a dusting of icing sugar or drizzle of glaze and you have a gorgeous cake.
This recipe is from The Bundt Collection by Brian Hart Hoffman, creator of The Bake From Scratch Empire. Black cocoa gives this cake a dark richness while white chocolate in the vanilla batter offsets the bitter cocoa with sweetness. Black cocoa powder is becoming more readily available. I bought mine at Bulk Barn. You could use substitute regular cocoa powder, but the colour contrast won’t be quite as dramatic.
This cake employs the cold-oven method. Placing the cake into a cold oven gives the batter extra time to rise, producing an extra smooth tender crumb. The texture off this cake is plush! It’s a great technique for cakes like this that do not contain any baking soda or powder.
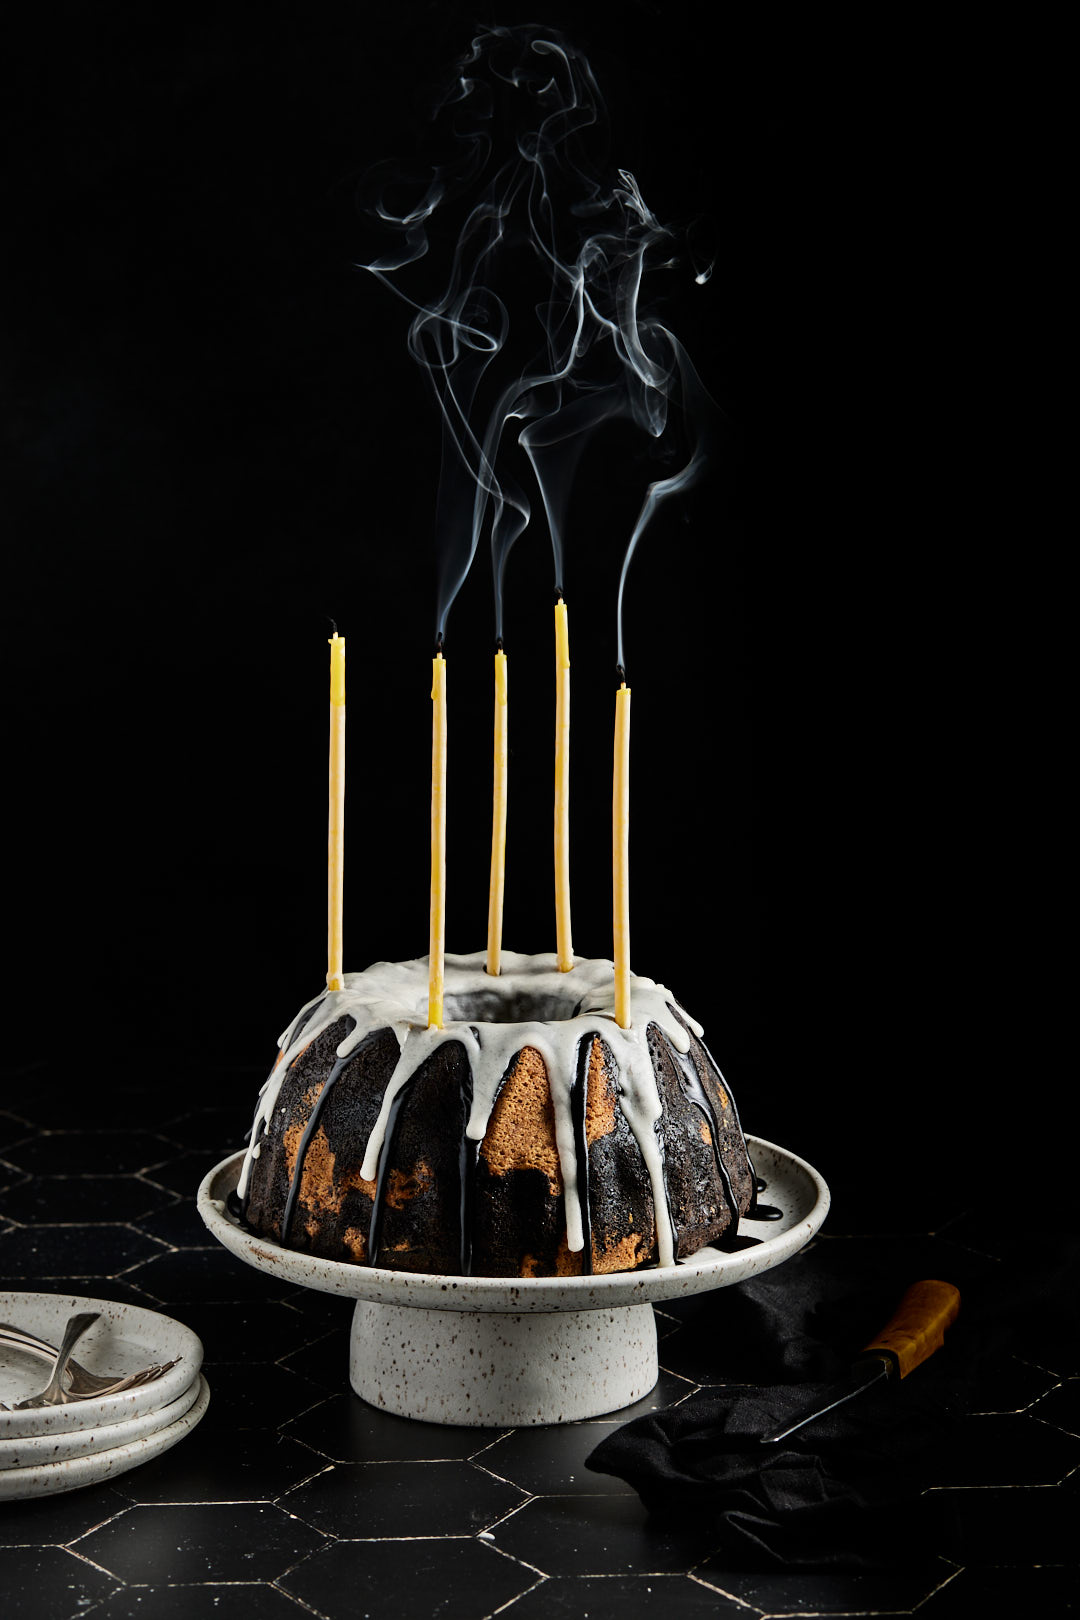
This cake gets treated with a double glaze. Start with the black cocoa glaze, give it about 15 minutes to set and then channel your inner Jason Pollock and follow up with the vanilla bean glaze. You could skip the glaze and just dust this cake with some powdered sugar, but why would you?
This cake is special enough to stand in for a birthday celebration. I found these elegant candles on Etsy. They really elevate the occasion.
Check out how these surprising muffins come together.
I dislike the whole idea of a gender reveal celebration. There are lots of surprises thrown at us, many are kind of scary and not a lot of fun. Finding out the sex of your baby at the moment of birth is one of the few good surprises we have left to experience. I know it’s a polarizing topic, and I’m sure a few of you are nodding in agreement with me, and the rest of you are rolling your eyes at me. It’s ok, I can take it!
With advances in technology, it’s almost impossible not to find out in advance these days. Parents say they want to know so they can get ready. Truthfully, you don’t need much to get ready to bring a baby home from the hospital. Those first few months are just a blur of eating, not sleeping and changing diapers. The best thing you can do to get ready is to fill your freezer with food that can be prepared and eaten with one hand!
When I was born, back in the dark ages, my parents were living at my grandfather’s house with my mom’s sister and brother. I had an older sister (18 months) who was sleeping in a crib in my parent’s bedroom. My mom emptied out a dresser drawer and lined it with pillows for me to sleep in. in her defence, she did remove the drawer from the dresser. It’s not like she put me in there and shut the drawer. These days, she would be reported to Children’s Aid for putting me in unsafe sleeping conditions. Newborns should never sleep with pillows, as it can put them at risk for SIDS.
There was no room in their bedroom for my makeshift crib, so I was put out in the hall to sleep every night. My uncle was a taxi driver, working the late shift, and every night he would come home at 2:00 am, trip on my drawer in the hall as he came up the stairs, cursing my parents. Eventually, my parents took the hint and bought a house of their own before my next sister was born.
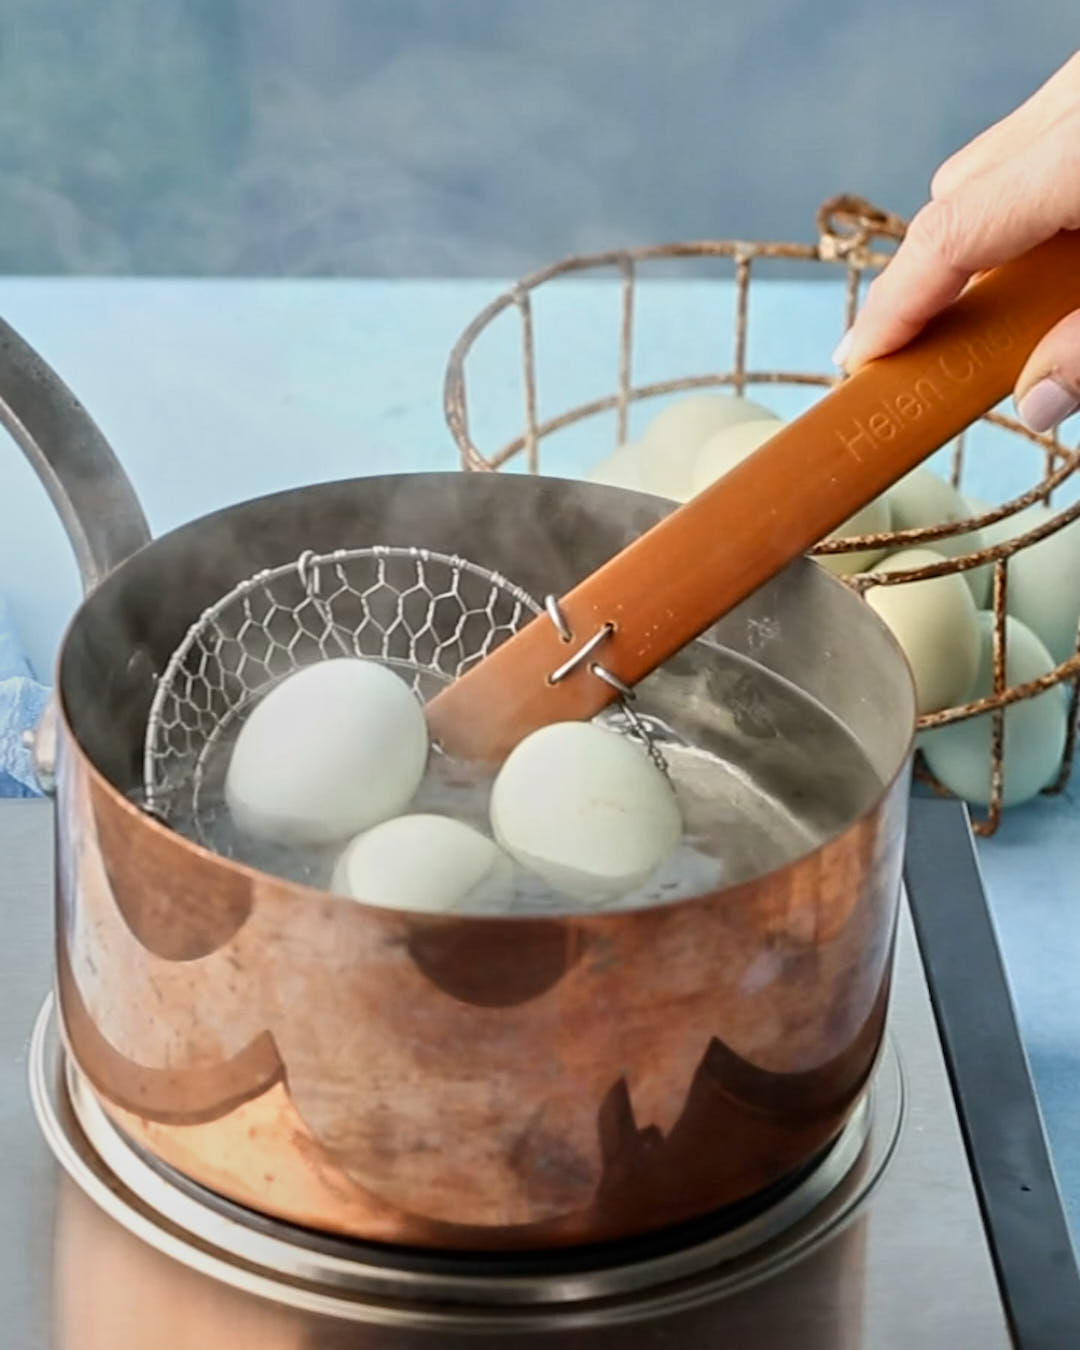
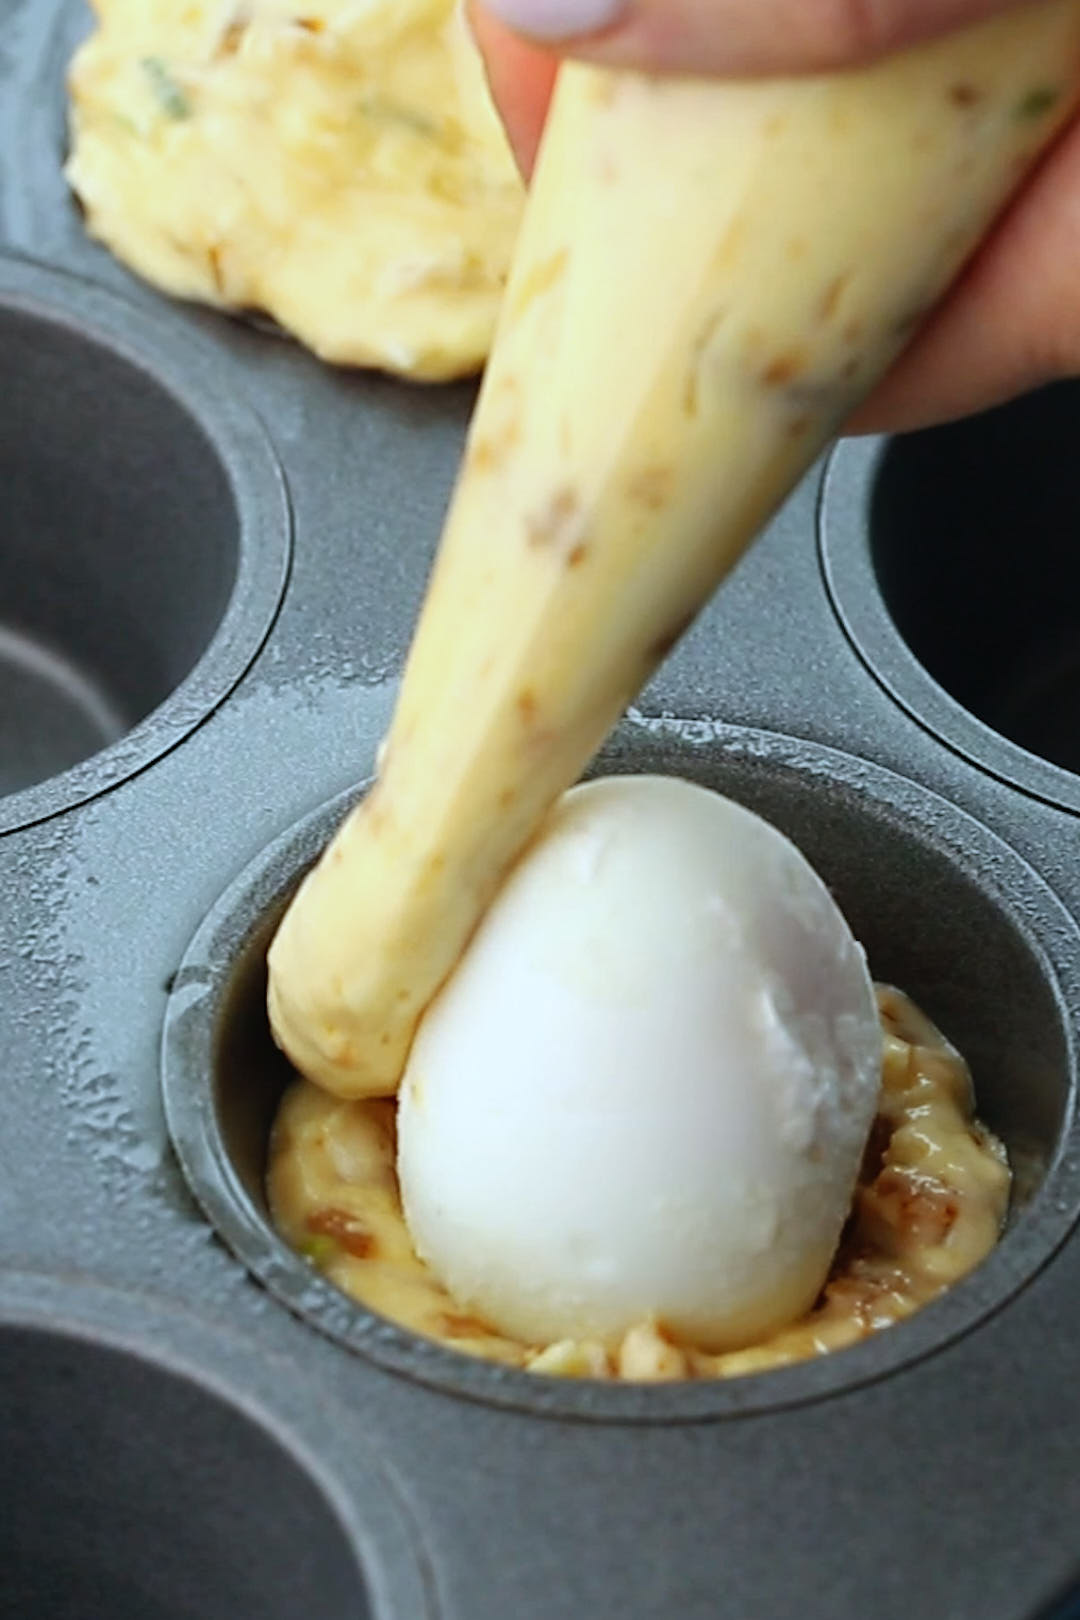
While I dislike a gender reveal, the reveal of a jammy egg yolk in the centre of this Savoury Breakfast Muffin, is one I can get behind! They were dubbed “Rebel Within Breakfast Muffins” by their creator, Chef William Werner of San Francisco’s Craftsman & Wolves.
How the heck does that yolk stay runny in the middle of a perfectly cooked fluffy muffin? It’s culinary alchemy and just plain delicious. You start with a 6 minute egg, which must be plunged into ice water to rapidly chill it.
The muffin batter is enhanced with a generous amount of cheese (Asiago and Parmesan), green onions and spicy Italian sausage (I used plant based Beyond Sausage).
Once the chilled egg is peeled, it gets rolled in some flour to coat the surface. The flour coating helps to insulate the egg and allow the batter to stick to it when baking. Piping the batter is the easiest way to cover it.
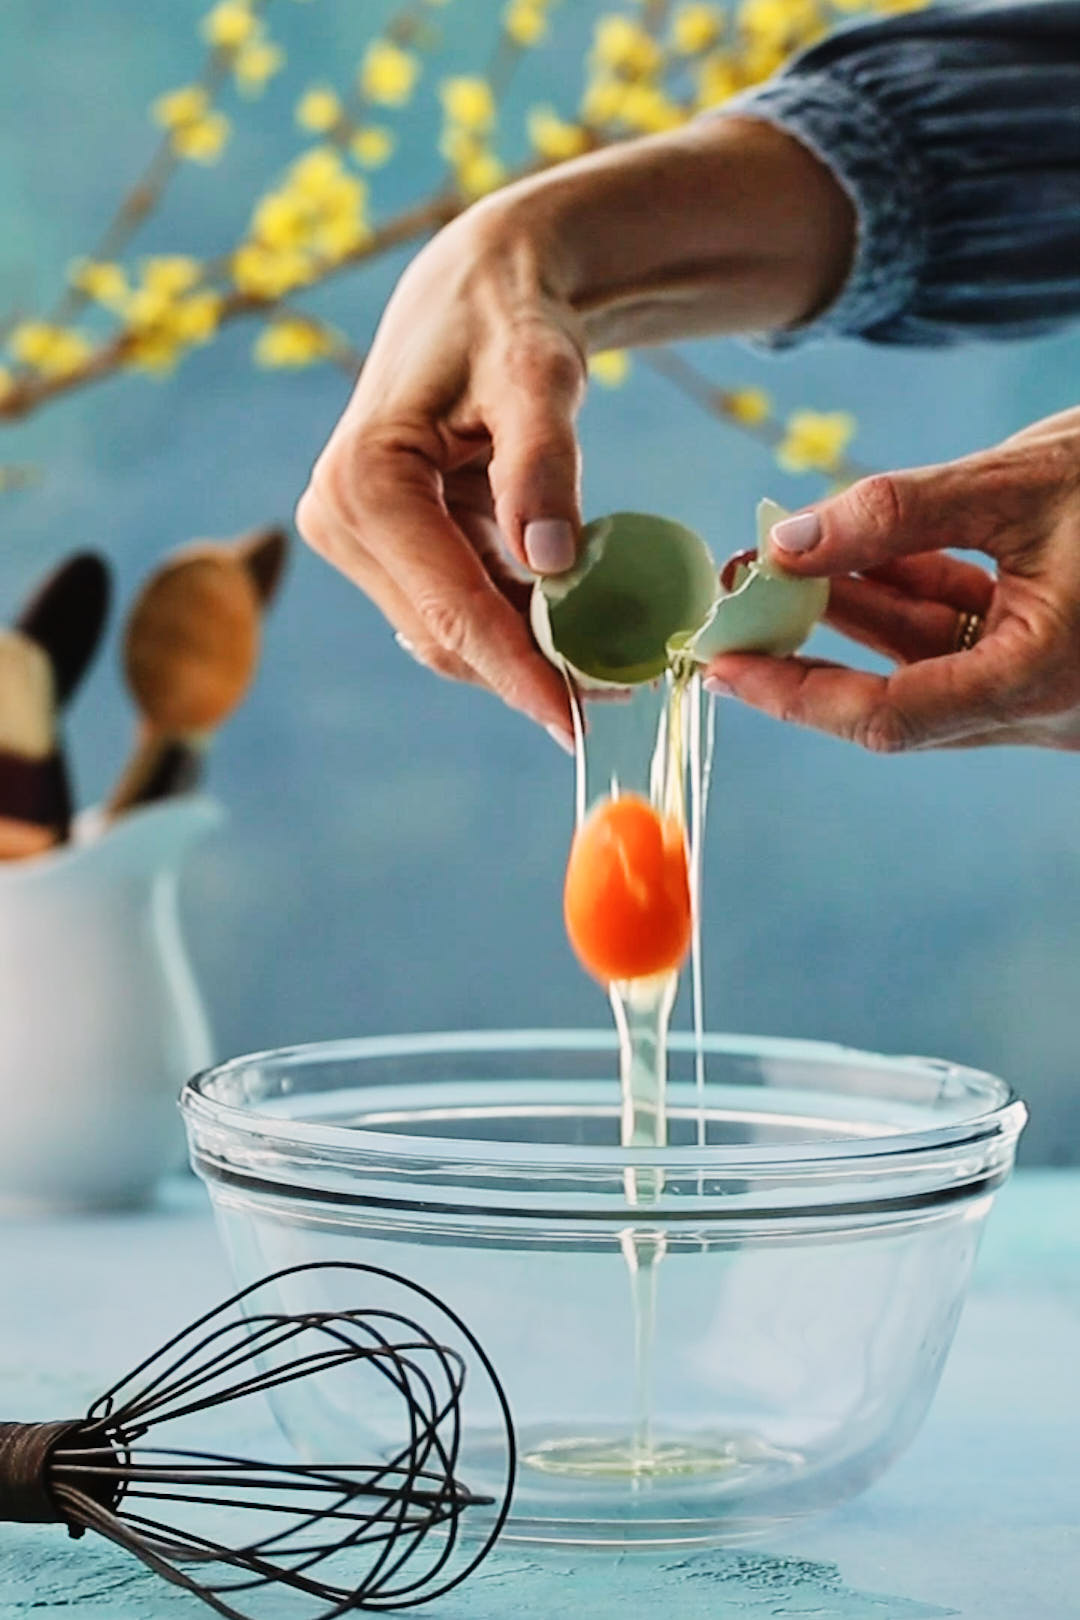
The amber colour of these yolks of these eggs is not photoshopped! They really are this gorgeous hue. My family and friends are sick of hearing me wax poetic about these amazing eggs, but it’s the small things that make me so happy.