Tag Archives: Melissa Clark

Double Coconut Peanut Granola

Double Coconut Peanut Granola

Sometimes a small change can make a big difference. For some reason, I eat the same thing for breakfast almost everyday. Anyone else out there do that? Let me know what you eat for breakfast! Inquiring minds want to know.

Mine is plain Greek yogurt, a dollop of roasted strawberry-rhubarb compote, and a scoop of Melissa Clark’s Double Coconut Granola. But then, a few weeks ago, as I was scrolling through instagram the talented Katia @gourmandpixels posted a photo of granola made with red skinned (aka Spanish-style) peanuts.

It was a lightbulb moment for me. My nut of choice is usually toasted salted almonds, but I really love the gentle pop of crunch you get from a Spanish peanut. Plus, as an extra bonus, peanut skins have a ton of natural antioxidants and dietary fiber.

Green Goddess Chilled Soup

Most of the year I live a fairly hermit-like existence. Don’t feel badly for me, I like it that way. Sometimes it’s all about JOMO (the Joy Of Missing Out). But come summer, I try to cram in as much socializing as is possible. I am fortunate to be able to spend most of the summer on the lake, at our cottage. We have family and friends almost every weekend.

Although I love cooking, I don’t want to spend all my time in the kitchen, so I try to keep things simple. All my guests know that when they ask what they can bring, I ask them to be responsible for one meal. My friends and family are very skilled in the kitchen so it’s really nice to spend the afternoon on the hammock and be called to the deck for aperitivo and dinner.

I spend a day in the kitchen during the week doing meal prep, washing and chopping vegetables, making salad dressings and dips and baking some cookies or squares and stashing them in the freezer. That way, when the weekend rolls around I just have to thaw, assemble and grill.

Each summer I try to find a few new dishes that are big on flavour, look pretty and are able to be made in advance. Then I make them every weekend. The guests change and don’t realize it was served last weekend. This works until my husband and I are sick of eating it. That usually sets in by mid-August.

This chilled Green Goddess Soup is going on the summer rotation. I love it because everything is buzzed in the blender and it keeps in the fridge for 2 days. As the summer progresses you can garnish it with sweet corn niblets and diced vine ripened tomatoes. For now, some fresh herbs and cucumber ribbons look really fancy.

This soup was inspired by Melissa Clark’s Chilled Cucumber Soup over at NYT Cooking. I decided to play with the flavours of Green Goddess dressing and added an avocado to the mix for added richness. Cucumber is fairly bland, so it needs help from lots of herbs, a touch of garlic and a secret flavour bomb of an ingredient, anchovy paste. The soup will not taste fishy, but it adds a wonderful rich and deep flavour note.

I used basil, mint, Italian parsley and dill. For the liquid, I used Greek yogurt, thinned with a bit of water. A squeeze of lemon and a splash of sherry vinegar add a hit of acidic freshness.

Click here to print recipe for Green Goddess Chilled Soup.

Cinnamon Brickle Rugelach

with tea 2 dpiAccording to my sister Bo, if I post any more of Melissa Clark‘s recipes I will be veering dangerously close into stalker territory. We both have a bit of a girl crush on Melissa. She is pretty awesome. To date, I have posted 9 of her recipes on my blog. I think that 10 is the line I must not cross or the restraining order will be shortly forthcoming.

Not to worry Melissa, I have a new girl crush. Her name is Mindy Segal. Although her book, Cookie Love, was released in 2015, for some reason, I just discovered it last month. Which, for a cookie fanatic like me, is kind of surprising. Mindy has turned the cookie world on it’s ear, taking the classics and updating them into fun and most decidedly delicious little bites.

Deciding which cookie to bake first, from this gem of a book, was not easy. As you can see, I have bookmarked lots.cookie loveThis is not a book for those looking for simple mix and scoop cookies. Many of the recipes in this book involve multiple steps and several “mini recipes” within a recipe. If that sort of thing bugs you, then this is not the book for you. If you are looking to up your cookie game, and enjoy spending time in the kitchen, creating little master pieces, then look no further, you have found your guru.

I decided to start with her cinnamon brickle rugelach. Rugelach, for the uninitiated, are a small Jewish pastry, of Eastern European origin. You can learn more about the history of rugelach in this post.

For these cookies you need to make a cream cheese dough, cinnamon nut brickle, and caramel sauce. All three of these components can be done several days ahead and you can assemble and bake the rugelach on another day if you like.

I started with the caramel sauce. Mindy’s recipe makes a generous 4 cups, and you really only need about 1/4 of this amount for the rugelach. But the caramel sauce keeps in the fridge for 6 months and it’s always a good idea to have some caramel sauce around in case of emergency.  I don’t know about your emergencies, but some of mine can be resolved with a spoonful of salted caramel sauce. You can of course buy caramel sauce in a jar, but please don’t. Homemade is so much better. caramel sauceWhile the caramel sauce is cooling, make the cream cheese dough.cream cheese doughcutting circleThis is a supple dough, easy to roll, with no cracking. Mindy suggests you roll it into a rectangle and then cut it into triangles. I read her instructions for doing this 3 times and could not figure it out. Geometry was never my strong suit. I decided to form mine into a circle, and used a 13 inch round plate to make my circle perfect, because that’s how we roll around here.

The dough needs to chill for about 30 minutes before you can make the rugelach, so go on to the cinnamon nut brickle. Brickle refers to something with little elasticity; hence it is easily cracked or fractured or snapped. Does anyone else remember Butter Brickle Ice Cream from their childhood? My mom used to buy the “light” version and we’d end up eating twice as much.

We’re essentially making nut toffee here. Butter, sugar and cinnamon are heated until melted. Mixed salted nuts are coated in this concoction and then tipped out onto a baking sheet to harden.nut brickleThen get out the food processor and make some noise. There will be leftover brickle after forming your rugelach. It will keep for over a month, and is excellent on yogurt or ice cream, in case of another emergency.chopped brickleNow for some fun.


I altered Mindy’s recipe slightly, using less caramel sauce and less brickle than she does. spreading caramel saucesprinkling brickleA pastry wheel or pizza cutter make quick work of forming the wedges. You could also use a sharp knife. cutting rugelachrolling rugelachMake sure you brush with beaten egg whites so that the cinnamon sugar will stick. Mindy topped her rugelach with more brickle, but I found that most of it just fell off and burned on the baking sheet, so I left that step out. I did however, sprinkle them lightly with flaked sea salt (Maldon), before baking. The salt really balances out the sweetness of the caramel sauce and brickle filling. ready for bakingThe rugelach will ooze quite a bit of their filling so don’t be alarmed. Those little pools of ooze will harden into a delicious toffee. Keep a ring of the toffee around each rugelach for a more delicious treat. caramel oozing on baking sheet

Click here to print recipe for Cinnamon Brickle Rugelach.

with tea 1one rugelach


Grilled Asparagus and Farro Salad

On blue oval platterAs parents, I believe one of our most important jobs is to create memories for our children. Certain aromas or sounds can instantly evoke specific memories or feelings. It only takes a shake of Ajax cleansing powder and a squirt of Joy dishwashing liquid to transport me right back to the kitchen of my childhood. The combo of Ajax and Joy was my mom’s special recipe for disinfecting the sink after dinner each night. The scent was sinus clearing and most certainly  responsible for the loss of a few brain cells. But we had the shiniest sinks in the neighbourhood.

If you were to ask my children, undoubtedly, they would tell you that the annoying whir of my cobalt blue Braun immersion blender was the soundtrack to their childhood. Each morning, they were roused from a deep sleep to the sound of their mom frothing milk for her morning latte. (This was before Nespresso machines with milk frother attachments) No need for alarm clocks in our house.

I hope that I have created other memories for my children, that were perhaps a bit more pleasant.3 platesLast weekend was the start of cottage season and we had a full house. My youngest son was there as well as my daughter and 3 of her friends. A few days earlier the girls had decided that they wanted to eat healthy for the weekend, so I was instructed to please not bake anything tempting. I made this salad for our lunch on Friday. It was met with rave reviews. It’s not really a grain salad, as the farro only plays a supporting role. The real star of this salad are the fat spears of sweet asparagus, charred to perfection on the outside but still maintaining a bit of crunch in the center.

The inspiration for this recipe came from Melissa Clark, over at www.cooking.nytimes.com. She roasted the asparagus in the oven, but I wanted to officially start grilling season. I like fat spears of asparagus and I peel the bottom third of each spear because that’s how I was taught to do it at my very first restaurant job.peeling asparagusready for grillinggrillingThe dressing for the salad packs a flavour punch. Lime juice, garlic, soy sauce and olive oil are whisked together and mixed with the cooked farro. This is a great make ahead salad as the farro can sit in the dressing for several hours. The asparagus and green onion can sit for about 30 minutes before serving. Lime Soy DressingI decided on a bed of peppery arugula and bitter radicchio. Toss the farro with the salad greens and top with the grilled vegetables. Using a vegetable peeler, shave thin shards of Parmesan cheese over the top of this salad. close up

Click here to print recipe for Grilled Asparagus and Farro Salad.

2 plates

Cultured Butter Cookies

with-latte-and-sugar-cubesIf there were a “little black dress” of the cookie world, this cookie would be it. Simple and elegant, much like I imagine Melissa Clark, creator of this cookie, to be. Cultured Butter Cookies, perfect for any occasion, need to become a staple in your cookie wardrobe.

A rather unassuming little cookie, but appearances can be deceiving. When a cookie lists flour, butter and sugar (along with a little salt, baking powder and an egg yolk), as the only ingredients, then quality matters. That’s where the cultured butter comes in.

For the uninitiated, here’s a little butter making history. (I always consider it a great day when I learn something new!) Many years ago all butter was made with “cultured” cream. After the evening milking the farmers left the cream to sit out overnight so that the milk would settle and the cream would rise to the top of the bucket. Without refrigeration, the naturally occuring bacteria in the milk caused it to sour slightly, giving it a tangy nuttiness. This cultured cream, once churned into butter, retained that delicious flavour.

Once dairy farmers began pasteurizing their milk, all the active cultures were killed and the cream no longer soured on its own. If they wanted cultured cream they would have to add an additional step in the butter making process and add live cultures back into the pasteurized milk. In an effort to save time and money, North American farmers skipped this step and made butter from sweet cream.

We grew accustomed to the mellow flavour of butter churned from sweet cream. But over in Europe, they never stopped adding live cultures back into the pasteurized cream. When we began importing these European cultured butters into North America people were surprised at how different this butter tasted. Cultured butter is a higher-fat product (86% butterfat vs 80% for regular butter), which in turns makes the butter more silky and gives it a richer taste. The complex tanginess is very pronounced.

When the flavour of butter is front and center, it’s worth the extra money to buy cultured  butter. simple-ingredientsThe dough comes together quickly and then it’s essentially a slice and bake cookie. The dough gets rolled in coarse sanding sugar for a little glitter, because even cookies need a bit of bling!rolling-log-in-sanding-sugarslicingcooling-on-rackThese cookies are crumblier, crisper and more buttery in flavour than a traditional butter cookie. Sometimes simple is best.tied-up

Click here to print recipe for Cultured-Butter-Cookies.

with-latte-and-sugar-stick


Caramelized Leek and Potato Soup

serving soupI have been transfering my liquid dish soap into beautiful glass bottles ever since I was inspired by this. That was in 1993, long before #hatemartha was trending. For the record, I am firmly in the #lovemartha camp. She is all about making everyday life aesthetically pleasing. She speaks my language.

While my husband doesn’t share this passion, he does tolerate it. However, I think I pushed him to the brink this week when I bought a charming new glass bottle for the liquid dish soap. soap bottleHe complained that the soap is very slow to come out. I turned the bottle upside down and counted. Yes, it takes a full 7 seconds for the soap to drip into the dirty dishes. I told him he was viewing it with the wrong lens. He simply needs exchange his impatience for anticipation. He just smiled and nodded, a trick that I taught him. My little secret for how to have a happy marriage. You’re welcome.

This is not a quick cook soup. It too, requires some patience. But while you are caramelizing the leeks, just anticipate how delicious it will taste. A traditional leek and potato soup (vichyssoise) is pureed smooth and served cold. The leeks are very briefly sautéed before the potatoes and stock are added. In this version, created by New York Times columnist Melissa Clark, the leeks are cooked until golden brown. If you haven’t already, you need to sign up for the New York Times Cooking Newsletter. Wonderful daily inspiration!

You can’t hurry caramelizing onions. They must be cooked over a low heat for a good 25-30 minutes. Turn up the heat and you will burn them, resulting in bitter onions.in white bowl 2 625 sqdicing leeksThe leeks are sautéed in a mixture of butter and olive oil. At first it seems like you have way too many leeks, but they eventually shrink down to a very small pile, of golden delicousness.raw leeks 1caramelized leeksFlavouring this soup is a supporting cast of fresh herbs. Sage, bay, thyme, parsley and celery leaves get tied up in a cheesecloth bundle to impart their goodness to the soup. I used a mixture of vegetable stock and water, but I think I would use all water next time, to really let the leek flavour shine through.bouquet garni Yukon golds are the potatoes of choice. I peeled, halved and thinly sliced them.slicing potatoesI very coarsely pureed the soup with a few bursts of power from my hand held immersion blender. I really like to leave the soup mostly chunky.soup pot

Click here to print recipe for Caramelized Leek and Potato Soup.in white bowl on wood and white marble server

Roasted Squash with Smoked Paprika, Maple Syrup and Sage Salt

Roasted squash 2 625 sqWhile home for a visit last weekend, my daughter observed the mess on our dining room table and expressed the opinion that perhaps I may have developed a bit of a hoarding problem. “Don’t you think you’ve acumulated enough food photography props mom?” she asked.DR tableClearly she doesn’t understand. Those are all spring/summer props. Now I need to start acquiring appropriate fall/winter props. While some parents turn their kid’s vacated bedrooms into gift wrapping quarters or perhaps an extra closet to store off season clothing, it is entirely possible that her bedroom may be converted into my props closet, if I continue collecting at my current rate.

Of course it doesn’t help when my sister sends me these charming bowls. They were intended as nut bowls, but they are just perfect as mise en place bowls for a photo shoot!  I let out a squealed with joy when I opened my gift. I have an extreme fondness for bowls! The colour combination of these little vessels is just gorgeous. little bowlsShe found them in Toronto at The Cookery Store. I have since discovered you can also get them online at Fishs Eddy.

I had a glut of winter squash after a recent photo shoot, and I needed to use them up before they went bad. My go-to ingredient for roasting vegetables is smoked paprika. It just makes everything taste better. The inspiration for this roasted squash hails from Melissa Clark’s book, Cook This Now. She mixed smoked paprika with olive oil and honey and smeared it all over squash before roasting. I swapped out the honey for some maple syrup, because that’s just the way we Canadians roll!ingredients

brushing squashMelissa suggests finishing the roasted squash with a sprinkling of homemade sage salt. So simple to make; just bake some fresh sage leaves for about 10 minutes, until crispy. Then crumble them between your fingers with some coarse sea salt. Earthy, and slightly bitter, sage makes a perfect partener for sweet squash. A final sprinkling of toasted pumpkin seeds adds a welcome crunch.

Click here to print recipe for Roasted Squash with Maple Syrup, Smoked Paprika and Sage Salt.

Roasted squash 1 625 sq

Pomegranate Molasses Glazed Carrots

ready to eat 2 625 sqYou know it’s January because every food blogger worth her salt is writing about the joys of vegetables . Those sweet food porn days of December are long gone, buried under the 5 pounds of butter and sugar, tucked oh so discretely under a layer of skin, in my case, just below where my waist used to be.

Although we squeal with delight and burble over with joy at summer produce (remember wild blueberries?), winter in the produce aisle can produce some gush worthy moments as well. It just requires a bit more work.

Carrots are often bypassed as too pedestrian, but in deft hands, carrots can be magical. These carrots were way too pretty to leave behind at the supermarket.carrots in a circle 2I have a secret ingredient that turns ordinary roasted carrots into something quite special. It’s pomegranate molasses. Not actually molasses at all, but just pure pomegranate juice, and a bit of sugar boiled down and reduced to a thick, syrupy reduction. Dip your finger into this thick, garnet coloured syrup and you will be instantly transported back to your childhood! sweet tarts fIf you are of a certain age you will remember with fondness that powerful puckering of your lips from these candies. Pomegranate molasses has that tart/sweet quality, but in a grown up way. It adds an intense earthy depth of flavour to so many things. I have been using it in a chicken sauce for years now, and everyone who eats it always asks, “what is in this sauce?” It can be found in many supermarkets now, as well as in Middle Eastern specialty shops. If you can’t find it, here is a recipe from Alton Brown to make your own pomegranate molasses.


The idea of roasting carrots with pomegranate molasses came from Melissa Clark’s book “In the Kitchen with a Good Appetite.” The first time I made them, I found the flavour to be delicious but the carrots were a bit shrivelled in appearance and leathery in texture. As I thought about how to avoid this issue, I remembered that I boil potatoes for a few minutes before roasting to get a crispy not leathery skin. I wondered if the same treatment with carrots would work? I peeled them and cut them on the diagonal, to increase the surface area that would come into contact with the roasting pan. peeling carrots They got a quick 2 minute dip in boiling salted water. Then I drained them on paper towels for a few minutes before roasting.boiling carrotsdraining carrotsI tossed them with a bit of olive oil, salt, pepper and a pinch of cayenne and roasted them in a hot (425°F) oven for about 45 minutes. I added the pomegranate molasses and some honey during the last 5 minutes of roasting as I did not want them to burn.ready for oven

pouring glaze on carrotsThe finished carrots were crispy without being leathery. The pinch of cayenne added a nice kick and the pomegranate molasses added an amazing sweet tart punch. I gilded the lily and sprinkled on some pomegranate seeds. They glistened like little jewels.

Click here to print recipe for Pomegranate Molasses Glazed Carrots.

ready to eat 1jpg


Rhubarb Curd Strawberry Tart and Some Surprising Discoveries

For those of you who have been following my blog for the past little while, you know that I have been suffering from some disc problems that landed me flat on my back in bed for about 8 days. I’m pleased to report that I am continuing to feel much better. But while I lay in bed, in agonizing pain, I became quite anxious about the fact that I was unable to do any of my regular forms of fitness (treadmill, elliptical, weight training and yoga).

I have come to rely on exercise as a stress reliever, as well as a way to allow me to control my weight. A mentally balanced sane person would be more concerned about the errant disc fragment lodged in her spine, pressing on the nerve that connects to her left hip flexor and quadriceps. Yet, I seemed to be more concerned about weight gain.

Surprising discovery # 1: Shockingly in the past 3 weeks I have actually lost 5 pounds! I am not quite sure how that happened. It may have something to do with muscle loss (muscle weighs more than fat) or it could have something to do with the fact that I was unable to get down the stairs to my kitchen, where we keep the food, for 9 days. Now don’t misunderstand me here.  I didn’t starve for 9 days. The lovely family members in my house did bring me food and water at regular intervals. It’s just that perhaps my regular intervals are a bit more frequent than theirs!

Again, a mentally balanced and sane person would look at this weight loss and begin planning healthy meals of quinoa, kale and lentils, so that the pounds do not creep back on. However, I saw a loss of 5 pounds and immediately started planning what I would bake and blog about next.

I knew I wanted to be seasonal and bake something with rhubarb. Of course the obligatory strawberry rhubarb pie was a possibility, but I am not really a pie lover, unless it involves coconut cream. Searching for inspiration I turned to Melissa Clark’s “Cook This Now.” And sure enough, in the May chapter, she had a recipe for a Rhubarb Curd Tart. As I read through the recipe, I made surprising discovery #2: Curds are not just for lemons anymore! You can make a curd from any fruit juice you fancy.

While I love the tangy flavour of rhubarb, I find the stringy texture a bit off-putting. Melissa had come up with a genius way to get all the tang of rhubarb, without the texture. Puree the raw rhubarb in the food processor and then strain the pulp and squeeze out the juice. Use this juice instead of lemon, in the curd. Brilliant!

For the tart crust, I wanted to try a recipe from Anna Olsen. She has a new show called Bake, on the Food Network (Canada). This week’s episode featured desserts made with Pate Sable (tender tart dough). As I watched Anna prepare the dough, I made surprising discovery #3:  A hardboiled egg yolk contributes greatly to the texture and richness of Pate Sable. This European way of making tart dough was created by French pastry chef Pierre Herme.

The final tart was perfect. The crust was reminiscent of shortbread; crumbly and just a little bit sweet with the richness of butter (and egg!). The curd plays tricks on your mind. You see the yellow curd and you think lemon, but once you take a bite your mouth immediately recognizes the tart and tangy taste of rhubarb. Balanced by the sweetness of strawberries, this is one perfect bite. I think that should Anna and Melissa ever meet, they would be quite proud of their collaboration!

The secret ingredient to the rich crust is the yolk of a hardboiled egg! Butter and icing sugar are creamed together. The hard-boiled egg gets sieved and added. Additions of vanilla extract, salt, raw egg yolk and cake and pastry flour  complete the dough. I like to roll out the dough between 2 sheets of parchment paper. Transfer to tart pan with removable bottom. If the dough cracks while transferring, don’t sweat it. It’s a forgiving dough and is easy to patch. Trim off excess dough by running the rolling-pin across the tart pan. Line with parchment paper and fill with pie weights or dried beans to bake.

While the tart is baking, prepare the curd. The idea that any juice can be turned into a curd has just blown my mind. I’m not sure why I only thought curd could be made with lemon. I guess I’m just not an out of the box kind of thinker, but now that I know, the possibilities are endless. I am planning a pomegranate curd tart for the fall! I always associate pomegranates with my mom. She used to make us strip down to our underwear and  go outside in the backyard to eat pomegranates, because the fruit stained so badly. Luckily, these days you can already buy the fruit juiced.

When making the curd, Melissa says to stand at the stove and whisk constantly for 18-20 minutes. I did not. I walked away for several minutes at a time and everything came out just fine. Although, I must admit, when I strained the curd, I did see a few bits of scrambled egg in the bottom of my strainer.

This tart would also be wonderful with fresh raspberries, but strawberries seemed like the right choice today.

Click here to print the recipe for Rhubarb Curd and Strawberry Tart.

Chile-Coconut Braised Beef Short Ribs

Here’s a sentence I never thought I’d hear myself utter. “I’m one blog post away from being considered a stalker.”  When it comes to the blogsphere, I don’t think there is an official definition of when you have crossed the line from fan to stalker, however, this is my third blog post where I gush about Melissa Clark and her genius book, Cook This Now. I think if I give away any more of her recipes or continue to fawn over her, she may have me arrested.

Trouble is, every recipe in her book really does scream to you, “cook this now.!!”, and I just can’t help myself from blabbing to everyone I know about Crisp Roasted Chicken with Chickpeas Lemons and Carrots or Double Coconut Granola.

I actually made these short ribs over three weeks ago, when it was still actually still  winter here in Ottawa, and you wanted to eat hearty beef ribs. I just got a bit distracted and am only getting around to posting about it now. Kind of bad timing for me to post about them when today’s record high temperature reached 28°c (82°F for any non Canucks reading this), and the only kind of coconut you may be wishing for is the scented sunscreen kind! However, just file the recipe away for next week, when no doubt we will be freezing once again.

Click here to print the recipe for Chile-Coconut Braised Beef Short Ribs.

Double Coconut Granola

I have a confession to make. I have a bit of a cookbook crush. I’m not sure there is such a thing, but if there is, I have it. Melissa Clark’s new book, “Cook This Now”, is aptly named. As I leafed through this book, I felt compelled to run to the kitchen and create almost every recipe in the book, immediately. This is not a glossy photo filled coffee table book. There are some colour photos, but the stories she tells, the descriptions of the food and the recipes themselves make glossy photos totally unnecessary.

I have come to be a granola lover fairly late in life. When it comes to breakfast, I am a creature of habit. I tend to eat the same breakfast every morning for several years in a row, until I start to feel bored. First it was Cheerios and bananas. Sometimes I would get a little wild and crazy and have multi-grain Cheerios instead of the original. Then I switched over to Rideau Bakery rye bread, toasted, with salted whipped butter and sour cherry jam. Next, it was Quaker Oats Squares, with blueberries in the summer and bananas in the winter. From there I moved onto oatmeal, sweetened with a hint of maple syrup.

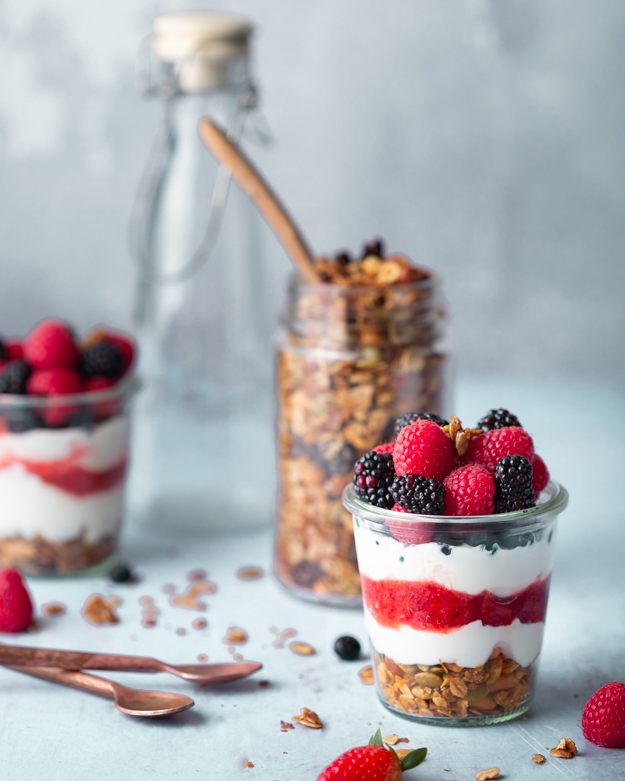
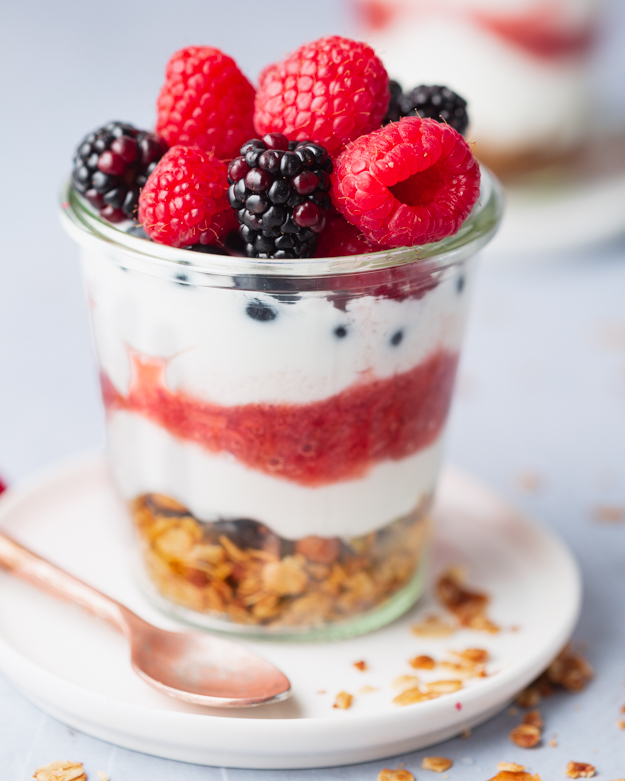
And then, everything changed when fat-free plain Greek yogurt became widely available at my local supermarket last year. I mixed the yogurt with some berries and then crumbled a Dad’s oatmeal cookie on top. The crunch and sweetness of the cookie was a wonderful complement to the creamy, tangy yogurt. A new breakfast routine was born.

Then, last fall when I was away on holiday in Italy there were no Dad’s oatmeal cookies to crumble on my yogurt. I sprinkled some granola on top and was shocked at how good it was. This granola had big clumps and was chock full of almonds, seeds, oats, raisins and coconut. When I tried to get the recipe I discovered it was not home-made, but was Kellogg’s Fruit and Nut Granola. I was unable to find it at home and have been dreaming about it ever since. I frequently save different granola recipes to try out, but then when I look at them again, they just don’t appeal to me.  But when I read through Melissa’s granola recipe I thought I might have found a contender.

To be honest, she had me hooked when I read the title. DOUBLE COCONUT! My girlfriend Sandy says that coconut is one of those polarizing ingredients. People either love it or hate it. I happen to love it. Without a doubt, Joanne Yolles’ coconut cream pie from Scaramouche restaurant in Toronto would be my last meal request.

The first coconut in this granola recipe comes from what Melissa calls “Coconut Chips”.  Essentially, these are just large flakes of unsweetened dried coconut. Shredded won’t be the same, you need to seek out the large flakes. I buy mine locally at the bulk food store.

The second form of coconut is coconut oil. Melissa calls for virgin coconut oil. When I went shopping I just picked the first coconut oil off the shelf, which was organic expeller pressed coconut oil. Upon doing a little bit of research, I learned that Expeller Pressed Coconut oil is less expensive than Virgin Coconut Oil, and because it goes through a steam deodorizing process the taste is very bland, unlike Virgin Coconut Oil which retains the odor and taste of fresh coconuts. If you don’t want the coconut flavour to be overwhelming, go for the expeller pressed. I used the expeller pressed, but will definitely seek out the virgin for my next batch, to really amp up the coconut flavour.

I was really shocked (and thrilled) to learn some of the health benefits of coconut oil, not the least of which is that it aids in weight loss. Apparently it contains short and medium-chain fatty acids that help in taking off excessive weight. Not that I really understand what short and medium chain fatty acids are, but I am happy to be delusional in thinking that eating large handfuls of this granola will help me lose weight! Coconut oil also contains lauric acid, which is a key ingredient in breast milk. Now really, could you get any healthier than mother’s milk?

The coconut oil is solid and must be melted before using. To be honest, it looks more like a cream to rub all over the body for moisturizing. The original recipe called for pecans but I used almonds instead.

Rolled oats, pumpkin seeds, dried cherries, maple syrup, brown sugar, cinnamon, nutmeg and salt round out the ingredient list.

Use your hands to toss everything together, then spread it out on a baking sheet.

It takes about 40 -45 minutes to bake, and you should toss it every 10 minutes for even browning.

This granola is like a party in your mouth! It has the perfect balance of flavours and textures. Slightly salty with great crunch from the almonds and pumpkin seeds, some chewiness from the dried cherries and coconut, and a hint of maple and cinnamon, this granola makes me very happy! Mornings just got a whole lot better around here!

Click here to print the recipe for Double Coconut Granola.

Crisp Roasted Chicken with Chickpeas, Lemons and Carrots

There has been quite a bit of buzz (well in the culinary world at least), about New York Times food columnist Melissa Clark’s new cookbook, Cook This Now. My kitchen shelves are bulging with cookbooks and I resolved not to buy anymore, but I did order one to give as a gift to my sister. When it arrived, of course I had to look through it. Melissa organizes the book by month, which ordinarily irritates me. My husband can provide anyone interested with the entire litany of little things that irritate me, but let’s  keep it pleasant and not go there today. As I was saying, ordinarily, I prefer when cookbooks are organized by traditional categories (ie: appetizers, breads, chicken etc…) However, Melissa had me hooked from the very first January recipe, “White Bean Stew with Rosemary, Garlic and Farro.” She had me at farro!

So of course, I kept the cookbook for myself and ordered another one for my sister, plus a bonus book (Momofuko’s Milk Bar) as my penalty for being late. Bo, if you’re reading this, now you know why your gift was late.

And rebel that am, I skipped right past the first 2 January recipes and boldly tackled the 3rd one first!  Full disclosure here, I’m really not that much of a rebel, I just happened to have a whole chicken defrosting in the fridge.

Melissa likes to play a game when she looks through food magazines. She doesn’t read the recipes. Instead, she looks at the photos and imagines what she thinks the recipe should be. She says that her track record is pretty good at guessing accurately, but sometimes she’s way off base. And that’s how the recipe for crisp Roasted Chicken with Chickpeas, Lemons and Carrots was born. Melissa explains:

“The photo was of a roasted chicken on a bed of chickpeas and what I thought were tiny cubes of carrot. I could taste the dish in my head. The chickpeas were crunchy and salty next to the melting, sweet carrots and everything was suffused with chicken fat from the roasting bird.

    In fact, the carrots turned out to be bits of orange bell pepper (definitely not in season in January in New York) and the chickpeas were added to the pan during the last few minutes of cooking so they would stay moist and soft, without the time to absorb much in the way of chicken essence. I’m sure it was a perfectly good dish. But I liked my own idea better.”

Her description was very persuasive. I set to work right away. Lemons are sliced into little wedges and then mixed with chickpeas and garam masala, an Indian spice blend. I happened to have rainbow carrots and some parsnips, so they got thrown into the pan as well.

More garam masala is rubbed all over the chicken and then the chicken is seasoned with salt and pepper and then stuffed with more lemon and some fresh thyme. Melissa suggests rubbing the chicken with softened butter, but I left this step out as I didn’t want the extra fat. The stuffed chicken is placed on a rack, above the carrots and parsnips and roasted in a 400° F oven for 30 minutes.

After 30 minutes, the chickpea-lemon mixture is added to the bottom of the pan and the chicken gets about another hour in the oven. While it was roasting I prepared the gremolata garnish.

This dish is pure roast chicken goodness! Moist and succulent and intensely flavourful.The carrots and parsnips turned dark brown and had a wonderful sweet caramelized flavour. The chickpeas turned all crispy from roasting in the chicken juices. The only part of the dish we didn’t love was the roasted lemons. Melissa says they are edible, but we found them to be too bitter. Next time, and there will be a next time very soon, I will add only the zest of the lemons to the chickpeas.

Click here to print the recipe for Crisp Roasted Chicken with Chickpeas, Lemons and Carrots.