Tag Archives: Passover

Blondes have more fun and Blonde Chocolate Ganache Macarons.

macarons in bowl 1


in egg holder square for blog

Seems that blondes really are taking over the world. First we had the introduction of Blonde Ale, then Starbucks released its Blonde Roast, and now Valrhona has introduced the world’s first blonde chocolate. Say what?? Blonde chocolate?? You thought there were just dark, milk and white?

milk dark and white

Before we delve into the world of Blonde chocolate, I offer you a quick Chocolate 101 Primer:

cocao bean on treeroasted nibs

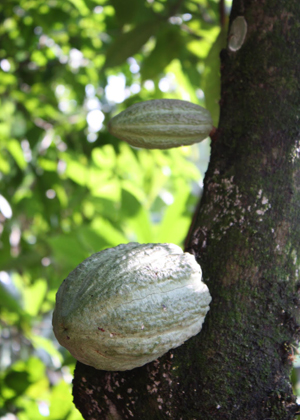
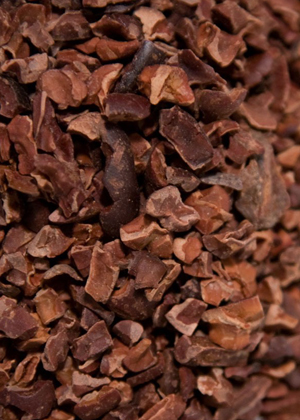
The process of making chocolate starts with the cocoa bean. The beans are fermented, dried, roasted and then shelled. These shelled beans, known as cocoa nibs, are ground and the resulting product is a thick liquid known as chocolate liquor. (It’s not actually alcohol.) Then, this chocolate liquor is pressed and from this pressing we get two products:

1. Cocoa butter, which is actually the fat from the chocolate liquor

2. Chocolate solids, which when ground results in cocoa powder.

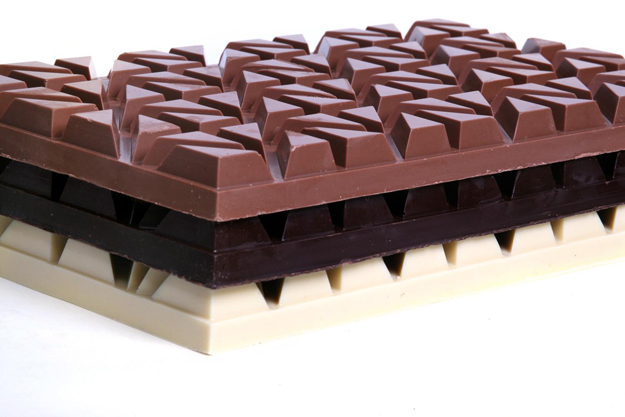
Unsweetened chocolate is basically cocoa butter reblended with cocoa powder. Sugar is added to make semi-sweet and bittersweet dark chocolate, and milk is added to produce milk chocolate. White chocolate contains none of the chocolate liquor. It contains cocoa butter, milk, sugar and sometimes vanilla.

Yes, you chocolate purists out there, I know that technically white chocolate is not really considered chocolate since it does not contain any pulp from the cocoa solids extracted from the cocoa bean.

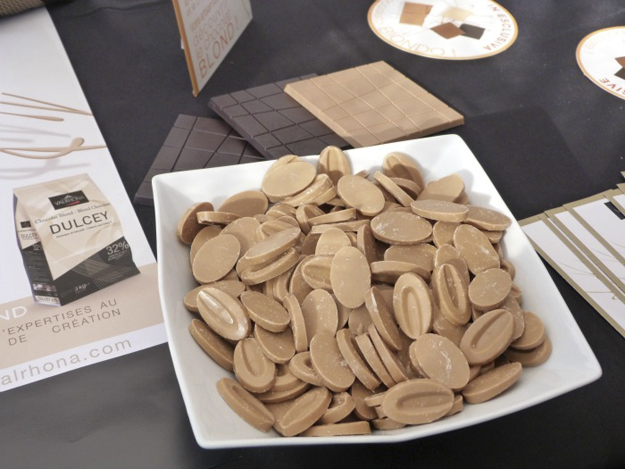
To be labeled white chocolate, there must be a minimum of 20% cocoa butter, 15% milk powder and a maximum of 55% sugar. Note that real white chocolate is not pure white in colour, it is actually an ivory colour. If you see snow white chocolate, it is likely that it contains vegetable oil, rather than cocoa butter and trust me, the taste difference is significant!

OK, now onto the discovery that rocked my world, Blonde Chocolate! (Just a little aside here, when I announced this startling discovery to my husband and two sons they all started snoring! Ungrateful sods, no blonde chocolate treats for them!)

As with several other culinary innovations, this one was also an act of pure serendipity! About 8 years ago, Frédéric Bau, Executive Chef and director of Valrhona’s Ecole du Chocolat, was doing a demonstration for pastry chefs from around the globe. He had some white chocolate melting in a bain-marie. He used a small amount of that white chocolate for his demonstration and the remainder was left sitting there, continuing to slowly heat, completely forgotten about.

Around 10 hours later, he returned to discover that the white chocolate had caramelized into a stunning buckwheat honey blonde colour.  It had the aroma of toasted shortbread, and when he stuck his finger in there for a taste, he was shocked to discover an intense biscuity, caramel flavour.  It was smooth, buttery and there was a hint of salt on the finish.  Frédéric was convinced that he was clearly onto something big here. It took almost 8 years to be able to reproduce this happy accident on a large scale and sell it commercially.

But in October of 2012 Dulcey 32%, the world’s first blonde chocolate was born. Clearly I must have been living under a rock, as I had no idea about this launch. I only became aware of it last week when I got an email from The Vanilla Food Company, featuring some new products to their lineup. My mind was spinning with the possibilities and I immediately ordered a 2 kilogram bag.

dulcey 32-1

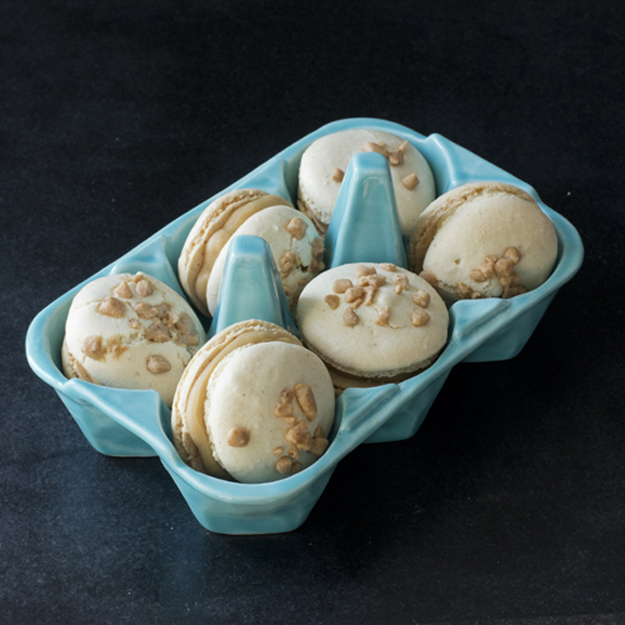
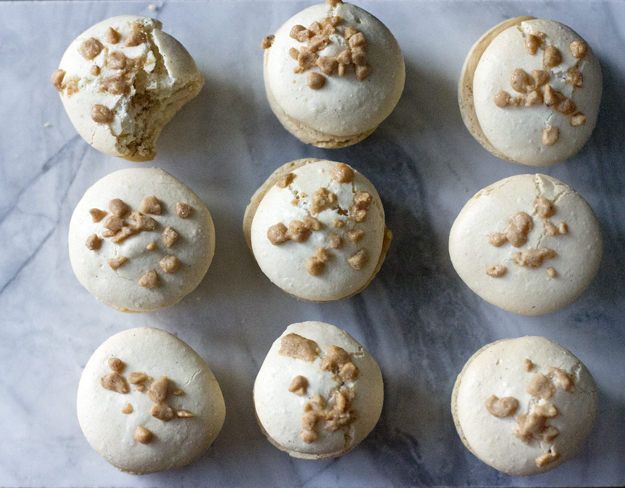
Since Passover is coming up soon (March 25), I decided to make some macarons and fill them with a Blonde Chocolate ganache. I think Frédéric would approve. These are classic French macarons, with only one “o”, not to be confused with American macaroons, (with two “oo”‘s), which are made with coconut.

on marble slab 2

Macaons are the perfect Passover dessert, since they contain no flour. There is a plethora of information and recipes out there in the Blogosphere. I have tried numerous recipes and techniques. Last year I discovered Stella Parks’ (aka Bravetart) macaron primer. I had always thought that macarons were the prima donnas of the pastry world, very temperamental and required a delicate touch. Not so says Stella. If you are a macaron geek like me, then these posts by Stella are required reading:

1. The 10 Commandments of Macaron Baking

2. Macaron Mythbusters

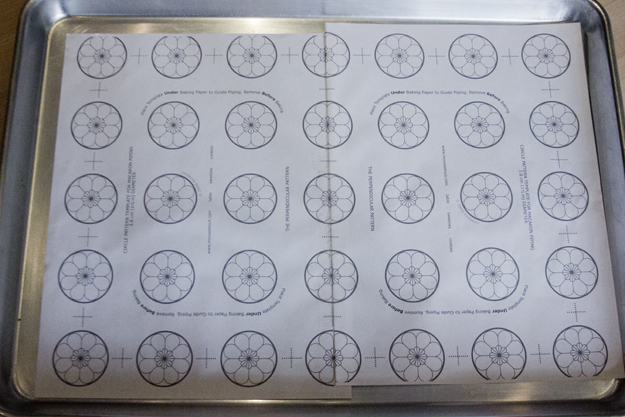
To make your life easy, print out this template for piping your macarons. Depending on the size of your baking sheets, you could print two and tape them together. Place template on baking sheet, cover with parchment and set aside.

template

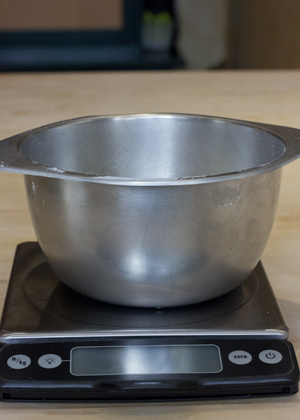
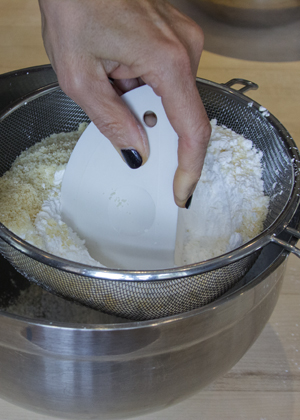
A kitchen scale and stand mixer are recommended for success with macarons. Classic macarons begin with almond flour, sometimes called almond meal. You can buy ground almonds at most grocery store or bulk food stores. The ground almonds are combined with powdered sugar and then pressed through a sieve.

scalesieve

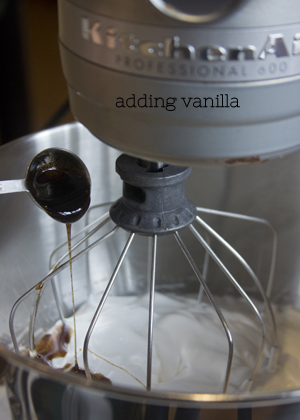
Egg whites, sugar and salt are whipped to stiff peaks. Stella gives quite explicit instructions, including number of minutes and speeds, which I have detailed in my attached recipe.after 3 minutesafter 6 minutes

after 9 minutesadding vanilla

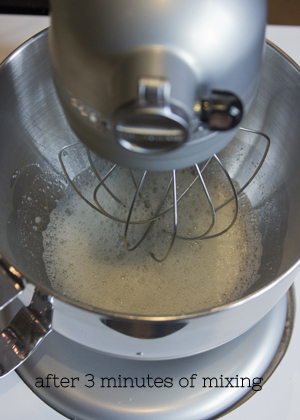
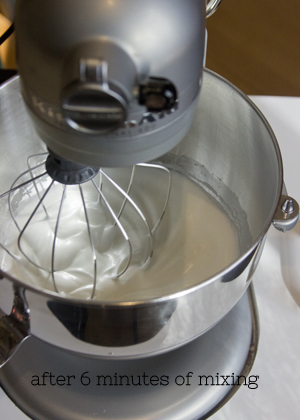
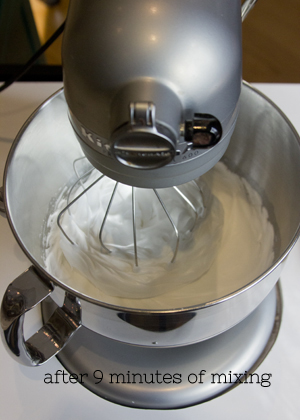
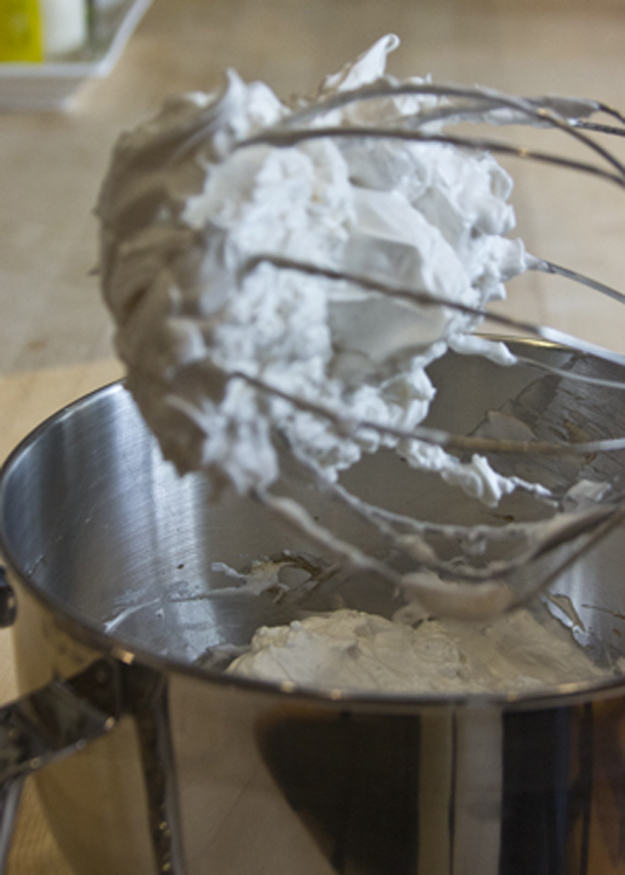
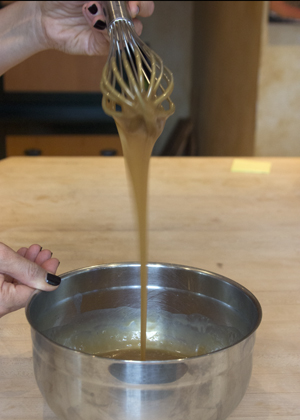
The meringue is whipped enough when there is a big clump of meringue in the center of your whisk, like this:

meringue clumped 2

Next the ground almond/powdered sugar mixture is dumped on top of the meringue and a rubber spatula is used to combine everything. A combination of a folding stroke and a pressing motion, against the sides of the bowl to help deflate the meringue, are used. Remember, we are making macarons here, not meringues. You want to knock the air out of the egg whites.

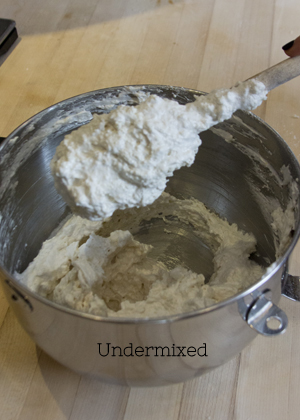
The batter, also known as the macaronage, is sufficiently mixed and perfect for piping when you spoon some batter on top of the bowl and it mounds up on itself, but after about 20 seconds, it melts back down on itself. Your macaronage is under-mixed and too stiff if you spoon some out and drop it back into the mix and it just sits there, never incorporating. Your macaronage is over-mixed if it has the consistency of pancake batter. Do not let it get to this stage!

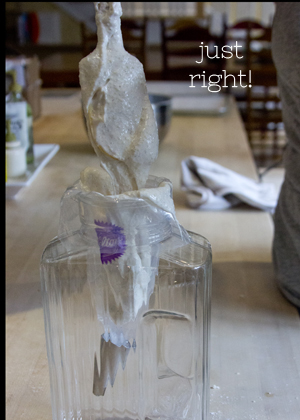
Filling the piping bag is easy if you place it inside a tall glass or pitcher, and cuff the top down. Only fill the bag half full. Otherwise, it will ooze out from the top and you will have a sticky mess, and probably curse me!

too thick 2spooning into piping bag 2

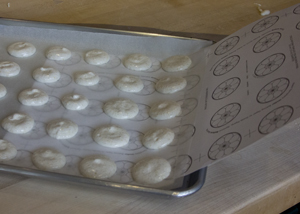
Pipe just inside the circles, as the mixture will spread.

piping 2

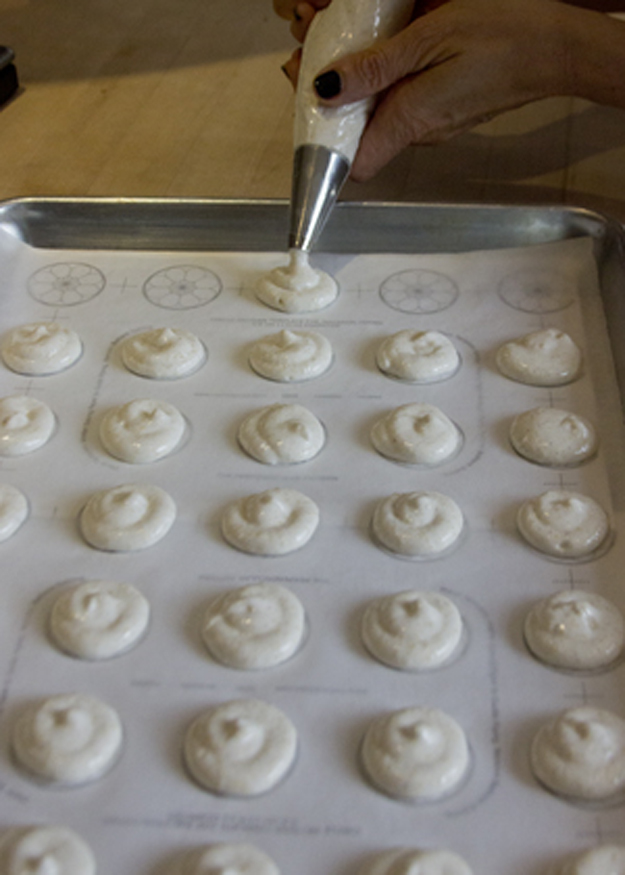
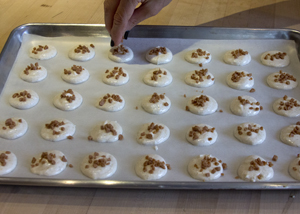
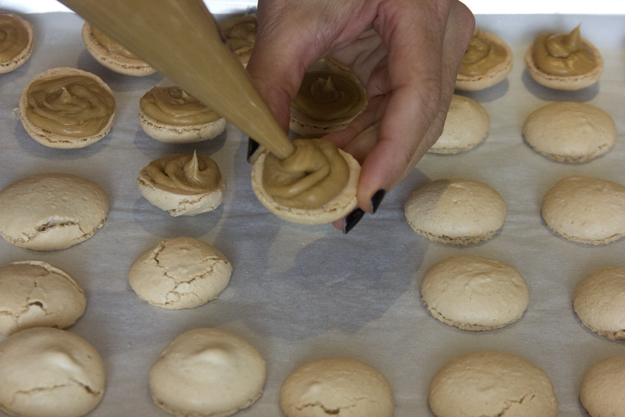
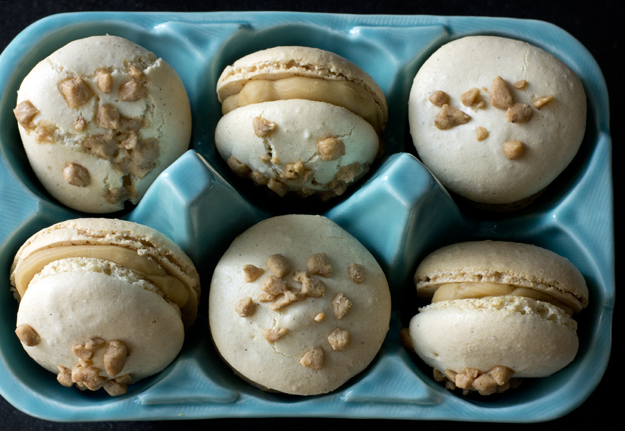
Remember to remove template before baking. Top half the macarons with a few Skor bits. These will be the top half of your macaron sandwich cookies.

remove templatetopping with Skor bits

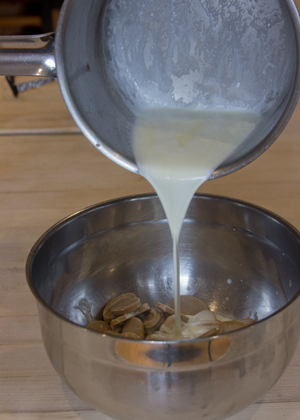
While macarons are baking and cooling, prepare ganache filling. Bring cream and butter to a boil. Pour over chopped blonde chocolate. (You could also use white, milk or dark chocolate) Let sit for 3 minutes then whisk until smooth.

pouring creamwhisking

Let cool to room temperature, until quite thick and then pipe onto half the macarons. Top with Skor lids.

piping blond ganache

Macarons will keep in the fridge for a week or in the freezer for up to a month. Let come to room temperature before serving.

in egg holder

Click here to print recipe for Almond Macarons with Blonde Chocolate Ganache Filling.


.


.


Alice’s New Classic Macaroons

For me, it’s just not Passover unless we have macaroons.That’s macaroons, with two oo’s, the ones made with coconut, not to be confused with macarons, the French confection, with one o, which are typically made with ground almonds, powdered sugar and egg whites.

In fact, I love macaroons so much that I dressed up as a chocolate one several years ago.  My youngest sister, in Toronto, held a masquerade Seder.  We all had to come dressed as our favorite Passover character.  I took a little creative license and showed up dressed head to toe in chocolate-brown, topped with a very large pyramid-shaped cardboard hat, covered with macaroons.  A word of advice for anyone thinking of trying this – don’t!  I used canned macaroons (I didn’t want to waste the homemade ones for a craft project) and they became very heavy when coated with glue.  The overpowering stench of coconut and glue, as we drove from Ottawa to Toronto, left everyone in out van feeling quite ill.

However, it didn’t cure me of my love for all things coconut, especially macaroons. Cookbook author, dessert chef and Chocolatier Alice Medrich, created these incredible macaroons in her recent book, “Chewy, Gooey, Crispy, Crunchy, Melt-in-Your-Mouth Cookies.” Leave it to Alice to come up with a genius twist on this classic cookie. Instead of using shredded or desiccated coconut, Alice suggests using coconut chips. These are wide shavings of unsweetened coconut that can be found in most health and bulk food stores these days.

Chewy, toasty and supremely yummy! The pure coconut flavour really shines through in these stunning beauties. Alice suggests shoving a large chunk of bittersweet chocolate into the centre of each cookie to take a great cookie over the top!

Egg whites, coconut chips, vanilla extract, sugar and a pinch of salt all get mixed together in a large bowl. I used vanilla extract paste so you can see the flecks of the vanilla bean seeds in my mixture. The bowl then gets set in a large pan of simmering water, to heat the mixture through and thicken the egg whites.

I used a small ice cream scoop (about 3/4 of an ounce) to form the macaroons. I stuck a piece of 70% bittersweet chocolate in the centre of each before baking. Unfortunately they oozed right out once I baked them.

I got a little smarter on the second tray and carefully inserted the chocolate into the centre of the macaroon and used wet fingertips to make sure chocolate was mostly enclosed. It wasn’t until I baked them all that I reread the recipe and discovered that Alice inserts the chocolate after baking, while macaroon is still warm!

However you insert the chocolate, these macaroons are pure coconut heaven!

Click here to print recipe for New Classic Coconut Macaroons.

Chocolate Sparkle Cookies

For our family Passover seders in Toronto, I help out by bringing desserts. Last year I made Matzoh Crunch, Salted Caramel Macarons, Chocolate Macarons as well as Coconut Macaroons. My nephew Riley will cause a revolt if I don’t show up with Matzoh Crunch, so that stays in the rotation, but I needed to come up with something new to add to the plate this year. Passover desserts are quite limiting as you can’t bake with flour during Passover. For many years, people used Matzoh Meal as a substitute for flour in their favourite desserts. The results were always leaden and heavy and stayed with you almost as long as the eight days of Passover. Coconut is a very prevalent ingredient on the Passover dessert table, usually in the form of macaroons.  But even coconut lovers have their limit.

This post is dedicated to all the coconut haters out there. I may not be a member of your tribe, but I respect your right to hate coconut. I may not understand it, but I do respect it. Coconut is one of those polarizing flavours, much like cilantro. You either love it or hate it. I happen to love it.

This is a great recipe to make for the coconut haters. This recipe was sent to me several years ago, by my sister Bonnie. I keep a very organized filing system and the recipe was exactly where I thought it should be. Trust me, that doesn’t always happen. Aside from being simple to make, they are quite beautiful to look at. They glitter like Kim Kardashian’s engagement ring and will disappear even quicker than her marriage! The texture of these cookies is a perfect combination of crunchy on the outside and chewy in the middle.

Eggs, sugar and honey are beaten very well, then melted chocolate and butter are mixed in. Ground almonds and a touch of cocoa powder are added and then the whole mixture is chilled for several hours.

Scoop cookies onto baking sheet, roll in coarse sugar and bake.

Click here to print recipe for Chocolate Sparkle Cookies.

My Passover Faux Pas (Shmura Matzoh Crunch)

Everyday at 5 pm, in the week leading up to Passover this year, the doorbell would ring. When I opened the door, there would be a flat square box of matzoh left on the front porch. By the end of the week, I had a stack of about 6 boxes. Various Jewish organizations around our city were dropping them off at our house with wishes for a happy and healthy Passover.

These were not like the ordinary boxes of matzoh I bought at the supermarket.  Regular matzoh are about 8 inches square and come 10 to a box. They are machine-made. Shmura matzoh are round in shape, about 12 inches in diameter. They are hand-made. We traditionally ate this matzoh on the first night of Passover, at the Seder.  That was about all I knew about Shmura matzoh.

As I stared at this stack of matzoh boxes, I wondered what we were going to do with all of them. After all, I still had 8 boxes of the regular stuff in the storage room. Suddenly, divine inspiration struck. I didn’t want to let this special matzoh go to waste. I was going to give it the royal treatment. First, I would coat it in a warm butter and brown sugar caramel and then I would slather it in milk chocolate and finally, top the whole thing off with toasted chopped almonds. Who wouldn’t feel special and loved with this treatment. I think there may actually be a spa treatment similar to this somewhere in the world. If not, there definitely should be!

Last year I made Marble Matzoh Crunch with Bittersweet and White Chocolate. This is my adaptation of  Montreal baker Marcy Goldman’s creation. Everyone I feed it to rolls their eyes in ecstasy. When I made it with the square matzoh, I broke it into small rectangular pieces. How beautiful it would be, I thought, to wrap up an entire 12 inch circle of this coated beauty!

I had 6 of these all wrapped and chilling in the fridge, ready to go to Toronto for our family Seders. My husband was packing up the car for our drive and he asked me where all the boxes of Shmura Matzoh were. I proudly showed him what I had created. He was horrified! Apparently my creations were sacrilegious. I managed to calm him down by telling him that several boxes survived unscathed and we could take those boxes to his sister’s house. I fed him small bites of the chocolate almond shmura matzoh crunch during out 4 hour drive and he had forgiven me by the time we arrived.

When we returned home I did some research and discovered that Shmura means “watched” in Hebrew, as in, to watch over something carefully. This matzoh is called shmura because it is made under strict rabbinical supervision, meaning that the rabbi is keeping an eye on the process, which must be completed according to a strict set of Jewish religious rules, and in 18 minutes.

thecitycook.com provided this explanation: “The Seder is the centerpiece of Passover. For some who observe and celebrate this holiday, it is particularly meaningful to replace factory-made matzoh, the unleavened bread so essential for the Seder meal, with shmura — or shmurah — matzoh. Shmura means watched from the harvest, which signifies that every step of the process of making this matzoh, from harvesting the grain to the final baking, has been supervised by a rabbi. It also means that when the bread is being made in its small batches, the flour and water are kept in separated cubicles as extra insurance that there is no premature contact between them until the last possible moment, thus preventing any leavening.”

I also discovered that a box of 3 Shmura matzoh, will set you back about $15.00 -$20.00. Shmura matzoh is expensive, because producing it is very labor intensive. Every piece is made by hand, not machine. The production of shmura matzoh is a labour of religious love. Think of it as Artisnal Matzoh.

Whether you decide to give regular or Shmura matzoh the royal treatment, you will not regret it!

To print the recipe for Shmura Matzoh Crunch, click here.

Chocolate Macarons with Chocolate Ganache Filling


Okay, now I’m really confused. In my last post I cleared up the difference between macarons and macaroons. According to my thorough research, macarons (one o) are the French almond meringue sandwich cookie and macaroons (two oo’s) are the American coconut based cookie. In my pretentious little blurb, I even went so far as to instruct you on how to pronounce macaron correctly with a French accent. Imagine my surprise when I visited the web site of Ladureé. They spell the ubiquitous little almond meringue sandwich cookie, MACAROON!!  Huh?

Now, given that it was Ladureé’s first cousin, who at the beginning of the 20th century first thought of taking two macaron shells and joining them with a delicious ganache filling, you would think that Ladureé would know the correct spelling. If anyone out there can clear up this spelling mystery for me, please do!

However you spell it or pronounce it, there is no denying that this is an incredible confection. Light and crisp on the outside and chewy and soft in the center, it is the perfect little mouthful. In my last post I tackled the more complex Italian meringue technique for making macarons, where the egg whites are beaten with a sugar syrup cooked to 230ºF -240ºF. They were delicious but I will admit that there was quite a bit of work and dirty pots and bowls involved.

I have been making a simplified version of macarons for several years now, using an old recipe from Gourmet magazine. But, now that I am more knowledgeable about macarons, I discovered that my Gourmet recipe was not quite authentic. I decided to try the French meringue technique, which is a bit more involved than my old recipe, but not as challenging as the Italian technique.

Here are the main differences between the Gourmet recipe I have been making for several years now, the  French and the Italian.

Gourmet Recipe

French Meringue Technique

Italian Meringue Technique

Ground AlmondsGrind Your OwnUses pre-groundUses pre-ground
SieveNot forced through sieveForced through sieveForced through sieve
Egg WhitesBeaten without sugarBeaten with sugarBeaten with cooked sugar syrup

Of course I had to do a side by side comparison between what I have been baking (the Gourmet recipe) and the classic french meringue technique so I prepared both. For the french technique, I used Sue’s recipe from her blog, You can do it at home.

The one on the left is the macaron made using the classical French meringue technique.  The one on the right is the Gourmet Magazine recipe. The classical one is smoother, shinier and has a more complex structure. The outside is crisp and as you bite into it, the shell shatters and gives way to a chewy interior. The Gourmet recipe is much more one-dimensional texture wise. The whole thing is chewy. I much prefer the Classical French Macaron. I urge you to give it a try. You will be thrilled with the results!

Before starting, make sure you have a scale. From all the recipes I read, it seems that you are more likely to achieve success if you weigh your ingredients rather than measure. Weighing is much more exact than measuring. That is how all professional pastry chefs bake. You will need either a stand mixer or a handheld mixer for beating the egg whites. A food processor is needed to grind the almond meal and icing sugar. A pastry bag (disposable is fine) and half-inch plain piping tip will be needed.

Finally, before you begin, if your piping skills are not top-notch, it’s a good idea to make a template so that all your macarons will be the same size. Take a sheet of parchment and trace out 1.5 inch circles (a shot glass is ideal for this), leaving about 1/2 inch space between the circles. Place the template on a baking sheet and then place a second sheet of parchment on top. That way, once you have piped your circles, you can slip out the template sheet and reuse it. It is also a good idea to double up your baking sheets to protect the bottom of the macarons from burning.

Almond meal is essentially ground blanched almonds. It is readily found at bulk food and natural food stores. It is sometimes called “Almond Flour”, although it contains no flour. The almond flour and confectioners sugar are ground for several minutes in the food processor and then pushed through a coarse sieve. This ensures that the batter will not contain any lumps.

I encountered quite a discussion about the egg whites. Most of the experts agreed that the egg whites should be aged for at least 24 hours. What this means is that you need to separate the eggs one day before you plan to make the macarons. Put the egg whites in a covered container in the fridge to age. According to Duncan, of Syrup & Tang, “Egg whites consist of proteins and quite a lot of water. The water can make the final batter unmanageably wet, either in the making or in the oven (where the macarons refuse to dry adequately). Old egg whites have lost some of their water content through evaporation so can yield a more successful batter.”  Remove the egg whites 2 hours before you plan to use them so they can come to room temperature.

The egg whites are beaten to soft peaks and then finely ground granulated sugar is slowly added to the egg whites, while still beating, until the mixture is glossy and holds stiff peaks.

Next the almond mixture is combined with the beaten egg whites. Sue of “You can do it at home” gave one of the best descriptions on how to combine the two so that the batter is not overmixed. “Put the whipped egg whites into the almond meal & icing sugar mixture. Stir vigorously for the first 10 stokes or so. Then continue to mix the mixture until fully combined. At this point, you might wonder if you have deflated your meringue. Don’t worry, we’re not after the air and texture of meringue. It’s more important that the batter is totally blend-in and combined. The batter should have the consistency of thick cake batter and have the ribbon-like consistency…or many website described it as “magma-like consistency”

To make it easy to fill the piping bag, place it in a tall glass or pitcher and turn the bag down like a cuff.  After the macarons are piped, you can top half of them with a sprinkling of cocoa nibs. These will become the tops of your sandwich cookies. The bitterness of the cocoa nibs plays off very nicely with the sweetness of the macarons.

The baking sheets are then tapped against the counter to flatten out the macarons a bit.  Then the macarons sit at room temperature for about 30 minutes before baking. You want them to be dry to the touch before baking. If batter still sticks to your finger when you touch it, let it dry a bit more. This helps to ensure the macarons bake without cracking.

When the shells are baked let them cool completely before trying to take them off the parchment paper. Turn the macarons upside down. Then spoon or pipe the filling onto half the shells and cover with remaining half to make sandwiches. A successful macaron has what they call, “feet”. This refers to that fuzzy little ring around the edge. My macarons grew feet and I was proud!

To print recipe for Chocolate Macarons with Chocolate Ganache Filling, click here.

It is best to make the fillings a day ahead of time and give them a chance to firm up overnight in the fridge. Chocolate ganache is simple to make. Heat 35% cream and butter in a pot until simmering. Add chocolate and stir until melted. Pour into a container and refrigerate until firm.

Salted Caramel Macarons


Apparently, this year in desserts, cupcakes are out and macarons are in. Macarons, not to be confused with macaroons, are the new darling of the pastry world. These are French macarons we are talking about here (one o), made with ground almonds, not American macaroons (two oo’s), and made with coconut. Essentially they are an ethereal confection consisting of 2 almond meringue cookies, sandwiched together with a filling.

The correct pronunciation, if you care about things like that, is Ma-Ka-ROHN, (the “r” is rolled)  Check out this YouTube video  (http://www.youtube.com/watch?v=TiKKh7Rf9AQ) to hear it pronounced. If you’re Canadian, well then, you’re ahead of the game as you already know how to roll your r’s .

Clearly I am ahead of the trend, as I have been making macarons for about 5 years now. However, in my mind, they were associated with Passover and not Paris. Until recently, I thought they were a Jewish creation because I only made and ate them at Passover. It was only once I visited the venerable Ladureé (London store), that I realized this was a French cookie and was blown away by the flavour variations possible. I whipped out my camera to take a picture and the saleslady started screaming at me. No photos allowed! I did manage to copy a photo from their website.

Once I visited the store and tried all the flavour variations I became slightly obsessed with them. I realized that there was a whole world of macarons beyond my Passover variation.  There are several food bloggers out there who excel at macarons and I began lurking on their sites. Sue, of “You can do it at home”, http://youcandoitathome.blogspot.com/2010/10/i-heart-macarons.html, has mastered the art and I am awed by her talent. Duncan, of “Syrup and Tang” is another master.  I also purchased 2 wonderful little books, which have step by step photos and offer some amazing flavour variations (Secrets of Macarons and Macarons).

I have discovered that there are two main methods for making macarons. The first is simpler. It involves using a French meringue, which is essentially egg whites beaten with finely ground granulated sugar. This is then folded into the ground almonds and icing sugar. The second method is a bit more complex. It involves using an Italian meringue, which is a cooked sugar syrup poured into egg whites and then beaten until stiff and glossy.Apparently the Italian method yields a shinier, smoother macaron as well as more consistent results.

Below I chronicle, by video, my first attempt at making italian Meringues, filled with Salted Caramel Buttercream. The meringue method and recipe are courtesy of Duncan at www.syrupandtang.com.

Duncan’s recipe for the macarons can be found here .

My recipe for the Salted Caramel Buttercream, to fill the macarons with, can be found here.

Admittedly, the macarons are a labour of love. I still have a long way to go to perfect the technique. Mine aren’t nearly as lovely as Duncan’s or Sue’s. Luckily, I will have lots of practice in the following week as I offered to bring dessert to the Passover seder at my sister-in-law’s (35 guests), the Passover Seder at my mom’s (41 guests) and a Passover dinner party at a friend’s house (10 guests). I expect, that by the end of the week, my macaron skills will improve greatly.

Stay tuned as more eggs are sacrificed, and my pants become tighter. In a few days I will post about the French macaron method when I prepare Chocolate Macarons with a Chocolate Ganache filling.

Marble Matzoh Crunch

This week in the Bread Baker’s Apprentice Challenge I am scheduled to bake Stollen.  However, it’s Passover this week and I’m not eating bread.  So in honour of this holiday I offer my favourite Passover treat, “Marble Matzoh Crunch.”  The original recipe comes from Montreal baker extraordinaire Marcy Goldman.  Her cookbook Better Baking.com is one of my go to standards.

For those unfamiliar with matzoh, it is a cracker-like unleavened bread made of white plain flour and water. The dough is pricked in several places and not allowed to rise before or during baking, thereby producing a hard, flat bread.  Matzoh is the substitute for bread during Passover, when bread and other leavened products are not permitted. There are two major explanations for eating matzoh. One is historic and the other is symbolic.

Historically, Passover is a commemoration of the exodus of the Jewish people from a life of slavery in Egypt. The Israelites left Egypt in such a hurry, they could not wait for their bread dough to rise. The resulting product was matzoh.  The other reason for eating matoh is symbolic.  On the one hand, matzoh symbolizes redemption and freedom, but it is also known as poor man’s bread.  So it serves as a reminder to be humble, and to not forget what life was like as slaves of the Egyptians. Also, leavening of the bread symbolizes corruption and pride as leaven “puffs up”. Eating the “bread of affliction” is both a lesson in humility and an act that enhances one’s appreciation of freedom.

All that history and symbolism for a little cracker!  There are those that compare eating matzoh to cardboard.  I wholeheartedly disagree.  I love Matzoh.  Perhaps it’s because the rest of the year, for health reasons, I spread butter and jam so thinly on my toast  I can barely taste it.  However at Passover I spread both butter and jam on with reckless abandon.  Passover is my excuse to consume butter and jam and matzoh is the perfect vehicle for allowing me to do it.

Marcy Goldman’s Matzoh Crunch is guaranteed to convert any matzoh hater into a matzoh worshipper.  You don’t even need to be Jewish to love this treat.

Ingredients:

6 slices matzoh
1 cup (2 sticks) unsalted butter or kosher for Passover margarine
1 cup firmly packed brown sugar
2 generous cups finely chopped bittersweet chocolate or semi-sweet chocolate chips (about 12 ounces)
1 1/2 cups white chocolate, finely chopped (about 8 ounces)
1 teaspoon sea salt or kosher salt

Directions:

1.  Preheat oven to 350º F.  Cover an 18 x 13 inch rimmed cookie sheet with foil and then cover the foil with a sheet of parchment paper. Do not leave this step out or you will be cursing me when it comes time to cleanup!  Cover the parchment paper evenly with the matzoh.  You will have to trim some of the matzoh with a sharp knife to make it fit into a flat even layer.  You will have some matzoh scraps left over.  Slather with butter and jam and eat.

2.  In a large heavy bottomed saucepan, add brown sugar and butter or margarine.  Cook over medium heat, stirring constantly with a wooden spoon, until the mixture comes to a boil.  This will take about 2-4 minutes.  At one point it will look like the butter is separating from the sugar and it will appear to be an oily mess.  Just keep stirring, it will come together again.  Once mixture comes to a boil, keep stirring for about another 3 minutes.   Carefully pour caramel onto matzoh.  Using a metal spatula, spread it out into an even layer.

3.  Place baking sheet into oven and bake for about 12 minutes until the caramel topping is golden brown and bubbling.

4.  While caramel is baking chop white chocolate into small pieces.  Place in glass measuring cup and microwave on medium power for 2 minutes.  When you remove chocolate from microwave, it will look like the chocolate is not finished melting.  Take a clean dry spoon and stir white chocolate.  It will continue to melt as you stir.  Pour melted white chocolate into a disposable plastic piping bag.  The easiest way to do this, if you are alone, is to place the piping bag in a large glass or pitcher and fold down the top.  Pour in white chocolate and let sit until you are ready to use it.


5.  Remove caramel covered matzoh from oven after about 12 minutes when it is golden brown and bubbly.  Place pan on a wire cooling rack on the counter.  Immediately sprinkle caramel matzoh with chopped bittersweet chocolate or chocolate chips. 


6.   Wait for a few minutes until chocolate has a chance to soften.  Then, using a metal spatula, spread chocolate into an even layer.

7.  Now comes the fun part!  Making a marble design with the white chocolate.  Twist the top of the piping bag closed and using a sharp scissors, cut a small tip off the end of the bag.  Starting in one corner of the pan, pipe white chocolate in a zig zag pattern.  Then starting in the opposite corner, pipe a zig zag pattern in the opposite direction.  Using the sharp tip of a wooden skewer, drag it through the wet white and dark chocolate making a nice design. You can either drag skewer in a circular pattern or go in straight lines.  Below is a video of me demonstrating the process:

8.  While chocolate is still wet, sprinkle with sea salt.  Chill pan for several hours until chocolate is firm.  Peel off foil and parchment paper and place marble matzoh crunch on a large cutting board. Using a very large sharp knife, cut matzoh into large squares.  For an 18 x 13 inch pan, I usually get about 18 pieces.  Store matzoh crunch in an airtight container in the fridge.  It keeps well for about 5 days. (That is as long as no one else in the house knows it’s there!)

For an equally delicious variation, instead of marbling with white chocolate,  sprinkle dark chocolate with toasted chopped unblanched almonds (about 1 1/2 cups).  Or try milk chocolate and almonds, or dark chocolate and dried cherries, or white chocolate and chopped pistachios or macadamia nuts.  The possibilities are endless.  Have fun!