Tag Archives: Salt

Perfect Chocolate Chunk Cookies 2.0

Still on the cookie train over here at saltandserenity.com. It’s pretty much all I bake in December. I adore cookies and so I give myself permission to bake, blog and talk about cookies all month. I’ll be back with some vegetables in January, I promise.

I decided it was time to update my post on these cookies. I first blogged about them back in 2011.  And then again in 2015. They are my most requested cookie. Actually, it’s not even my recipe. The original recipe comes from Ashley of the wonderful blog “Not Without Salt.”

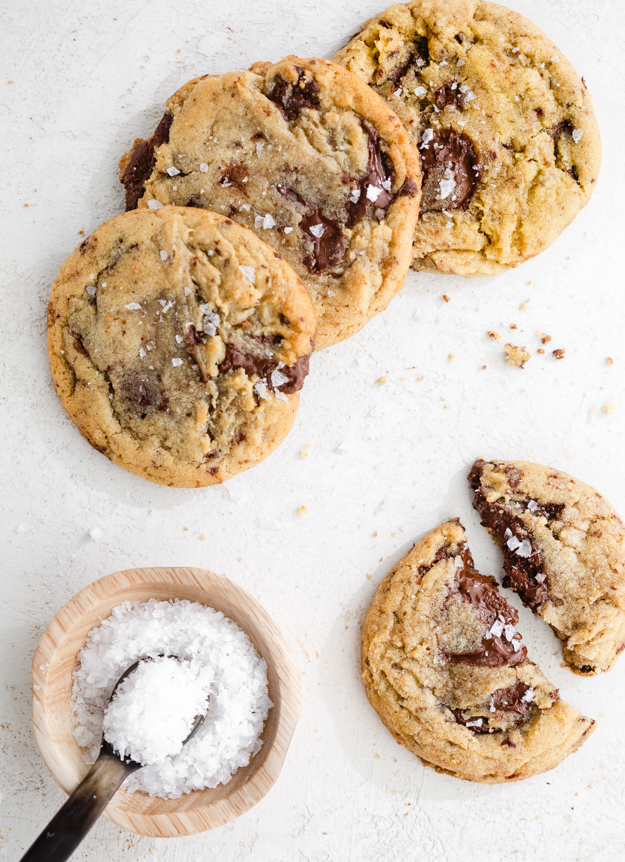
I have given the recipe to lots of friends and family members. Often they will tell me that they just don’t taste the same as the ones I bake. I have been tweaking Ashley’s recipe and technique over the past few years, so I figured it was time to share exactly what I do to make mine so yummy. Plus, it was time to update the pictures. Along with my baking skills, my photography skills have also improved over the years and these fabulous cookies needed a new headshot!

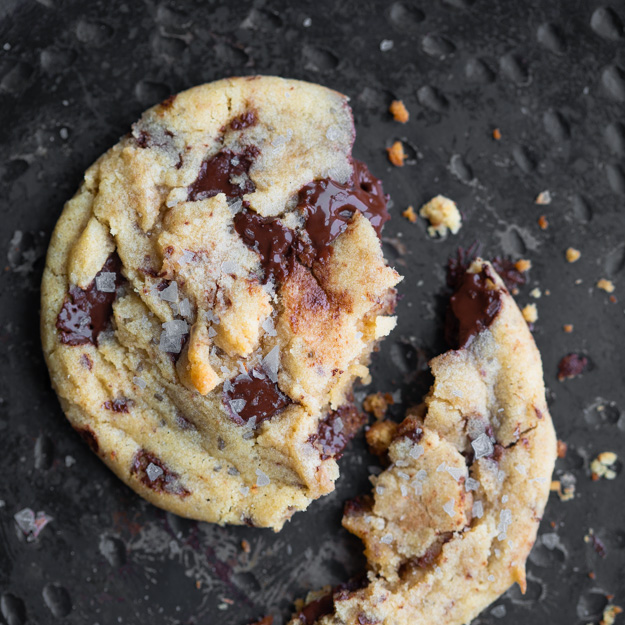
First, let’s talk butter. (because talking about butter brings me great joy!) Room temperature butter means butter that has been sitting on the counter for 30-45 minutes. You will know your butter is at the perfect temperature when you press your finger into it and make a slight indent.  It should still feel firm, but not cold and it should not feel greasy. If it’s too soft, the butter won’t aerate properly when beaten with sugar, leading to flat cookies.

Eggs should also be at room temperature. Just remove them from the fridge when you remove your butter. Cold eggs can curdle the butter and they just won’t mix properly into the ingredients, leaving you with a poorly mixed dough, which results in inconsistent cookies.

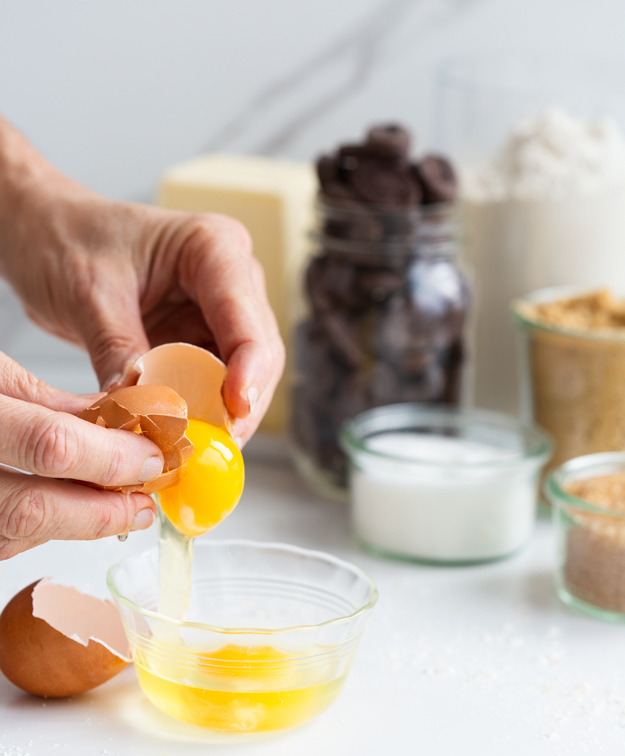
Let’s chat chocolate. If you make these cookies with regular chocolate chips that you find in the baking aisle, they will be good cookies, but they won’t be outstanding. I use Valrhona Guanaja Feves. The lovely Michelle at The Vanilla Food Company in Toronto will ship them to you. This is not a sponsored post, I just really love this chocolate.

Ok, we’ve sorted out butter, eggs and chocolate. What about sugar? Ashley came up with the brilliant idea of using 3 kinds of sugar, light brown sugar for chewiness, white sugar for crispiness and turbinado sugar (also called sugar in the raw), for a bit of crunch.

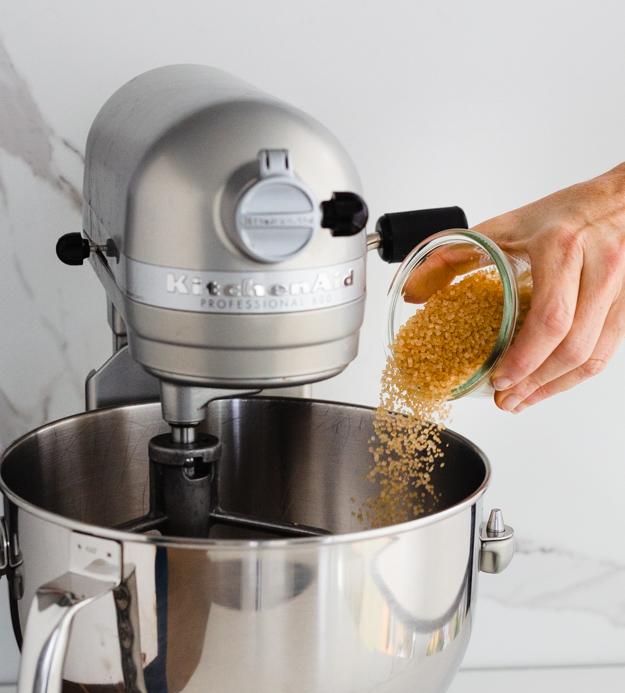
The last ingeredient we need to talk about is flour. I have recently tried making these cookies with a mix of bread flour and all-purpose flour. Alton Brown and Jacques Torres (Mr. Chocolate) swear by using some bread flour in your chocolate chip cookies. Bread flour has a higher gluten (protein) content which gives the cookies a chewier texture. I made a batch with all bread flour but found them to be too dense. I settled on a ratio of about 1.3 bread flour : 1 all purpose flour.

I like to chill the dough for before baking. Chilling the dough firms up the butter, so that the cookies spread less, making a chewier thicker cookie. That hour in the fridge also dries out the dough slightly, which concentrates the flavour. If this kind of baking science is your jam, check out this awesome article on the King Arthue website.

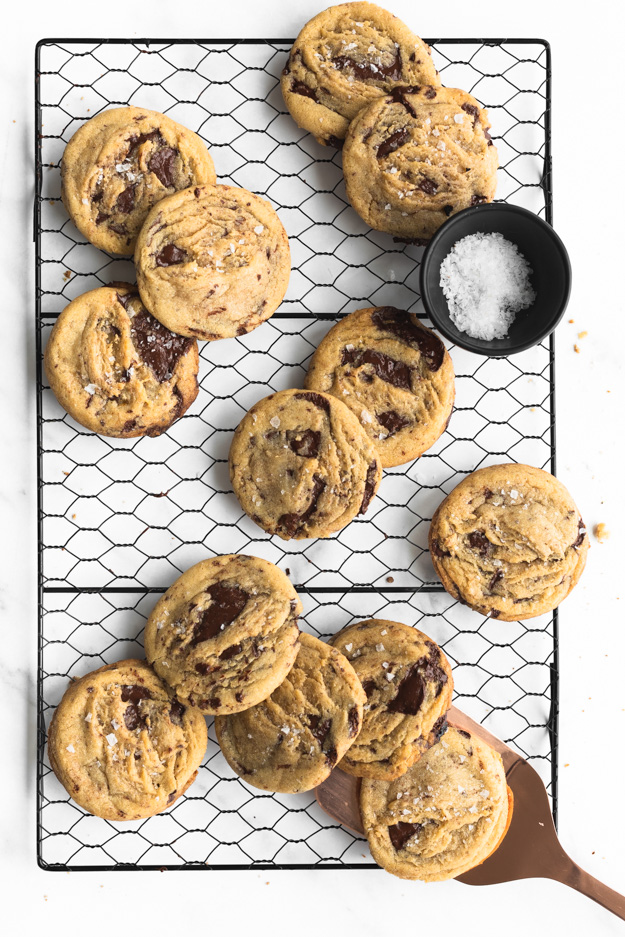
I scoop my cookies with an ice cream scoop so that they are all exactly the same size.
Finally, don’t forget to sprinkle with a tiny bit of coarse salt. That salty-sweet balance is really important. Kind of like a metaphor for life. Without the salty tears, the sweet moments are not as meaningful.
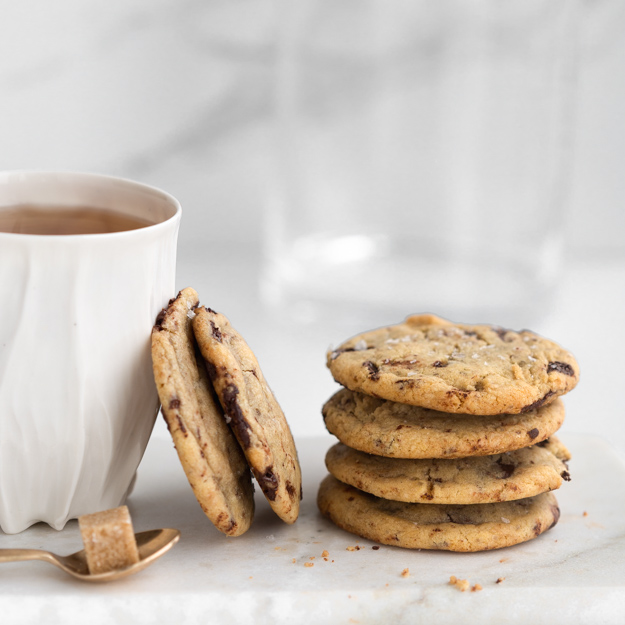
Chicken and Artichoke Pot Pie

I could wax poetic here and spin a lyrical little tale about how the nip in the air and the gorgeous scarlet and golden maple leaves have inspired me to make some homey dish that smacks of nostalgia. But, if I’m to be completely honest, the reason I baked these chicken artichoke pot pies was because I was cleaning up the basement storage room and I found this box of freaking adorable barnyard cooky cutters. (Why did they misspell cookie?).

I seem to recall buying them when the kids were little and had grandiose plans for baking sugar cookies with them and letting them decorate them with coloured royal icing suck icing from the piping bags, but sadly we never did it. It is possible they were used with play-doh at some point!

That little metal chicken was calling out to me and I instantly knew that I wanted to make chicken pot pies. As a child of the 70’s I was practically weaned on Swanson Chicken Pot Pies and TV Dinners. Carol Brady  was my second mother and I so badly wished that Alice was our housekeeper. Not that my mom was a bad cook, but she had 6 kids and was very busy cleaning all the time, so frozen meals were a big part of my childhood. Our favourite dessert was Sara Lee Banana Cake. One of my sisters always snuck into the freezer and picked the icing off the top of the cake. We never did discover who it was.

This chicken pot pie is inspired by a Chicken and Artichoke Casserole that I used to make all the time at one of my very first full-time kitchen jobs. I was working at Dinah’s Cupboard. It was run by a woman named Dinah Koo. The little shop, in the Yorkville neighbourhood was Toronto’s first Gourmet take-out food shop. Dinah was an amazing woman to work for. She demanded perfection and precision in everything we made. She taught me a great deal about discipline in the kitchen. Food quality always came first but following close on its heels was presentation. She knew how to make food look beautiful. It was also at Dinah’s Kitchen that I learned to love salt. Before any of the dishes left our kitchen to be sold in the food shop, Dinah or her brother Barry would taste them. Without fail, almost every time I got the response “more salt”!

I cringe when I hear people boast “Oh, I don’t use any salt when cooking.”, as if that’s a good thing. And then I hope I never get invited to eat at their house! Salt is an integral ingredient in cooking as well as baking. It fills out the flavour of foods. If it is absent, food just tastes flat. British restaurant critic Jay Raynor said it best, “Salt is the difference between eating in Technicolor and eating in black and white.” If loving salt is wrong, then I don’t want to be right. Sorry, I’ll get off my salt soap box now and stop lecturing you on the evils of cooking without salt.

I decided to make mini pot pies, because they are so adorable and because I knew we would have leftovers and I could stash them in the freezer and bake them another day.

I started with poaching chicken breasts. Buy chicken breasts on the bone and then cut the meat off the bone before you add them to the pot. That way, you can remove the breast meat after 20 minutes, when it is perfectly cooked and continue cooking the vegetables and bones to extract the maximum amount of flavour, so that you will have a really great stock.

Once the chicken is poached and you have your stock, make the pastry. I decided to add some poppy seeds to the dough, for a bit of crunch. This recipe for the dough comes from chatelaine.com. It is a bit unusual in that instead of cutting the cold butter or shortening into the flour and then adding liquid, they melt the butter with the water and then mix it into the dry ingredients. You can make the dough with all butter, half butter and half shortening or all shortening, the choice is yours. Just don’t forget to add the salt.

While the dough is chilling, prepare the chicken and artichoke filling. I like the addition of leeks, rather than onions as a flavour base. Leeks need to be cleaned very well in cold water. Slice lengthwise and then into 1/2 inch pieces. Place in a bowl of cold water and use your hands to swish the leeks around. Scoop out leeks that have floated to the top of the bowl.

Flour is added to the sautéed vegetables and then chicken stock and white wine are added.

Once the mixture simmers for a few minutes, I added the artichokes, diced chicken meat, frozen peas and some parsley. I also added the zest of one lemon and a few teaspoons of Siracha sauce for some zip.

The filling gets spooned into little casserole dishes.

Top with dough and bake.

Click here to print recipe for Chicken and Artichoke Pot Pie.

Avocado Toasts

I’m about to confess something that may get me drummed out of the tribe. I’m sick of eating humus! Truthfully, I have only myself to blame for this unfortunate state of events. I have been eating humus with carrot and celery sticks  for lunch everyday for the past year. Seriously, everyday! I know, you must be wondering, how is that possible? She’s a food blogger, she must create all kinds of wonderful lunches, each day more imaginative and fantastic than the last. But the sad truth is that I get into a rut, it’s just easy, plus it’s healthy and fairly low cal and so then I feel justified later in the day to indulge in my daily aperitivo!

I confess my boring lunch habit not so you will feel sorry for me, but as a way of sharing with you the discovery of a fantastic and simple appetizer to serve with drinks when company comes to visit.

Every summer for the past 26 years we have been gathering at our cottage with my husband’s University housemates and their spouses. Over the years our numbers have swelled as everyone started having kids. We had our annual get together this past weekend. It was just a small group of 15 this year as several members had other commitments. Each family is responsible for one meal over the weekend. It’s fantastic because it means that I am not in the kitchen the entire weekend cooking for everyone and I can enjoy my company instead of resent them!

As I began to plan what to serve my guests with drinks before dinner, I ruled out the usual suspects: humus and pita (sick of humus, see above!), tortilla chips and salsa (too predictable), a big bowl of pistachios or peanuts (nut allergies). As I was reading my July issue of Bon Appetit magazine, the photo on the editor’s letter page stopped me cold. It was just simply grilled bread topped with ripe avocado, sea salt, olive oil and red pepper flakes. I have to say that since Editor-in-Chief  Adam Rapoport took over at the helm of Bon Appetit, I have really started to enjoy reading this magazine once again. He has injected it with a fresh modern vibe and it just inspires me to cook everything on the pages. I still miss Gourmet (a moment of silence please!), but Bon Appetit is really doing a great job to partially fill the void.

The beauty of these avocado toasts is in their simplicity. The key is to gather together the very best ingredients for this dish. There is no real cooking or recipe involved here. Think of yourself as an orchestra leader, bringing together some gifted musicians. Each on their own, sounds quite nice. Together, they create a beautiful harmony. Look for good Artisan bread that has an “open crumb structure” (that’s baker speak for bread with lots of holes – more holes means more crusty spots to give added crunch and crevices for the olive oil to drip into).

A big fat clove of fresh garlic gets rubbed onto just grilled bread.

The avocados should be perfectly ripe, so buy them a few days ahead so they have time to ripen to perfection.

Table salt need not apply for the job of topping these crostini. Pull out the Maldon Sea Salt or some Fleur de Sel. The large crystals of salt will give added crunch and provide a perfect counterpoint to the bland creamy avocado. Pull out that expensive bottle of fruity, slightly bitter olive oil that you have been saving for a special occasion. The nooks and crannies of the grilled Artisan bread will soak it up. Finally, a very light sprinkling of red pepper flakes to wake up the taste buds.

These Avocado Toasts will have your friends and family toasting you!!

Day One: Almond-Pecan Caramel Corn


Last Monday I finally treated myself to a cortisone shot in my elbow.  You may be thinking, “What kind of treat is that?”  Well here is the sad story of my baking injuries. Last December I piped over 160 gingerbread snowflake cookies and gave myself an awful case of carpal tunnel syndrome.  Just a simple matter of overuse of some very small, not often used muscles.  It finally healed by late February but then this summer, after finishing the Bread Baker’s Apprentice Challenge, I noticed pain in my elbow.  Of course I ignored it and by September it was so bad I could not lift a coffee mug or squeeze toothpaste without terrible pain.  I went for to the Baking Sports Medicine Clinic and began physiotherapy for tendonitis (also known as tennis elbow, or in my case, bakers elbow).

It was getting a little bit better but not much.  After 10 weeks I asked my therapist what else I could try as I was starting to get desperate.  I had over 40 gift baskets to bake for the holidays.  I blogged about this briefly last year.  Rather than shop for gifts for all the people in my life for whom I am grateful, I decided many years ago to bake.  And I had to get going.  Thus the cortisone shot.  I have heard from many people that a cortisone shot does not hurt.  They are liars!  My arm felt like it was going to fall off for the first 2 days but then magically,  by the 4th day, the pain was gone.  It is my own personal holiday miracle.

So here, for the next 7 days you can follow along with me on my baking frenzy.

On day one I tackle Almond Pecan Caramel Corn.  I found the recipe for this addictive treat many years ago, in a sweet little book called, “Gifts of Food” by Susan Costner.  I only make this recipe when I have somewhere to take it as I have absolutely no willpower at all when it comes to this popcorn.  Each recipe uses a pound of butter.  Do not tell people this when you give it to them as they will hate you for life.  I have altered the recipe slightly and add about 2 teaspoons of kosher salt to each batch when I am making the caramel.  A tall heavy non-stick soup pot is ideal for making this.  A candy thermometer is helpful as well.  I like this one as it has a ledge at the bottom so the bulb can not touch the bottom of the pot and give you a false reading.

I popped some microwave popcorn.  I toasted the almonds and pecans and mixed everything together in a big bowl.  If your counter is not heatproof, place the bowl on a cooling rack.

The caramel contains sugar, corn syrup, water, salt and butter.

When the caramel reaches 280 – 300º F, it’s  time to pour it onto the popcorn and mix well.  Then it gets spread out on a parchment lined cookie sheet and you wait (or not) for it to cool.  If you are impatient and try to eat it before it cools and totally hardens, it is still quite sticky and can pull out a filling!  Don’t say I didn’t warn you.

Click here to print recipe for Almond Pecan Corn.

Sweet and salty and crunchy and habit forming!


#38. Tuscan Bread (Salt and Serenity bakes without salt!)


This week’s bread in the Bread Baker’s Apprentice Challenge presented me with a real dilemma.  You see, Tuscan bread is unique in that it is one of the only breads, the world over, that is made without salt.  If you are a regular reader of my blog you will know that those words, “without salt” chill me to my very core.  Salt is the essence of flavour. It provides a depth and complexity to whatever you are preparing.  It helps to enhance all the other ingredients and provides balance to any dish.  My greatest fear is that my doctor will tell me I have high blood pressure and then recommend a sodium reduced diet.  I am so worried about this that I actually bought a home blood pressure monitor and I religiously check my blood pressure every month.  It’s been averaging about 114 over 70, so for now I’m safe.

The response from my fellow BBA Challengers was less than stellar.  Phyl, of Cabbages and Kings said, “But, the big question was, how would it taste? Could a salt-free bread really stand up to the other amazing breads that have come out of the BBA Challenge? Would the flour paste make such a huge flavor difference that, as PR suggests, I might decide to incorporate it into other bread recipes?  In a word — meh.”

Sally of Bewitching Kitchen said,“… the lesson I took from this recipe wasthe fact that you can make a bread without salt, doesn’t mean you should”

Ok then, maybe I should just add salt to this bread.  But I think that would be cheating.  I decided to do a little research to see why the Tuscans, who make such fabulous food otherwise, would leave out the salt.  Most queries came up with the response that once upon a time, there was a prohibitive tax on salt in Tuscany and so people could not afford to use it.  Okay, I understand that was the case many years ago, but why would sane Tuscan people with fully functioning taste buds still put up with that?  There had to be another reason.

Renowned cooking  teacher and Florentine expert Giuliano Bugialli explains,  “The fact is that Tuscan food is highly seasoned and has always been so and the bread, which is eaten with the main course and is an essential part of the meal, provided a better balance without salt.”   From a culinary standpoint that made sense to me.   Alright then,  game on!  This was going to   be a double challenge for me:

1. Resist temptation to add salt and make the bread as intended.  This proved difficult as my ever-present beautiful coconut husk salt-cellar sits out on the counter in plain sight.

2.  Find some amazingly flavourful foods to go with this bread.

This bread is fairly simple to make but does require two days.  On day one you add boiling water to some bread flour, stir it up and let it sit out overnight on the counter.  Peter Reinhart explains that, “…the gelatinized starches release flavors that give this bread a distinct quality, quite unlike any other bread.”  Well good, I thought, this saltless bread is going to need all the help it can get.  As I mixed up this concoction I had a vague memory of smelling this particular aroma before but could not quite place it.


The next day the paste is mixed with yeast, olive oil, water and more bread flour.  Again I had a nagging sense that I had smelled this aroma before, but where?  I just could not place it.

The dough was covered and set aside to rise until doubled.   Then I formed it into two loaves.  I chose the boule shape and decided to let it have it’s second rise in a banneton (a special wicker bread basket used for proofing dough).  The banneton would give the bread a beautiful appearance even if the taste was disappointing. As I only have one banneton, the other boule was left to rise freeform.  Within an hour the dough had doubled so it was time to bake it.

I slid my freeform loaf onto the baking stone in the oven.  Then I gently tipped the bread out of the banneton and onto my bread peel.  I gave it a quick slash with my sharp knife and slid it onto the baking stone .  So far, so good.  I placed a pan of hot water beneath the baking stone to provide extra moisture to the oven.  This should ensure a better shine on the crust.  25 minutes later the breads were done.  They looked just gorgeous.

I let them cool for about an hour and sliced into them.  I handed a slice to my friend and as she held it to her mouth she took a sniff and said, “This bread smells like play-doh.”  AHA!!   That’s what the smell I could not place was.  Then I took a bite.  The play-doh aroma perfectly matched the play-doh taste.  You may be wondering how I know what play-doh tastes like. As a child I  sometimes tasted the food creations my sisters and I crafted from play-doh.  (Okay, maybe that should be placed in the “too much information” file).  To be fair, I think I may have underbaked this bread a bit as the center, even after cooking was quite doughy.

If anyone ever asks you to explain to them why most baking recipes contain a bit of salt all you have to do is hand them a slice of this bread.  No verbal explananation will be necessary.  This bread tasted flat, dull and lifeless.  But, I was not to be deterred.  I had a challenge of making this bread taste good.  Going through the list of possibilities of salty foods to pair this one with I immediately thought of my friend Sandy’s olive tapenade.  I whipped up a batch and toasted some of this bread and slathered it with the tapenade.  It did a wonderful job of masking the play-doh taste.

#33. Poilâne-Style Miche

This week in the Bread Baker’s Apprentice Challenge we tackle Poilâine-Style Miche.  When it comes to artisan bread, the name Poilâine is synonomous with excellence.  Bread freaks from all over the world travel to Paris to purchase bread from the Poilâne family.  Pierre Poilâne started a baking business in 1932 in Paris, creating bread using stone-ground flour, natural fermentation and a wood-fired oven. His son, Lionel took over the bakery in 1970, continuing the traditional methods.  Sadly, Lionel died in a plane crash in 2001.  His daughter, Apollonia now runs the business.  Lionel’s brother, Max, branched out on his own and opened his own bakery.  As in all families, there are squabbles about whose bread reigns supreme. 

Poilâine’s most famous bread is a 2 kilogram (about 4.4 pounds) round country sourdough loaf, called Pain Poilâine.  Lionel simply called it a miche.  The bread is made from a sourdough starter, grey stone-ground flour (whole wheat flour with about 10-20% of the bran removed) , water and sea salt from Guérande.  There are about 20 trained bread artisans baking at the family factory in Bievres, outside of Paris.  Although the dough is now machine kneaded, all other aspects of creating the bread are done by hand in the time honored method established by Pierre Poilâne. 

Peter Reinhart gives a wonderful detailed description, in his book, on how the bread is created.  It is indeed a labour of love.  The amazing thing about this bread is that is keeps for about a week, at room temperature.  It is a dense and chewy bread and as Peter Reinhart says, “the flavours change in the mouth with each chew.”  The Poilâne family says that the flavour peaks on day 3. 

If you can’t get to Paris, they will ship you a loaf.  I went to their web site , created an account for myself and put 1 loaf into my shopping basket.  For 37.10 Euros ($52.30 Canadian Dollars) they will send me my very own loaf!  I have not yet clicked on confirm order but I am thinking about it.    If I do go through with it then I really will classify for “Bread Freak ” status.  I’ll keep you posted.

So, onto my attempt at creating this magical miche.  Day 1 we make the firm starter, mixing up some whole wheat flour, some of our sourdough starter and water.  This gets refrigerated overnight.

On Day 2, the final dough is made.  In order to replicate the “grey flour” used at Poilane, Peter Reinhart suggests we put our whole wheat flour through a sieve to extract some of the bran. 
 

I was very excited to finally open up the jar of Grey Sea salt that has been sitting in my cupboard for over a year now.  I’m not quite sure why I hadn’t used it yet, but here was the perfect opportunity.

 The starter is mixed up with the sifted whole wheat flour, grey sea salt and more water.  This is a big mass of dough, way too big for the Kitchenaid, so hand kneading was necessary.  Here is the dough just after I began mixing.

After about 15 minutes of hand kneading, I had a beautiful supple silky dough.

Once the dough is kneaded, it gets placed in an oiled bowl, covered with plastic wrap and ferments at room temperature until it doubles in volume, about 4 hours.  At this point it is formed into a boule and placed into a linen towel lined bowl.  So that the dough will not stick, the towel is sprayed with a bit of oil and then dusted with flour.  The boule should be placed seam side up, then covered with the towel and refrigerated overnight. 

As you can see from the photo below, I screwed up and placed the dough into the bowl, seam side down, so that the smooth side was on top.  You might say, big deal, so what?  The big deal is that the bottom of the dough (where the seam is) becomes the top of the loaf and then your seam turns into some unsightly cracks.


The next morning the dough is removed from the fridge and allowed to sit at room temperature for about 4 hours.  Then the dough is gently turned out onto a baking peel, lined with cornmeal and is scored.  At the Poilaine bakery they score it with the letter P in a gorgeous font.  I wanted to score mine with S&S (for Salt and Serenity) but my fine motor skills are sorely lacking for artistry of that caliber!  I decided to go with a square design with an X in the center.  Unfortunately, I also had the cracks from the seam of the boule to contend with so it looks a bit strange artistic.  But that’s the wonderful thing about Artisan bread – each loaf is hand made and no two are identical. 

The bread goes onto a baking stone in a hot oven and is baked for about 45 minutes.  Here is is my loaf on and below it the Poilâne loaf.  I can’t tell the difference, can you? (Can you say denial?)

I sliced into the bread after about 2 hours.  I thought the taste was good but a little “whole wheaty”.  I closed my eyes to see if the taste changed with every chew, as Peter Reinhart promised, but I don’t think my palate is that highly developed.   I did notice that I liked the bread a little better on day 2.  It seemed a bit more mellow, and not as earthy.  It lasted very well in a paper bag for almost 5 days and then we sliced what was left and froze it for toast.

I will try this one again, next time using a recipe for Whole Grain Sourdough  passed on to me by Sally of Bewitching Kitchen.  It uses whole wheat flour only in the starter and a mixture of white bread flour, rye flour and spelt in the remainder of the dough.  Sally promises that it is more like the real Poilâne.