Tag Archives: White Chocolate

Black & White Chocolate Marble Pound Cake

I have amassed quite a collection of Bundt pans. My cake decorating skills are rudimentary at best, but with a Bundt pan, the pretty work is all done for you. Just finish with a dusting of icing sugar or drizzle of glaze and you have a gorgeous cake.

This recipe is from The Bundt Collection by Brian Hart Hoffman, creator of The Bake From Scratch Empire. Black cocoa gives this cake a dark richness while white chocolate in the vanilla batter offsets the bitter cocoa with sweetness. Black cocoa powder is becoming more readily available. I bought mine at Bulk Barn. You could use substitute regular cocoa powder, but the colour contrast won’t be quite as dramatic.

This cake employs the cold-oven method. Placing the cake into a cold oven gives the batter extra time to rise, producing an extra smooth tender crumb. The texture off this cake is plush! It’s a great technique for cakes like this that do not contain any baking soda or powder.

This cake gets treated with a double glaze. Start with the black cocoa glaze, give it about 15 minutes to set and then channel your inner Jason Pollock and follow up with the vanilla bean glaze. You could skip the glaze and just dust this cake with some powdered sugar, but why would you?

This cake is special enough to stand in for a birthday celebration. I found these elegant candles on Etsy. They really elevate the occasion.

Click here to print recipe for Black & White Chocolate Marble Pound Cake.

Dried Cherry, Coconut White Chocolate Biscotti

These biscotti are adapted from a very old recipe, in the now defunct Gourmet Magazine (a moment of silence please!!). The original recipe used dried cranberries and was dipped in white chocolate. I decided to switch it up with dried cherries, used chopped white chocolate in the dough, instead of dipping them and added shredded coconut because everything tastes better with coconut!

I first posted a version of these biscotti almost 10 years ago, in 2010. While the recipe has stood the test of time, my image from 10 years ago (see below), has not! I find it rewarding to look back and see my progress over the years.

Traditional biscotti is made with eggs and no additional fat. This recipe adds butter which keeps them a bit soft and chewy in the centre. If you like a crunchier biscotti, just bake them for longer. These are perfect cookies for mailing as they stay crunchy for a long time. They are also perfect for freezing and pulling out when you need a quick sugar fix.

The dough is formed into a loaf and baked until it just begins to set. Then it is cooled and sliced and baked a second time, until crunchy.


Double Chocolate Almond Butter Bark

Today, an old favourite gets a makeover. I have been making this treat for many years to give away as part of a holiday cookie box. It is always met with awe at how pretty it is and, more importantly, how addictively delicious it is. The original was made with peanut butter but this year, I went rogue and used almond butter.

There is no baking involved and that gorgeous marbling effect on top takes about 40 seconds to create. No skill involved. It’s the perfect last minute holiday present or hostess gift. Everyone loves it and people will be impressed by your mad pastry chef skills.


A few tips to make sure yours comes out perfectly.

  • Line the baking pan with foil and then lay a piece of parchment paper on top of that.
  • Use real white chocolate, not white compound coating chocolate. Real white chocolate is ivory coloured. Compound coating chocolate is white and tasted like wax.
  • Melt the white chocolate in a bowl over gently simmering water, or on very low power in the microwave. White chocolate does not like high heat. You will scorch it.
  • I suggest adding chopped almonds to the mixture for extra crunch. Please use toasted almonds. Untoasted almonds take like sawdust when you chew them. Salted roasted almonds are an excellent choice.
  • Use good quality bittersweet chocolate for drizzling.
  • Don’t forget to finish it with flaky sea salt while the chocolate is still wet.
  • Give the bark at least 2 hours to chill before cutting it.
  • A large sharp chef’s knife or serrated knife is easiest for cutting into nice squares, although no one will complain if they get irregular shards.

Go forth and create. This confection is one of my favourites to make. I feel so artistic when I swirl the wet chocolate and create beauty.

Click here to print recipe for Double Chocolate Almond Butter Bark.


Blondies

lined-up-in-trayAs the aroma of butter and sugar filled the kitchen, my husband magically appeared to find out what was going on. When I revealed that I was baking blondies he looked puzzled. He had no idea what a blondie was. I explained that a blondie is essentially a brownie without the chocolate. His response was “what’s the point of that?”

His response was understandable. There are times when only a deep dark fudgy brownie will satisfy you. But have you considered the fact that without the distraction of chocolate, butter and brown sugar get to be the star? Once the blondies hit the oven, the brown sugar takes on an undertone of butterscotch, with rich caramel notes. The flavours of a blondie are subtle and complex.cut-up-blondiesThe golden top, slightly crispy, gives way to a chewy interior. Studded with white chocolate, macadamia nuts, toffee bits and coconut, these blondies are chock-full of goodness.what-youll-needThese blondies are adapted from Daphna Rabinovitch’s blondie recipe in her comprehensive new cookbook, “The Baker in Me.” It is from Daphna that I first learned about the freakishly delicious combination of white chocolate and macadamia nuts. She was the pastry chef at the take-out food shop I worked in many years ago. I would have happily accepted her white chocolate macadamia nut cookies or skor bar cookies in lieu of a paycheque.spreading-out-batter-in-pancutting-blondies

Click here to print recipe for Blondies.

piled-up-in-glass-stand

The Truth About Chanukah and Pomegranate Sugar-Dusted White Chocolate Doughnuts.

ready to eat 3 625 sqI recently discovered that the “Miracle of Chanukah” story, is just a legend. You know the one I’m taking about, where Judah and his merry band of Maccabees go into the destroyed temple and  discover just enough oil to keep the menorah’s candles burning for a single day. But somehow, miracle of miracles, the oil lasted for eight days and the flames of the menorah burned for eight nights. When I discovered that the long lasting oil is not really at the root of the Chanukah commemoration, I felt gutted. Kind of reminiscent of coming home for winter break in first year university to discover that I was the last one in the family to find out that our dog, Heidi, had died!

“Truth” is a word to be avoided when discussing history and religion. Since the victors of a battle often write the history, the facts of what happened in the past depend very much on whom you ask and when it comes to religion, everyone has a different truth.

Chanukah is the only major Jewish holiday not explicitly mentioned in the Torah (Judaism’s written law), since the events that inspired the holiday occurred after it was written. The Rabbis wrote about Chanukah in the Talmud (Jewish oral law and tradition), but that was written over 600 years after the Maccabees revolt. Their version of Chanukah differs markedly from The Books of Maccabees written in the 2nd century B.C.E.

So we have here two versions of the Chanukah story: one from the Book of Maccabees and the other from the Talmud. Both versions agree on the first part of the story. Around 200 B.C.E., Judea (Israel) came under control of the Syrian King, Antiochus III. He was a benevolent fellow and allowed the Jews to continue practicing their religion. Things changed drastically when his son, Antiochus IV, took over.

This evil king outlawed the Jewish religion and ordered the Jews to worship Greek gods. In 168 B.C.E., his soldiers marched into Jerusalem, exterminated thousands of people and desecrated the holy Second Temple by constructing an altar to Zeus and commanded the Jews to sacrifice a pig upon this alter.

The Jewish priest Mattathias and his five sons led a large-scale rebellion against Antiochus and his army. When Mattathias died in 166 B.C.E., his son Judah Maccabee took over. Within two years, the Jews, relying on Guerrilla warfare tactics, defeated the Syrian Greek army and drove them out of Jerusalem.

The Maccabees cleansed the Second Temple, rebuilt the altar, lit its menorah and celebrated the rededication (the word Chanukah means dedication). And thus the eight-day festival of Chanukah was born.  Why eight days? Well, here’s where the story begins to diverge. According to The Book of Maccabee II, while the Maccabees were fighting, they had missed the eight-day holiday of Sukkot, (celebrated in early fall) and so to celebrate the Second Temple rededication, they declared a “better-late-than-never” celebration of Sukkot.

Version 2, as written in the Talmud gives us this spin on the eight-day festival.  Judah Maccabee and his team, who took part in the rededication of the Second Temple, witnessed what they believed to be a miracle. Even though there was only enough oil to keep the menorah’s candles burning for a single day, the flames burned for eight nights. This wondrous event inspired the Rabbis to proclaim a yearly eight-day festival.

The Rabbis barely mentioned the battle between the Maccabees and the Greeks in the Talmud. The reason for this is unclear. Perhaps they did not want to encourage the celebration of a military battle, or perhaps, as pacifists, they did not want to encourage the Jewish people, who at that time, were living under Roman rule, to be inspired by revolt.

Rabbi Andrew Jacobs, on “Blog Shalom” explains the miracle of Chanukah this way,

“…even without the oil, .Chanukah is still a miraculous story. The Maccabees were a tiny group of Jews who should not have been able to defeat the powerful Greeks.  But they did!  And because of this miracle, Judaism survived and did not become consumed by Greek culture.   This story of miraculous survival repeats itself many times throughout Jewish history.  Despite tremendous powers that have raged against us, nothing has stopped the Jewish people.  This is a miracle.”

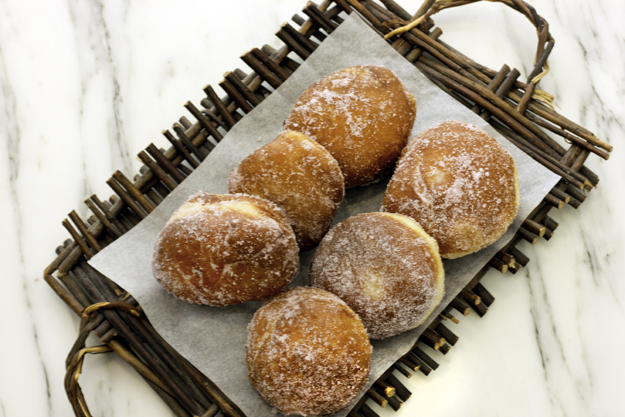
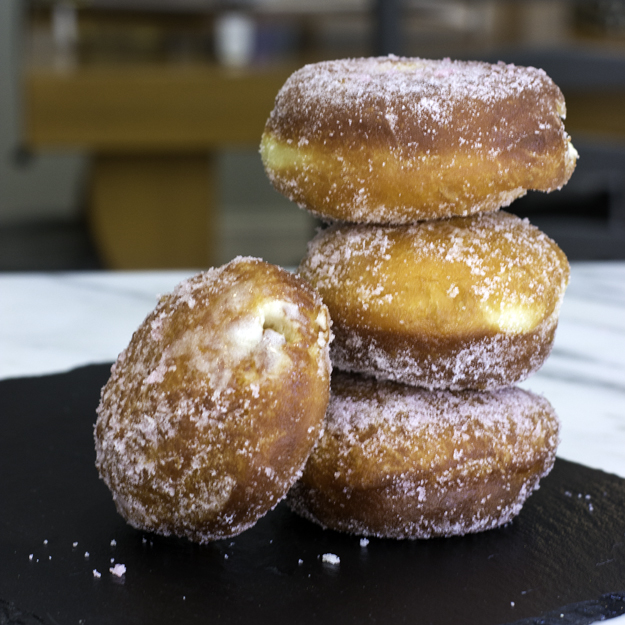
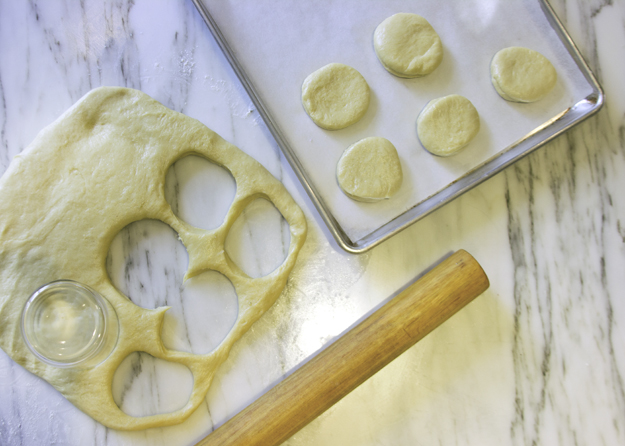
Although the miraculous oil story may be just a legend, I refuse to give up food fried in oil on Chanukah! To celebrate my newfound knowledge, I am going to go all out this year and celebrate Chanukah with these decadent Pomegranate Sugar-Dusted White Chocolate Doughnuts.ready to eat 2 625 sq
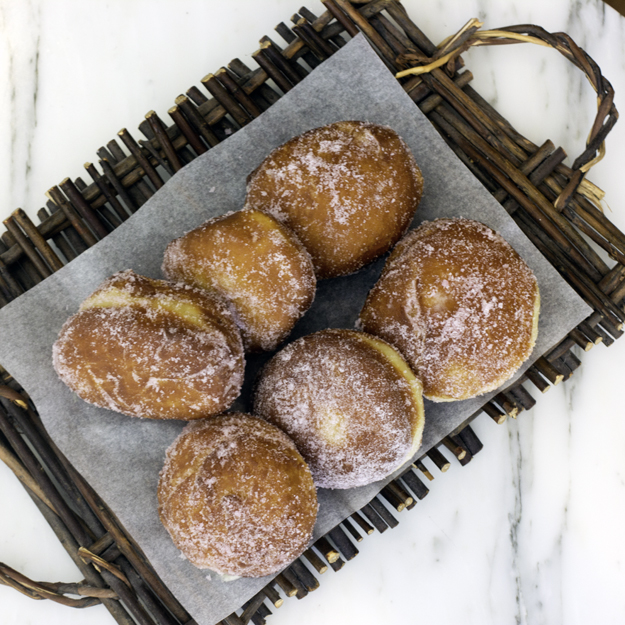
The idea behind these doughnuts comes from the genius mind of Chef Lynn Crawford. However, after discovering that her recipe called for a pound of butter in the doughnut dough, I decided to use her white chocolate filling and pomegranate sugar coating, but looked elsewhere for the actual doughnuts. Anna Olsen‘s recipe used only  a 1/4 pound of butter. So while these doughnuts are not exactly light fare, they are lighter than originally intended by Chef Lynn!

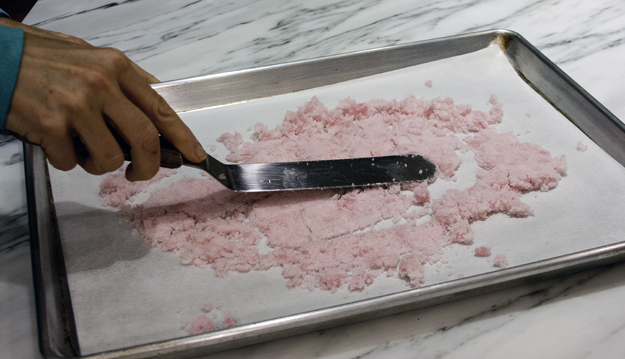
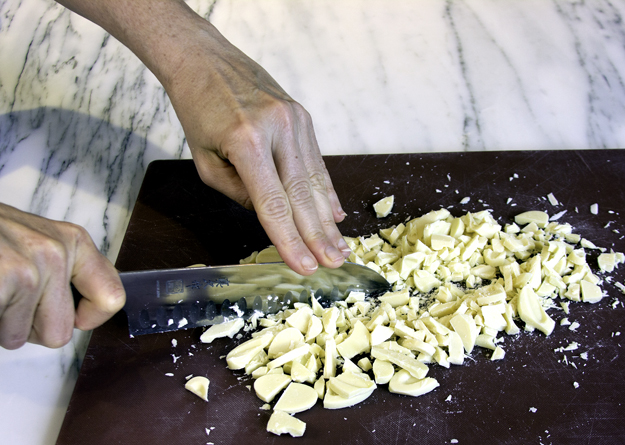
The pomegranate sugar and white chocolate ganache filling can be prepared a day ahead.making pom sugar 1making pom sugar 2

chopping white chocolateganache mixed with whipped cream
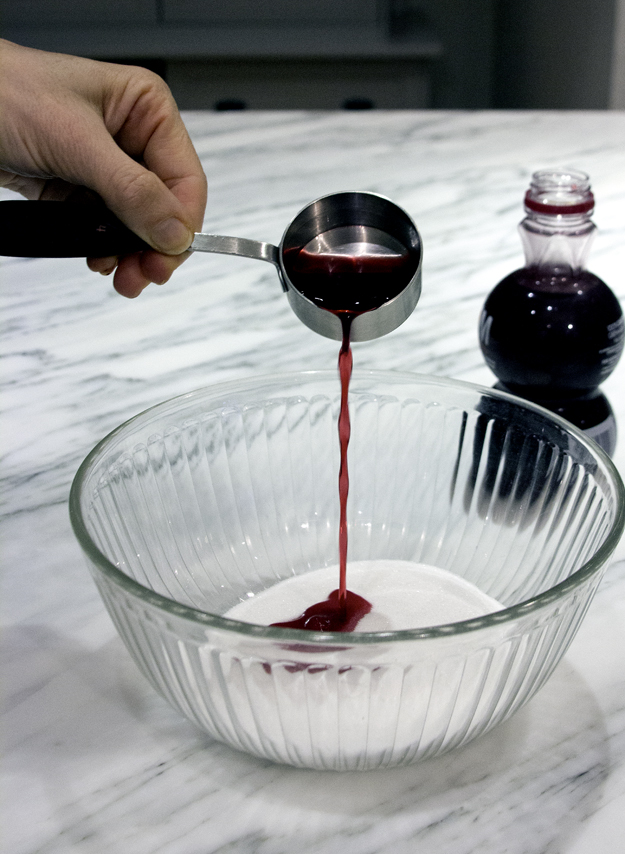
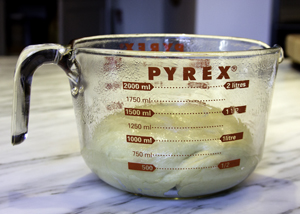
These are yeast raised, not cake doughnuts. The dough comes together in about 5 minutes if you have a stand mixer. Thanks to a quarter pound of butter this brioche-like dough has an amazing silky texture.dough with dough hookdough before first risedough after first rise

cutting out doughnuts
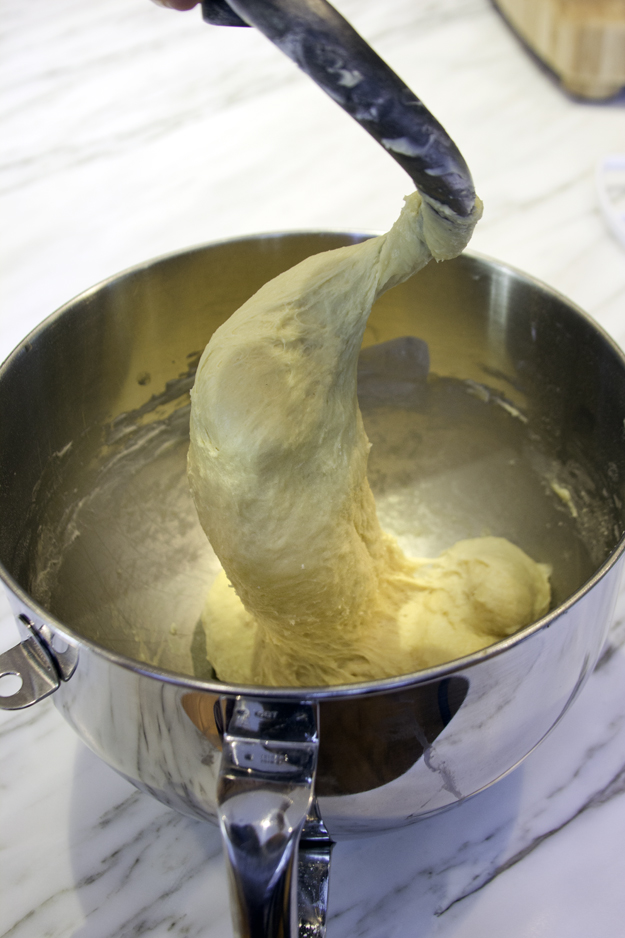
My deep fryer, which normally only gets pulled out once a year to make french fries takes all the guess work out of deep frying. You can of course use a deep pot with a candy/oil thermometer to regulate the temperature.frying 1
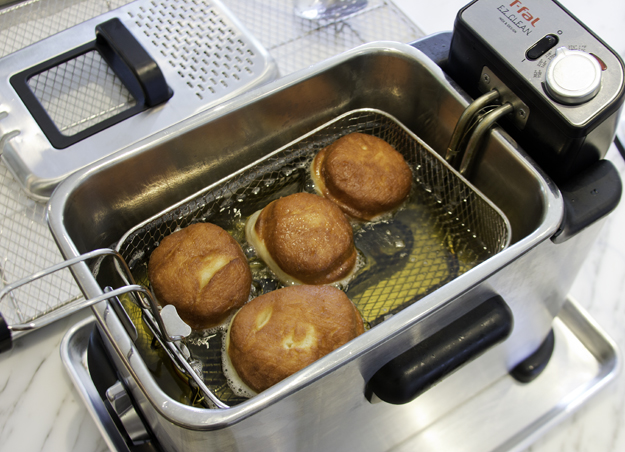
These babies puff up like little pillows. I can not accurately express the joy I experienced watching my own little miracle here in the deep fryer!frying 2
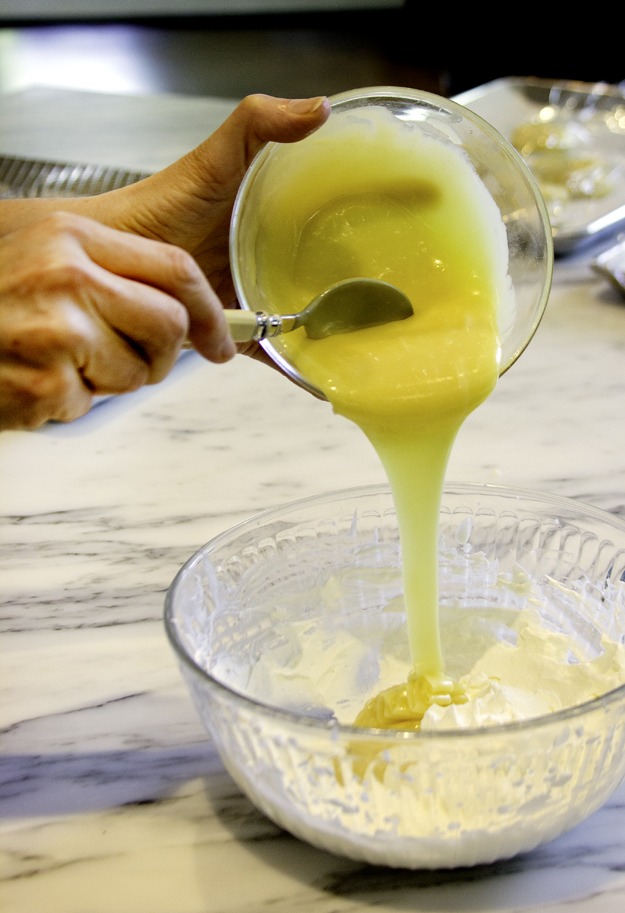
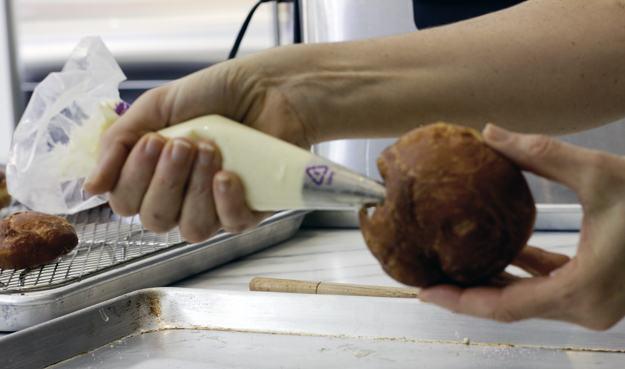
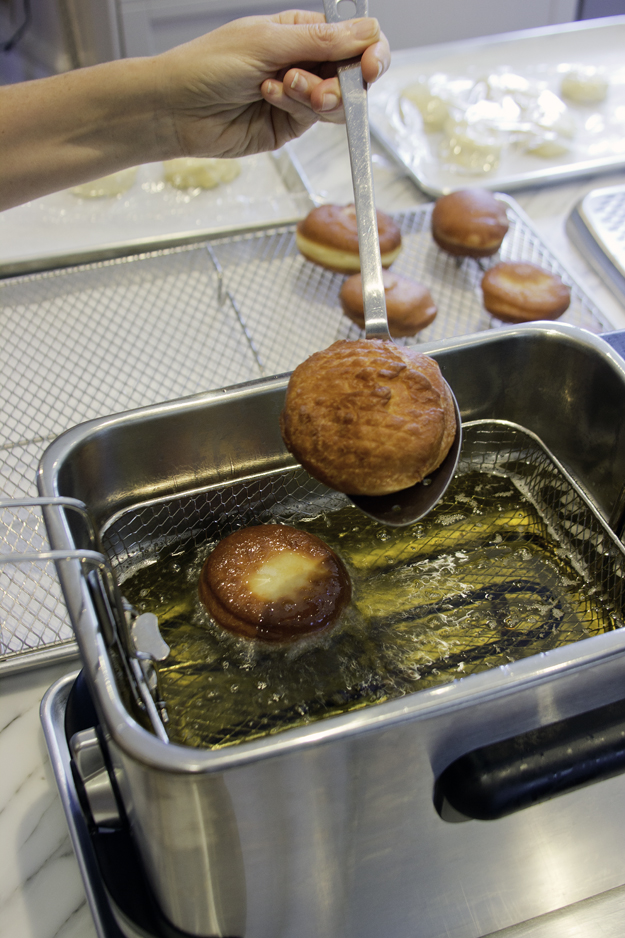
Filling the doughnuts with the white chocolate ganache whipped cream is quite simple. A plain piping tip, inserted into the side of the doughnut makes easy work of the job. filling doughnuts 2filling doughnuts 1
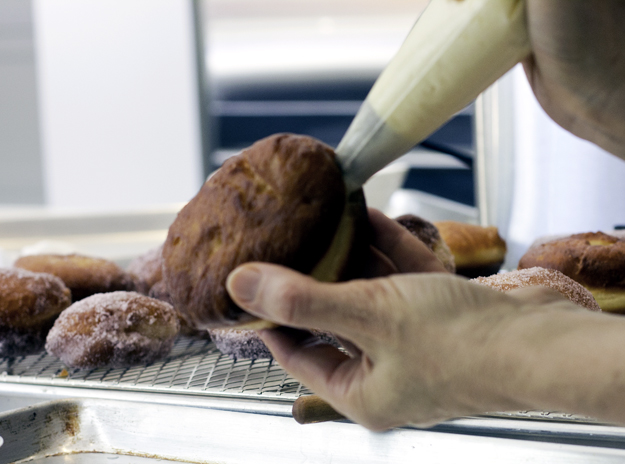
These doughnuts are really best eaten the same day they are made. I sent 16 of these beauties off with my husband to share with his hockey team after I made them one Sunday afternoon. He said that they were inhaled very quickly and that they actually brought a few of these strong burly hockey players to their knees as they gushed at how good they were.

Click here to print recipe for Pomegranate Sugar Dusted White Chocolate Doughnuts.

ready to eat 1

Day Seven: Chocolate Peppermint Cookies


On the seventh day of  holiday baking , my true love brought to me: a heating pad and thermometer. No, I’m not sick with fever and chills.  Those are just some essential tools to temper chocolate.  The recipe for these cookies comes from the December 2008 issue of Martha Stewart Living.  I dreamed about these cookies for over a year, not quite trusting myself to make them without having a clear plan of where to deliver them.  I finally made them for my holiday gifts last December and they were so amazing, I had to bake them again this year.

I have adapted this recipe somewhat.  Martha asks you to roll the chocolate dough, chill it, cut out circles, with a 2 inch cookie cutter, chill the cut-out cookies and then bake them.  I simplified things by rolling the dough into a cylinder, freezing it and then slicing and baking.  Faster and easier.  Although Martha does not suggest tempering the chocolate before dipping, I highly recommend it.  It gives the chocolate a beautiful shiny coat and the white chocolate will not melt in your hand when you eat them.  I am warning you, it is a time consuming and highly exacting process, but I think it’s worth it.  Should you decide to forgo the tempering, they will still taste just as delicious but the appearance will not be as spectacular.

Begin with creaming the butter and sugar.  Sift the dry ingredients.  Usually when a recipe calls for sifting, I just ignore those instructions, but when cocoa powder is involved, it’s a good idea as it always has lumps.  Divide dough into two, roll it into a cylinder, wrap in waxed paper, and freeze.  Then slice and bake.  The bottom of each slice becomes a bit flat when you slice them.  You can reshape them quickly back into a perfect circle with your fingers if you want, and then you will have perfectly round cookies.


After the cookies have cooled,  get ready to temper the white chocolate.  DO NOT USE CHOCOLATE CHIPS FOR DIPPING!  I can not emphasize this enough.  Chocolate chips are made with certain stabilizers in them to help them hold their shape and not melt completely.  That is not what you want here.  Also, do not buy the pure white stuff at the bulk food store that is labelled white chocolate.  It is not real white chocolate, but rather a coating compound.  It will melt beautiufully, but it will taste like crap.  Real white chocolate is ivory coloured.  Buy good quality white chocolate.  I like Callebaut or Lindt.

Many chocolate companies are now manufacturing their chocolate in the form of “Callets“.  While they may look like chocolate chips, they are not.  It is the same as buying a block or bar of good chocolate but saving yourself the time and mess of chopping.  A great source for them is www.qzina.com.  For tempering, it is also a good idea to have some solid blocks or bars of chocolate as well.  Those work well to help cool down the chopcolate in the second step of tempering.  A good quality instant read thermometer is helpful for this project.   I have the Thermapen and I love it and use it for everything.  It was recommended by Alton Brown and Cook’s Illustrated.  Can’t get a better recomendation than those two!  I also just heard about a chocolate thermometer , which looks really cool.  haven’t bought it yet, but I am tempted.

Step 1:  Melt white chocolate over a double boiler of simmering water, to 115º F.

Step 2: Remove from heat and add a block of white chocolate.  Stir to cool chocolate down to 81º (for white and milk chocolate) (86° F for dark chocolate).  This will take about 10-15 minutes.  Be patient.  Remove block of unmelted chocolate.  This unmelted piece can be wrapped up and reused another time once it has cooled.

Step 3:  Then briefly place bowl back over the double boiler for just 10-15 seconds, until it warms up to 86º F (for milk and white chocolate) (89° F for dark chocolate). Congratulations!  You have tempered your chocolate.  Now transfer tempered chocolate to a smaller bowl and place on a foil covered heating pad, set on low.

A fork is the best tool for dipping the cookies into the chocolate.  I was given a fancy set of chocolate dipping tools many years ago and they are fun to use, but a regular fork will suffice.  I saw a less extensive set of these tools on amazon, so if you plan to do a lot of chocolate work, they are a worthwhile investment.


Dip cookies in melted chocolate, and sprinkle with crushed peppermint candies. After you crush the peppermint candies (the Cuisinart does a great job of this), put them through a sieve.  This will separate the finer dust from the crumbs.  It’s nice to sprinkle some of the cookies with the dust and others with the coarser crumbs.  Chill and eat!

To print this recipe, click here.


Day Three: White Chocolate Macadamia Nut Cookies

It seems like only yesterday I was going on about how wonderful it is when a product delivers as promised.  Oh wait, it was yesterday.  Yes people, my wonderful new beater blade has bit the dust.  Serves me right for bragging about it.  On the 10th batch of the Toblerone shortbread I was making, the spout of the bowl I was using to pour the chopped Toblerone into the mixer, accidentally hit the top of the spinning blade and it cracked my wonder blade into several pieces.  All my fault!!  I should have been more careful pouring.  So I had to bake today using my old beater blade and it took way longer than usual because I had to keep stopping the machine to scrape down the sides.  But not to fear, Golda’s Kitchen offers next day delivery so I’ll be back in business again tomorrow.

I got the recipe for these cookies many years ago when I worked at the now defunct David Wood Food Shop, in Toronto.  I was pregnant when I worked there and the pastry chef took pity on me and fed me as many as I could eat. (Which was a considerable amount).  Just knowing these cookies were in the shop made me practically skip to work everyday.  I went through terrible withdrawal when I left to have my baby.

This is an odd recipe as you cream together the butter and brown sugar, but the white sugar gets sifted in with the flour as part of the dry ingredients.  I never really understood why that is and what difference it makes.  But that’s how they made them at David Wood and who am I to mess with perfection?

The recipe instructs you to quarter the macadamia nuts.  Please go ahead and do that if you are that type of person and have the patience.  Truthfully, I just add them whole.  I find that the beater blade breaks them up somewhat and it all works out fine.   I like to use salted macadamia nuts. (I know, what a shock!)

To print the recipe, click here.

The edges get a little bit crunchy and the center is wonderfully chewy.   Macadamia nuts and white chocolate have such a natural affinity for each other.   The little hint of salt from the rich nuts balances the creamy sweetness of the white chocolate.

White Chocolate Cranberry Coconut Biscotti

Yesterday morning at 5:45 am I received an e-mail request to bake for a charity auction/fundraiser being held this Saturday night.  You may be wondering why I was awake so early. It wasn’t on purpose.  It’s just that I keep forgetting to put my blackberry on “silent” mode before I go to sleep, so the beep of an incoming message woke me.  The request was from the Lanark County Therapeutic Riding Program.  I immediately hit reply and said YES!!  My speedy, enthusiastic (well, as enthusiastic as I can be at 5:45 am) reply was due to two reasons.

The main reason I replied yes is that my son, who has cerebral palsy, has been riding with them for over 6 years.   When he began he could not even sit up on the horse.  Now he is trotting.  He has developed increased balance, flexibility and coordination over the years.  But more importantly, he has gained a feeling of great independence and freedom as well as tremendous pride in his accomplishments.  I never could have imagined a day when I would see him trotting down a country road on a horse.  It is a joy to behold.

The second reason for my speedy acquiescence is that I love any excuse to bake, especially when I know the baking will be leaving my home and moving out of harm’s way (Harm in this case, being my mouth!)

I knew right away what I wanted to bake.  I was planning to bake on Thursday and the event was not being held until Saturday, so it had to be something that didn’t get stale quickly.  Biscotti would be the perfect thing to make.  They keep well for several weeks, although they never seem to last that long around here.  The inspiration for this biscotti recipe came from the now defunct Gourmet Magazine (a moment of silence here please!!).  The original recipe was for cranberry biscotti dipped in white chocolate.  I decided to add white chocolate chunks to the dough instead of dipping them.  I also added coconut to the dough because coconut makes everything taste better!   Unbeknownst to me, my sister Bonnie made the exact same changes to the recipe.  We laughed when we discovered what the other had done.

Oh, and I had a third reason to be excited to bake today!  I would get to try out my new Beater Blade for my Kitchenaid mixer.  The company claims that this blade, ” … virtually eliminates hand-scraping the bowl and batter build-up on the blades. Ingredients are thoroughly incorporated ensuring foolproof mixing and baking preparation.” After softening the butter, I set to work creaming the butter and sugar.  I was very impressed with the new blade.  No scraping down was needed.  I love it when a product delivers like it promises.

Then time to add the rest of the ingredients.

Biscotti is Italian for “twice baked”.  First the dough is formed into logs and baked.  Then the logs are sliced and put back into the oven for a second baking.  This is a wonderful dough to work with, so pliable and malleable.  Forming the logs is simple.

The logs are brushed with beaten eggwhite and baked for about 25 minutes.  Then they cool for about an hour.  I discovered that using a cleaver works really well for slicing the logs.  I got an inexpensive one from Ikea.  I like to slice them on the diagonal for really long biscotti.  They go back into the oven for a second baking.  They will be a bit soft when you remove them from the second baking but will firm up as they cool.

Click here to print recipe for White Chocolate Coconut Cranberry Biscotti.