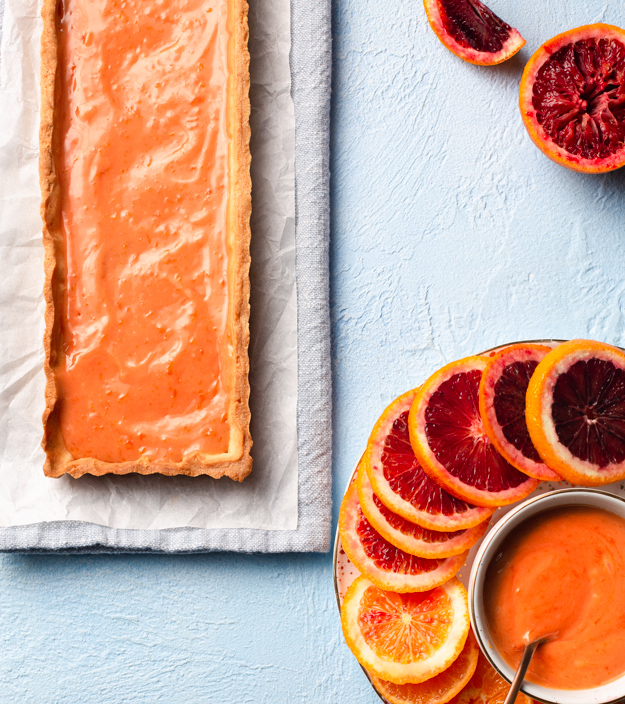
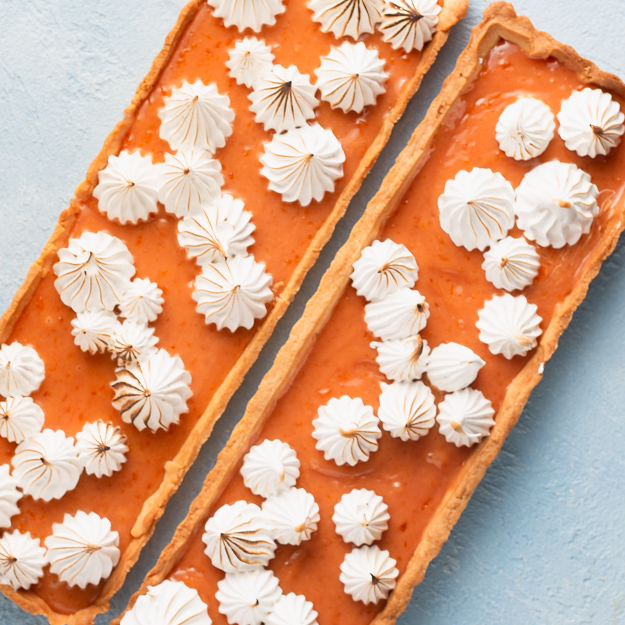
One of the most beautiful ways to showcase the glorious blood orange, is to make a curd. You can use the curd to fill a pie or tart, spread it between two cookies, sandwich it between cake layers, swirl it into ice cream, stuff it into donuts or cupcakes…. you get the idea. Curd is glorious and versatile.
The juice and zest of about a dozen blood oranges are packed into this dessert. Start by reducing 2 cups of juice in half. You want the tart to pack an orange punch! The curd can chill while you make the crust. For the meringue topping I looked to Stella Parks for advice. Her swiss meringue is foolproof. It whips up into a perfectly light, yet stable topping. You could, of course, blanket the entire top with meringue, but I didn’t want to cover all that gorgeous orange curd, so I left some spots bare.
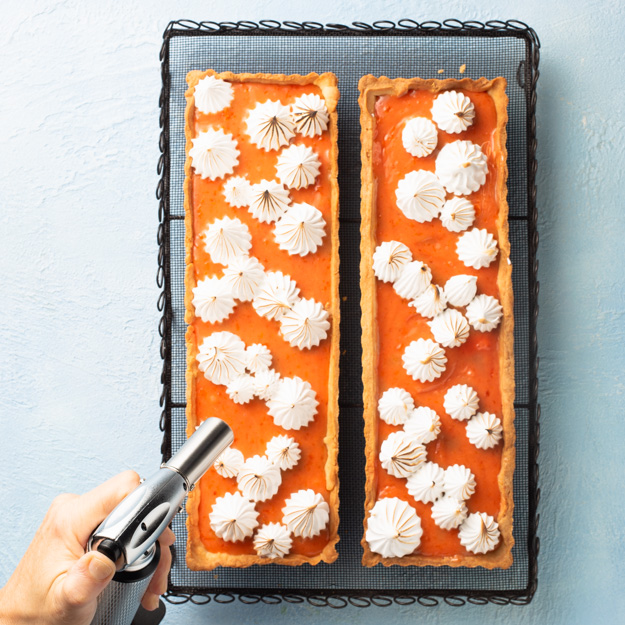
Leave the meringue snowy white or torch it for toasted goodness.
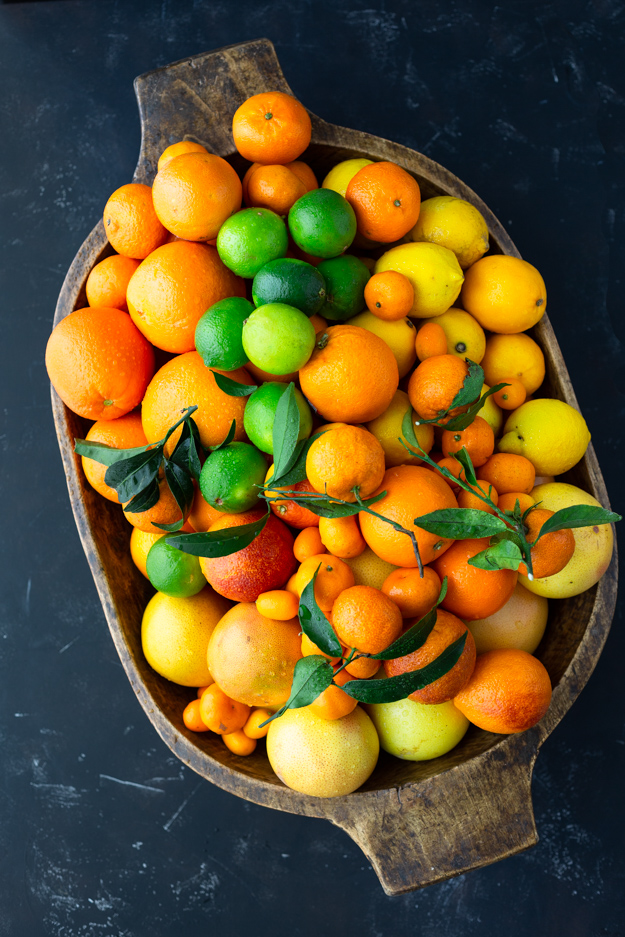
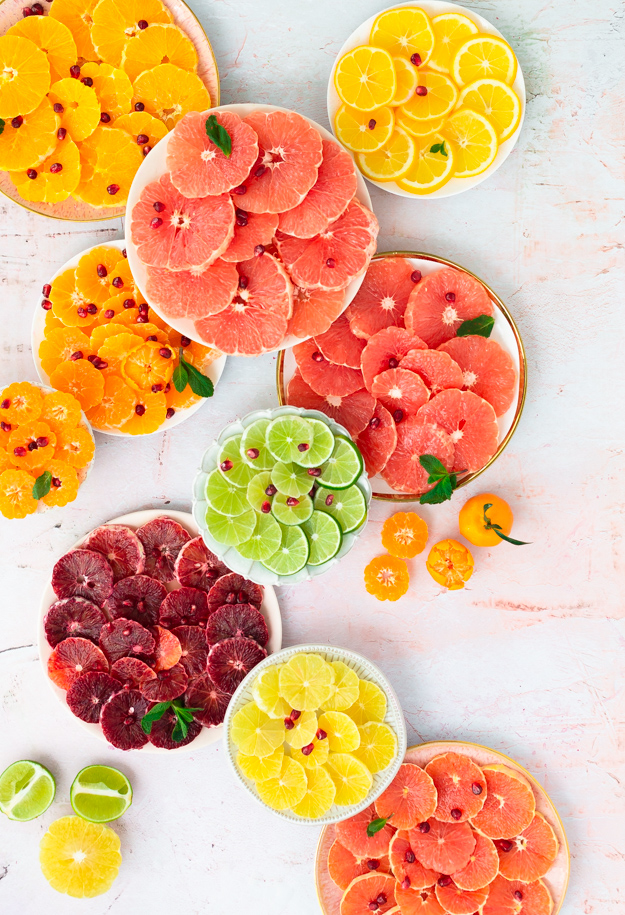
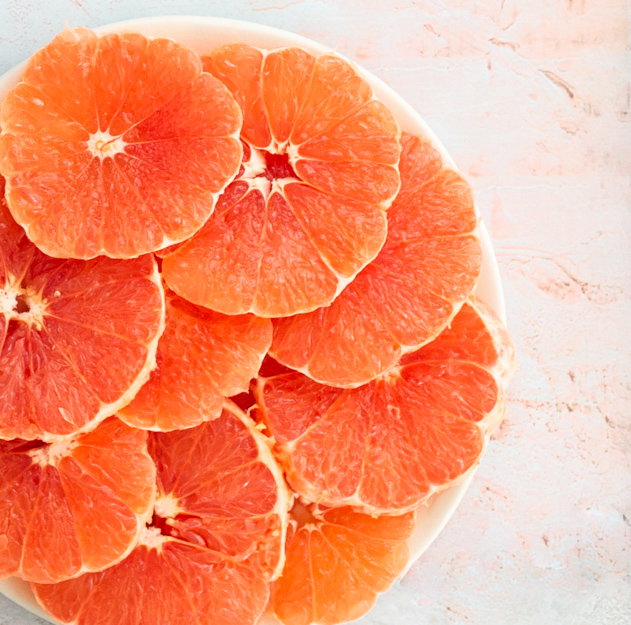
We’re deep into citrus here at saltandserenity this month. I bought every type of citrus I could find at Farm Boy last week, and I’ve been having fun exploring and shooting them. Without a doubt, blood oranges are the darling of the citrus world. But, like most drama queens, you never really know what kind of mood they’ll be in. Sometimes you cut one open and you get a glorious blaze of crimson. Other times, she’ll be in a tamer mood and it’s just a hint of fire.
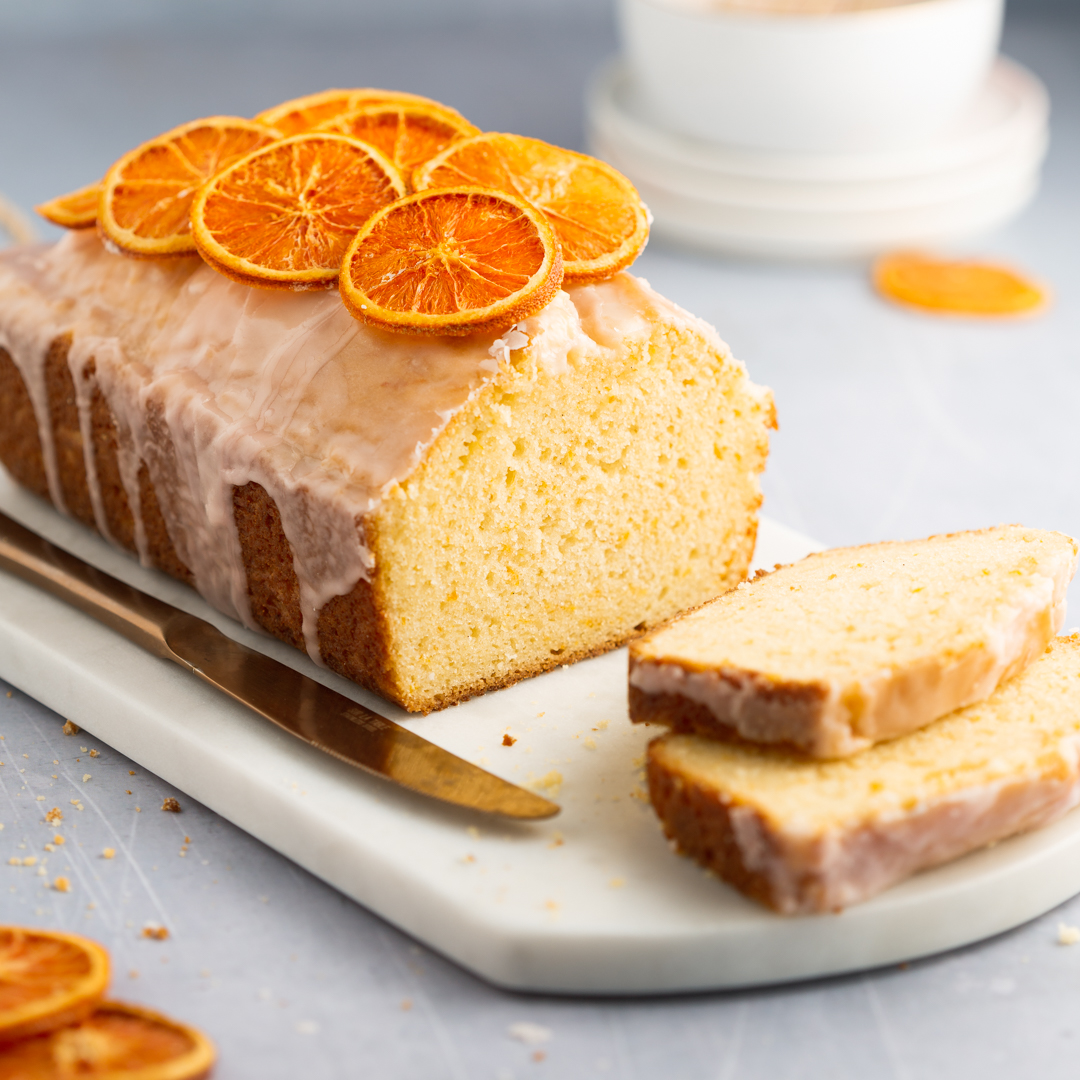
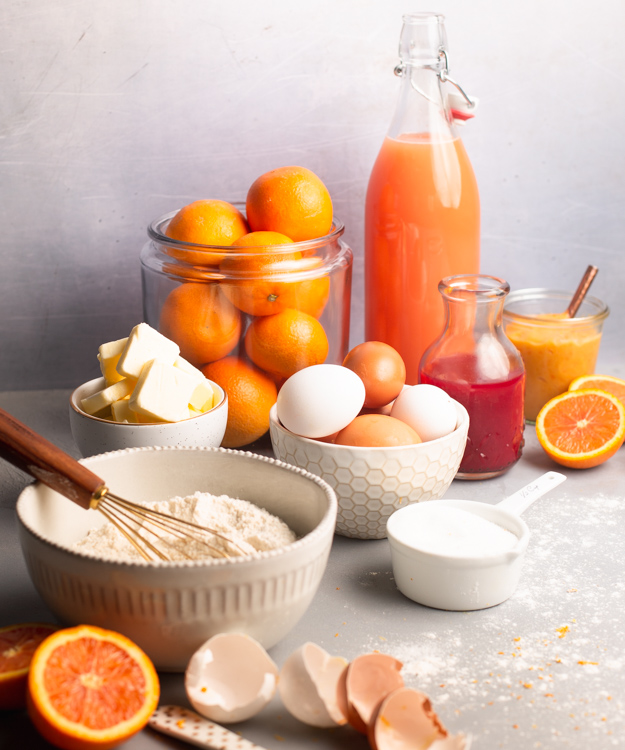
But I’m here to tell you about her shy cousin, the Cara Cara orange. A member of the navel family, they’re a cross-cross-polination of the Washington Navel and the Brazilian Bahia Navel. While they look like a regular navel orange on the outside, inside, their flesh is a lovely pink colour. They’re sweeter and less acidic than a regular navel orange. They have a delicious “berry-like” flavour. They’re available from December – April. Seek them out, you won’t be disappointed. I decided to make a simple pound cake to highlight the Cara Cara. I adapted one of my favourite pound cake recipes (lemon pound cake) from Daphna Rabinovitch’s book “The Baker in Me.”
Butter, sugar, eggs, sour cream, flour and of course lots of Cara Cara orange zest for flavour. About halfway through mixing the batter, it will look like it has curdled. Don’t panic. Once you add the flour mixture, it will all smooth out. Daphna instructs you to cream the butter and sugar with an electric mixer for quite a while. You want to aerate the batter. When it comes time to add in the dry ingredients, she instructs you to remove the bowl from the mixer and switch to a wooden spoon, so that you don’t overwork the batter. Listen to her. She knows her stuff!
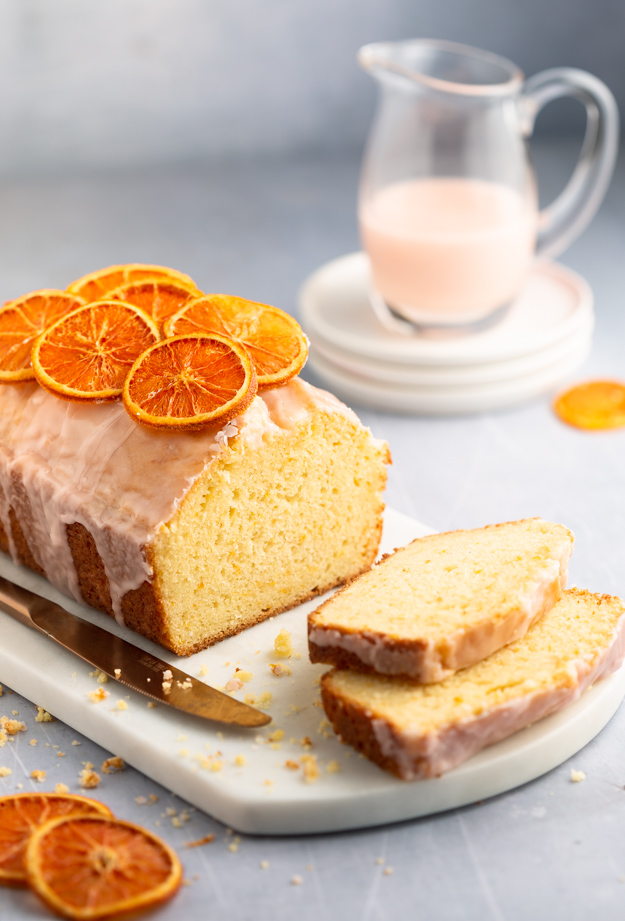
I decided to add an icing sugar glaze to the cake. Powdered sugar, cara cara juice and just a touch of lemon juice to amp up the acidity. If you want the glaze to stay shiny when it dries, add a spoonful of white corn syrup to the glaze. I added an optional garnish of dried orange slices. I really like how pretty they make the finished cake. They are available online from several different sources, but it’s pretty simple to make your own.
If you want to try, thinly slice about 4 oranges. Arrange on parchment lined baking sheet, in a single layer. Sift a heavy layer of icing sugar over the orange slices and bake in a 200°F oven for 4-5 hours.
Making falafel at home is not something I ever considered doing until recently. Falafel eating was reserved for trips to Israel. Where the falafel originated is up for debate. Israelis, Egyptians, Palestinians and Lebanese all claim it as their own. But no matter the origin, finding falafel in Israel is as easy as finding a Timmy’s in Canada.
Everyone has their own favourite falafel joint. During one of my first trips to Israel, I fondly recall exceptional falafel in the town of Abu Gosh at The Lebanese Restaurant. On our last trip, we inhaled the falafel at Falafel Hakosem in Tel Aviv. A great falafel has a nubbly texture, moist and fluffy on the inside with a crunchy shell.
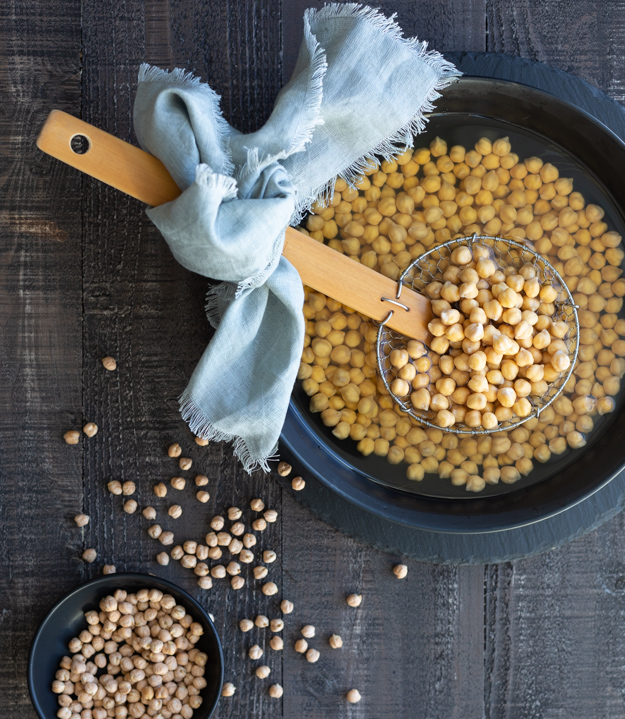
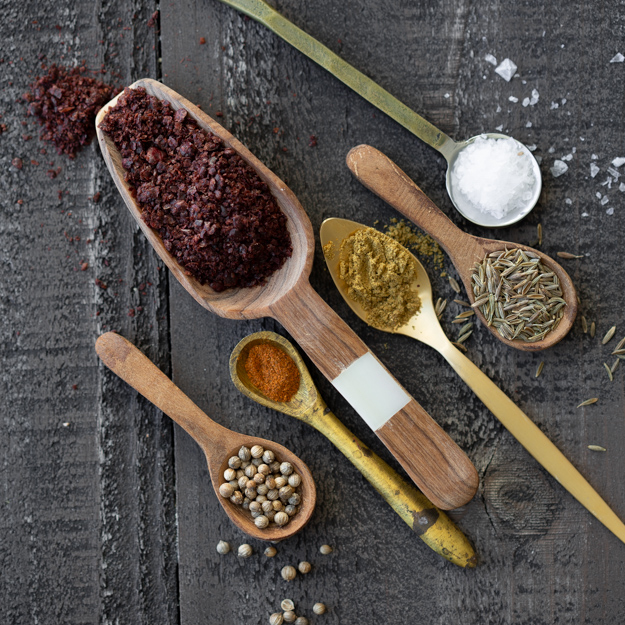
The main ingredient in falafel is chickpeas. You must use dried chick peas. Canned chickpeas will give you mushy falafel. Start with soaking dried chickpeas overnight. Once they have soaked for at least 8 hours (and up to 24 hours), drain them and transfer them to a food poriocessor. No need to cook the chickpeas. Chickpeas are quite bland so load up on the flavour. Cumin, dried corriander, sumac, salt and a pinch of cayenne to bring the heat. You need lots of onion and fresh herbs for flavour and freshness. I like the combo of cilantro and parsley, but feel free to just use parsley if you are cilantro averse. The problem is that all this moisture makes them fall apart. Flour is a commonly used binding agent, to help hold the falafel together. However, flour alone as a binding agent leads to dense falafel. The genius folks at Cook’s Illustrated borrowed an Asian bread-baking technique called tangzhong. It involves mixing flour with water and then cooking it briefly in the microwave until it forms a paste.
Here’s the scientific explanation from Cook’s Illustrated, if you geek out like I do at this stuff:
“When the paste is cooked, the flour’s starch granules burst and form a gelatinous web that locks the water in the paste in place, preventing it from making the mixture even looser. Meanwhile, cooking the flour also greatly increases its ability to absorb water, so we can add less flour overall to act as a binder. The result: fritters that are well seasoned, moist, and easy to form.”
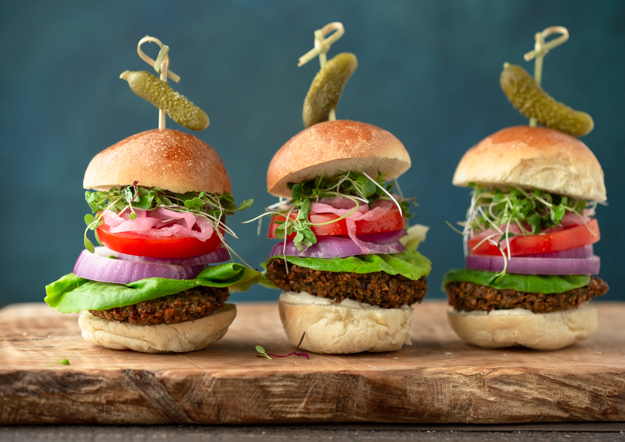
Traditionally, falafel is shaped into balls, fried and served stuffed into a pita. I decided to go a bit rogue and make falafel slidfers. I formed them into patties and fried them.Let’s build a slider.
Lettuce, tomatoes, pickles, onions (raw or pickled), tahini sauce or tzatziki are all fine additions. Pickled beets or turnips would also be delicious. In Israel, you can top your stuffed pita with fries. Although I am a french fry lover, I draw the line on stuffing fries into my falafel. It makes them too soggy. I just ask for them on the side!!
This recipe is inspired by my new niece, Danit. She is a very welcome addition to our family and we were all thrilled when she agreed to marry our nephew Ben. They live in Florida and last month they welcomed a sweet baby girl into the family. The first of the next generation. I am now a great aunt, although if you were to ask some of my 24 nieces and nephews, I think that at least one or two would say I have always been a great aunt!
We finally managed a visit to Florida, a few weeks ago, to see the baby. She is adorable, and the most chill baby I have ever met. I’m convinced this is due, in no small part, to her relaxed parents. Their laid-back attitude was so unusual to see in a new parent. When we walked in, Danit immediately asked us if we wanted to hold her. Once I had her in my arms, sniffing in that delicious new baby scent, Danit proceeded to make lunch for us.
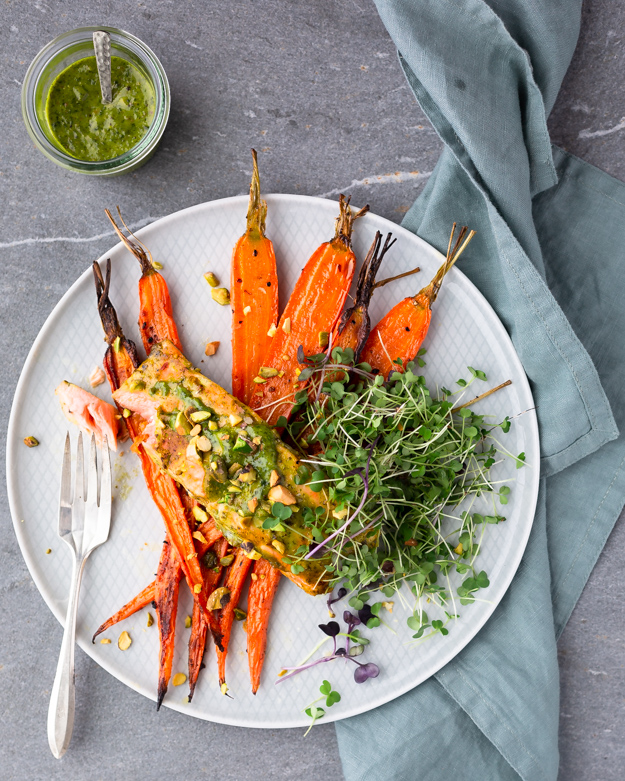
She made oven baked cilantro salmon, roasted shredded brussels sprouts, rice and a salad. I don’t recall being capable of making lunch for myself, let alone guests, when my first born was 5 weeks old! Everything was delicious and that sweet baby lay quietly in her bounce chair, dozing, while we ate lunch.
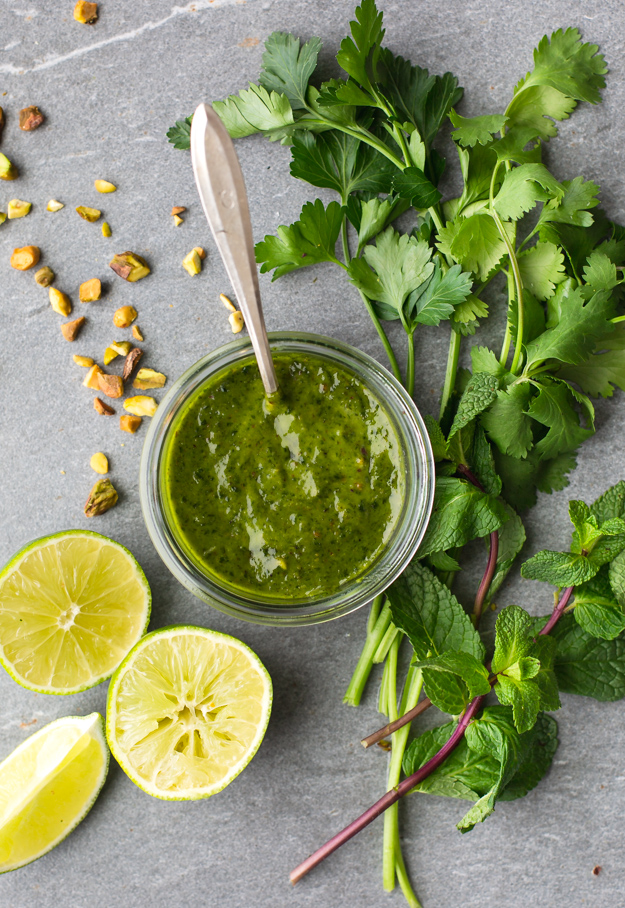
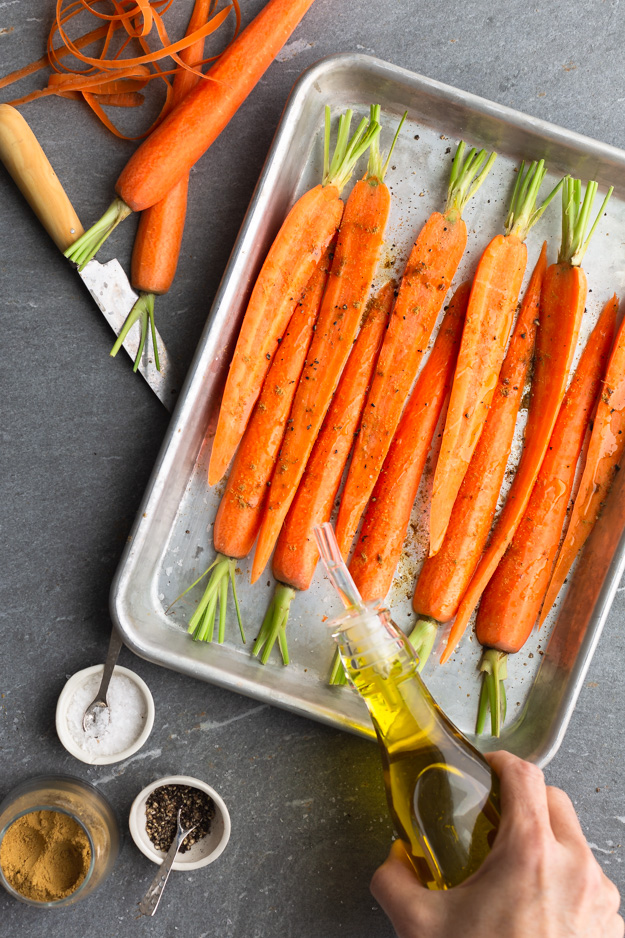
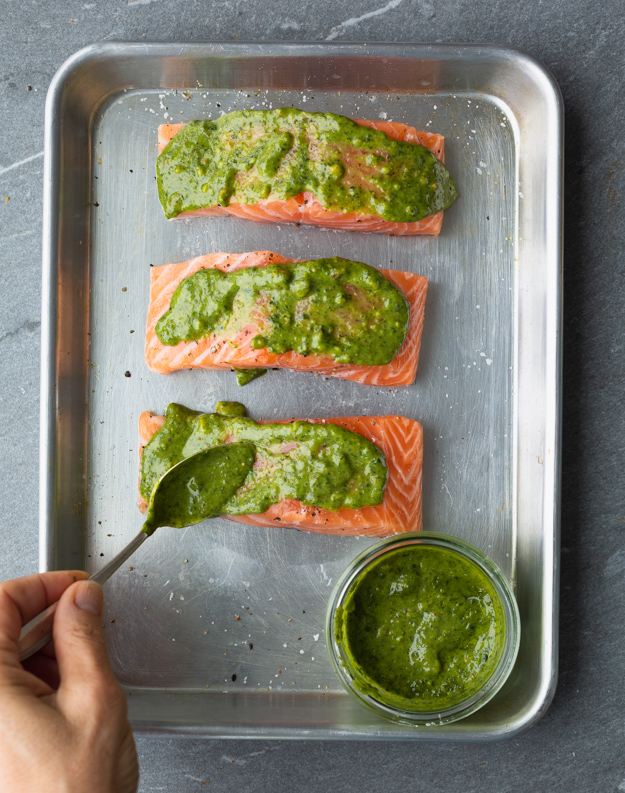
This is my take on Danit’s salmon. I used a mixture of tender green herbs, including cilantro, Italian parsley, mint and basil. Dill would be an excellent addition. This is a very flexible marinade. Cilantro haters, feel free to omit the cilantro and add more of the other herbs. Make it your own. I added some toasted pistachios to the mixture for a bit of texture, lime juice for fresh acidity and honey to balance the tartness. I put the carrots in the oven before the fish, as they need a longer roasting time. They were simply dressed with salt, pepper, olive oil and cumin. Carrots and cumin are a really delicious pairing.
Fresh light and bright, for when the comfort foods of January fail to satisfy.
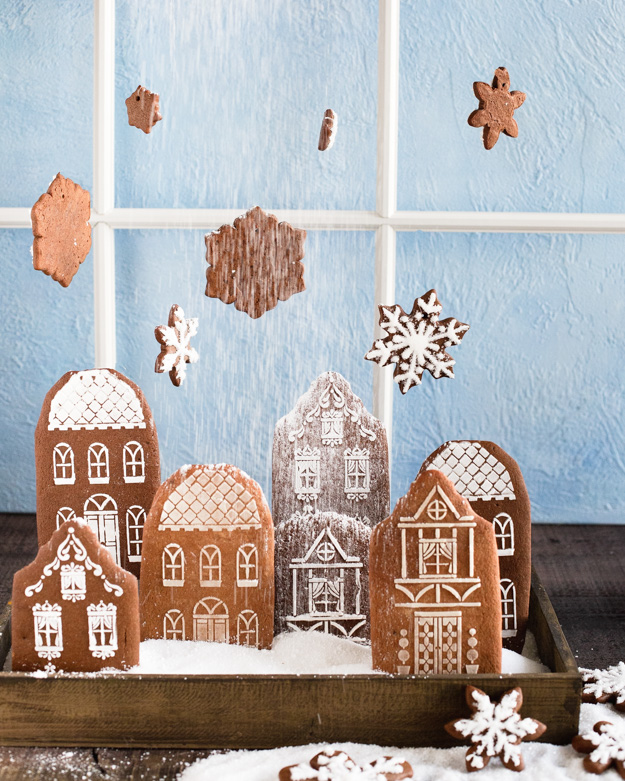
They say it takes a village to raise a child. I say, it takes a child to build a village. Luckily my daughter was visiting this week to help me create this gingerbread village.
We had a lot of fun putting this together. We started with a big batch of my favourite thick and chewy gingerbread dough, from Cook’s Illustrated. I cut some of the dough into houses using these cookie cutters. Instead of piping the doors and windows, I discovered these stencils. You do not require any special skills to use them. They are so simple and the results are quite dramatic.
A few tips for stenciling success:
Practice a few times on parchment paper, so you don’t waste cookies.
Your royal icing should be the consistency of toothpaste.
A small offset spatula makes the job a bit easier than a regular knife. Put the icing on the bottom-side of the spatula.
Use one hand to hold the stencil in place and the other hand to gently spread icing. I found it easiest to start in centre and work my way to one end, then switch and do the other half.
Scrape off excess icing, but don’t scrape it clean. Just a thin coat is enough.
Try not to let stencil lift while applying icing. If you mess it up, remember that mistakes still taste good.
Wash stencil between cookies. Just place wet stencil on towel and pat dry. Be gentle with stencil.
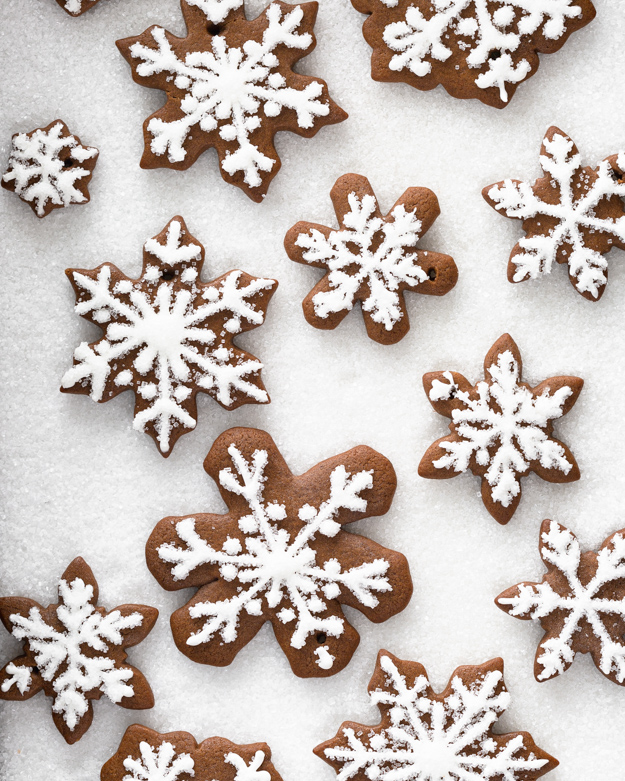
For the snowflakes, I used these cookie cutters. I wanted an assortment of sizes and shapes, as no two snowflakes are alike in nature! If you want to hang your snowflakes, be sure to put a hole in them before baking. I used the small end of a size 3 piping tip. We piped simple decorations on these cookies and sprinkled on coarse sanding sugar while they were still wet.
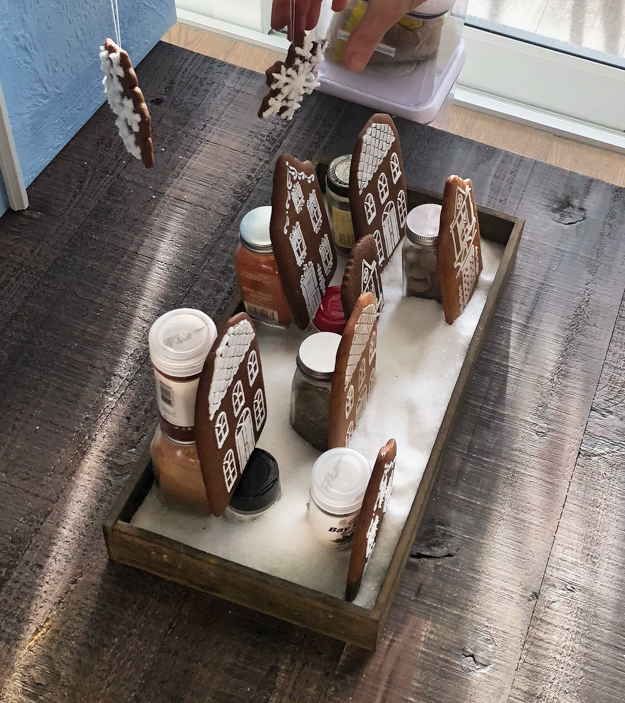
We filled a wooden box with” snow” (coarse sanding sugar) and used spice jars to support the houses. I trimmed some of them to have varying heights.
To hang the snowflakes I built two towers from my oxo good grips containers. Then I duct taped three wooden dowels across the top of the containers. We threaded the snowflake cookies with fishing wire and hung them. The tricky part was getting the snowflakes to all face front with their pretty icing side. My daughter turned them the right way and I was behing the camera ready to hit the shutter as soon as she moved her hands. We were almost successful. I photoshopped out the fishing wire in editing.
We decided to try making it snow. It made a huge mess but we got the shot!
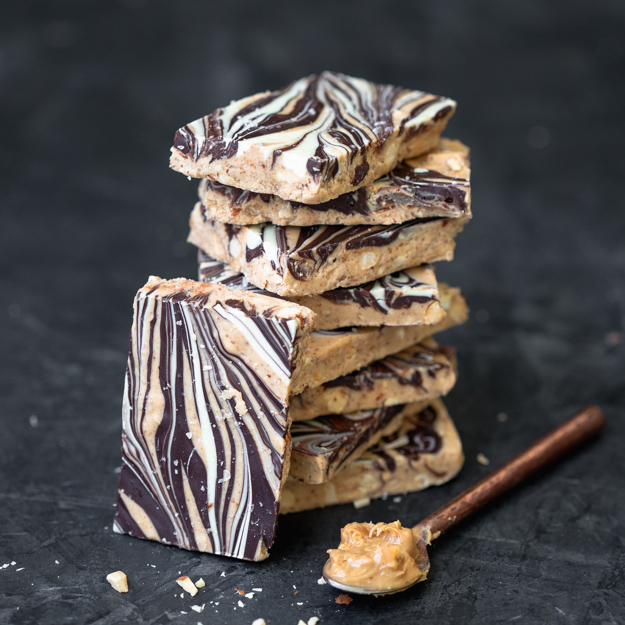
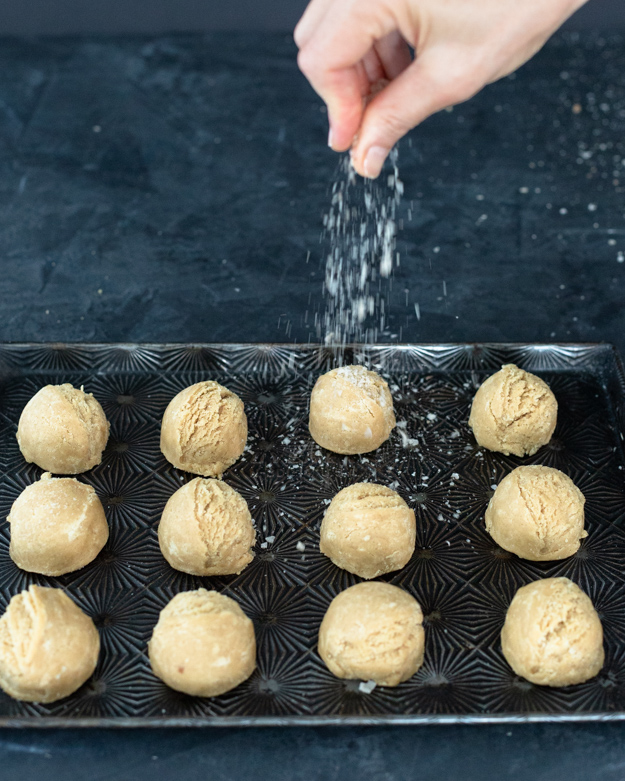
Today, an old favourite gets a makeover. I have been making this treat for many years to give away as part of a holiday cookie box. It is always met with awe at how pretty it is and, more importantly, how addictively delicious it is. The original was made with peanut butter but this year, I went rogue and used almond butter.
There is no baking involved and that gorgeous marbling effect on top takes about 40 seconds to create. No skill involved. It’s the perfect last minute holiday present or hostess gift. Everyone loves it and people will be impressed by your mad pastry chef skills.
A few tips to make sure yours comes out perfectly.
Line the baking pan with foil and then lay a piece of parchment paper on top of that.
Use real white chocolate, not white compound coating chocolate. Real white chocolate is ivory coloured. Compound coating chocolate is white and tasted like wax.
Melt the white chocolate in a bowl over gently simmering water, or on very low power in the microwave. White chocolate does not like high heat. You will scorch it.
I suggest adding chopped almonds to the mixture for extra crunch. Please use toasted almonds. Untoasted almonds take like sawdust when you chew them. Salted roasted almonds are an excellent choice.
Use good quality bittersweet chocolate for drizzling.
Don’t forget to finish it with flaky sea salt while the chocolate is still wet.
Give the bark at least 2 hours to chill before cutting it.
A large sharp chef’s knife or serrated knife is easiest for cutting into nice squares, although no one will complain if they get irregular shards.
Go forth and create. This confection is one of my favourites to make. I feel so artistic when I swirl the wet chocolate and create beauty.
Still on the cookie train over here at saltandserenity.com. It’s pretty much all I bake in December. I adore cookies and so I give myself permission to bake, blog and talk about cookies all month. I’ll be back with some vegetables in January, I promise.
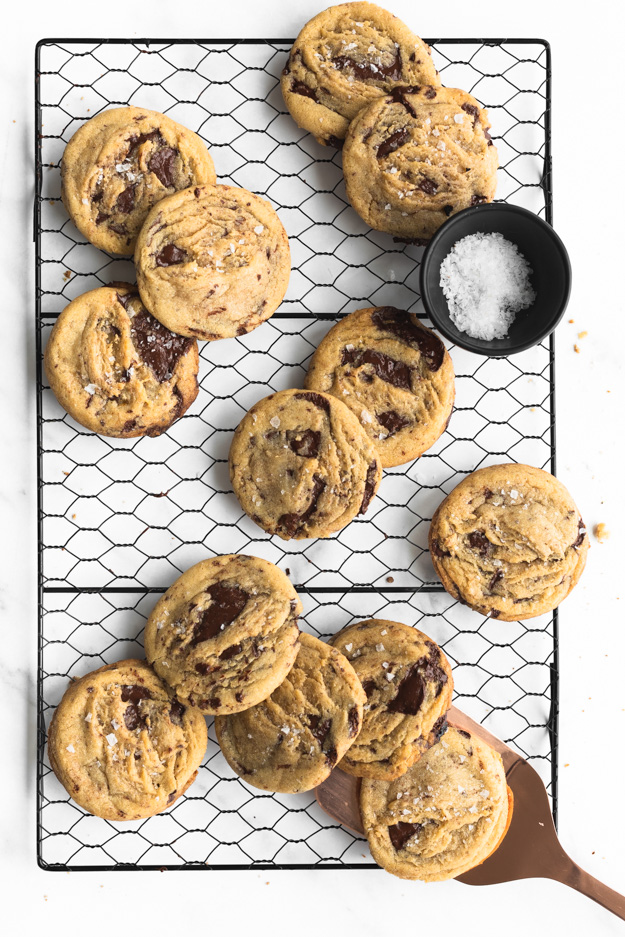
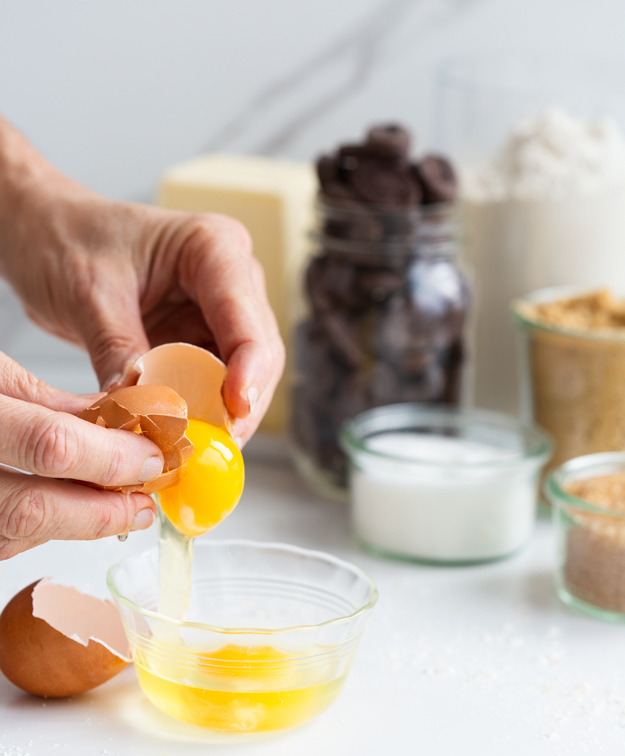
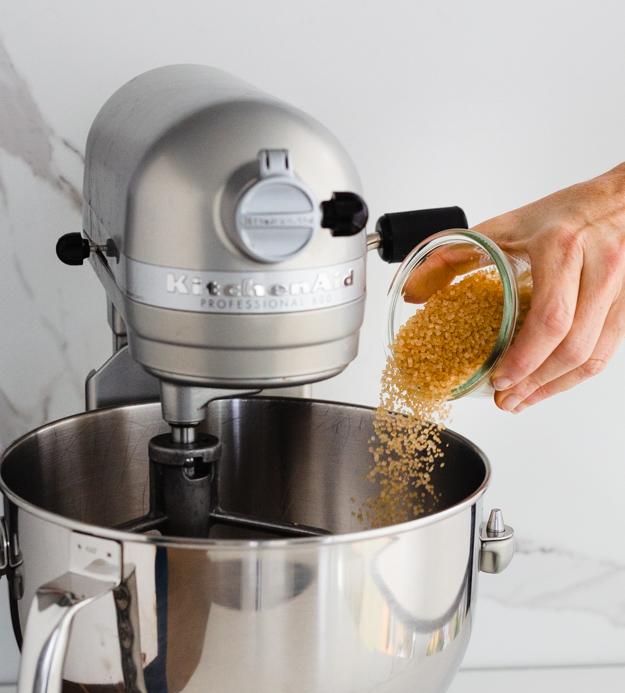
I decided it was time to update my post on these cookies. I first blogged about them back in 2011. And then again in 2015. They are my most requested cookie. Actually, it’s not even my recipe. The original recipe comes from Ashley of the wonderful blog “Not Without Salt.” I have given the recipe to lots of friends and family members. Often they will tell me that they just don’t taste the same as the ones I bake. I have been tweaking Ashley’s recipe and technique over the past few years, so I figured it was time to share exactly what I do to make mine so yummy. Plus, it was time to update the pictures. Along with my baking skills, my photography skills have also improved over the years and these fabulous cookies needed a new headshot! First, let’s talk butter. (because talking about butter brings me great joy!) Room temperature butter means butter that has been sitting on the counter for 30-45 minutes. You will know your butter is at the perfect temperature when you press your finger into it and make a slight indent. It should still feel firm, but not cold and it should not feel greasy. If it’s too soft, the butter won’t aerate properly when beaten with sugar, leading to flat cookies.
Eggs should also be at room temperature. Just remove them from the fridge when you remove your butter. Cold eggs can curdle the butter and they just won’t mix properly into the ingredients, leaving you with a poorly mixed dough, which results in inconsistent cookies. Let’s chat chocolate. If you make these cookies with regular chocolate chips that you find in the baking aisle, they will be good cookies, but they won’t be outstanding. I use Valrhona Guanaja Feves. The lovely Michelle at The Vanilla Food Company in Toronto will ship them to you. This is not a sponsored post, I just really love this chocolate. Ok, we’ve sorted out butter, eggs and chocolate. What about sugar? Ashley came up with the brilliant idea of using 3 kinds of sugar, light brown sugar for chewiness, white sugar for crispiness and turbinado sugar (also called sugar in the raw), for a bit of crunch. The last ingeredient we need to talk about is flour. I have recently tried making these cookies with a mix of bread flour and all-purpose flour. Alton Brown and Jacques Torres (Mr. Chocolate) swear by using some bread flour in your chocolate chip cookies. Bread flour has a higher gluten (protein) content which gives the cookies a chewier texture. I made a batch with all bread flour but found them to be too dense. I settled on a ratio of about 1.3 bread flour : 1 all purpose flour.
I like to chill the dough for before baking. Chilling the dough firms up the butter, so that the cookies spread less, making a chewier thicker cookie. That hour in the fridge also dries out the dough slightly, which concentrates the flavour. If this kind of baking science is your jam, check out this awesome article on the King Arthue website.
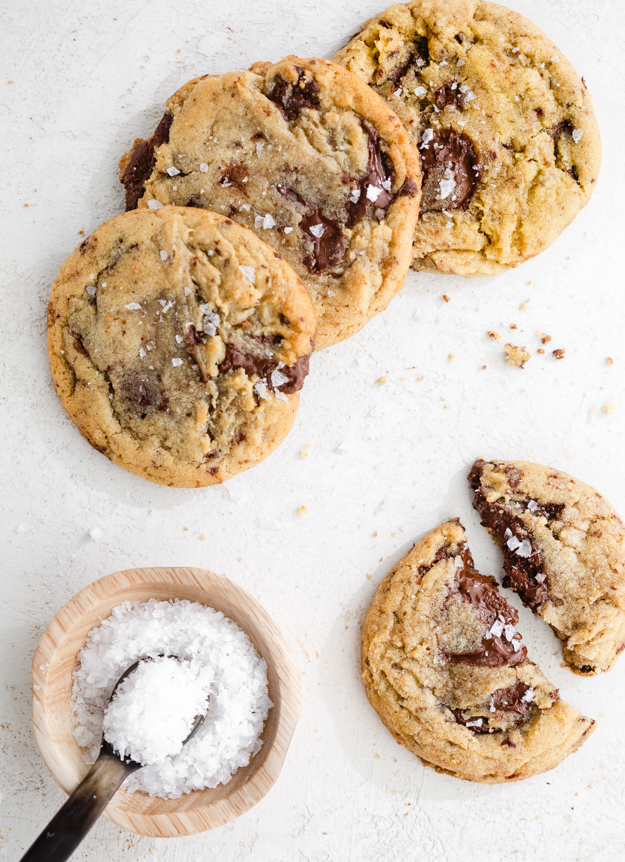
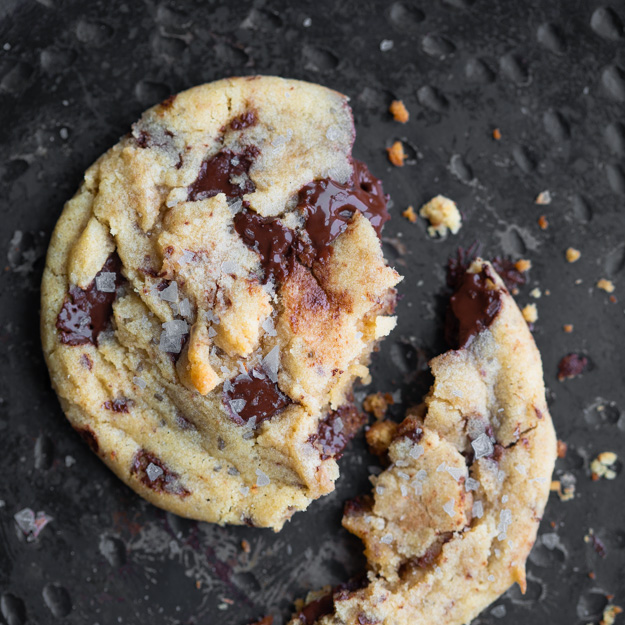
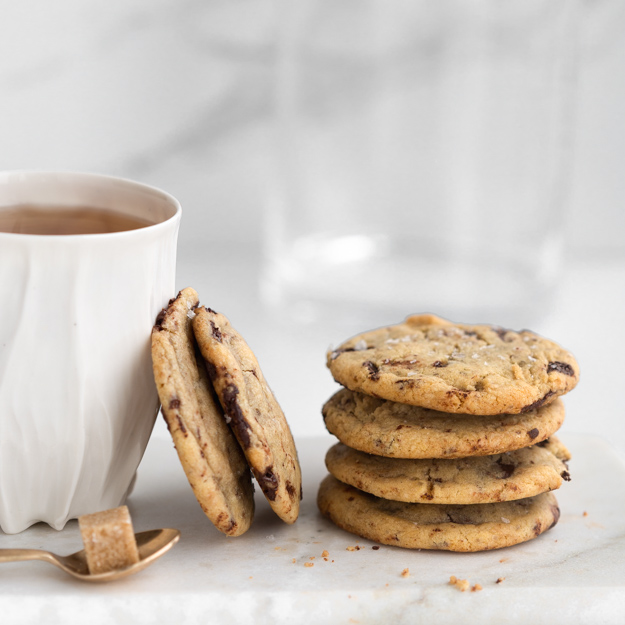
I scoop my cookies with an ice cream scoop so that they are all exactly the same size. Finally, don’t forget to sprinkle with a tiny bit of coarse salt. That salty-sweet balance is really important. Kind of like a metaphor for life. Without the salty tears, the sweet moments are not as meaningful.
There are times that call for a cookie studded with chunks of bittersweet chocolate, crammed with oats, dried cherries and Skor bars, or brimming with nuggets of Toblerone. And then there are times that call for a simple quiet cookie. A cookie that my dad would have loved. He liked plain things. I remember how bothered he was when Cheerios rolled out their product line extension and introduced Cinnamon Nut Cheerios in 1976, and then Honey Nut in 1979. I can only imagine, if he were still alive, how irked he would be by Dulce de Leche Cheerios.
These sugar cookies are made with brown sugar. They are a bit softer in texture than a typical sugar cookie made with white sugar. I think they have a more nuanced flavour profile than sugar cookies made with white sugar. They do not have the cloying sweetness that some sugar cookies do owing to the slight bitterness of molasses in brown sugar.
They are the perfect cookie to have with a cup of tea. My dad would have loved them
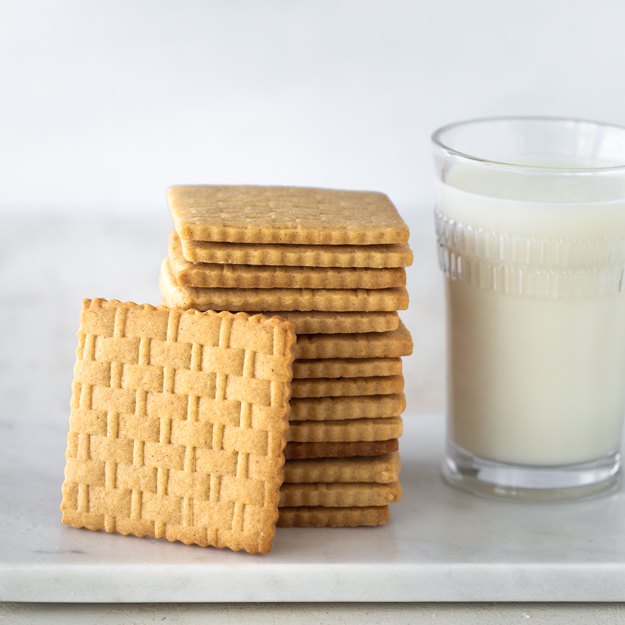
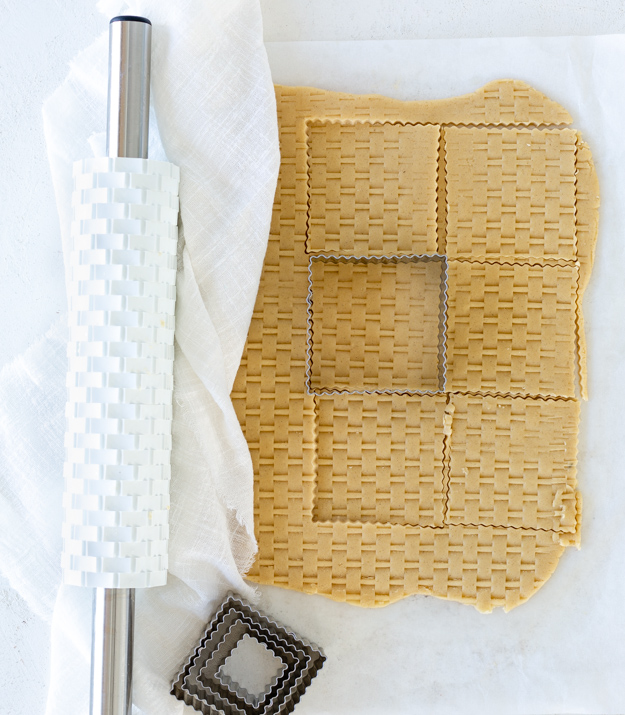
It’s no secret that I’m a habitual user of amazon.com. I adore the convenience of having everything I need shipped right to my door. I could easily become agoraphobic. So when an ad for this rolling pin popped up on the sidebar of my laptop I was both thrilled and disturbed. How wonderful that amazon could anticipate that I was about to bake sugar cookies and this rolling pin would dress them up perfectly. On the other hand, how disturbing that amazon knew I was going to bake cookies. Are they watching me? Maybe it was the sugar, flour and baking soda I ordered from them that tipped them off! These cookies are not difficult to make but they do require attention to detail. Here are a few pointers to ensure success:
After making the dough, divide it in half and roll out each piece between 2 sheets of parchment paper. Chill the rolled dough for at least 45 minutes. It must be fairly firm before you can roll the pin over it. It will stick to warm dough.
After embossing the dough, cut into shapes with cookie cutter and chill again for about 15 minutes before baking. That helps to hold their shape.
I won’t post a recipe with an obscure ingredient just for the sake of novelty. I try not to ask you to special order something unless it truly adds to the recipe and significantly improves the dish.
So it was with some trepidation that I ordered a $15 bag of smoked brown sugar to experiment with. In my defence, I was curious. I had never seen smoked brown sugar before and I was intrigued. I’m not a huge fan of smoked fish, but I adore smoked almonds and smoked turkey. Plus, I love nothing more than kitchen experiments. My inquisitive brain wanted to see what would happen if I snuck some into a batch of cookie dough.
I was envisioning a cookie with a hint of that campfire smoke you associate with making s’mores. Sometimes there is a huge gap between what you wish for and what actually transpires. I ended up with a batch of cigarette flavoured cookies. Too smoky!! I tried them again with just a scant 1/4 cup of smoked brown sugar and while the smoke flavour was mild, they had an odd smell. reminiscent of sweaty gym socks. Not what you are looking for in a cookie.
But it was not a total failure. As my sister Jody is fond of saying, “mistakes are how we learn”. The texture of these cookies was stellar. They were slightly crispy at the edges with a pronounced chewiness in the center. I decided to make them with all regular brown sugar and I added a bag of chopped Skor/Heath bits to really enhance the toffee notes of brown sugar. I finished them off with a light sprinkling of flaked sea salt before baking. As I munched my way through the new batch, I knew I had a winner on my hands. And I saved you $15. You’re welcome!
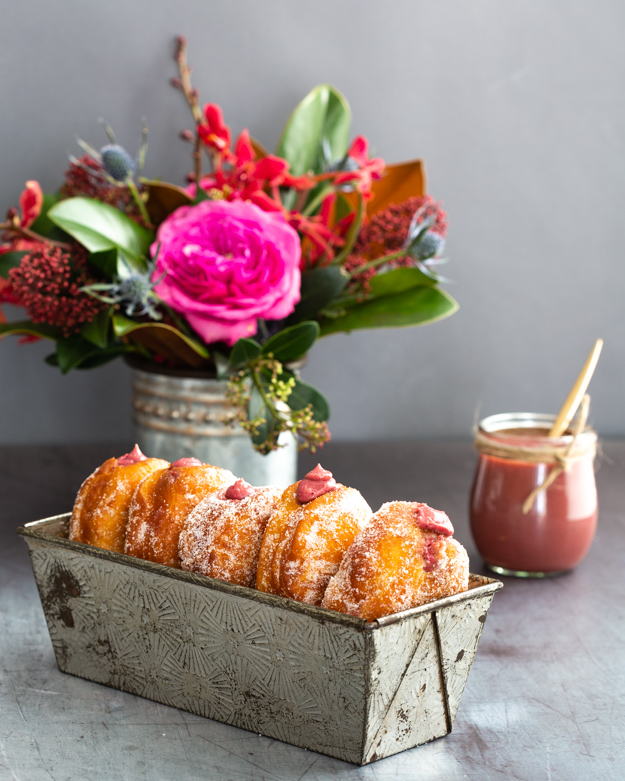
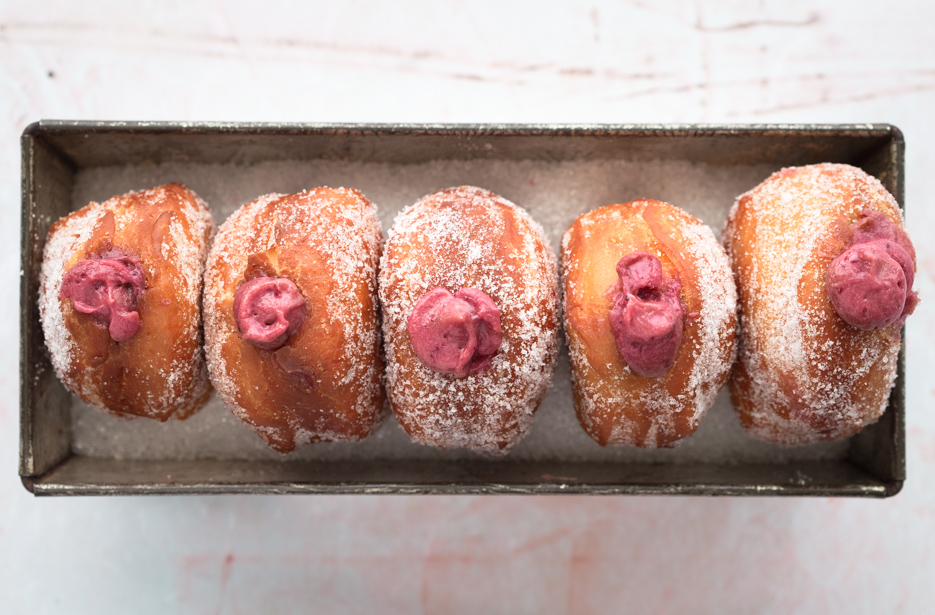
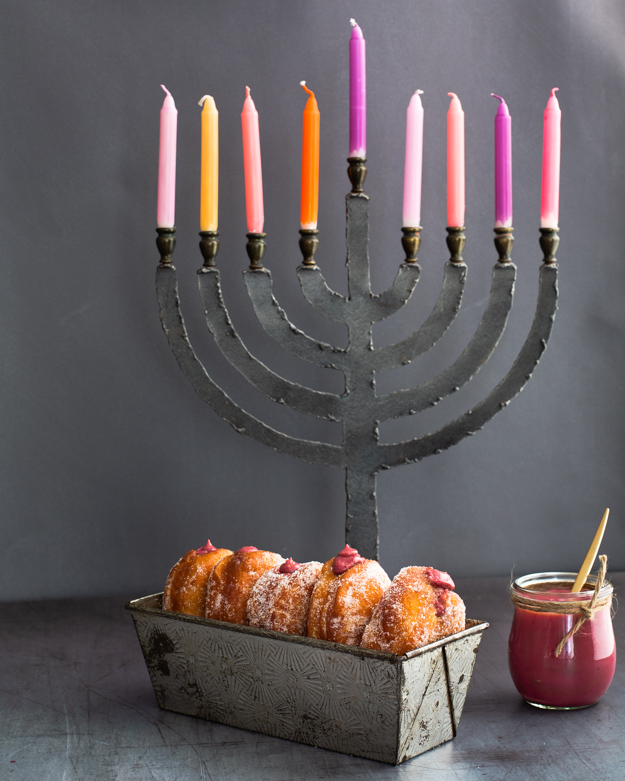
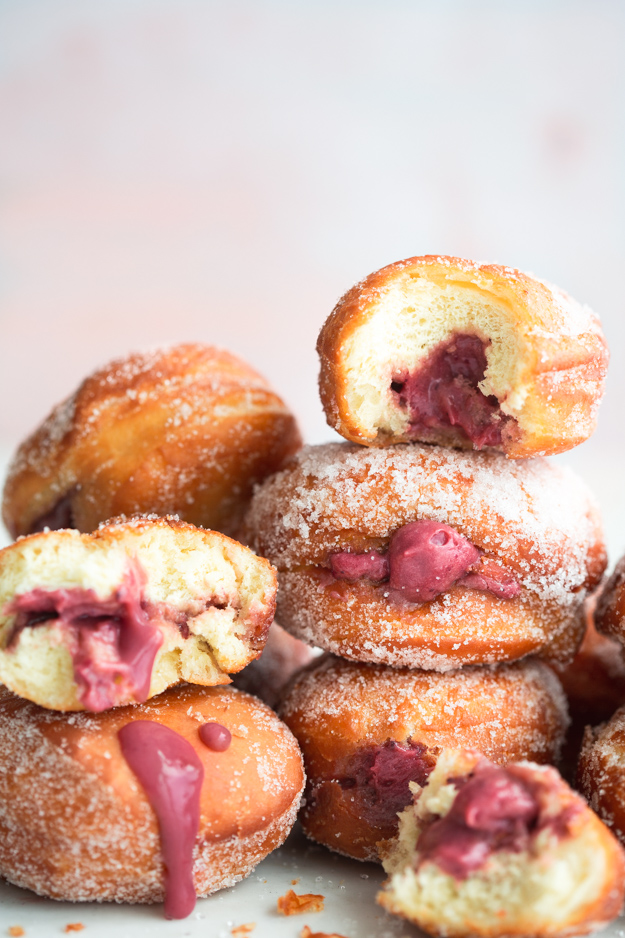
Chanukah starts tomorrow night. This eight day holiday commemorates a very special miracle of light. After defeating the oppressive Syrian-Greek army, the Jews set out to rededicate their holy temple, which had been destroyed during the war. When they went to light the special candelabra, they found only a small vial of pure olive oil. That meagre supply was enough to light the flame for just one day. Miraculously the oil burned for eight days, thus giving Jews, the world over, permission to eat fried foods for eight nights each year! In North America it is traditional to eat latkes (fried potato pancakes). In Israel, the holiday is celebrated by eating jelly filled donuts, known as “Sufganiyot”. I wanted to create a filled donut, but jelly is just “not my jam”. I wanted a tart filling to counteract the sweet donuts. Flushed with success from my Pomegranate Glazed Donuts, a few days ago, I decided too make a pomegranate curd.
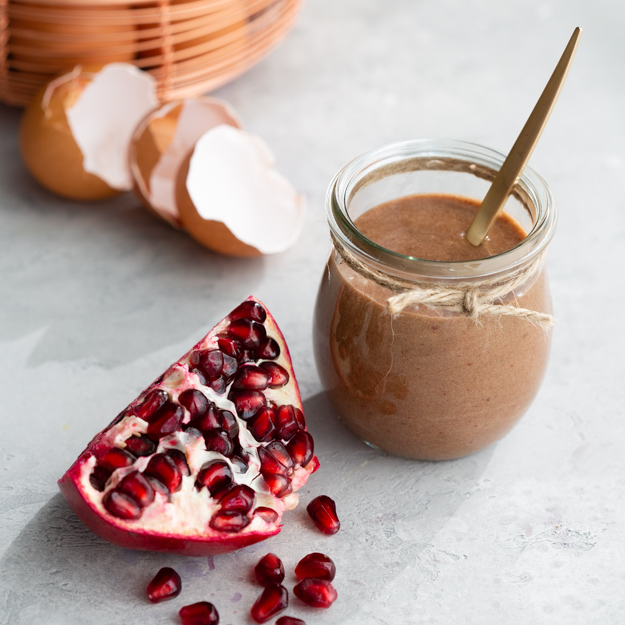
I learned a thing or two about heating pomegranate juice during the making of this curd. By my third batch I’d nailed it! I initially used a lemon curd recipe and added some pomegranate juice to it for flavour and colour. As I heated my sugar, eggs and pomegranate juice, I watched it go from a vibrant ruby red to a disgusting muddy mauve colour. I thought maybe something was wrong with the pomegranate juice, so I bought a fresh bottle and started again.
Round two; still disgusting dark looking hummus-like colour. I turned to Dr. Google and discovered that apparently there is a chemical reaction that occurs when pomegranate juice is heated, changing the colour. Lucky for me the brilliant Sarah of Snixy Kitchen figured out how to counteract this reaction. Turns out dried hibiscus flowers, ground up with your sugar will keep the colour pretty. I had a big jar of dried hibiscus flowers left over from my gin drinking summer days.
Success! This curd is gorgeous. Creamy, smooth, and mildly sweet, tempered with just enough tartness, it made the perfect filling for my donuts.

 One of the most beautiful ways to showcase the glorious blood orange, is to make a curd. You can use the curd to fill a pie or tart, spread it between two cookies, sandwich it between cake layers, swirl it into ice cream, stuff it into donuts or cupcakes…. you get the idea. Curd is glorious and versatile.
 For the meringue topping I looked to Stella Parks for advice. Her swiss meringue is foolproof. It whips up into a perfectly light, yet stable topping.
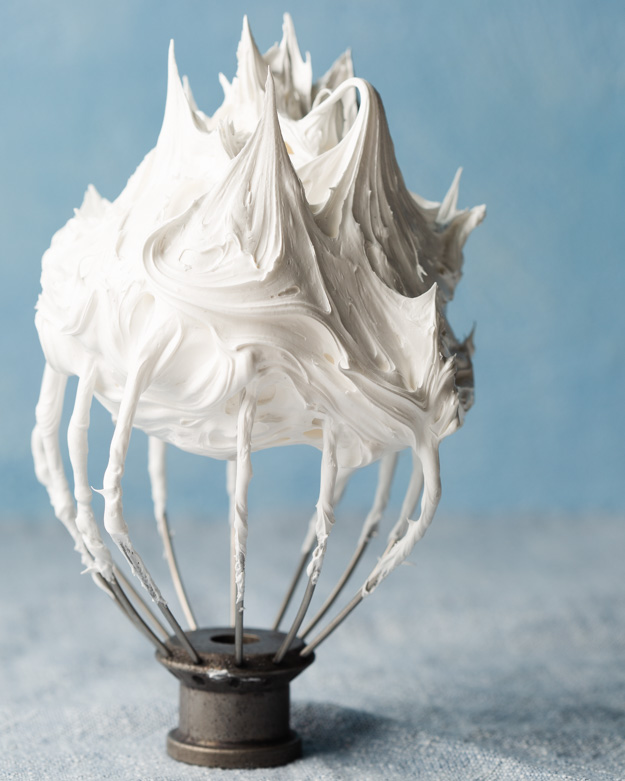 You could, of course, blanket the entire top with meringue, but I didn’t want to cover all that gorgeous orange curd, so I left some spots bare.
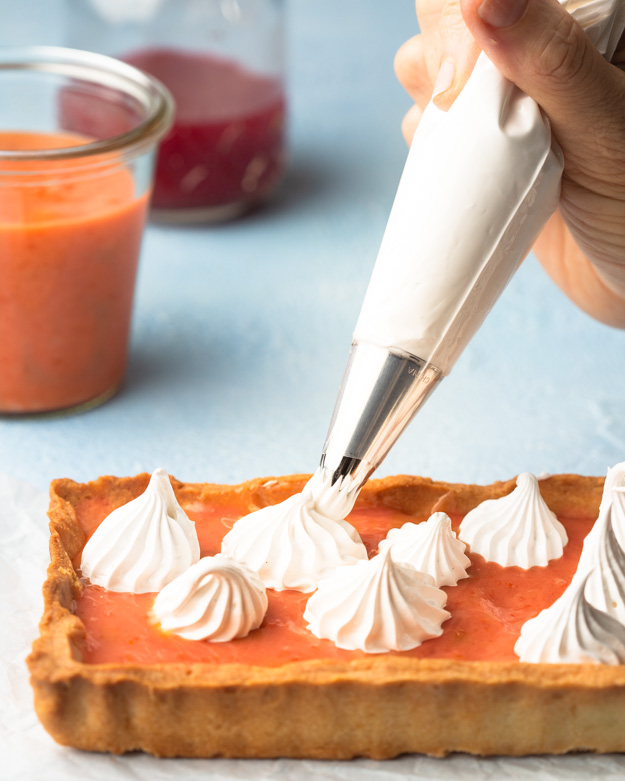

 You need lots of onion and fresh herbs for flavour and freshness. I like the combo of cilantro and parsley, but feel free to just use parsley if you are cilantro averse. The problem is that all this moisture makes them fall apart. Flour is a commonly used binding agent, to help hold the falafel together. However, flour alone as a binding agent leads to dense falafel. The genius folks at Cook’s Illustrated borrowed an Asian bread-baking technique called tangzhong. It involves mixing flour with water and then cooking it briefly in the microwave until it forms a paste.
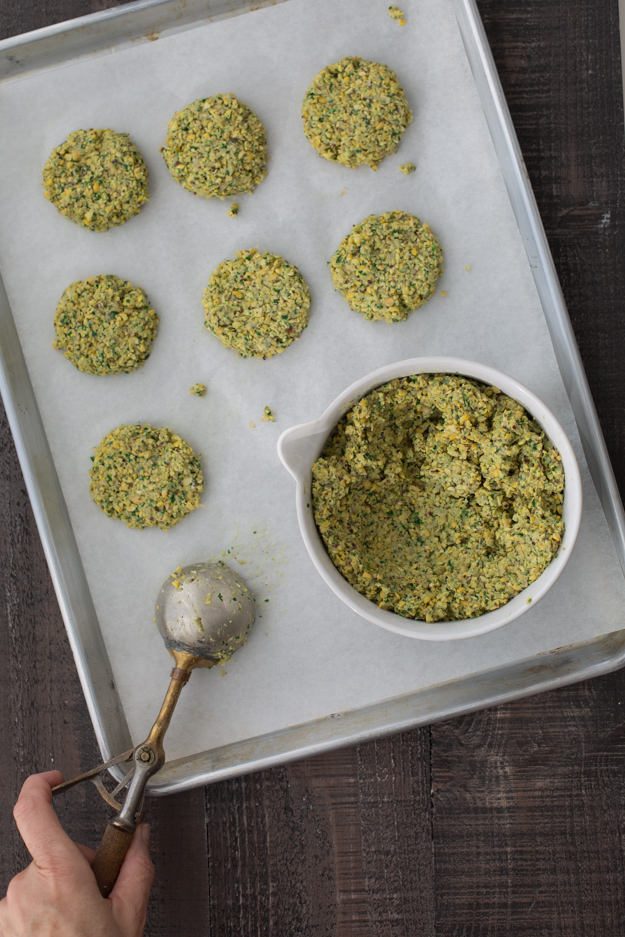 Let’s build a slider.