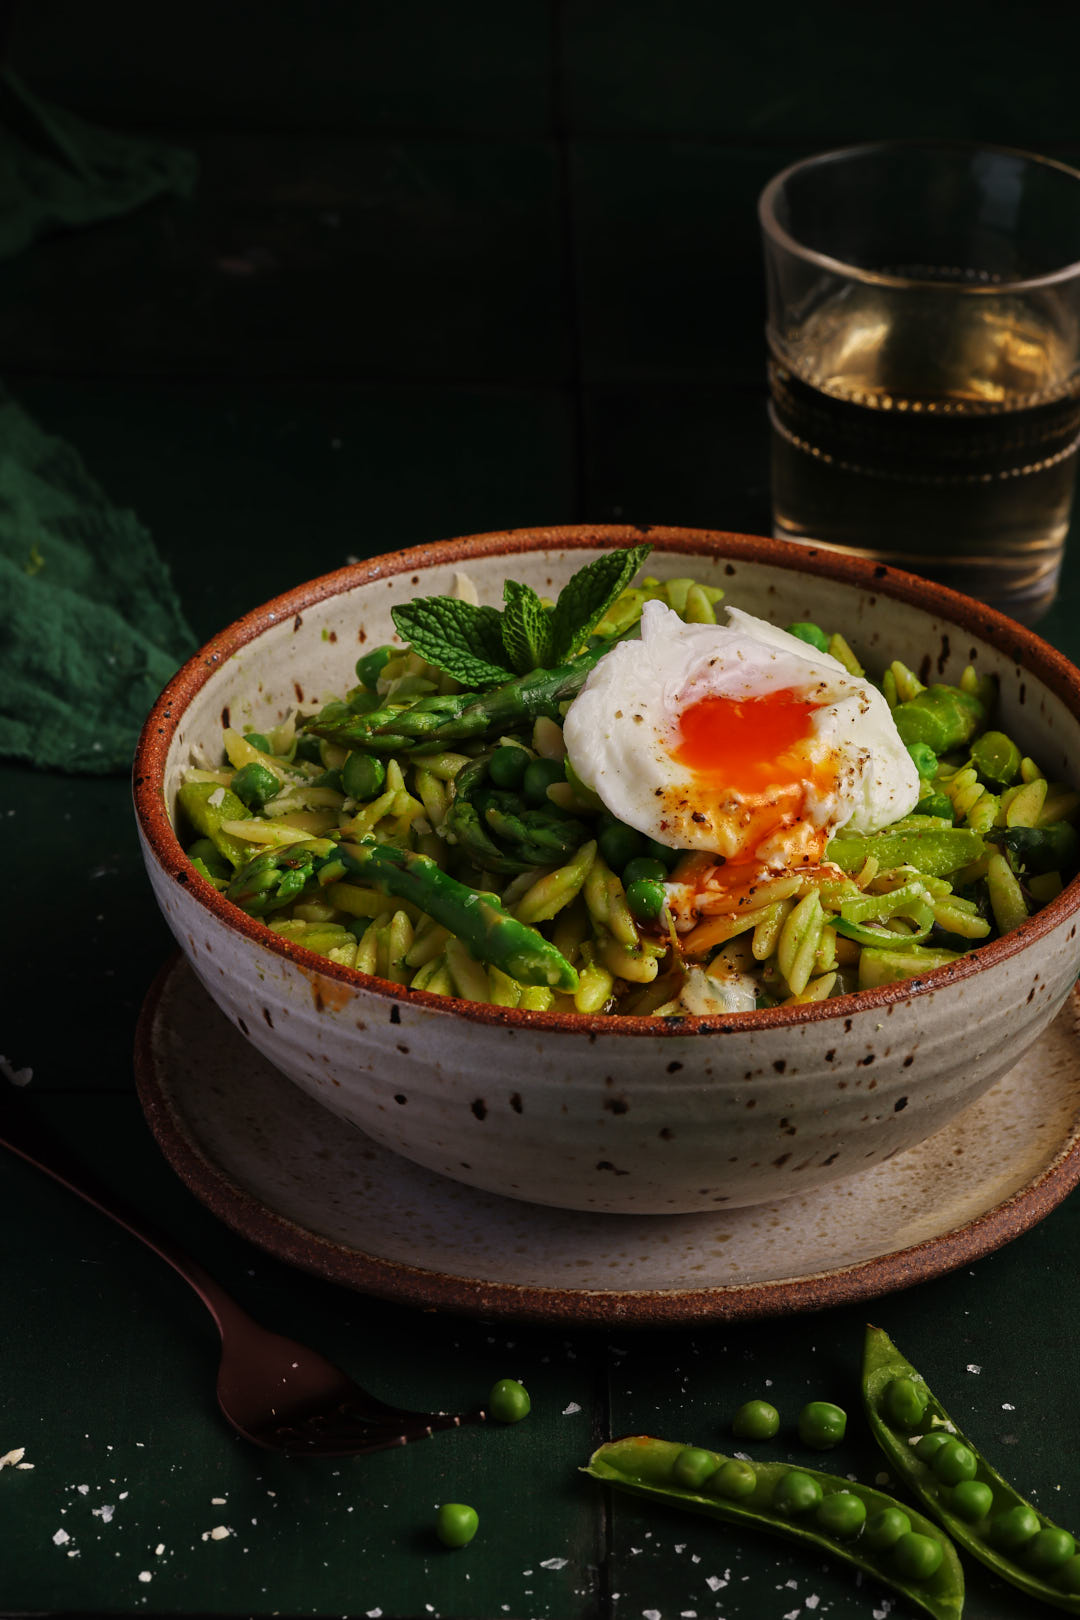
There’s something magical about the first green vegetables of spring. After months of stews and root vegetables, the sight of leeks, asparagus, and peas at the market feels like a deep breath of fresh air. It’s the culinary equivalent of throwing off a heavy winter blanket and stepping into the sunshine. This Primavera Orzotto is my celebration of that moment—bright, comforting, and full of life. It’s a riff on spring risotto, but with a laid-back twist: orzo. Unlike risotto, which demands constant stirring and your full attention, orzo is much more forgiving, letting you ease into spring with a dish that’s as relaxed as the season should be.
Watch how this vibrant, cozy dish comes together—no constant stirring required.
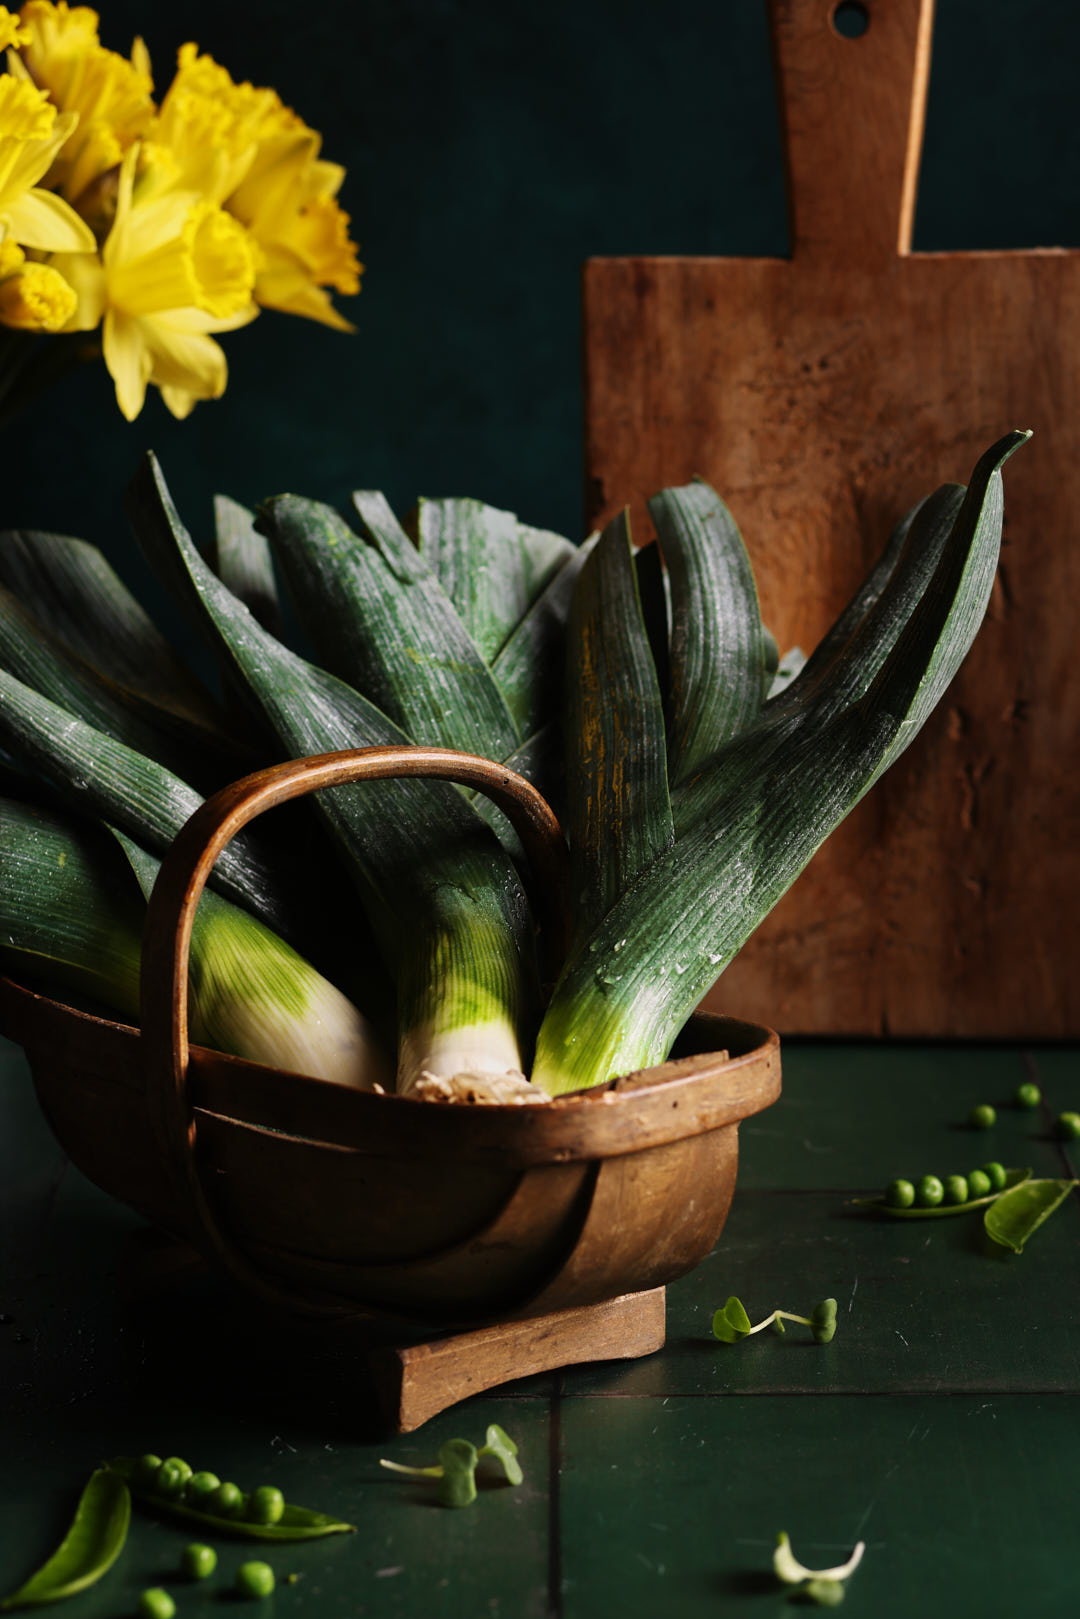
Why I Love Leeks (and How to Clean Them)
There’s something so elegant about leeks—their deep green tops fading into pale, creamy stems, still glistening with dew. They’re one of the first signs of spring in the market, and one of my favourite ingredients to cook with this time of year.
Leeks have a gentle, sweet onion flavour that turns beautifully mellow when sautéed. They’re the quiet hero of this dish, forming a rich, savoury base without overpowering the other vegetables.
But as gorgeous as they are, leeks are notorious for hiding grit and sand between their tightly packed layers. To clean them properly, I slice them into rounds, then submerge them in a big bowl of cold water. Swish them around with your hands to loosen any trapped dirt, then let them sit for a moment. The grit will sink to the bottom—just be sure to lift the clean leeks out with your hands or a slotted spoon. Don’t drain the bowl, or you risk pouring the sand right back over them.
A little extra care at the beginning goes a long way—and ensures every bite of this Primavera Orzotto is silky, clean, and full of spring flavour.
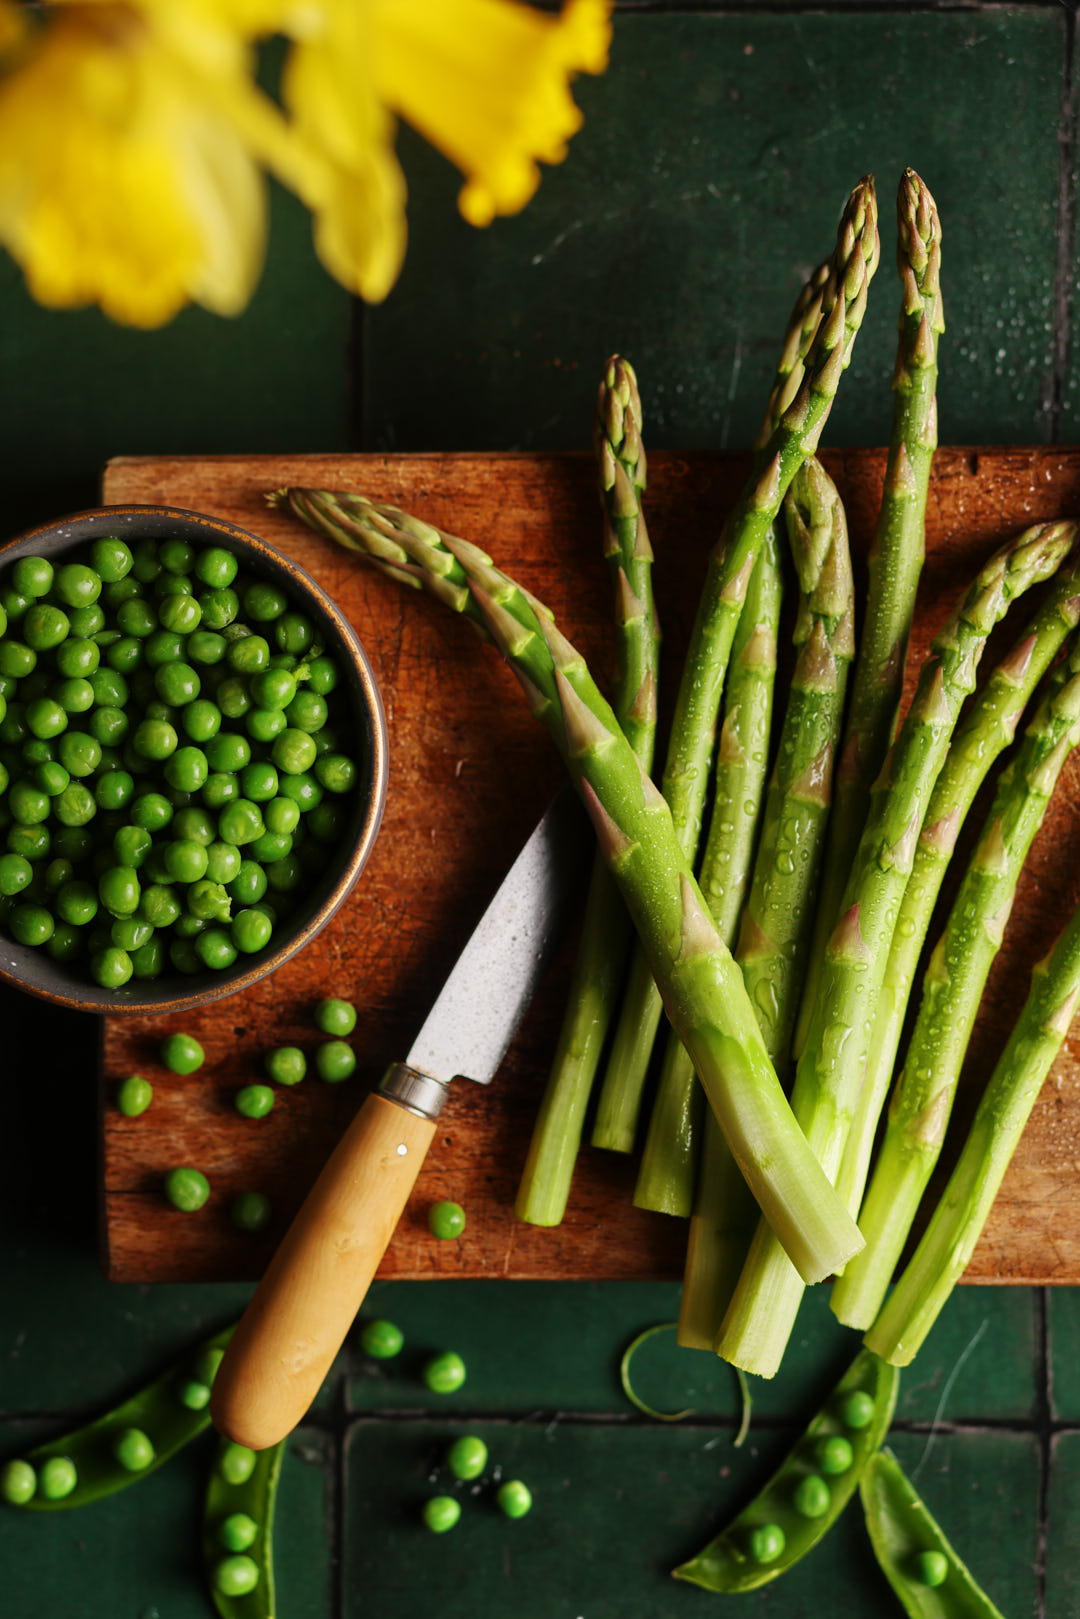
Choosing Asparagus (Yes, Size Matters)
I have some pretty strong opinions about asparagus—especially in spring. I never rush to buy the first pencil-thin stalks that show up early in the season. They might look dainty, but they’re often grassy and underwhelming in flavour. I wait patiently for the thicker spears to appear. They’re sweeter, more tender, and have a lovely meaty texture that stands up beautifully in a dish like this.
If I’m not cooking them the same day, I store the bunch upright in a jar or glass with a couple inches of cold water in the bottom—just like a bouquet. I loosely drape a plastic bag over the top and pop it in the fridge. This keeps the ends from drying out and helps the asparagus stay crisp and fresh for a few extra days.
One more tip: I always peel the bottom inch or two of each spear with a vegetable peeler. It’s a small step, but it makes a big difference in tenderness—and gives the asparagus a polished look that feels just a little extra special.
Fresh or Frozen Peas? Here’s the Deal
Unless you’re at the farmers’ market buying freshly shelled peas that were picked that morning (or maybe the day before)… don’t bother. Truly fresh peas are a delight—but they’re rare and fleeting.
For this recipe (and most recipes, honestly), frozen peas are the way to go. They’re flash-frozen at peak ripeness, which means they keep their bright colour, sweet flavour, and that perfect little pop. Best of all, you don’t even need to thaw them—just stir them in at the very end, and they’ll warm through in seconds.
Keys to Success for Primavera Orzotto
Start with a flavourful stock. Since the orzo absorbs so much liquid, the broth you use will make or break the dish. Homemade or high-quality store-bought stock is ideal—chicken or veggie both work beautifully.
Add asparagus later. To keep it tender and bright green (not mushy or dull), stir in chopped asparagus partway through cooking, not at the beginning.
Save the peas for last. Whether fresh or frozen, peas only need a minute or two of heat to warm through. Add them at the very end to preserve their sweet flavour and signature pop.
Frozen peas are perfect. Don’t stress about shelling fresh ones—frozen peas are harvested at peak ripeness and flash-frozen. They thaw in seconds and keep their lovely texture.
Let orzo do the work. Unlike traditional risotto, which needs near-constant stirring, orzo is much more hands-off. Stir occasionally and enjoy the relaxed pace.
Primavera Orzotto
Welcome spring with a bowl of Primavera Orzotto—where velvety orzo takes the place of rice in this light yet creamy twist on risotto.
170gramsfrozen green peas,about 1 cup, no need to thaw
1tablespoon lemon juice
113gramschicken or vegetable stock,about 1/2 cup
1Tablespoon olive oil
Orzotto
1large leek, white and light green part, thinly sliced
1teaspoonunsalted butter
1 teaspoonolive oil
280gramsdried orzo, about 1 1/2 cups
450gramschicken or vegetable stockabout 2 cups
340gramsasparagus, trimmed and cut into 2 inch pieces,about 1 bunch
225gramschicken or vegetable stockabout 1 cup
170gramsthawed frozen peasabout 1 cup
Garnish
28gramsgrated Parmesan cheese
Instructions
Make Green Stock
Place parsley leaves, frozen peas, lemon juice, vegetable or chicken stock to blender. Puree until smooth. Stream in olive oil at very end of blending time. Set green stock aside.
Make Orzotto
Fill a medium sized bowl with cold water. Place sliced leeks into bowl and use your hands to swish the leeks around. Remove leeks from bowl and discard sandy water.
Heat a large, high sided skillet or pot over medium heat. Add butter and olive oil. Add leeks and saute over medium heat for 3-4 minutes. If they start to burn, add a few Tablespoons of water.
Add orzo and saute for 1 minute until all the grains are coated in oil. Add 2 cups of stock and reduce the heat to medium-low to maintain a gentle simmer. Cook, stirring occasionally so the orzo doesn’t stick to the bottom of the skillet, until most of the liquid is absorbed, about 6 minutes.
Add asparagus and an additional cup of stock and continue cooking for another 4 minutes, stirring every minute or so.
Add green stock and peas and continue cooking for another 2 minutes.
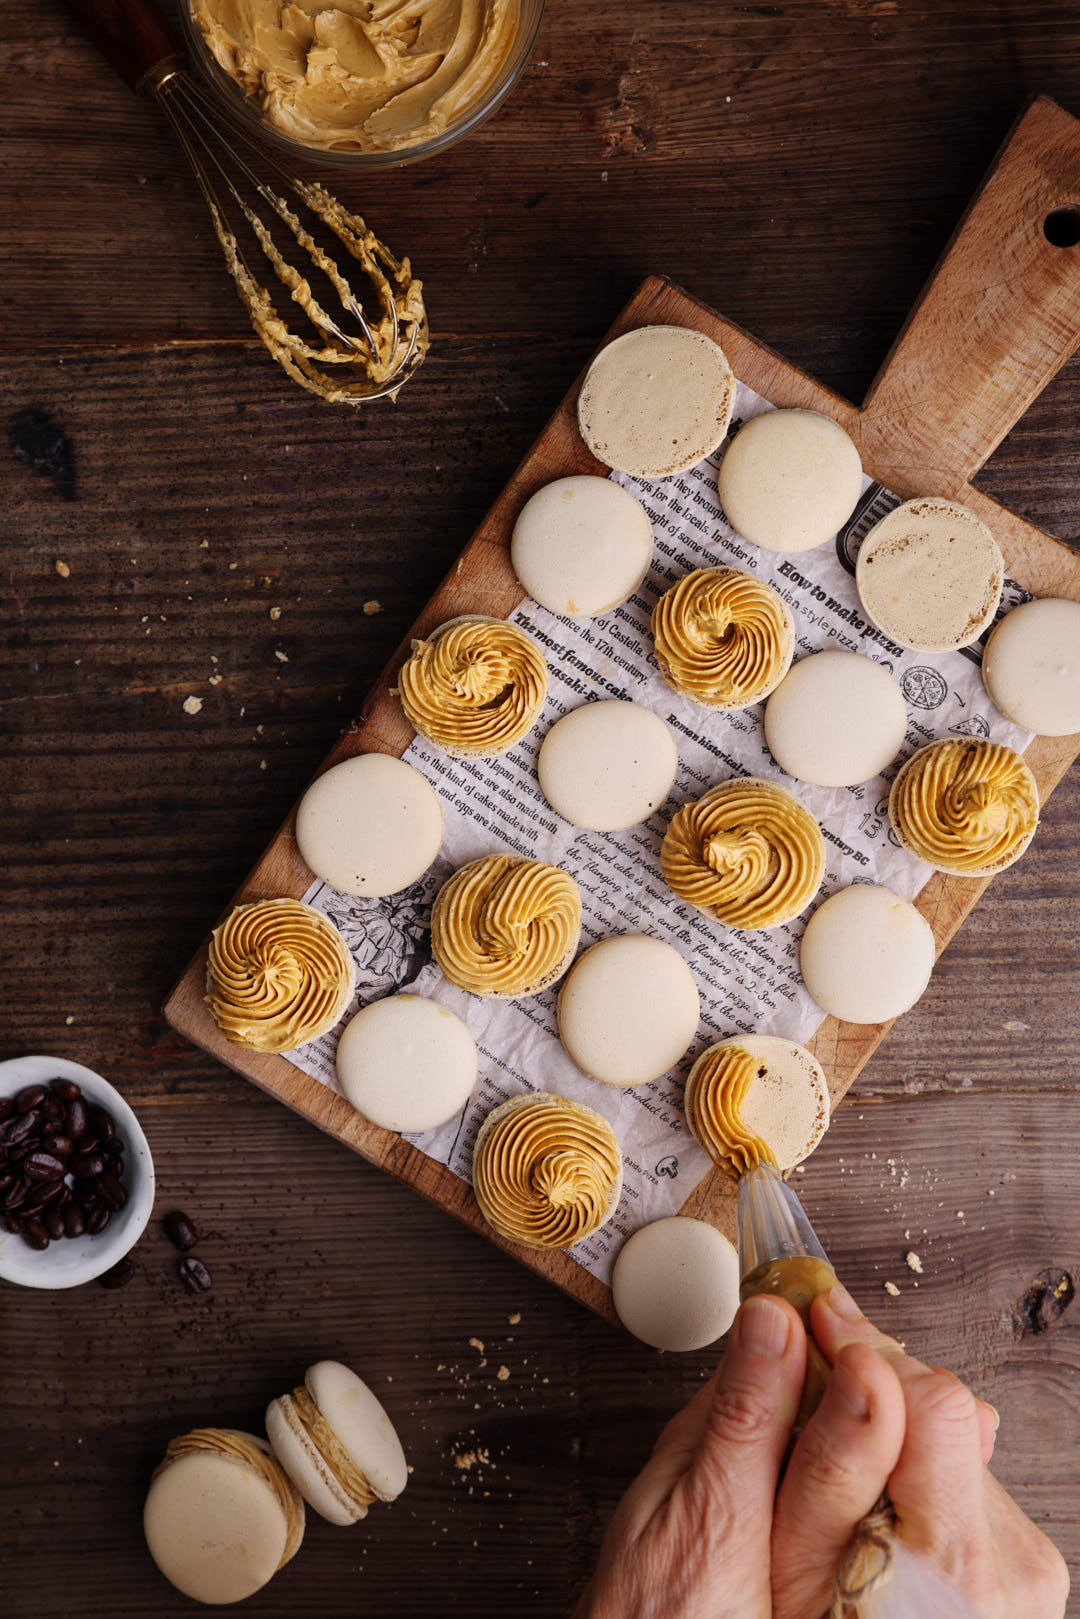
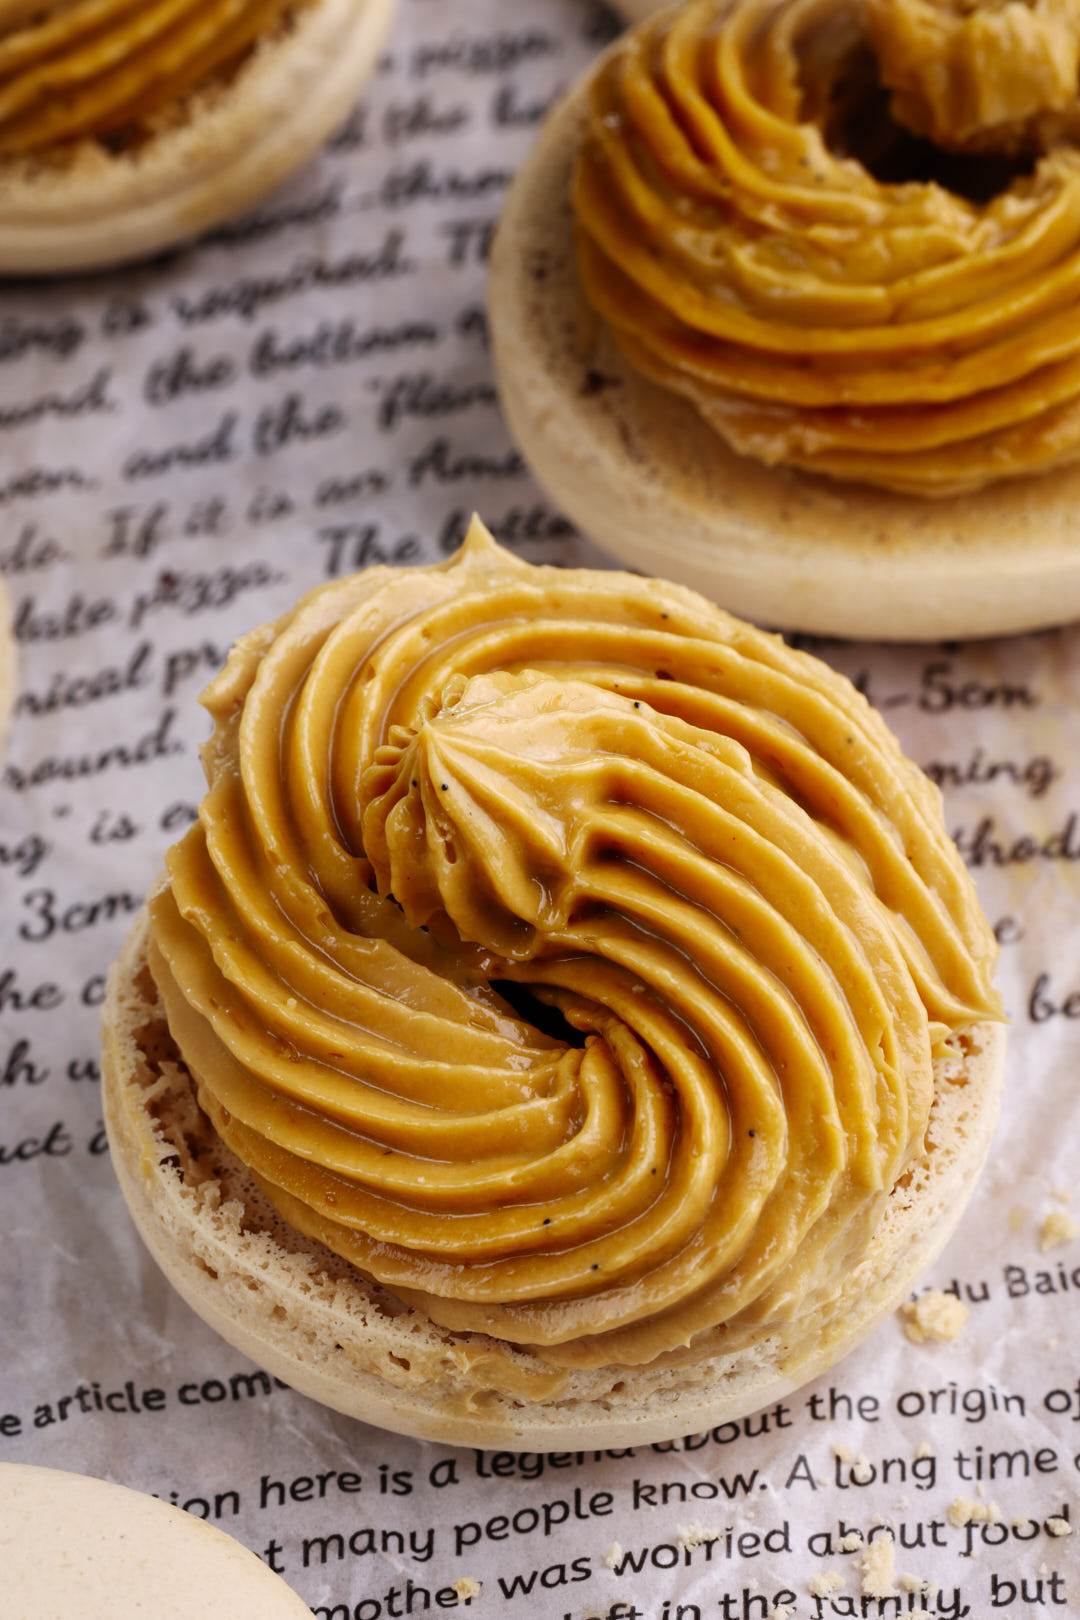
Espresso lovers, this one’s for you. These Espresso Macarons strike the perfect balance of crisp, chewy, and creamy. The delicate shells have that signature contrast—lightly crisp on the outside, irresistibly chewy in the center—sandwiched around a luscious, silky Espresso French Meringue Buttercream. Bold, rich, and undeniably sophisticated, these are macarons for grown-ups.
Macarons have a notorious reputation for being finicky—too much mixing, too little resting time, or the wrong oven temperature can throw them off completely. But don’t worry—I’ve perfected this recipe and will guide you through every step so you can achieve bakery-worthy results at home. Follow my method, trust the process, and soon you’ll be biting into the most luxurious homemade macarons you’ve ever had. And trust me, they’re worth the effort.
Keys to Success for Perfect Espresso Macarons
Precise Measurements Are Key – Macarons are all about precision. Weigh your ingredients for the best results—this isn’t the time for eyeballing!
Master the Macaronage – Macaronage refers to the technique of mixing the batter. The key? Mix until the batter flows like lava—smooth but not runny. A good test is the figure 8 trick: when the batter ribbons off your spatula and forms a figure 8 without breaking, it’s just right. Over mixing or under mixing can ruin your shells!
Resting Time is Non-Negotiable – Once piped, let the shells sit for at least 30 minutes until a thin skin forms. This step is crucial for developing the signature macaron “foot”—that delicate frill at the base of each shell.
Oven Temperature is Everything – Macarons are sensitive to heat. If your shells crack or don’t rise, check your oven’s accuracy with a thermometer. Small temperature adjustments can make a big difference.
Flavour Starts with the Filling – A great macaron is all about balance. Using high-quality espresso powder in the buttercream brings out the best coffee notes without overpowering the delicate shell.
Finish with a Flavour Cue – A beautiful macaron deserves an elegant finish. I drizzled mine with dark chocolate and topped each one with a chocolate-covered espresso bean—a little hint of the flavour inside.
Serving and Storing Espresso Macarons
Macarons actually taste even better after resting for a day in the fridge—the flavours meld beautifully, and the texture reaches perfection. Store them in an airtight container for up to a week.
For a refined look, I used a French piping tipto pipe the filling, but a standard star tip works just as well. This adds a touch of elegance compared to a plain tip.
These Espresso Macarons pair beautifully with a latte for an afternoon treat or make an impressive dessert at your next dinner party. However you enjoy them, they’re sure to be a showstopper!
Espresso Macarons
These are for the coffee lovers in your life. Chewy espresso macaron shells sandwiched together with a luxurious espresso french buttercream.The macaron recipe for the shells is very slightly adapted from the book,“Secrets of Macarons”. (JoséMaréchal). The method for making them is a compilation of tips and tricks from Erin at cloudykitchen, Stella at seriouseats and Natalie at loveandmacarons. The French Espresso Buttercream recipe is from atsloanestable.com.
200gramsalmond flour,I like Bob's Redmill or King Arthur
200gramsicing sugar
2teaspoonsInstant espresso powder
80 gramsegg whites,room temperature
175gramsfinely ground, granulated sugar
75 gramswaterroom temperature
25gramsfinely ground granulated sugar
80gramsegg whites,room temperature
Coffee Buttercream
6largeegg yolks, room temperature
100gramsgranulated sugar
45gramswater,3 Tablespoons
227gramsunsalted butter, room temperature, cut into 1/2 inch cubes
1teaspoon vanilla bean paste or vanilla extract
2 teaspoonsespresso powder
Decoration
36chocolate covered espresso bean candies
125gramssemi-sweet or bittersweet chocolate,coarsely chopped
Instructions
Macaron Shells
Prepare templates for macaron cookies so that your shells will all be the exact same size. You can download a template from http://barbarabakes.com/wp-content/upLoads/2010/12/macarontemplate.pdf Print out enough templates to line a 13x18inch baking sheet. Lay templates on baking sheet and cover with a plain piece of parchment paper.
Fit a large pastry bag with a plain ½ inch diameter round tip, and place in a large drinking glass or pitcher. Fold the cuff of the pastry bag over the rim of the glass or pitcher. This will make filling the pastry bag quite easy.
In the food processor, grind almond flour and icing sugar for about 2 minutes until it resembles a finely ground powder. Add espresso powder and pulse for 1-2 seconds to evenly distribute it. Transfer ground almond mixture to a sieve with medium sized mesh holes, set over a large bowl and using a rubber spatula or the back of a spoon, push the mixture though the sieve into the bowl. This process ensures a smooth and shiny macaron shell. Add 80 grams of egg whites and stir until all the dry ingredients have become incorporated into the egg whites. Cover with plastic wrap and set aside.
Place 175 grams granulated sugar and water in a small saucepan. Clip a candy thermometer to the side of the pan. Turn heat to high and cook, without stirring, until you reach a temperature of 240°F. You can swirl the pan, to even out the melting sugar, but don’t put a spoon in it and stir.
While sugar is cooking, place 80 grams egg whites into stand mixer with whisk attachment. Whisk on high speed until egg whites become bubbly. Add 25 grams sugar and whisk until soft peaks form. If soft peaks form before the sugar and water reach 240°F, turn mixer to low speed.
When the sugar reaches 240°F, the mixer to low and carefully pour the sugar syrup, in a thin stream into the mixer. Aim for the side of the bowl, rather than the whisk. Turn up the speed of the mixer to high and beat until the bowl of the mixer is warm to the touch, body temperature.
Add 1/3 of the meringue to the almond flour mixture. Fold meringue into the mixture to lighten it slightly. Add remaining meringue and fold it into the ground almond mixture. The best way to do this is to use both a folding motion and a pressing motion. Use a flexible rubber spatula to scoop the batter up from the bottom of the bowl and then press it against the side of the bowl to gently deflate. Keep turning bowl and repeating this folding and pressing motion until the batter flows like lava. If this is your first time making macarons, watch this video a few times. It will give you a great idea of the consistency you are looking for.
Spoon half the batter into the piping bag. Twist top of bag closed. Pipe batter onto prepared baking sheets, using circles as a guide. Most likely your piped macarons will have a little nipple or peak on them. Tap the tray on the countertop few times to slightly flatten them out. Repeat with the remaining batter on second and third cookie sheets if necessary. Remember to slide out the paper templates before baking.
Put rack in middle position in oven. Place an empty baking sheet on the middle rack to allow it to heat up. Preheat oven to 300ºF.
Let the macarons sit at room temperature for about 30-60 minutes so that the tops can dry out a bit before baking. This will help them rise a bit better. After 30 minutes, touch the top gently with your finger. If it does not stick to yourf finger, they are ready to bake.
Place one sheet of macarons in the oven, on top of the pan you left in there to preheat. The double pans help with insulation and more even baking. Bake for about 14-16 minutes, rotating the tray after 7 minutes for even baking. You will notice after about 5 minutes, little feet will start appearing as the macarons begin to rise. This is the mark of a well-made macaron.
While macarons are baking, take a clean kitchen towel, place it under the tap briefly to dampen it. Lay damp towel out on the counter.
After 14 minutes, check the macarons. Press down gently on the top of one of the macarons. If the foot wobbles it needs a little longer, if it is stable, then it is close to being done. Do a little test. Try to peel a macaron off the paper. If they are stable but cannot yet peel away cleanly, give them another minute or so.
Remove from oven and carefully slide parchment paper off the baking sheet onto the dampened towel.This creates a thermal shock that makes the macarons easier to get off the parchment paper. Let cool for a few minutes, then transfer macarons to a wire rack to finish cooling.
Espresso Buttercream
Place the egg yolks in a medium bowl or a bowl of a stand mixer fitted with a whisk attachment. Whisk on high speed until thick and foamy (about 3 minutes) while you heat the sugar and water.
Heat the granulated sugar and water in a small saucepan or frying pan over low heat, stirring constantly until the sugar dissolves. Increase the heat to medium and bring to a boil, or until it reaches 240 degrees F.
While the egg yolks are still whisking at medium speed. slowly add the sugar syrup into the bowl. Continue mixing until the mixture has cooled down to room temperature.
Add the butter to the mixture one cube at a time, allowing each piece to fully incorporate before adding another.
Add vanilla and the espresso powder. Continue mixing on low speed until the buttercream is completely smooth.
Transfer half the buttercream to a disposable piping bag fitted with a star tip. I used Ateco French tip #862. Pipe the filling onto a macaron and sandwich with another macaron. Repeat with all macarons.
Melt chocolate in glass bowl in microwave on medium power for 1 minute. Stir until completely melted. Transfer white chocolate to a disposable piping bag. Drizzle top of filled macarons with chocolate. While the chocolate is still wet, top each with a chocolate covered espresso bean.
Notes
A scale is necessary for measuring out the ingredients. There is too much margin for error when scooping into measuring cups. Macarons are finicky!
If you can’t find fine ground granulated sugar, just give regular granulated sugar a whiz in the food processor for 30 seconds.
Filled macarons will keep refrigerated for about 4-5 days. If you want to make them ahead of time, freeze the shells only and then fill with ganache the day before you plan to serve them.
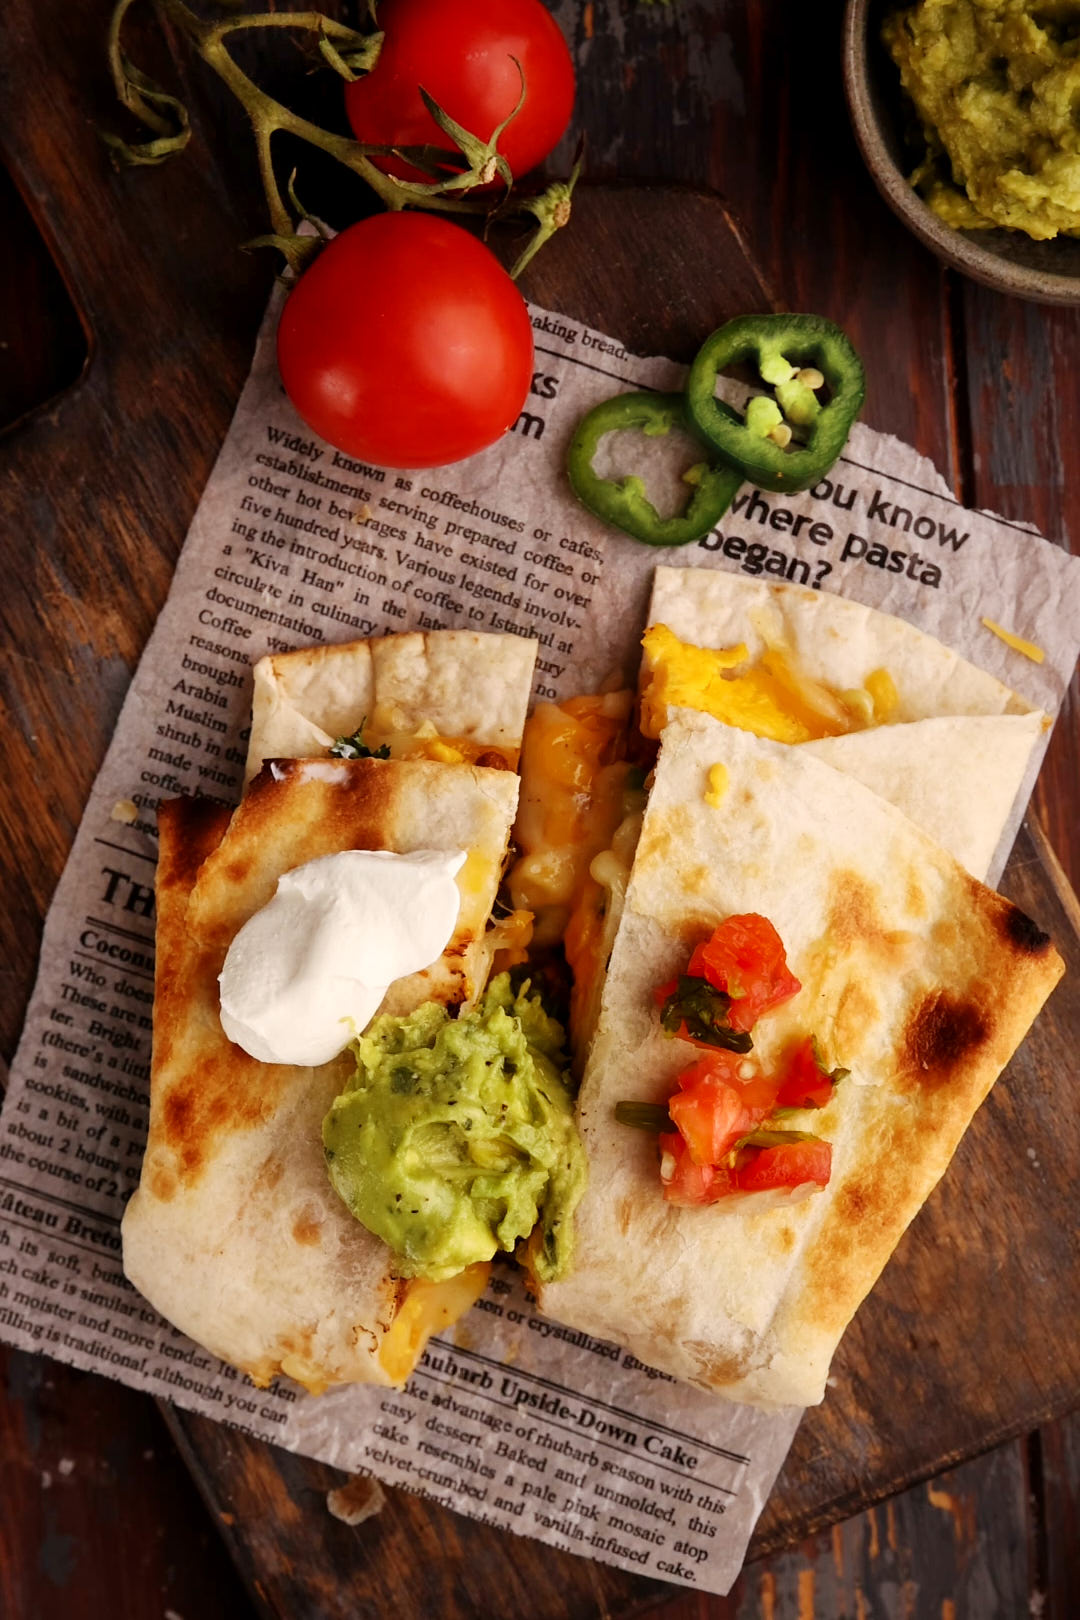
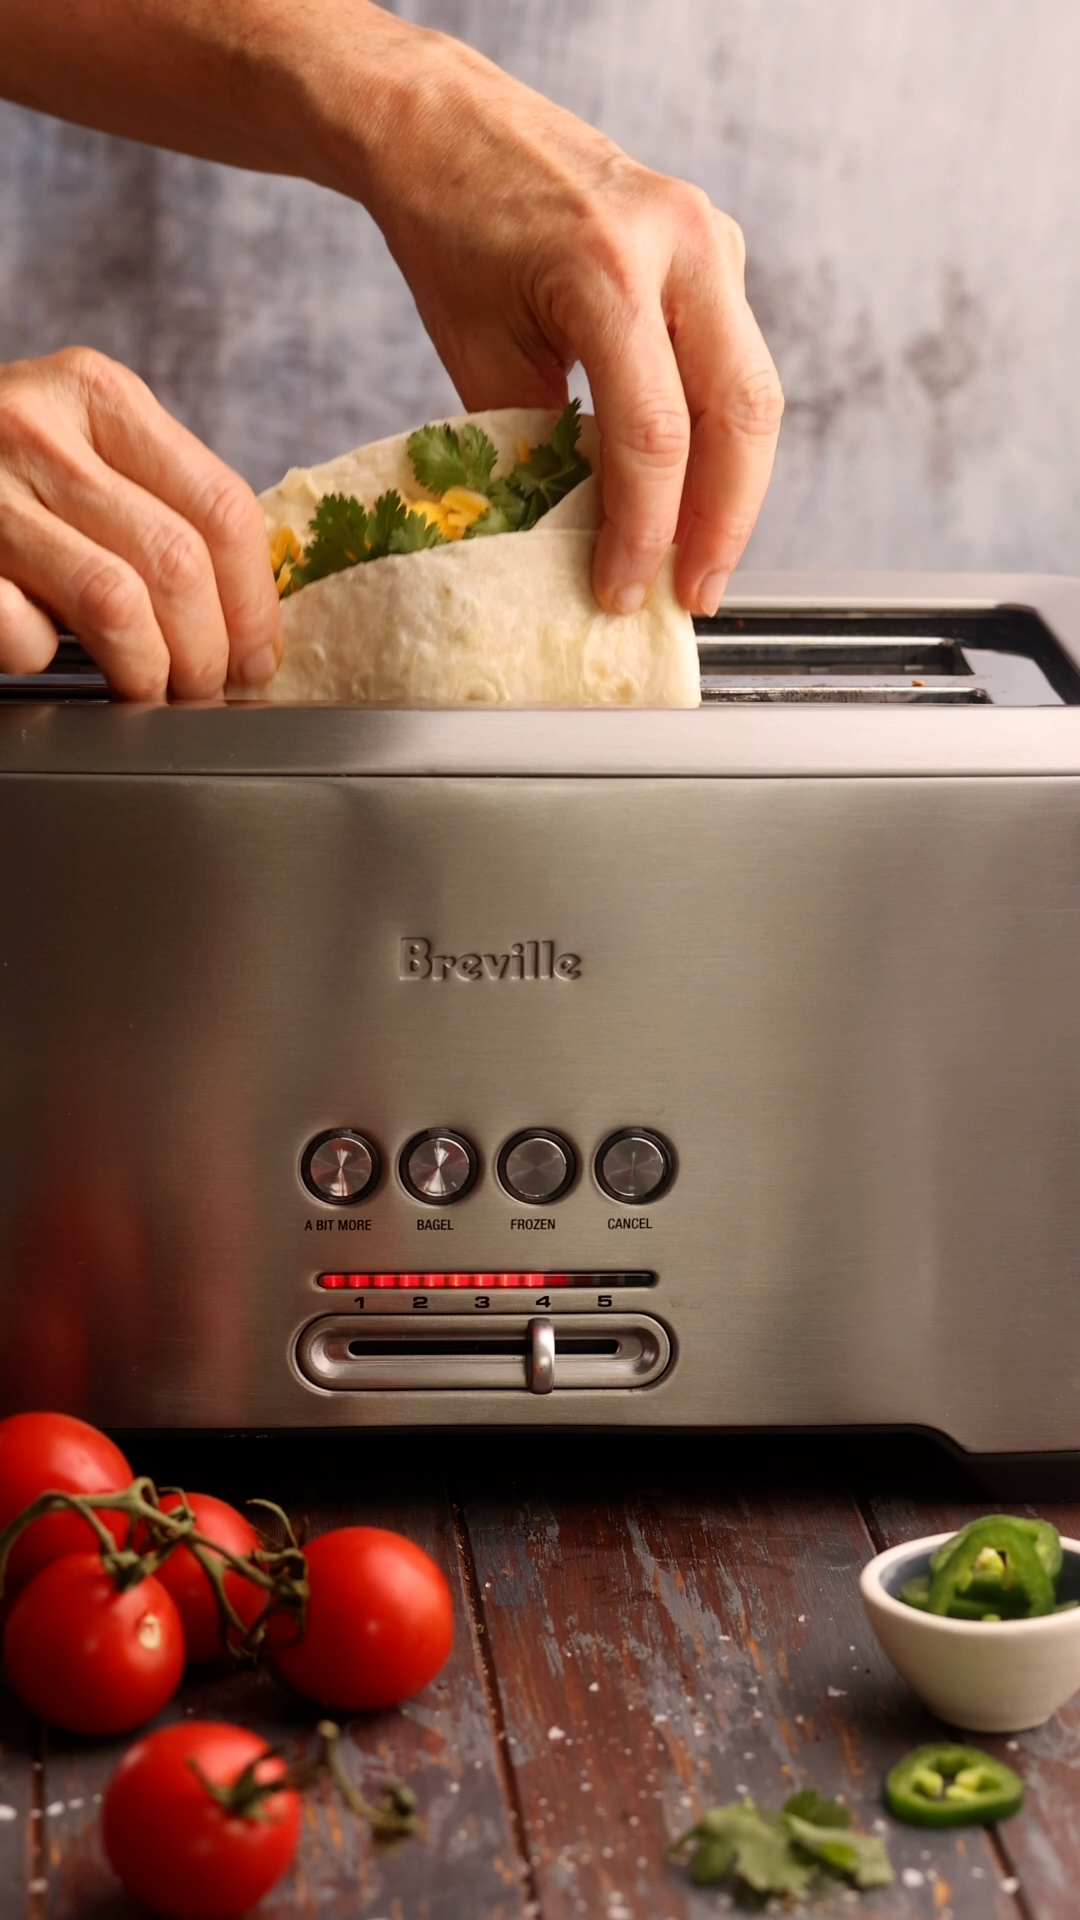
These Breakfast Toaster Quesadillas were inspired by an Instagram video I watched at least 20 times—I was completely mesmerized. I’m pretty sure the original idea came from some enterprising college student, stumbling back to their dorm room at 2:00 AM after a night out. It reminded me of my own university days when I’d wrap a cheese sandwich in foil and use an iron to make a makeshift grilled cheese.
I love testing unconventional ways to cook things. I often play a game I call “Will it Waffle?”
Turkey with gravy and stuffing? Let’s not talk about that one.
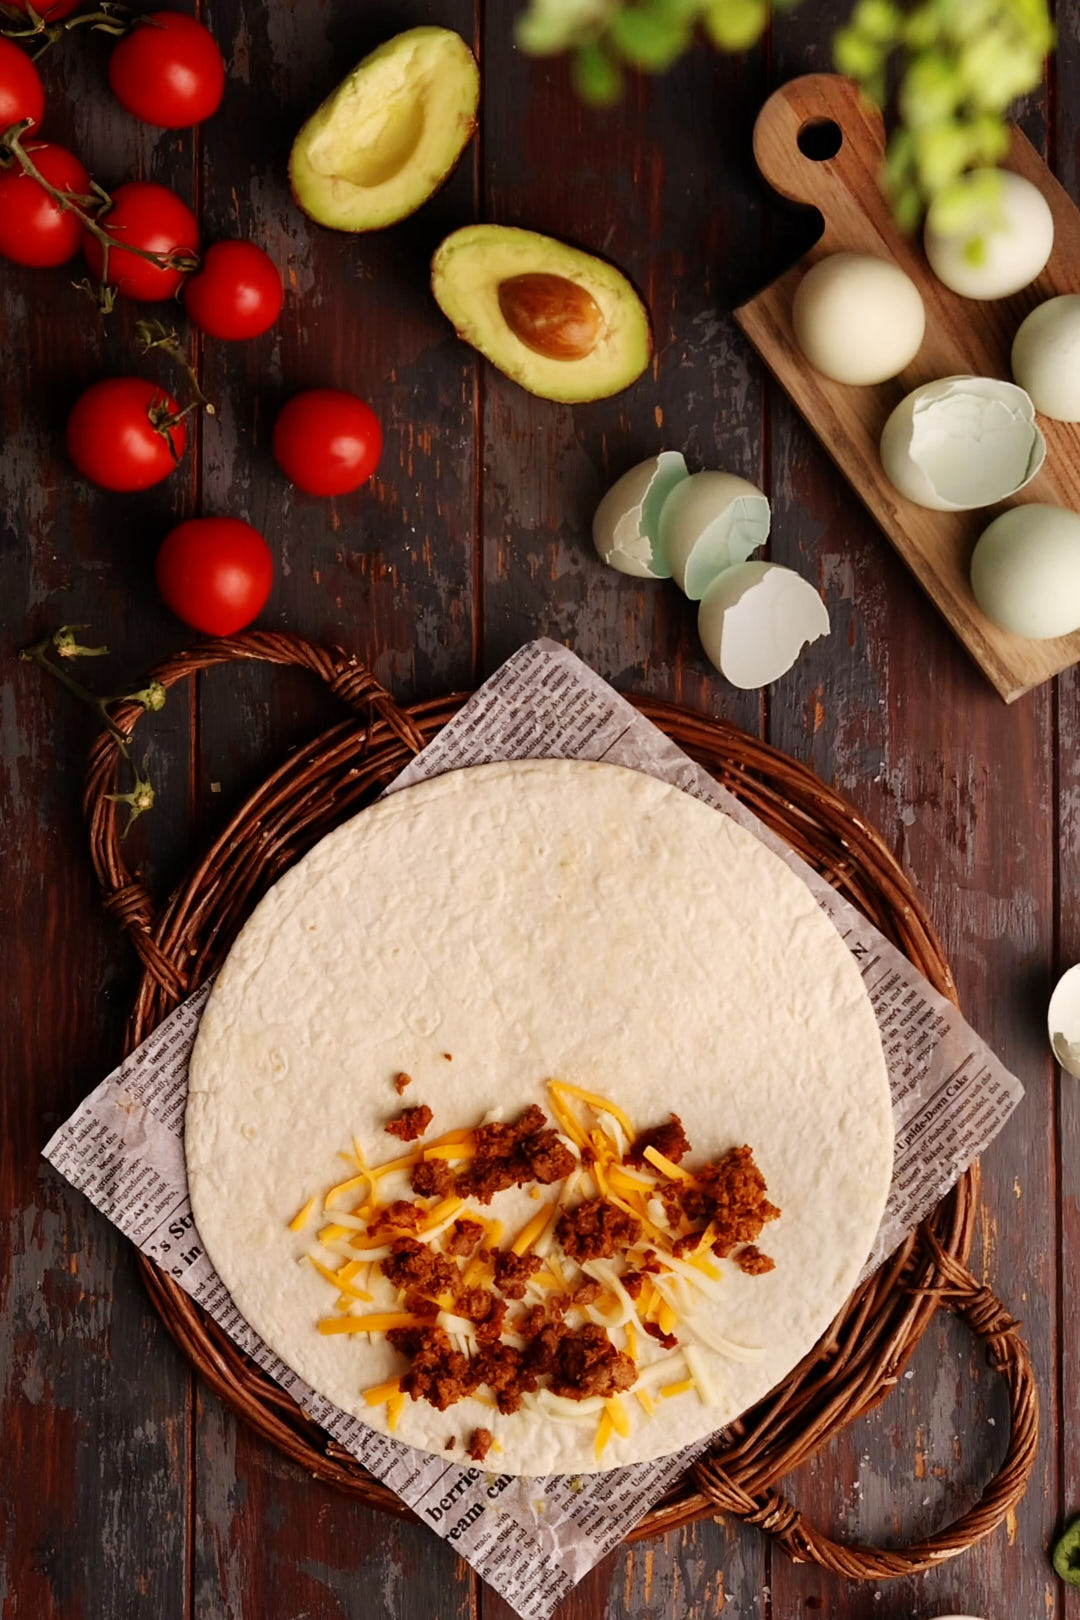
So naturally, when I saw Toaster Quesadillas, I had to try them. They’re fast, crispy, and endlessly customizable. My take? A Breakfast Toaster Quesadilla, loaded with:
Crispy and golden on the outside, gooey and cheesy in the center—all in just 3 minutes in the toaster. Top with guacamole, salsa, and sour cream, and breakfast is served.
Keys to Success for Breakfast Toaster Quesadillas
Lightly oil the outside for max crispiness.
Don’t over stuff—less is more.
Keep the filling in the top center to avoid spillage.
Fold carefully and press well before toasting.
Avoid wet fillings (like tomatoes) to prevent a toaster mess.
28 gramsshredded cheese,I used a mix of cheddar and Monterey Jack
1large egg,scrambled
28gramsplant based sausage, crumbled and cooked
2Tablespoonscorn,fresh or frozen
2slicesjalapeno
5leavescilantro
Toppings
1Tablespoonguacamole
1 Tablespoonsour cream
1 Tablespoonsalsa
Instructions
Brush one side of tortilla with vegetable oil. Flip tortilla over.
Place shredded cheese onto tortilla, centered in the upper half of the tortilla. Top cheese with egg, sausage, corn, jalapeno and cilantro.
Fold sides of tortilla in and then fold up the bottom of the tortilla, so you have a nice little envelope. Press down with your palm to compress the package.
Place in toaster and toast for about 3-4 minutes, until crispy and golden. Top with guacamole, sour cream and salsa.
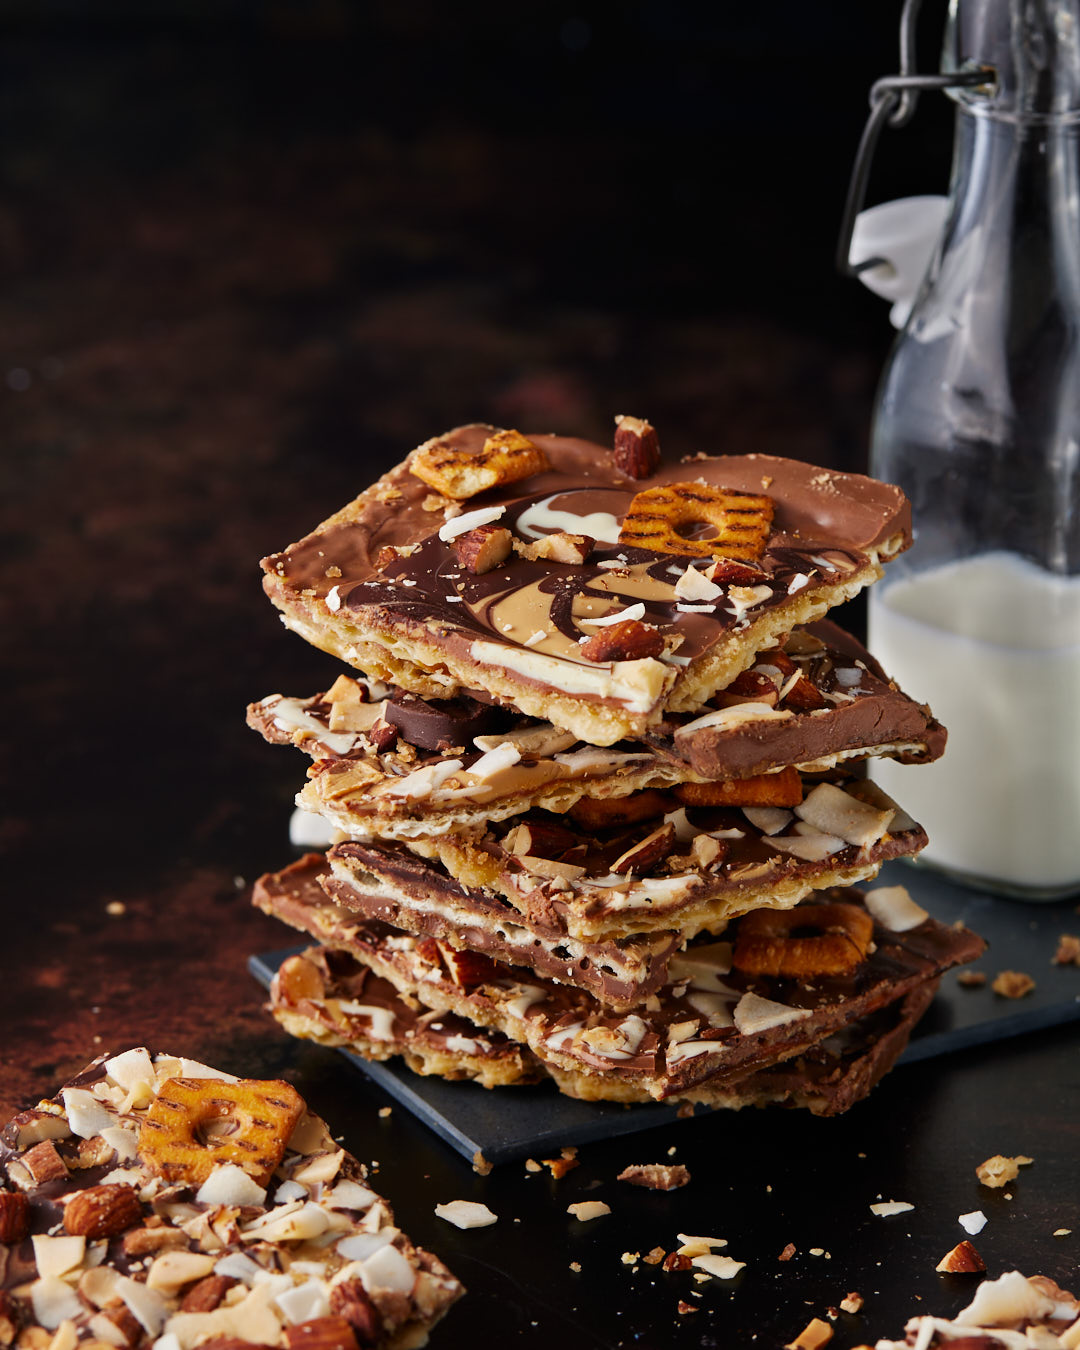
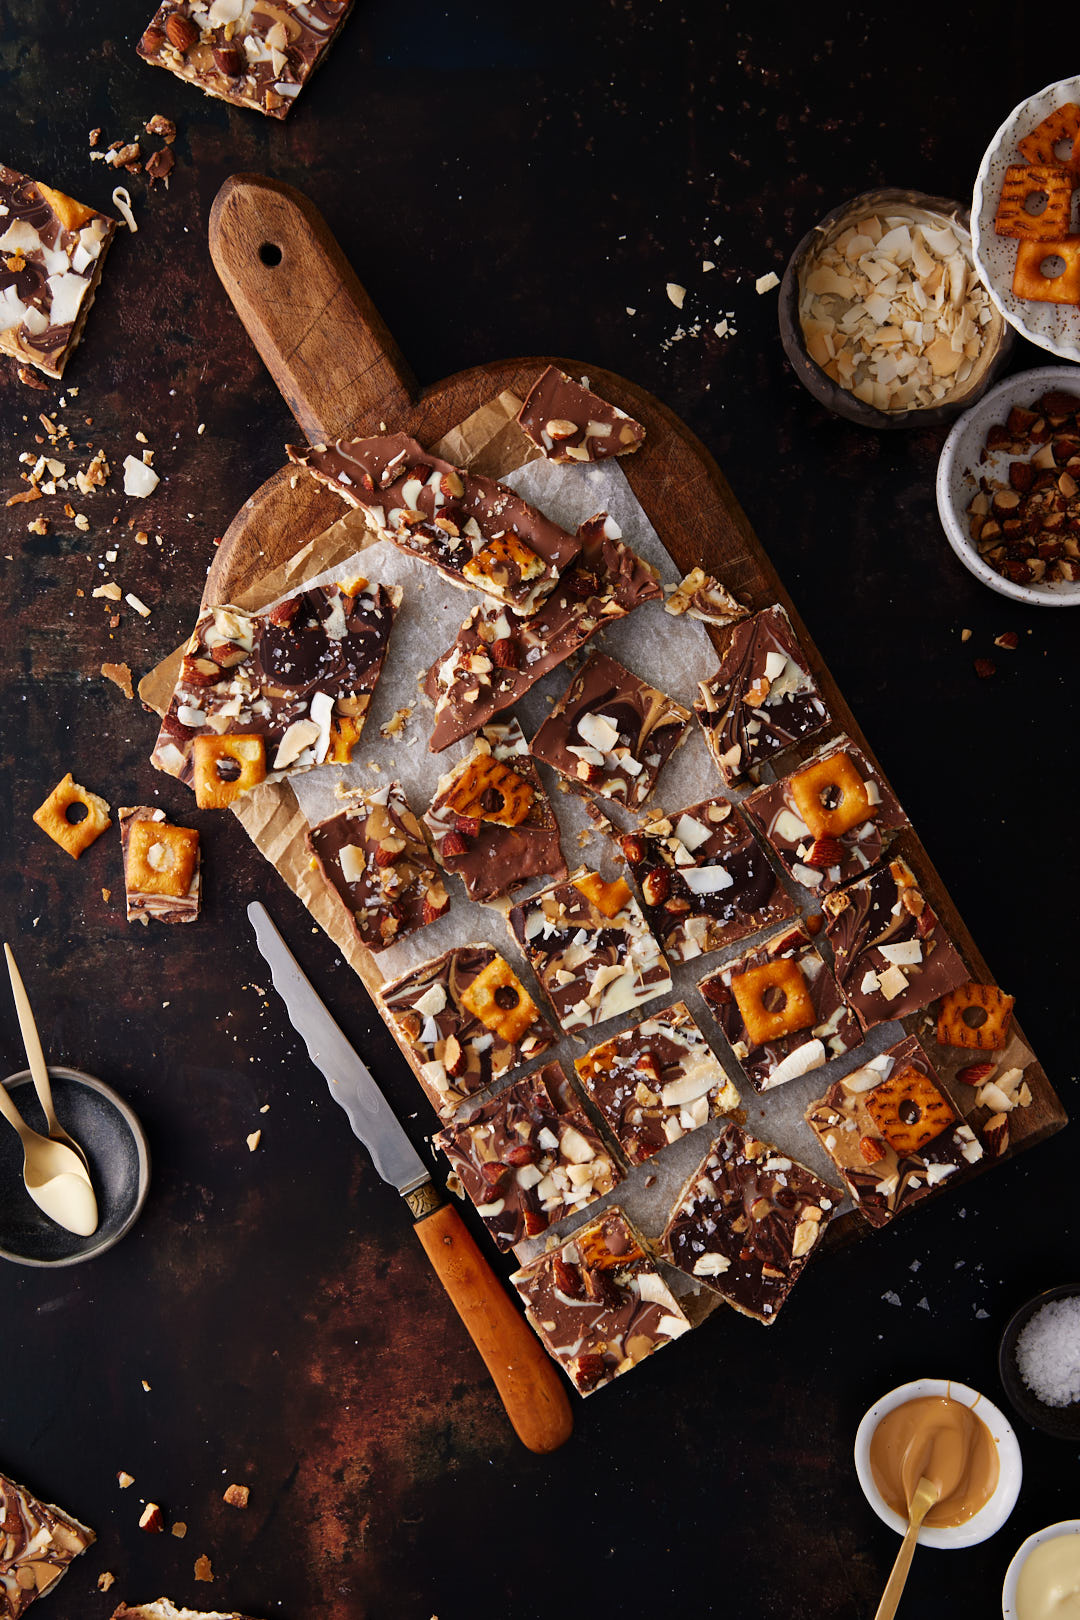
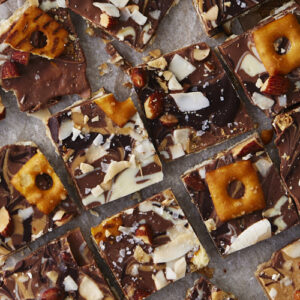
If you’ve never tried Matzoh Crunch before, prepare to be amazed. Sweet and Salty Matzoh Crunch starts with crisp matzoh, gets coated in rich, buttery toffee, and is finished with swirls of chocolate and a sprinkling of crunchy toppings. It’s completely addictive—just ask my husband, who has been “testing” it all week.
A huge shout out to @marcygoldman, who created the OG version of Matzoh Crunch. Over the years, I’ve had so much fun coming up with new flavour variations, and this one is my favourite yet. A mix of milk, white, blonde, and bittersweet chocolate, plus roasted almonds, Kosher for Passover pretzels, and coconut, creates the ultimate balance of flavour and texture. Sweet, salty, crunchy, and chocolatey—everything you want in a Passover dessert.
The recipe comes together fairly quickly and is easily customizable. If you want to keep it pareve, just use vegan butter or margarine and dark chocolate only. Can’t find blonde chocolate? Leave it out. it will still be delicious. It can be made ahead and stored in the fridge for several weeks. Watch it come together.
Keys to Success for the perfect Sweet and Salty Matzoh Crunch
1. Line Your Pan Properly – Trust me, skipping this step will lead to regrets. Line your baking sheet with foil first, then parchment paper. This ensures an easy cleanup and prevents any caramel from sticking to the pan.
2. The Toffee Trick – As the butter and brown sugar cook, the mixture might look like it’s separating into an oily mess. Don’t panic! Keep stirring, and it will come together beautifully. Once it reaches a boil, whisk vigorously for another minute or two to achieve a smooth, glossy caramel.
3. Melt Chocolate at 50% Power – Melting chocolate in the microwave? Use 50% power and stir every minute to avoid burning. Each type of chocolate melts at a slightly different rate, so be patient.
4. Marbling Magic – For a beautiful marbled effect, drizzle the white, blonde, and bittersweet chocolates over the milk chocolate while it’s still wet. Use a skewer or the tip of a knife to swirl them together into an elegant pattern.
5. Toppings Matter – Sprinkle on almonds, pretzels, and coconut while the chocolate is still melted and warm so they stick. A final touch of flaky sea salt brings out all the flavours.
6. Chill Before Slicing – Let the Matzoh Crunch set in the fridge for a few hours before cutting. Use a large, sharp knife to get clean, even pieces.
Sweet and Salty Matzoh Crunch
This “sweet & salty matzoh crunch” is delicious and utterly addictive, as my husband and chief recipe tester discovered this week. Thanks to @marcygoldman who created the OG matzoh crunch. I have so much fun coming up with new flavour variations every year.
227gramsunsalted butter, cut into 1/2 inch piecesremoved from fridge 30 minutes before starting recipe
213gramsbrown sugar
340gramsmilk chocolate,finely chopped
60gramswhite chocolate,finely chopped
60 gramsblonde chocolate,finely chopped
60 gramsbittersweet chocolate,finely chopped
32gramsPassover Pretzel Thins
70gramsroasted salted almondscoarsely chopped
35gramstoasted shredded coconut or coconut flakes
1teaspoonflaky sea salt,I used Maldon
Instructions
Preheat oven to 325ºF. Cover an 18×13 inch rimmed cookie sheet with foil and then cover the foil with a sheet of parchment paper. Do not leave this step out or you will be cursing me when it comes time to cleanup! Cover the parchment paper evenly with the matzoh. You will have to trim some of the matzoh with a sharp knife to make it fit into a flat even layer. You will have some matzoh scraps leftover. Slather the scraps with salted butter and jam and eat.
In a large heavy bottomed saucepan, add brown sugar and butter. Cook over low heat, stirring every minute or so with a wooden spoon, until the mixture comes to a boil. This will take about 2-4 minutes. At one point it will look like the butter is separating from the sugar and it will appear to be an oily mess. Just keep stirring, it will come together again. Once mixture comes to a boil, switch to a whisk and whisk vigorously for another minute or two. Carefully pour caramel onto matzoh. Using an offset metal spatula, spread it out into an even layer.
Place baking sheet into oven and bake for about 8-10 minutes until the caramel topping is golden brown and bubbling.
While caramel is baking, place milk chocolate in a glass bowl and melt in microwave on 50% power for 1 minute. Stir and melt for a further 10-20 seconds if not completely melted. There may be a few lumps, just stir and let sit for a few minutes to completely melt.
Repeat melting with white, blonde, and bittersweet chocolate.
Remove caramel covered matzoh from oven and let cool for at least 10 minutes before covering with chocolate. Pour milk chocolate over the matzoh and smooth it out into an even layer with an offset spatula.
Drizzle the white, blonde, and bittersweet chocolate over the milk chocolate. Using a wooden skewer or the tip of a paring knife, swirl the wet chocolate to make a marbled design.
While chocolate is still wet, sprinkle with almonds, pretzel thins, coconut and sea salt. Chill pan for several hours until chocolate is firm. Peel off foil and parchment paper and place marble matzoh crunch on a large cutting board. Using a very large sharp knife, cut matzoh into large squares. For an 18×13 inch pan, I usually get about 18 pieces. Store matzoh crunch in an airtight container in the fridge. It keeps well for about 2 weeks. (That is, if no one else int he house knows it’s there!
Notes
Substitutions: Can’t find blonde chocolate? No problem, leave it out. You can use any combination of chocolate here, or just use all one kind if you like and skip the marbling step. Can’t find Passover Pretzel Thins? No problem. Crush up a few passover potato chips for that salty crunch hit. Not a coconut lover? Leave it out. Make it your own.
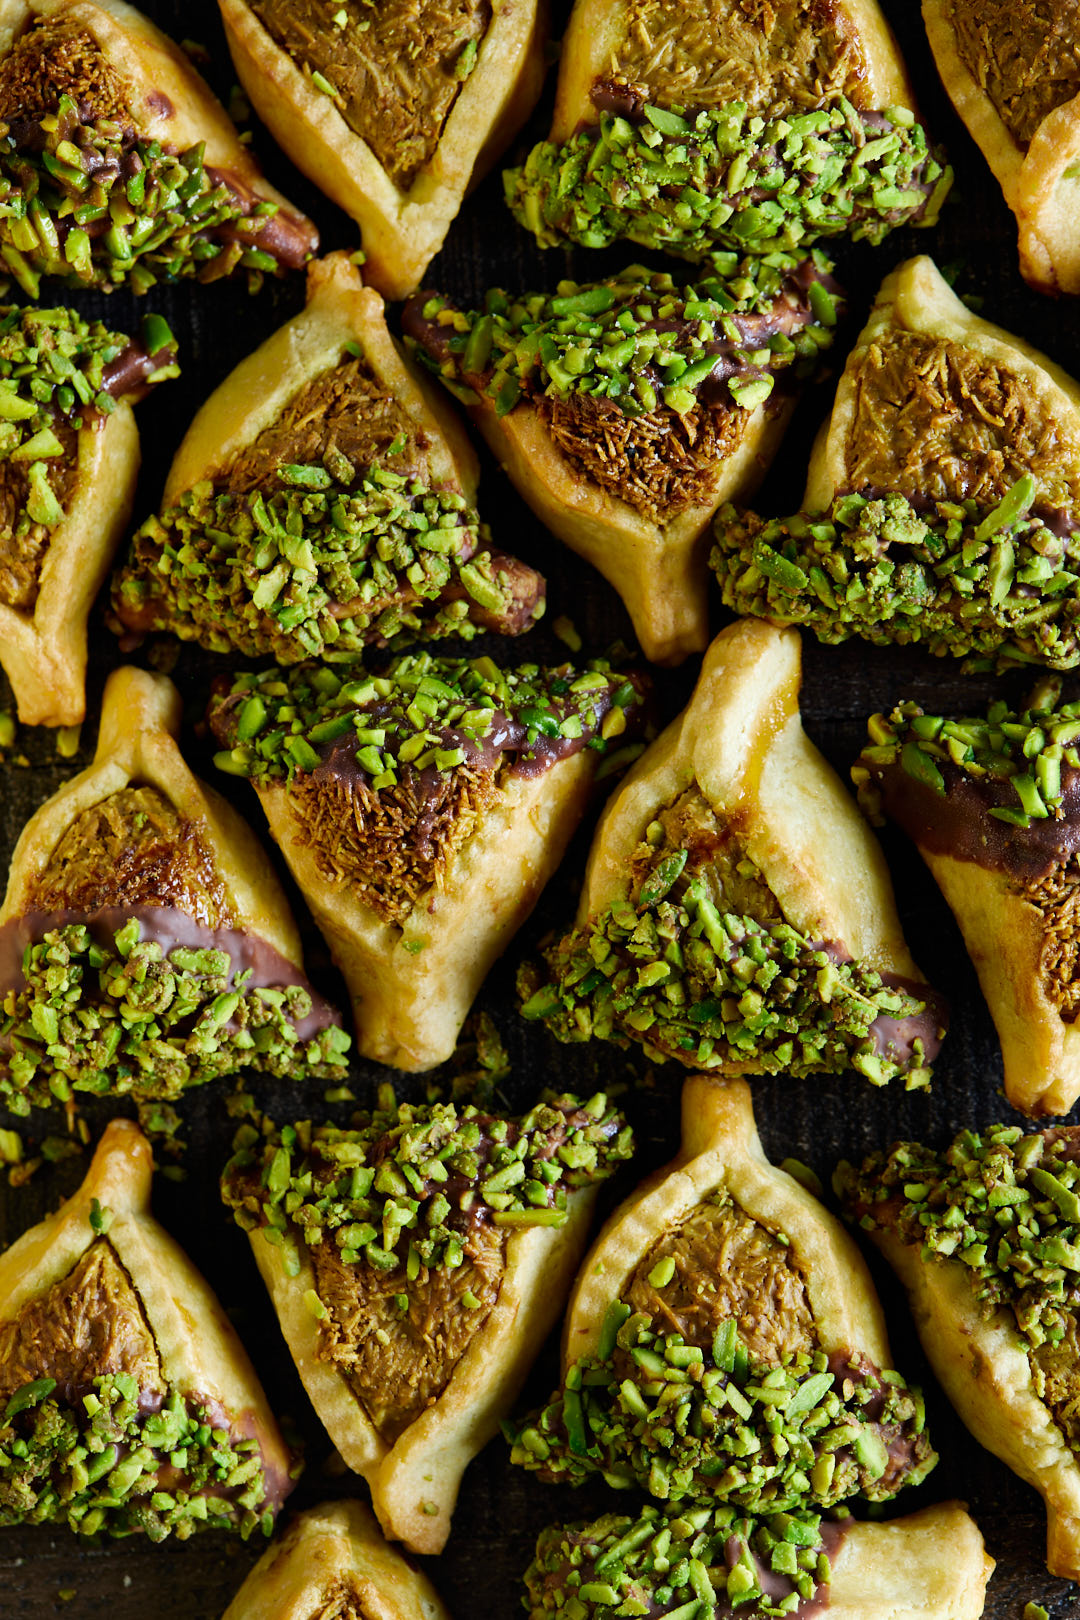
These Pistachio Hamentashen take inspiration from the viral Dubai Pistachio Chocolate bar, blending rich Middle Eastern flavours with a modern twist on the classic Purim treat. The filling is a decadent mix of crispy buttered kataifi (shredded phyllo), velvety pistachio paste, and creamy melted white chocolate, creating a luscious contrast of textures. Encased in a delicate, lightly sweetened cookie dough, each hamentashen bakes up to golden perfection. A finishing dip into milk chocolate along with a sprinkle of toasted pistachios, adds an extra layer of indulgence. These aren’t just hamentashen—they’re an experience.
When I was growing up, hamentashen always came from a bakery. I never really thought twice about it—that’s just how it was. It wasn’t until I got married and was introduced to my husband’s Aunt Carol that I realized people actually baked their own hamentashen. What a revelation.
Aunt Carol didn’t just bake hamentashen—she made hundreds of them every year, carefully packaging and mailing them to all her nieces and nephews across North America. Her hamentashen were something special: tender cookie dough wrapped around a sweet golden raisin and prune filling, dipped in honey and chopped toasted pecans for the perfect crunch.
She passed away suddenly in 2018, and I miss her dearly. She taught me not only how to bake hamentashen but also so many other lessons that have stayed with me. Every year, I make her hamentashen, and my family is happy. But as a food blogger, I also love to experiment—honouring tradition while creating new flavours.
This year’s creation is inspired by the viral Dubai Pistachio Chocolate bar—an indulgent mix of crispy buttered kataifi, pistachio paste, and white chocolate, all wrapped in a delicate cookie dough. After baking, they’re dipped in milk chocolate and finished with toasted pistachios. A little nod to tradition, with a modern, luxurious twist.
See them come together.
Keys to Success for Pistachio Hamentashen
Kataifi can be tricky to find. This delicate shredded phyllo dough isn’t always stocked in regular grocery stores, but you might have luck at Middle Eastern or specialty markets. If not, Amazon to the rescue!
Pistachio Paste vs. Pistachio Butter or Cream – Pistachio paste is made from 100% pure pistachios, while pistachio butter or cream usually contains added sugar and other ingredients. For this recipe, you want pure pistachio paste to get the best flavour and texture. It can be tricky to find in stores, but you can easily order it online.
Pinch the corners tightly! To keep the filling from leaking out, make sure to pinch the corners of your hamentashen firmly. Press them well where the edges meet, ensuring they hold their triangular shape while baking. Chilling the assembled hamentashen before baking also helps them keep their shape.
These hamentashen are inspired by the Viral Dubai Chocolate Bar. I stuffed my hamentashen with a filling crafted from pistachio paste, white chocolate and and crispy kataifi dough (shredded phyllo dough).
1/4teaspoonDiamond Crystal Kosher salt,or 1/8 teaspoon Morton's Kosher salt
Hamentashen Dough
170gramsunsalted butter,removed from fridge 30 minutes before starting to make dough
133gramsgranulated sugar
1teaspoonvanilla bean paste or vanilla extract
1largeegg, room temperature
1/2teaspoonDiamond Crystal Kosher salt, or 1/4 teaspoon Morton's kosher salt
320 gramsall purpose flour
1Tablespoonwater
Assembly and topping
1largeegg white,well beaten
150gramsmilk chocolate
100 gramsshelled pistachios, toasted and finely chopped
Instructions
Pistachio Filling
Chop kataifi into small pieces, about 2 cm. in length. Use your fingertips to gently separate the strands and fluff the kataifi.
In a large skillet, melt butter. Add kataifi and toast over medium heat, stirring constantly, until it becomes golden brown. Set aside to let it cool.
Place white chocolate into a medium sized heatproof bowl. Microwave on 50% power for 30 seconds. Stir and continue heating in additional 10-15 second bursts, until completely melted. Stir in pistachio paste, vegetable oil, icing sugar and salt.
Pour white chocolate-pistachio paste mixture over browned kataifi. Using 2 forks or your hands, mix until all the kataifi is coated. Set aside.
Make dough
In a stand mixer fitted with paddle attachment, cream butter and sugar until light and fluffy, about 2 minutes. Scrape down sides of the bowl. With motor running, add vanilla and egg, then mix to incorporate. Add flour and salt and mix on low until all the flour is incorporated. Add 1 Tablespoons of water and continue mixing until dough comes together. Squeeze a handful of dough. It should hold together. If it’s still crumbly, add another Tablespoon of water.
Divide dough in half and roll each piece, between 2 sheets of parchment paper, to an ⅛” thickness. Chill rolled dough in fridge for one hour. (Dough will keep in fridge for 5 days or can be frozen for up to a month.)
Form Hamentashen:
Remove one dough sheet from the fridge and place on work surface. Peel off top parchment sheet and gently lay it back in place. Flip the dough over; peel off and set top parchment layer aside. Use a 3-inch round cookie cutter (or upside-down glass) to stamp out as many rounds as possible, leaving as little space between them as possible so that you do not have too many scraps. Place rounds on parchment lined baking sheet, setting them 1½ inches apart. Set scraps aside.
Brush the edge of the circles with water. Spoon about 1 Tablespoon of the pistachio filling into the center of each circle. Fold up three sides of the dough against the filling, forming a triangular shape. Pinch the edges and corners firmly so that the shape holds together. Repeat with remaining filling and dough. Scraps can be rerolled and chilled for at least 30 minutes before cutting and baking more hamentashen
Preheat oven to 350°F. Chill unbaked hamentashen for about 30 minutes before baking. It will prevent the hamentashen from slumping and they will hold their shape much better. Brush chilled hamentashen with egg white.
Before baking, add a second baking sheet under chilled hamentashen. The double baking sheets will prevent the bottom of the hamentashen from getting too brown, before the tops and sides are done. Bake the hamentashen, rotating baking sheet halfway through, until golden, 16-18 minutes. Let cool completely.
Place milk chocolate into a medium sized heatproof bowl. Microwave on 50% power for 15 seconds. Stir and continue heating in additional 10-15 second bursts, until completely melted.
Dip hamentashen into melted milk chocolate. Sprinkle on some chopped pistachios. Chill until chocolate is firm. Hamentashen should be stored in an airtight container for 5 days or frozen for up to a month.
Notes
Note: If rolling dough to an even thickness is not a skill you excel at, do yourself a favour and buy some rolling pin guide ring spacer bands. They will make your life so much better.Instead of dipping the hamentashen in milk chocolate, you could get extra fancy and drizzle them with white and dark chocolate as I did in the video.
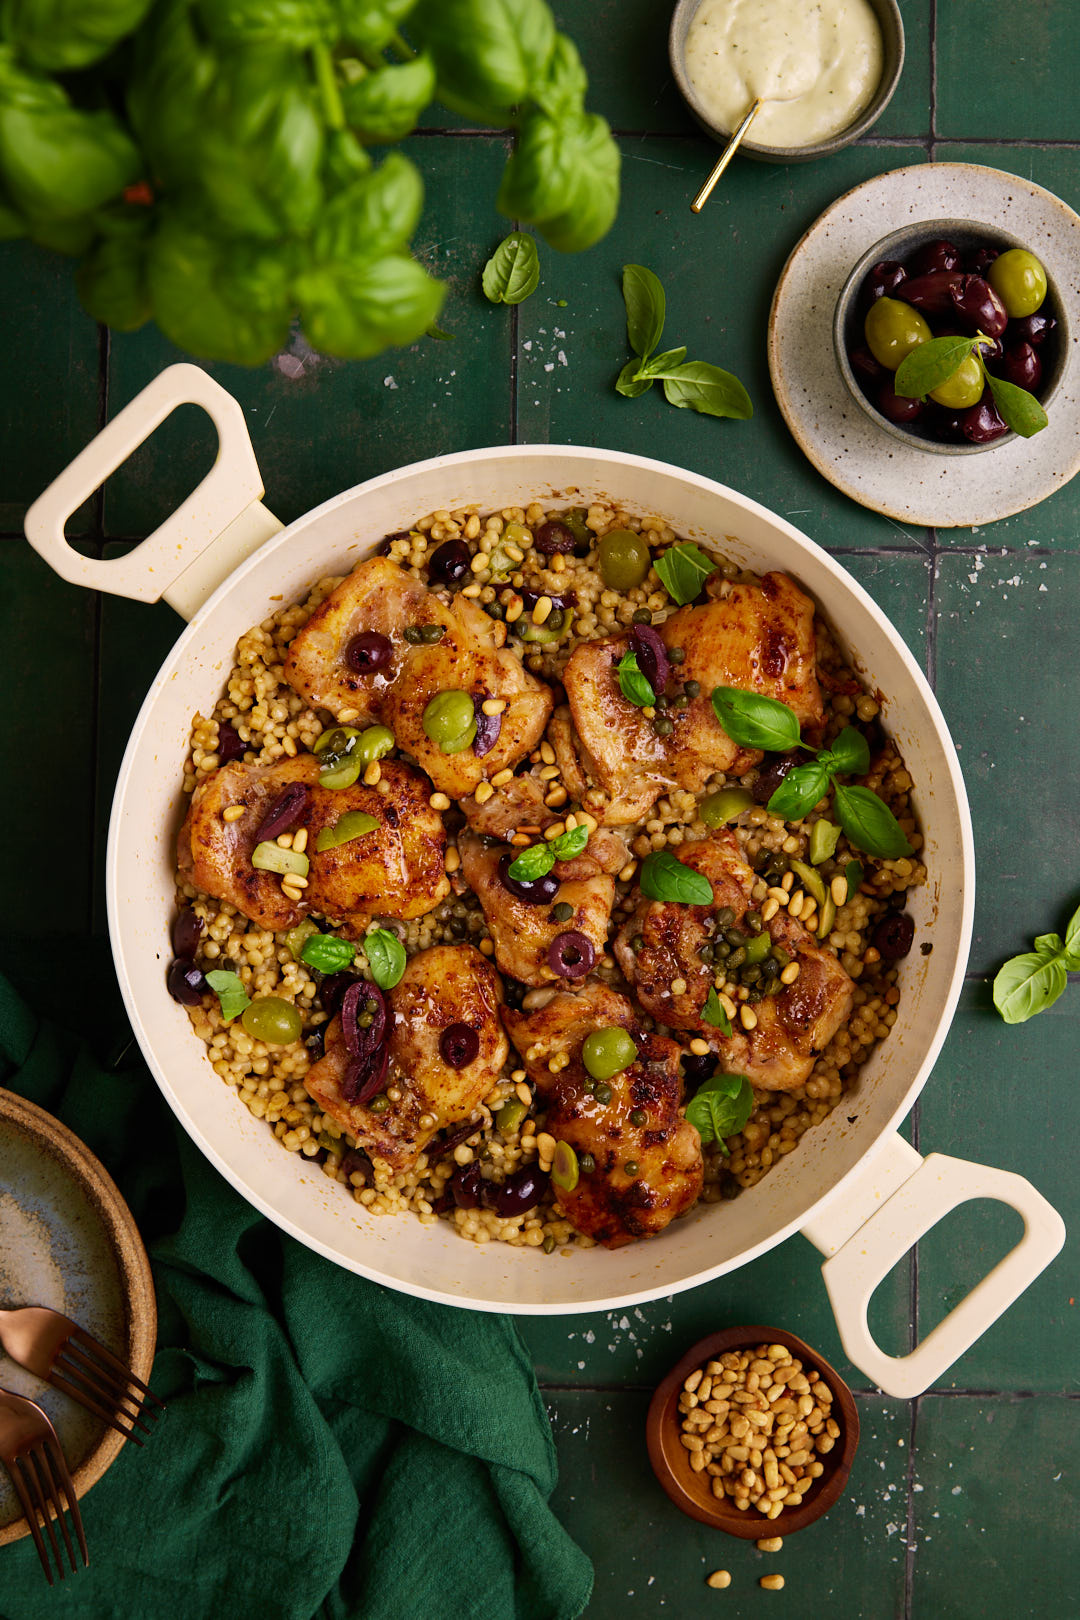
Who doesn’t love a one-pan dinner? Everything cooks together, letting the flavors build in the pan, and best of all—minimal cleanup, maximum flavor. My husband, who takes on dinner cleanup, especially appreciated this one!
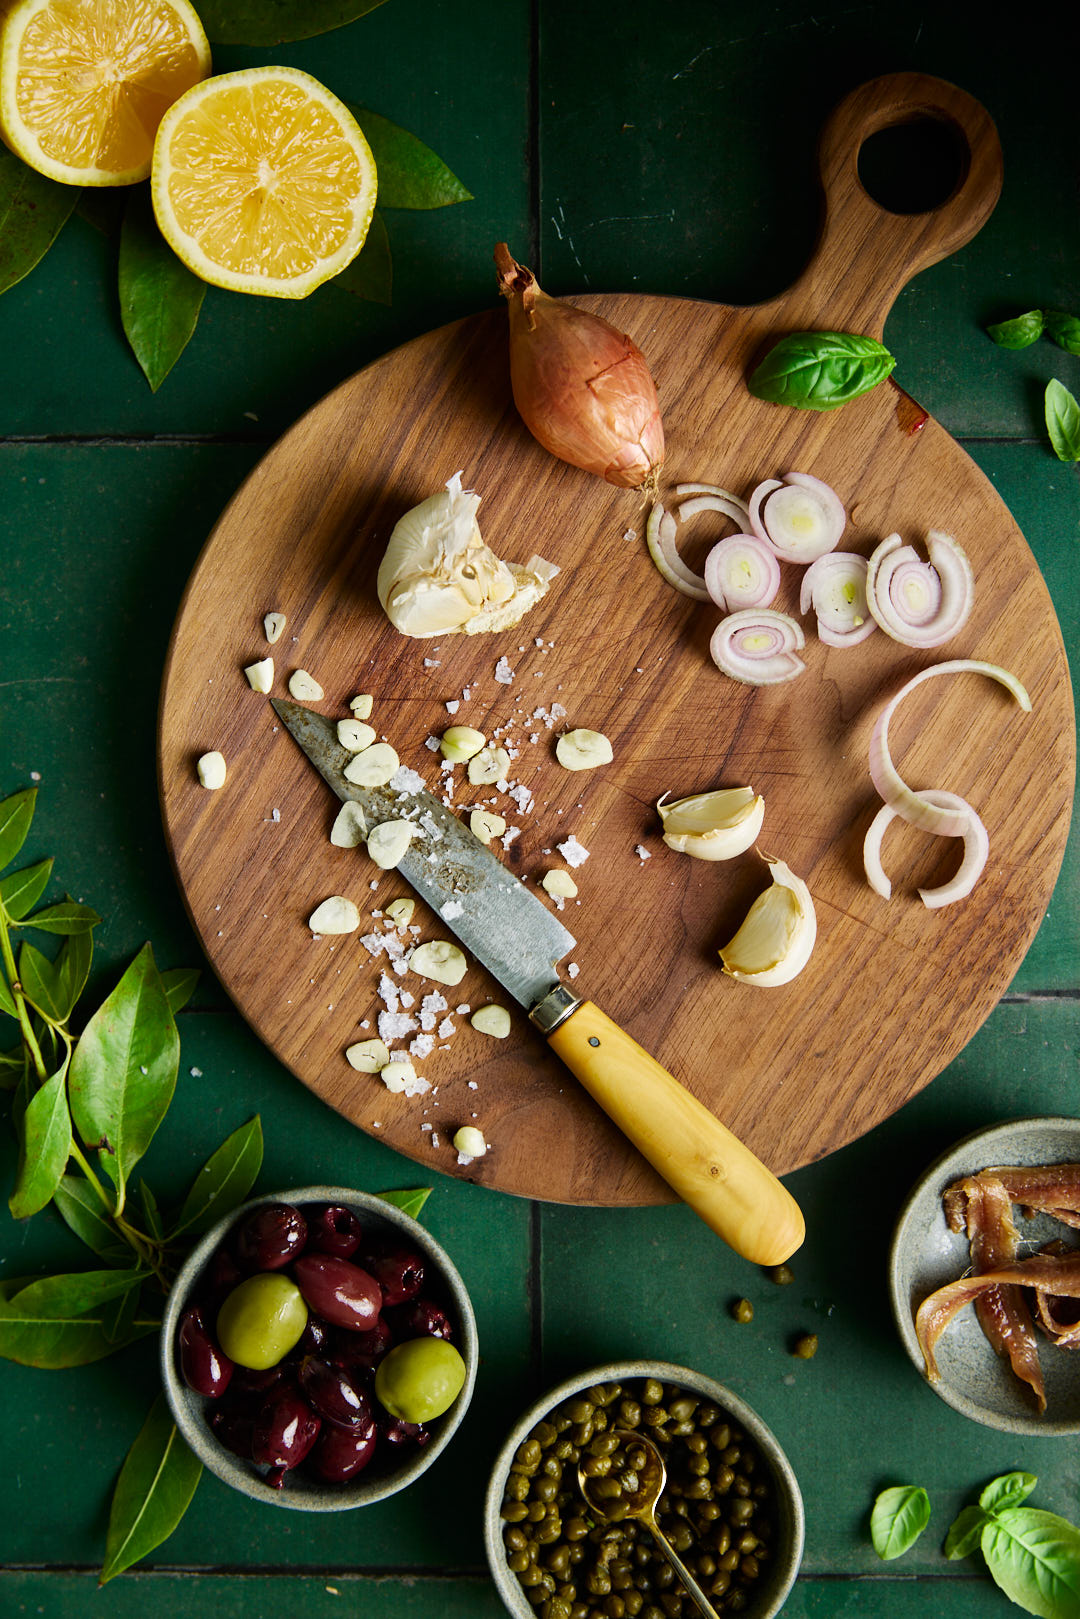
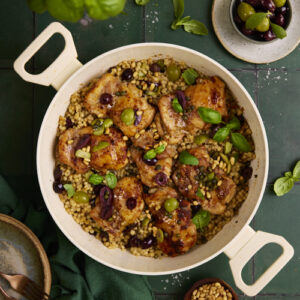
This dish is packed with bold Mediterranean flavours: garlic, olives, capers, and a secret umami booster—anchovies. If you think you don’t like anchovies, you just haven’t used them the right way. In this recipe, they’re finely chopped and melt seamlessly into the sauce, adding a deep, savoury richness—not a fishy taste, just pure deliciousness.
This is not a shy dish. Pantry staples come together to create a quick and easy weeknight meal that’s anything but boring. The garlic mellows as it cooks, capers bring a bright, briny punch, and the meaty chunks of olives add depth and character. I love using a mix of Kalamata and Castelvetrano olives for contrast. And then there’s the Israeli couscous—it soaks up all the punchy flavors as it simmers, making every bite incredibly satisfying.
Keys to Success for Mediterranean One Pan Chicken & Israeli Couscous
Use a large (12-inch) nonstick pan with a tight-fitting lid. This ensures the couscous cooks to perfection.
Give the chicken a head start. I used boneless, skinless thighs, but you can swap in boneless breasts (they’ll cook a little faster). If you prefer skin-on, that’s fine too—just make sure to sear it until golden and crisp.
Prep before you start. This dish cooks quickly, so having all your ingredients chopped and ready to go makes things easier.
Toast the couscous. Let it take on a bit of color in the pan before adding the stock for extra depth of flavor.
Use high-quality stock. Whether chicken or vegetable, a good stock makes a difference in richness. I love the brand Better than Bouillon.
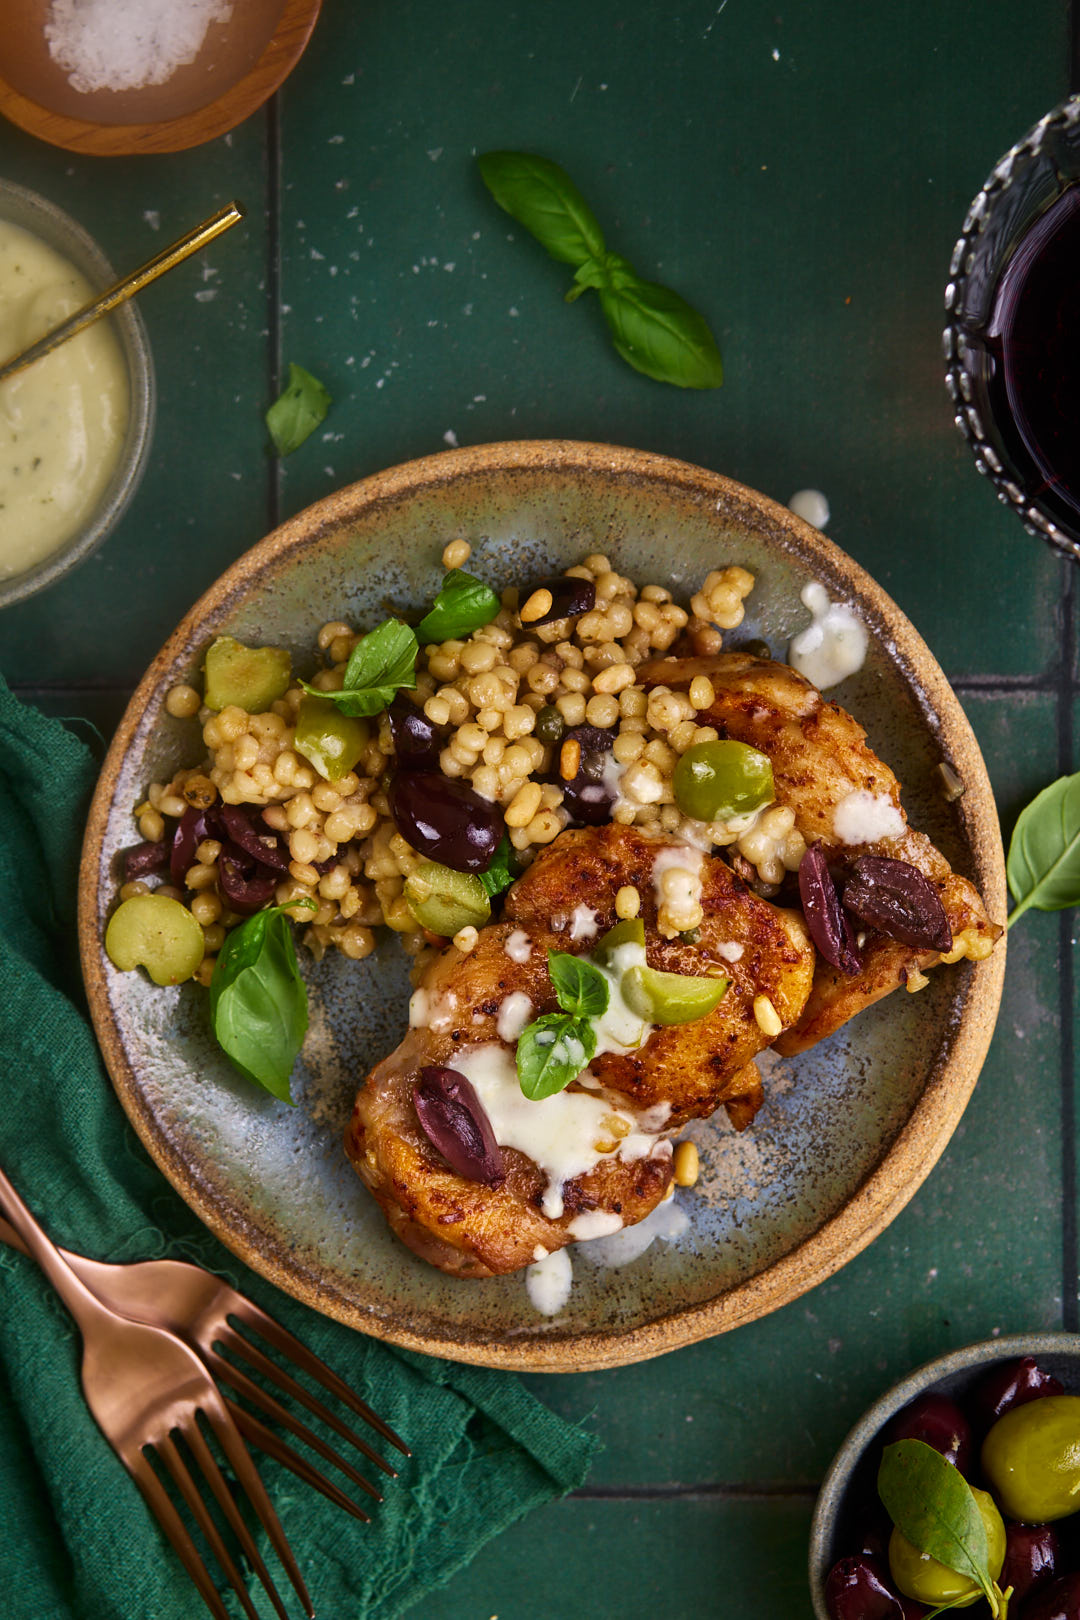
Finish strong. A drizzle of quick pesto mayo takes this dish to the next level. Top with toasted pine nuts for crunch and fresh basil for brightness.
With just one pan and a handful of bold ingredients, this Mediterranean Chicken & Israeli Couscous delivers big flavour with minimal effort. It’s the kind of dish that feels a little special but is easy enough for a weeknight. The anchovies work their magic, the couscous soaks up every drop of savoury goodness, and a final flourish of pesto mayo and toasted pine nuts takes it over the top. Whether you’re cooking for family or just for yourself, this is one of those meals you’ll want to add to your regular rotation. Give it a try—you might just find your new favourite one-pan dinner!
One Pan Mediterranean Chicken and Israeli Couscous
This one pan chicken dinner packs a punch of flavour thanks to the delicious Mediterranean additions of garlic, anchovies, capers, olives and lemon.
120gramsmayonnaise, regular or light is fine, don't use fat free, about 1/2 cup
10gramsjarred pesto sauce.about 1 tablespoon
1/4teaspoonDiamond Crystal Kosher salt, or 1/8 teaspoon Morton's Kosher salt
1Tablespoonfreshly squeezed lemon juice
Dry Rub for Chicken
1teaspoonDiamond Crystal Kosher salt, or 1/2 teaspoon Morton's Kosher salt
1teaspoonsmoked paprika
1 teaspoonAleppo pepper, or 1/4 teaspoon red pepper flakes
2teaspoons olive oil
900gramsboneless skinless chicken thighs
Chicken and Couscous
4anchovy fillets
5clovesgarlic,finely minced
2medium sizedshallots, finely diced
30gramscapers, about 3 Tablespoons
336gramsIsraeli couscous, also called pearl couscous,about 1 1/2 cups
100gramsolives, pitted and quartered,I used a mix of kalamata and castelvetrano olives
zest of 1 lemon
2cupschicken or vegetable stock, divided into 1 3/4 cups and 1/4 cup.
20gramsjarred pesto sauce, about 2 tablespoons
20gramspinenuts, toasted,about 2 Tablespoons
10leavesbasil, torn
Instructions
Make basil mayo sauce: In a small mixing bowl, combine mayo, pesto, lemon juice, salt. Cover and keep in fridge until serving time.
Prepare chicken for sautéing: Pat chicken thighs with paper towels so that they are dry and arrange them on a baking sheet or large plate. Combine 1 teaspoon Diamond Crystal Kosher salt, smoked paprika and Aleppo pepper and sprinkle on both sides of chicken thighs.
Heat 2 teaspoons olive oil in 12 inch non-stick skillet over medium heat and cook thighs for 3 minutes. Flip thighs and cook on second side for another 3 minutes. Remove thighs to a clean plate and set aside.
Without cleaning the skillet, add anchovies, garlic, shallots and capers. Saute on medium-low heat until shallots soften and anchovies completely breakdown and melt into other ingredients. If mixture begins to burn, add a few tablespoons of water.
Add Israeli couscous and stir until all the grains are coated. Mix in olives and lemon zest. Add 1 3/4 cups of chicken or vegetable stock and 2 tablespoons pesto. Stir well. Nestle chicken thighs onto bed of couscous. Cover with lid, turn the heat down to a simmer and cook for 12 minutes. After 12 minutes, check to see doneness of couscous. If still firm after 12 minutes, and all the liquid has evaporated, add additional 1/4 cup of stock, cover and cook for a few more minutes, until couscous is al dente.
Sprinkle with toasted pine nuts, fresh basil leaves and drizzle with reserved lemon basil mayo.
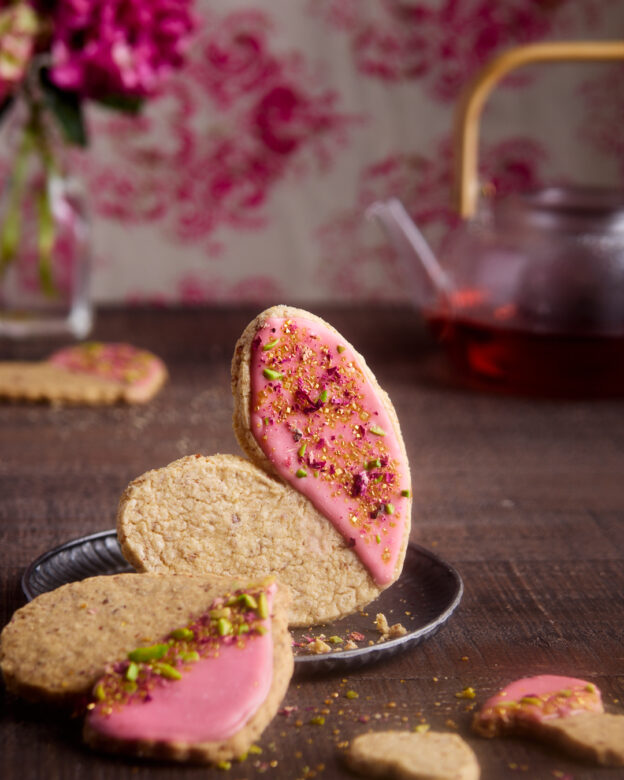
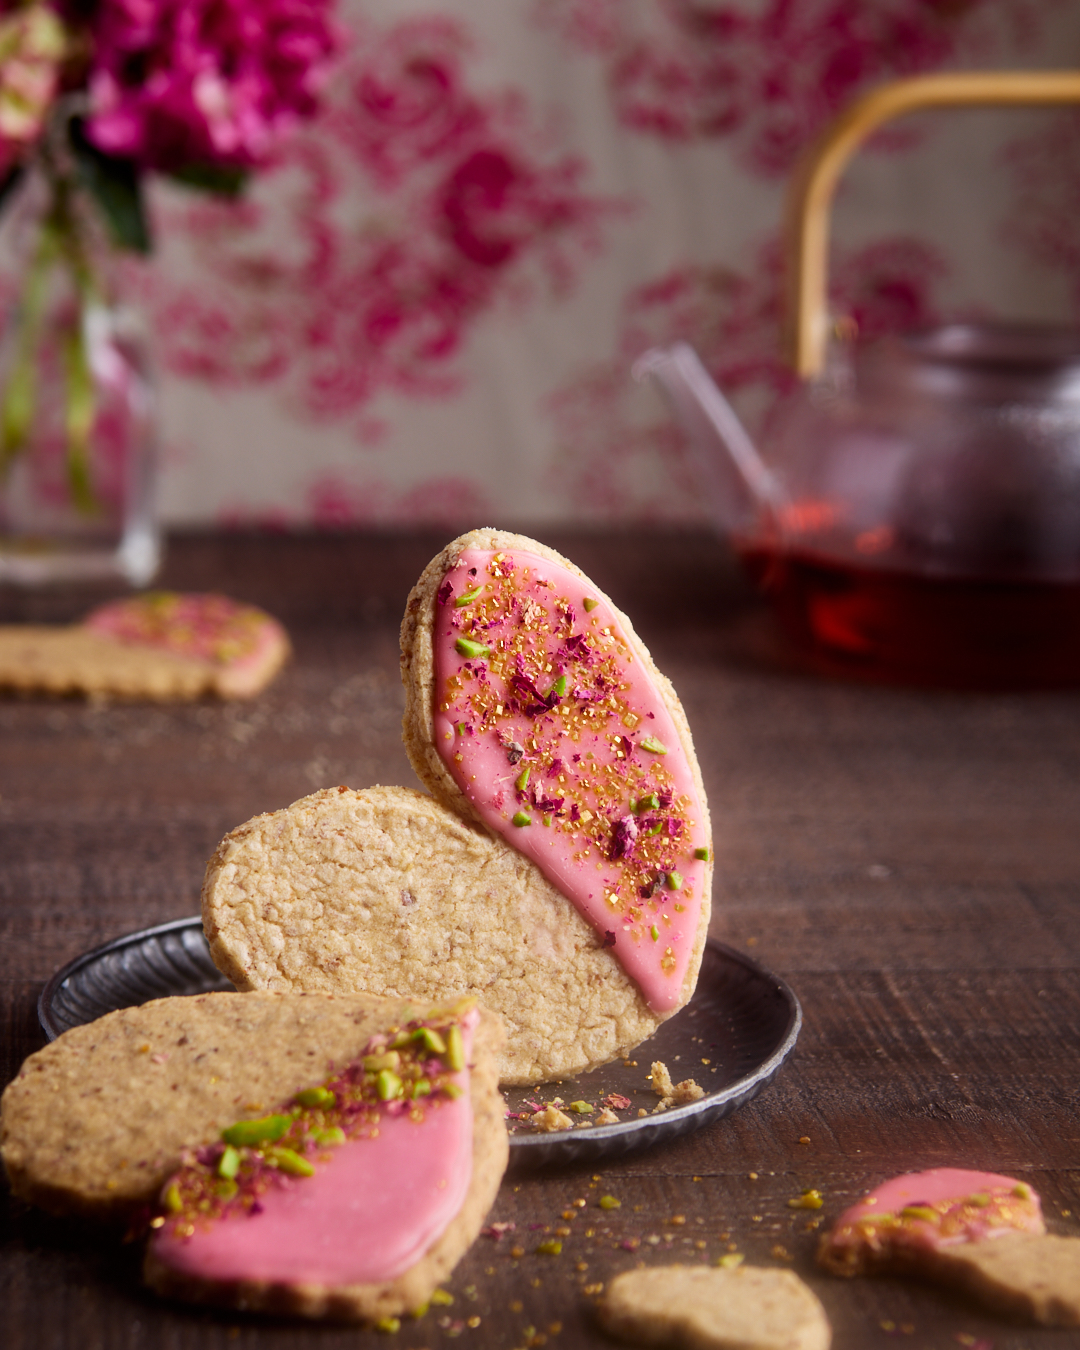
I can’t help it—I have a deep love for all things beautiful. Some might call it a blessing; other times, it feels like a curse (hello, endless tweaking and reworking). And when it comes to cookies? They need to be just as delicious as they are stunning. These Pretzel Shortbread Cookies meet all the criteria.
Most decorated cookies look amazing but taste like… well, just sugar. Royal icing, while pretty, can be overly sweet and one-note. I wanted to create a cookie that actually delivers on flavour and looks
The Cookie
This pretzel shortbread recipe comes from Amy at @constellationinspiration, and it’s perfection. Buttery, crisp-edged, melt-in-your-mouth goodness with a salty crunch from finely ground pretzels. That little hit of salt balances the sweetness beautifully and makes these cookies completely addictive.
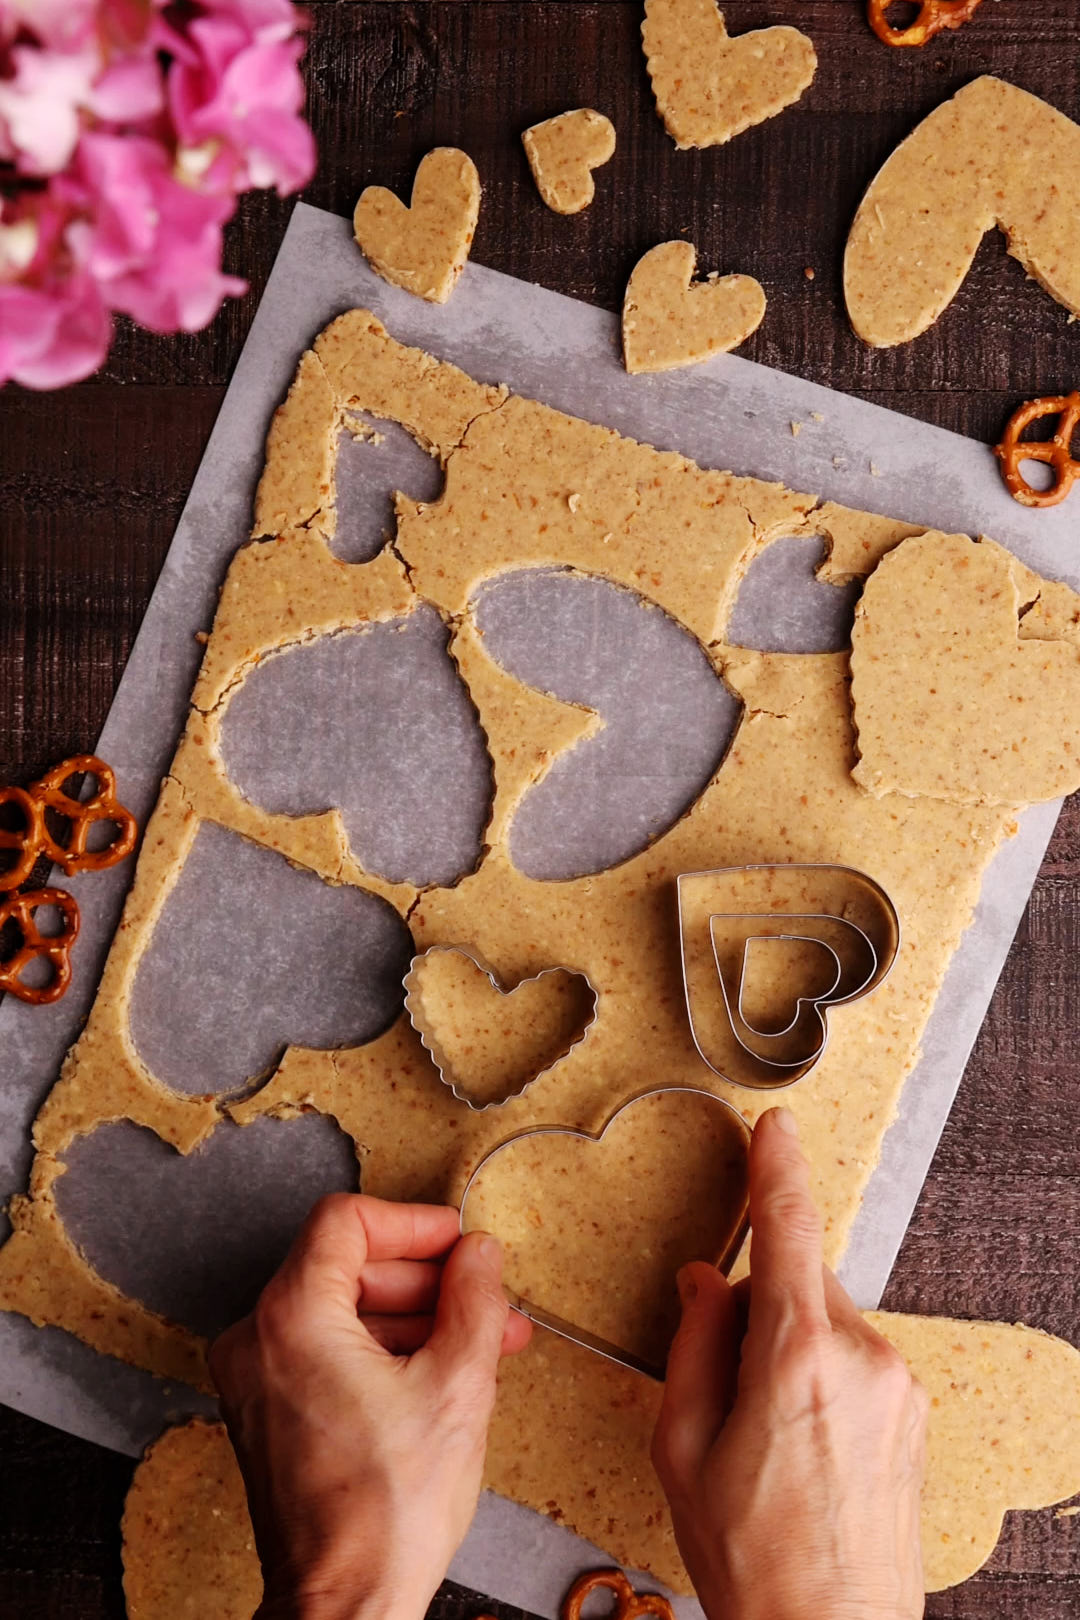
For the best results, I roll the dough between two sheets of parchment before chilling, then chill the cut shapes again before baking. This helps keep the edges nice and sharp—no wonky cookies here!
I’ve been obsessed with using freeze-dried fruit in icings for a while now. It adds such a vibrant, natural colour and brings real fruit flavour to the party.
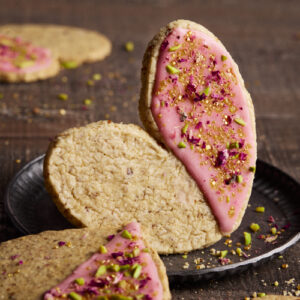
When I found freeze-dried pomegranate powder, I knew it had to become a glaze. This glaze is tangy, punchy, and perfectly balanced—made with icing sugar, freeze-dried pomegranate powder, a little pomegranate juice, and lemon juice to brighten everything up.
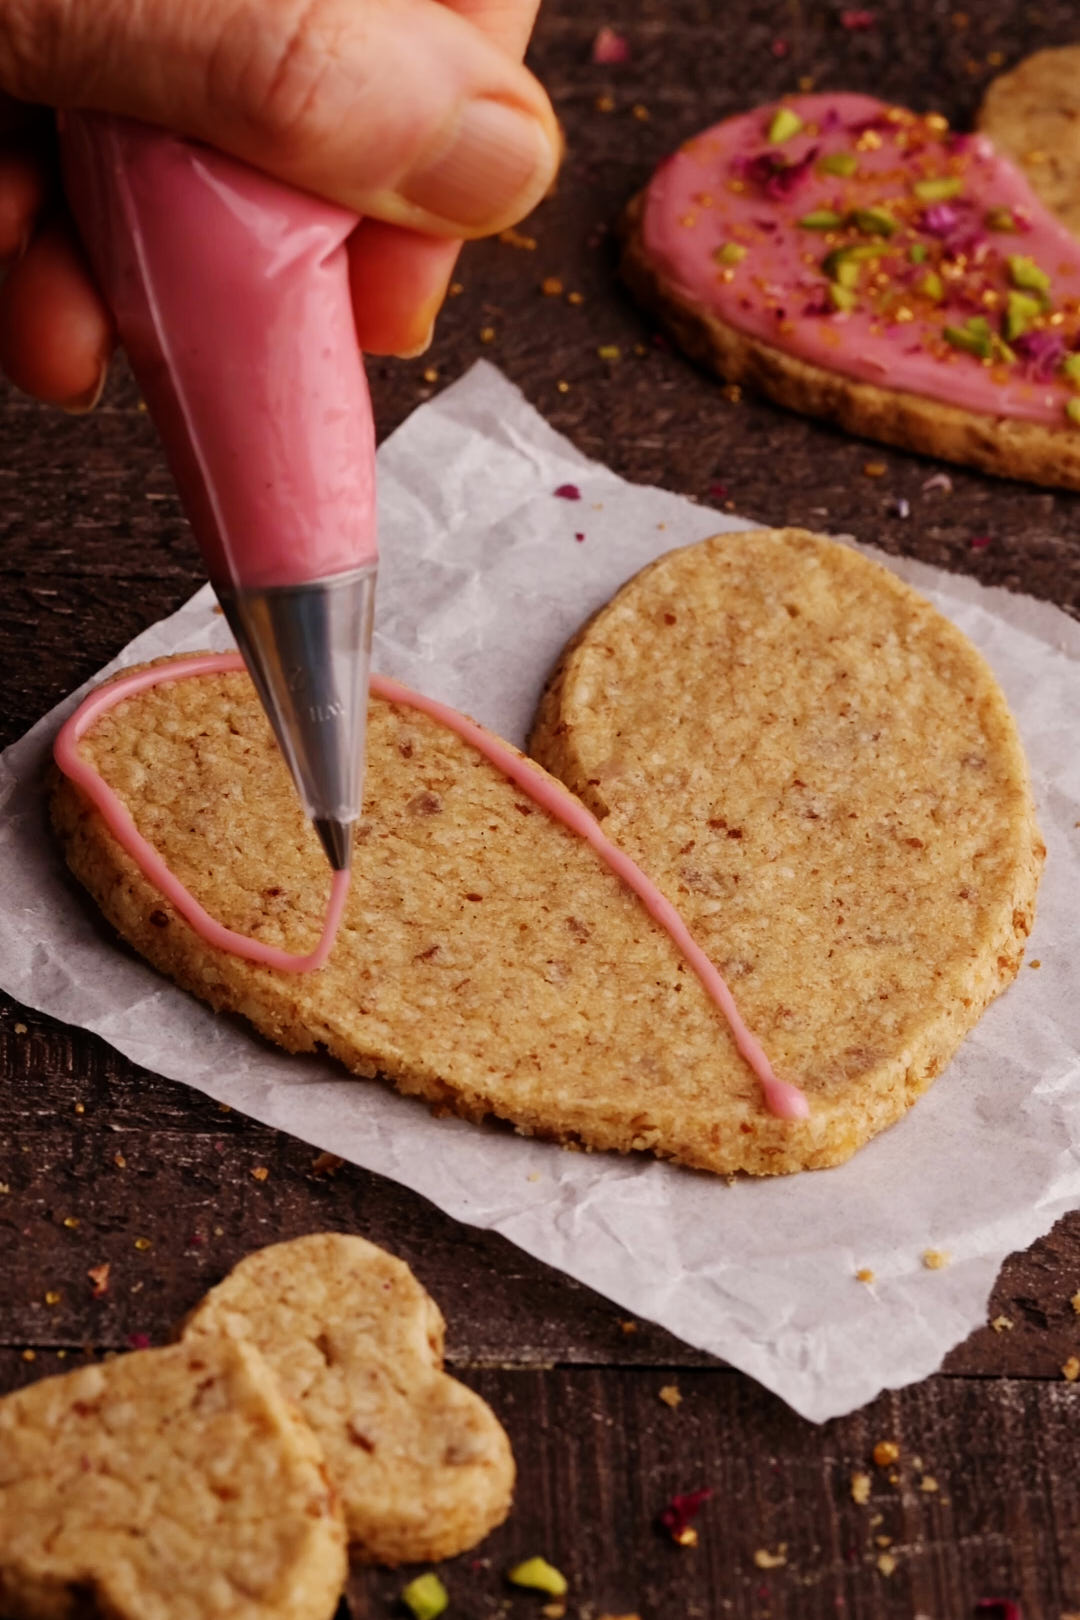
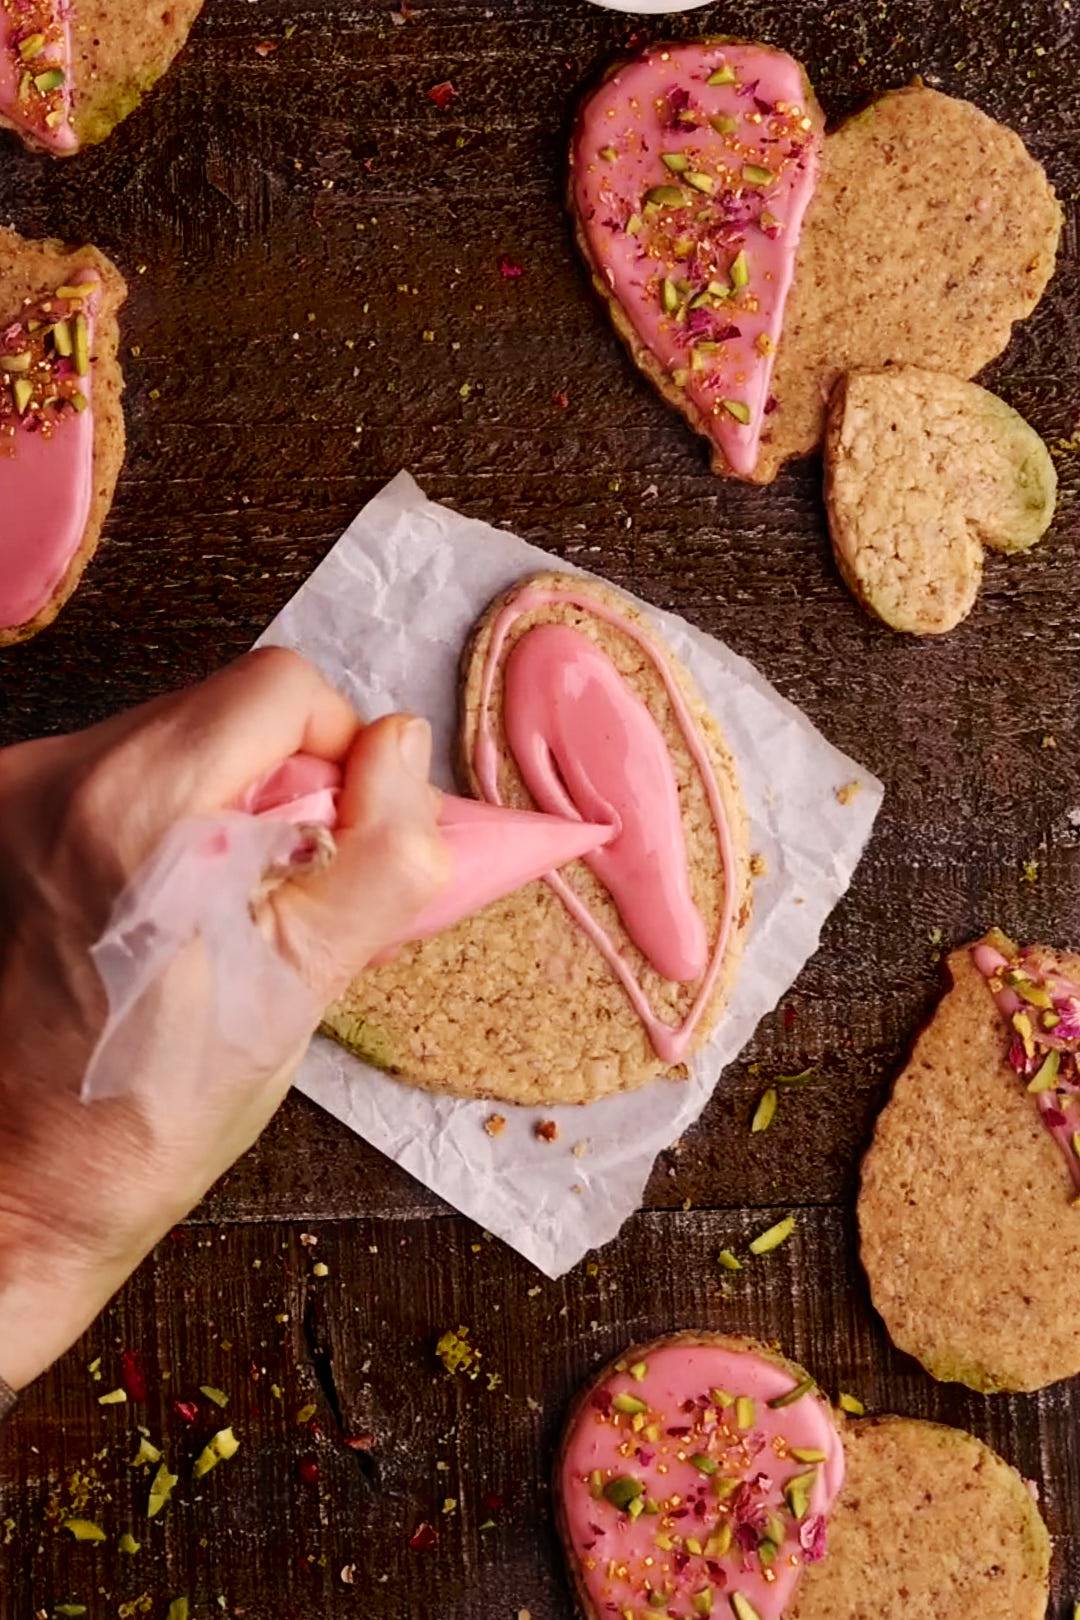
At first, I tried dipping the cookies, but the glaze dried unevenly, and the edges weren’t crisp. So I switched things up—piping a border with a thicker glaze and then flooding the inside with a thinner one, decorating just half of each heart. The result? A smooth, glossy finish that lets the natural pink colour shine.
For outlining, the glaze should be thick like toothpaste, holding its shape without running. For flooding, thin it to a honey-like consistency so it flows smoothly but doesn’t drip off the edges. Adjust with tiny amounts of liquid or powdered sugar until just right.
The Toppings
Since these were for Valentine’s Day, I went all in on the toppings. I wanted a mix of texture, colour, and a little sparkle:
• Chopped pistachios – for crunch, flavour and that gorgeous pop of green.
227gramsunsalted butter,removed from fridge 30 minutes before making dough
120gramsicing sugar, sifted
1teaspoonvanilla bean paste or vanilla extract
Pomegranate Glaze
500grams icing sugar, sifted
1/4cupfreshly squeezed lemon juice
1/4cupPomegranate juice
1/4cupFreeze Dried Pomegranate Powder
1/2teaspoonvanilla bean paste or vanilla extract
1/2teaspoonDiamond Crystal Kosher salt, or 1/4 teaspoon Morton's Kosher salt
Decorations
2Tablespoonsedible dried rose petals,finely chopped in a spice grinder or by hand with sharp knife
40gramsshelled pistachios,toasted and finely chopped
2 Tablespoons gold sprinkles
Instructions
Cookies
In food processor or blender, pulse pretzels until the texture resembles flour. Transfer pretzel flour to a medium sized bowl, add all purpose flour to bowl and set aside.
In the bowl of a stand mixer fitted with the paddle attachment, beat the butter on medium speed until smooth, 1-2 minutes. Add powdered sugar and vanilla and mix until fully combined. Scrape down the sides of the bowl and mix on medium speed for another 2 – 3 minutes, until the colour lightens and the texture becomes fluffy and smooth.
Add pretzel flour mixture to the bowl and mix on low speed until just combined. Gather the dough into a ball. Using your palms, press dough into a rough rectangular shape and place between 2 sheets of parchment paper.
Using a rolling pin, roll out dough to a rough rectangle, about 9×12 inches. The dough should be 1/4 inch thick. I use these rolling pin guides to help me get an even thickness. Place dough, still between 2 sheets of parchment paper, on a baking sheet and chill in fridge for about 45 minutes.
Line 2 baking sheets with parchment paper. Remove dough sheet from the fridge and place on work surface. Peel off top parchment sheet and gently lay it back in place. Flip the dough over; peel off and discard second parchment layer.
Cut the dough, using cookie cutters of your choice. I used a variety of heart sizes and shapes. Transfer shapes to prepared baking sheets, using a wide metal spatula, spacing them 2 inches apart. Chill cookies in freezer for about 15 minutes before baking. This will help prevent spreading and help cookies retain their shape.
Adjust the oven racks to the upper and lower middle positions and heat the oven to 350°F.
Bake cookies for 5 minutes. Rotate baking sheets from front to back and switch positions from top to bottom. Bake for a further 5 minutes until golden brown. Set cookie sheets on a wire rack and allow to fully cool.
Gently re-roll dough scraps between 2 sheets of parchment, chill and cut out more cookies. Transfer to cookie sheets and bake as above.
Glaze and Decorate
Place sifted icing sugar into large bowl. Add lemon juice, pomegranate juice, pomegranate powder, vanilla and salt whisk vigorously until smooth and no lumps remain.
In a small bowl, mix together finely ground rose petals, chopped pistachios and gold sprinkles.
Prepare border icing. Place about 1/4 cup of glaze into a small bowl. Fit one disposable piping bag with a #2 tip. This will be used for piping a border/outline of the cookie shape. Place about 1/2 a cup of glaze into a small bowl. For outlining, the glaze should be thick but pipeable, similar to toothpaste or soft frosting. It should hold its shape without spreading but still flow smoothly from a piping bag. When you lift a spoonful, it should ribbon off slowly and settle back into itself after several seconds. If it’s too thick, add a few drops of liquid (pomegranate juice or lemon juice) until it reaches the right consistency. If too thin, mix in a bit more powdered sugar to thicken.Transfer border icing to bag with piping tip. Cut a small hole in bottom of bag to allow tip to come halfway through. Twist top of bag and close with twist tie. Set aside.
Prepare flooding icing: Pour about 1 cup of glaze into a small bowl. For flooding, the glaze should be thin enough to flow smoothly but thick enough to hold a slight shape before settling—similar to honey or maple syrup. When you lift a spoonful, it should ribbon off easily and disappear back into the bowl within 10-15 seconds. It should spread evenly when piped but not be so runny that it drips off the edges. If it’s too thick, add tiny amounts of pomegranate or lemon juice; if too thin, mix in more powdered sugar until you reach the perfect balance.Transfer flooding icing to bag without piping tip. Twist top of bag and close with twist tie. Do not cut hole in bag until ready to flood icing.
Glaze cookies: Arrange about 4 cookies on baking sheet and outline cookies with border icing. I just outlined half the heart. Cut a small hole in flooding icing bag and flood the center of each cookie with the thinner glaze. Use a toothpick or wooden skewer to gently coax the icing to the edges of the border.
While the glaze is still wet, sprinkle with pistachio mixture. Repeat decorating the rest of the cookies. Let set for several hours until glaze has hardened.
Store cookies in airtight container, separating layers with parchment or waxed paper so they do not stick to each other. They will be fine at room temperature for a few days. For longer storage, freeze.
Notes
Pretzel shortbread cookie recipe created by Amy of Constellation Inspiration. The pomegranate glaze recipe was my addition.
If a brownie and a cookie had a love child, it would be this fudgy masterpiece. These Peppermint Bark Brownie Cookies are so rich and chocolaty, they’ll steal your heart. And let’s be honest—chocolate and peppermint isn’t just for December! It’s basically a love language, making it perfect for Valentine’s Day too.
Got leftover candy canes from the holidays? This is their moment to shine. No candy canes? No problem—peppermint candies work just as well. Pro tip: Place them in a Ziploc bag before crushing unless you enjoy finding rogue peppermint shards in your kitchen for days. (Ask me how I know.)
Tips for Perfect Peppermint Bark Brownie Cookies:
Leave some peppermint pieces bigger for crunch. A mix of fine and chunky bits gives the best texture.
• Use real white chocolate, not white baking chips. White chocolate (almost always sold in bar form) contains cocoa butter, while white baking chips don’t—meaning they won’t melt the same way. I recommend a good-quality white chocolate bar for the best flavor.
• Use both brown sugar and granulated sugar. Brown sugar makes the cookies moist and fudgy, while white sugar helps create that signature crinkly top.
• Whip the eggs and sugar for at least 3-4 minutes. This step is key—it incorporates air, which gives the cookies their perfect texture.
• Sift your cocoa powder with the flour. Cocoa powder loves to clump, and sifting ensures a smooth batter.
Use a cookie scoop for even sizes, and right after baking, do the ‘cookie scoot’—it’s the secret to getting perfectly round cookies. A round cookie cutter, just slightly bigger than the cookie works perfectly to reshape a wonky cookie.
• Don’t over bake! The cookies should be just set at the edges but still soft in the center when they come out of the oven. They’ll firm up as they cool.
Watch as they come together .
Peppermint Bark Brownie Cookies
Fudgy Chocolate Cookies topped with a Peppermint Bark heart
small heart shaped cookie cutter, about 1 -2 inches wide
Ingredients
White Chocolate Peppermint Bark Hearts
100gramswhite chocolate
8minicandy canesor 4 full size candy canes
Cookies
225gramsbittersweet chocolate, coarsely chopped
85gramsunsalted butter
2largeeggs,room temperature
50gramsgranulated sugar
160gramsbrown sugar
1 teaspoonvanilla bean paste
1/2teaspoonpeppermint extract
105gramsall-purpose flour
21gramsdutch process cocoa powder
1/2teaspoonDiamond Crystal Kosher salt,or 1/4 teaspoon Morton's Kosher salt
Instructions
White Chocolate Peppermint Bark
Place candy canes in a zip loc bag and seal well. Using a rolling pin, bottom of a heavy saucepan or the flat side of a meat tenderizer, coarsely crush candy. Set candy aside.
Line a small baking sheet with parchment paper and set aside. Place a heatproof glass or stainless steel bowl over a pot of simmering water, making sure the bottom of the bowl doesn’t touch the water. The bowl should sit snugly on top of the pot without sinking in. Add the chopped white chocolate to the bowl. Stir occasionally until smooth and melted.
Pour melted chocolate onto prepared baking sheet. Spread it into a rectangle, about 8×10 inches in size. Sprinkle crushed candy canes over the top. Chill in fridge for about 15 minutes, until firm.
Using a small heart shaped cookie cutter, about 1-2 inches wide, cut out hearts from the chilled peppermint bark. Store hearts in the fridge until ready to top the baked cookies.
Cookies
Place racks in upper and lower thirds of oven and preheat to 350°F. Line 2 baking sheets with parchment paper and set aside.
Melt bittersweet chocolate and butter. Place a heatproof glass or stainless steel bowl over a pot of simmering water, making sure the bottom of the bowl doesn’t touch the water. The bowl should sit snugly on top of the pot without sinking in. Add the chopped bittersweet chocolate and butter to the bowl, stirring occasionally until smooth and melted.
Place eggs, granulated sugar, brown sugar, vanilla bean paste and mint extract in bowl of stand mixer, fitted with whisk attachment. Beat on medium high speed for 3-4 minutes until mixture is very thick and pale. You can also use an electric hand mixer but I would not recommend trying to whisk by hand.
Once the eggs and sugar are light and pale, turn mixer down to low speed Slowly pour melted chocolate mixture into the bowl with the sugar and egg mixture. Mix until completely incorporated.
Sift flour, cocoa powder and salt. Add dry ingredients to mixer, and whisk on low speed until thoroughly combined.
Using a 2 Tablespoon cookie scooper, scoop dough and place on prepared baking sheets, 6 cookies per sheet. You can also use an 1/8 cup measuring cup to portion the dough. Just roll it between your palms to form a round ball before placing on baking sheet. Flatten each cookie slightly with your palm before baking.
Bake cookies, rotating pans top to bottom and front to back after 4 minutes of baking. Bake for a further 4-5 minutes, until the tops are crackled and edges are set. They will still be gooey in the center. Set cookie sheets on wire racks to cool.
Let cool for about 15 minutes. Place one peppermint bark heart in the center of each cookie, while cookies are still warm, but not hot. The warmth of the cookie will melt the bottom of the heart and help the heart to stick. Allow to cool completely before removing from baking sheet.
Notes
Cookies can be baked 3 days ahead and stored in an airtight container at room temperature. They can also be frozen for 2 months. Let thaw before serving, unless you are a member of my family and adore frozen cookies!
These cookies are chewy, fudgy, and loaded with peppermint bark goodness—everything you want in a Valentine’s Day treat. Because let’s face it: peppermint deserves more than just one month a year.
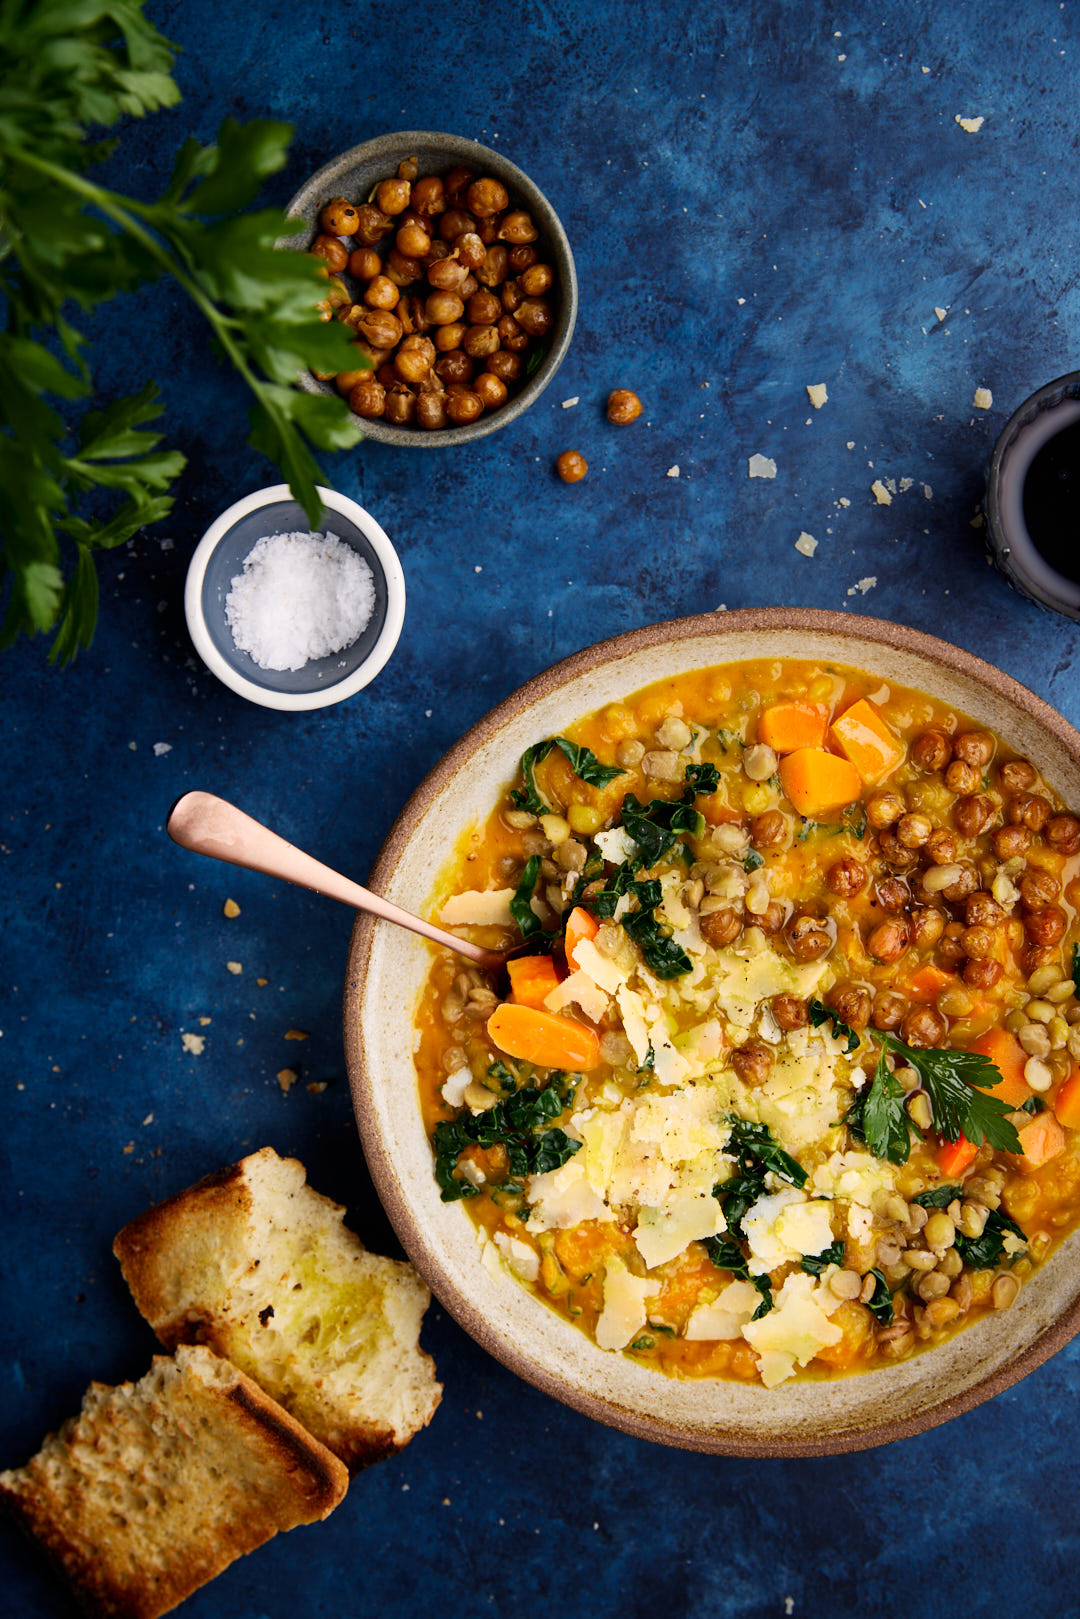
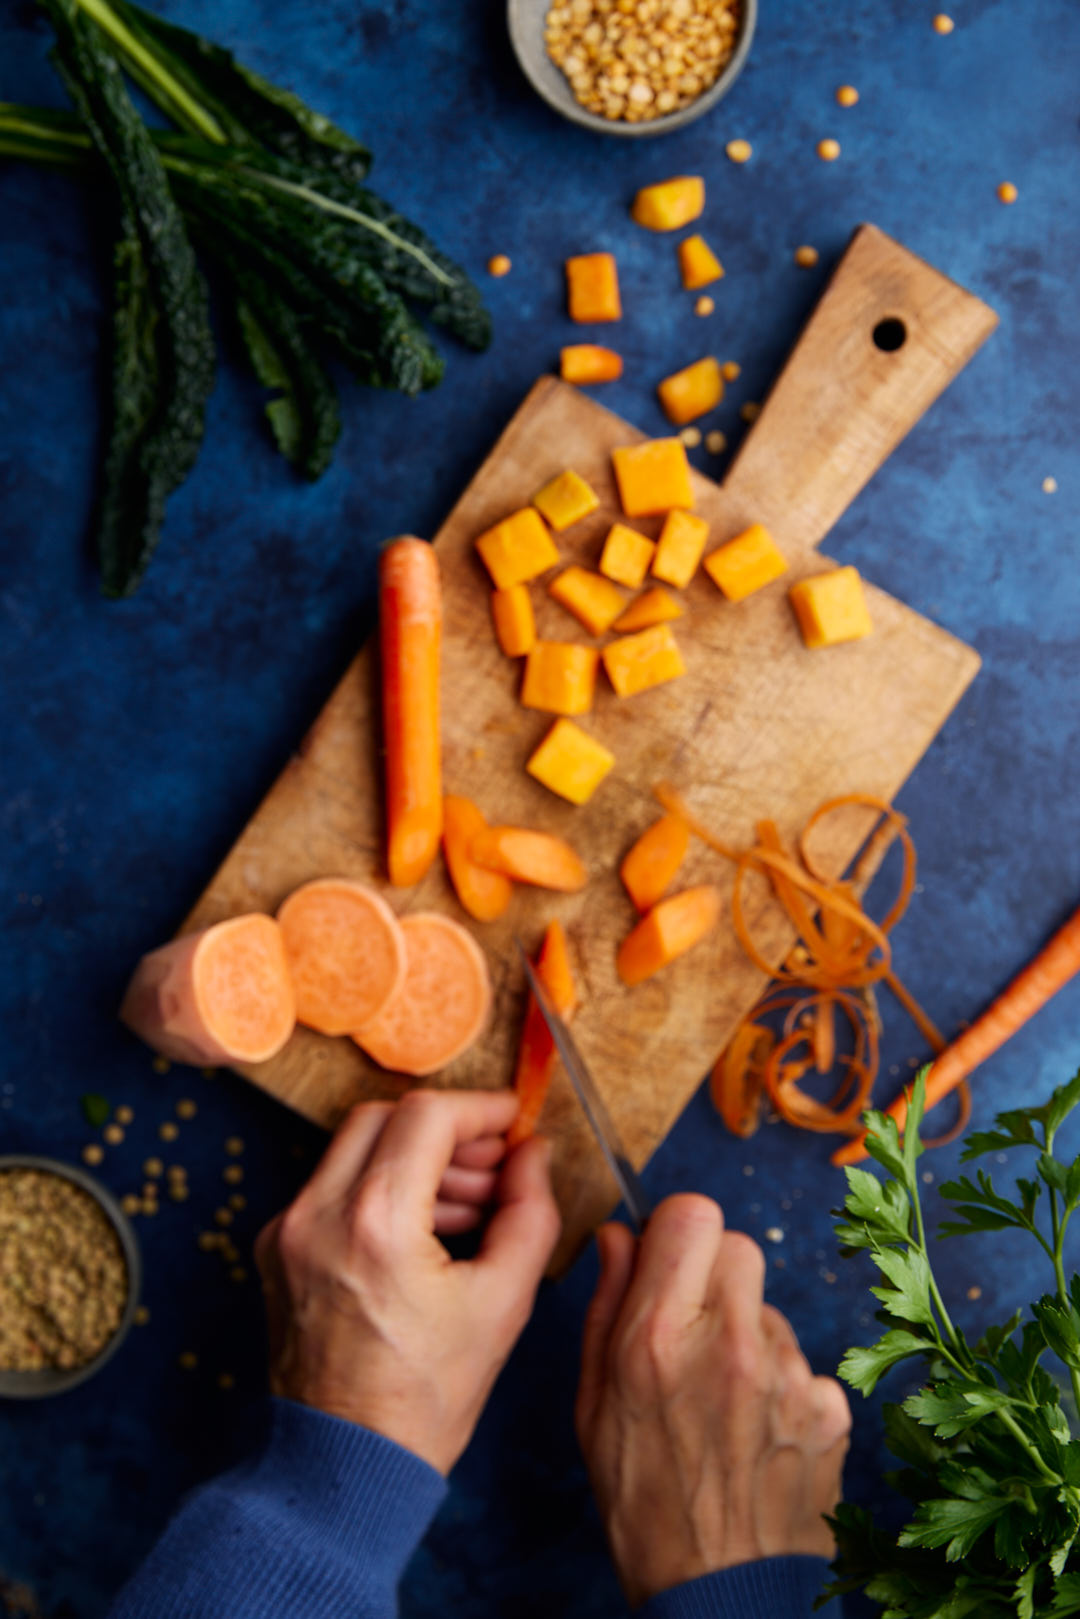
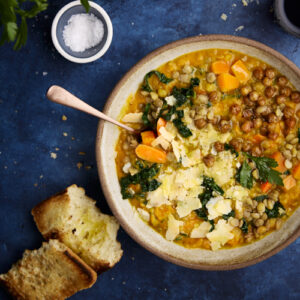
Whenever I serve soup for dinner, my husband gives me a look—the kind that says, ‘Nice appetizer… but what’s for the main course?’ Challenge accepted sweetie. This Lentil and Root Vegetable Power Soup isn’t just a starter; it’s a full-blown, protein-packed, stick-to-your-ribs meal. Loaded with lentils, split peas, and all the best winter veggies, this bowl means business. And because we’re not monsters around here, I always serve soup, with toppings. For crunch and funk I added crispy, spiced chickpeas and a flurry of Parmesan.
This lentil and root vegetable power soup weighs in at a whopping 25 grams of protein and 24 grams of fibre. I used all the orange winter veggies, (carrots, sweet potatoes and butternut squash), but this soup is entirely customizable.
Tips to Success for Lentil and Root Vegetable Soup
Blend for the best texture – Blending about a third of the soup gives you that perfect balance of creamy and chunky, so every bite is satisfying.
Brown the tomato paste – Don’t just stir it in—let it cook with the onions until deep and caramelized. This adds a rich, umami-packed depth of flavor.
Choose the right lentils – Green or brown lentils hold their shape, giving the soup texture. Red lentils? They go mushy, so save those for a different dish.
Double up on legumes – Adding yellow or green split peas alongside the lentils makes the soup extra hearty and layered with flavor.
Stock matters – For the best taste, use a good-quality veggie broth. My go-to is Better Than Bouillon for maximum richness.
Garnish like you mean it – Don’t skip the crispy spiced chickpeas and shaved Parmesan! The chickpeas bring crunch, and the Parmesan adds salt and a little funk. They’re the difference between ‘just soup’ and ‘wow, this is dinner!’
1largeyellow onion, about 350 grams,peeled, halved and finely diced
1Tablespoonolive oil
4 clovesgarlic, finely chopped or grated with micro plane grater
2inchesfresh ginger root, grated with micro plane grater
2Tablespoonstomato paste
1teaspoon Aleppo pepper, or 1/4 teaspoon red pepper flakes
1teaspoon ground cumin
1/2 teaspoonground coriander
1/4 teaspoonturmeric
1teaspoonDiamond Crystal Kosher salt, or 1/2 teaspoon Morton's Kosher salt
1smallbutternut squash, about 800 grams,peeled, seeded and cut into 1/2 inch dice
1largesweet potato, about 400 grams,peeled and cut into 1/2 inch dice
4largecarrots, about 350 grams,peeled ans cut into 1/2 inch dice
200gramsgreen lentils, about 1 cup
200 gramsyellow split peas, about 1 cup
8cupsvegetable stock or water
2 Tablespoonsolive oil
175gramsLacinato kale (also called Tuscan kale or black kale), about 1 small bunch
Garnishes:
400gramschick peas, rinsed and drained
2Tablespoonsolive oil
1teaspoon Aleppo pepper, or 1/4 teaspoon red pepper flakes
1 teaspoonground cumin
1/2 teaspoonDiamond Crystal Kosher salt, or 1/4 teaspoon Morton's kosher salt
100gramsParmesan reggiano cheese, grated on large holes of box grater
3Tablespoonsred wine vinegar
Instructions
Soup
Heat 1 tablespoon olive oil in a large, heavy bottom pot or Dutch oven. Add diced onion and cook over low heat until softened, about 5-6 minutes. If onion starts to burn, add a a few tablespoons of water.
Add garlic and ginger and saute on low for another 2 minutes, stirring well. Add tomato paste, Aleppo pepper, cumin, coriander, turmeric and salt and stir well. Cook for 2-3 more minutes
Add squash, sweet potatoes and carrots and mix well. Continue sautéing on low heat for another 3 minutes.
Add lentils, split peas and stock or water. Bring to a boil, reduce heat to low and simmer for 40-45 minutes until lentils and peas are tender.
Roasted Chickpeas
While soup is simmering, preheat oven to 400°F. Line a sheet pan with parchment paper. Place rinsed and drained chickpeas on baking sheet. Drizzle with olive oil and sprinkle with Aleppo, cumin and salt. Use your hands to mix everything so that the chickpeas are coated evenly. Roast for 23-30 minutes until crispy. Set aside as a garnish for the soup.
Finishing soup:
Ladle about 1/3 of the soup into a blender. Puree until smooth. Drizzle in 2 tablespoons olive oil and blend until mixed in. Pour pureed soup back into pot and mix soup.
Wash kale leaves. Strip kale leaves from stem. I find the tip of a paring knife is the best job for separating the leaf from the stem. Discard stems. Pile the leaves up and use a sharp chef's knife to slice across into 1/4 inch strips. Mix kale into soup and stir well. The heat from the soup will wilt the kale.
Ladle soup into bowls. Mix 1 teaspoon of red wine vinegar into each serving. Garnish with parmesan cheese and some crispy chickpeas.
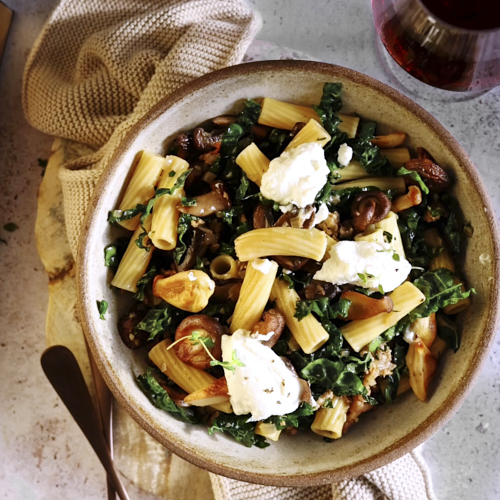
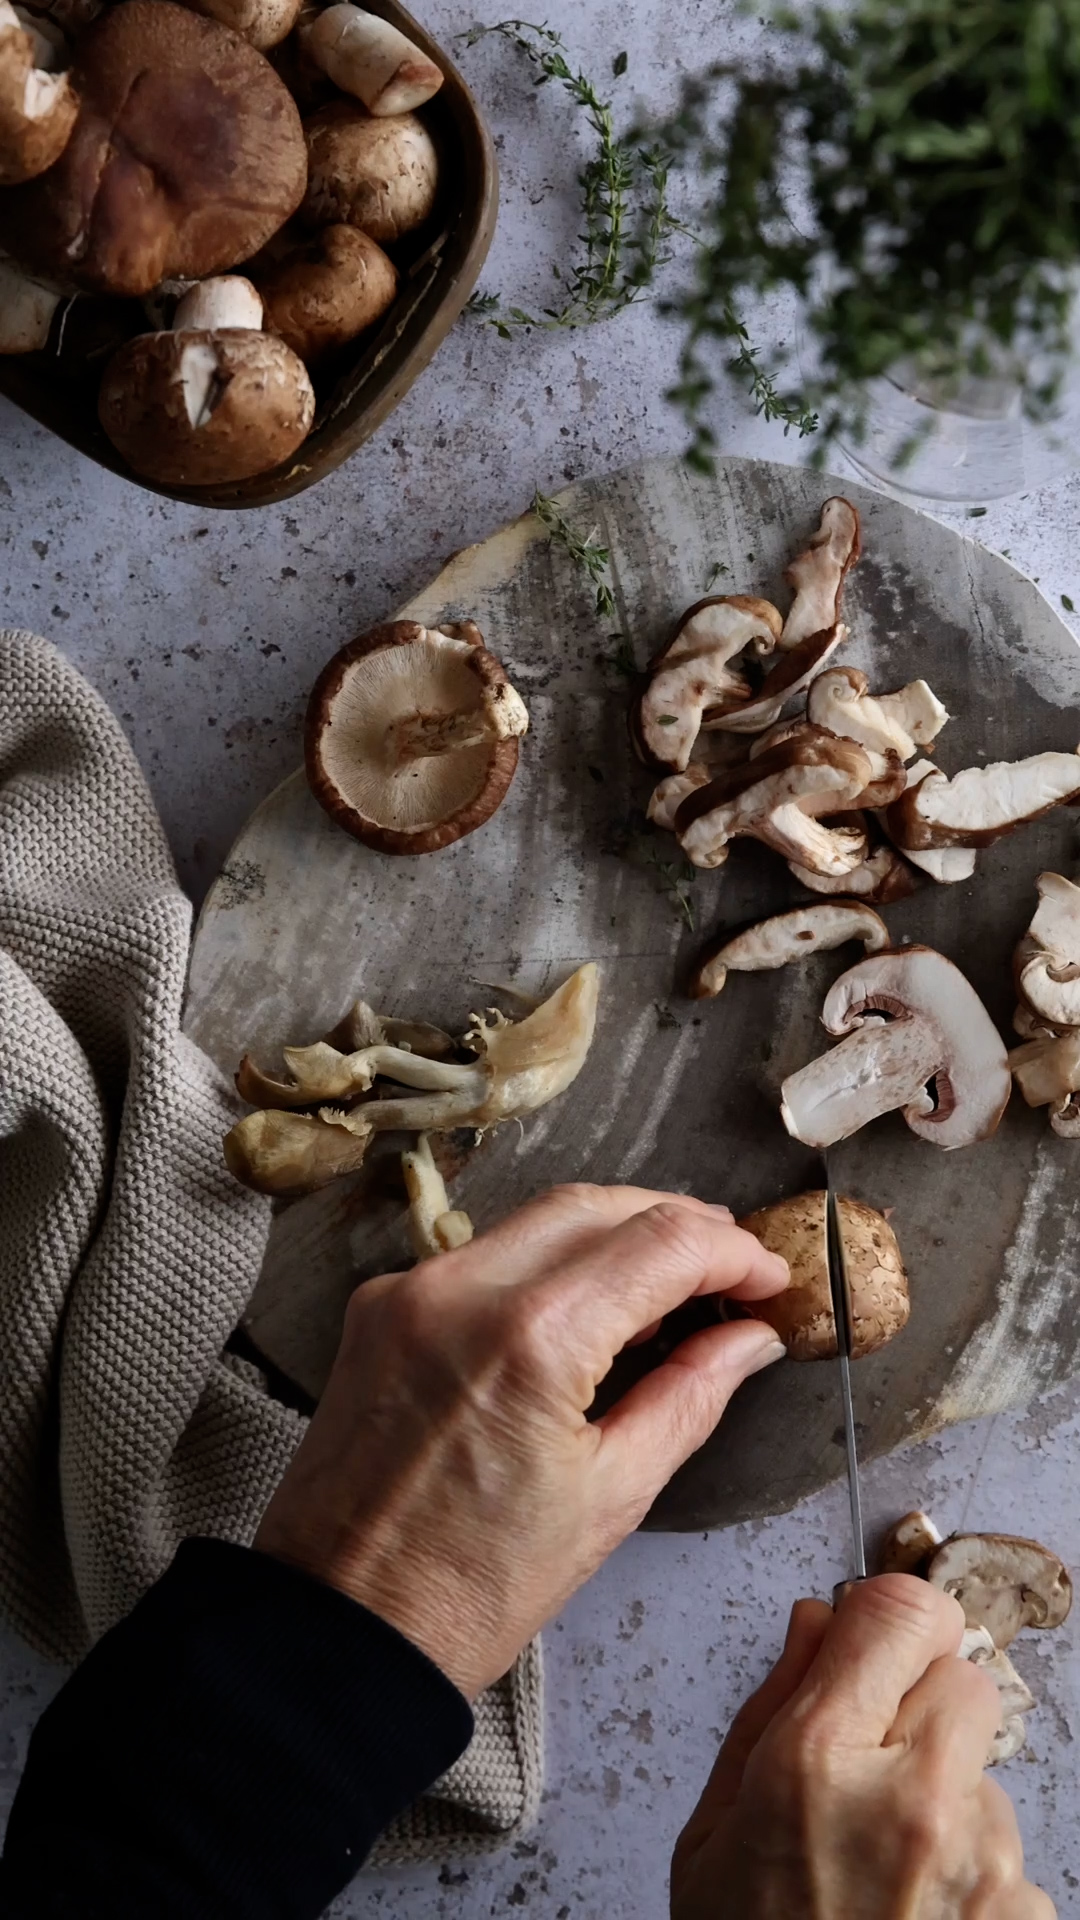
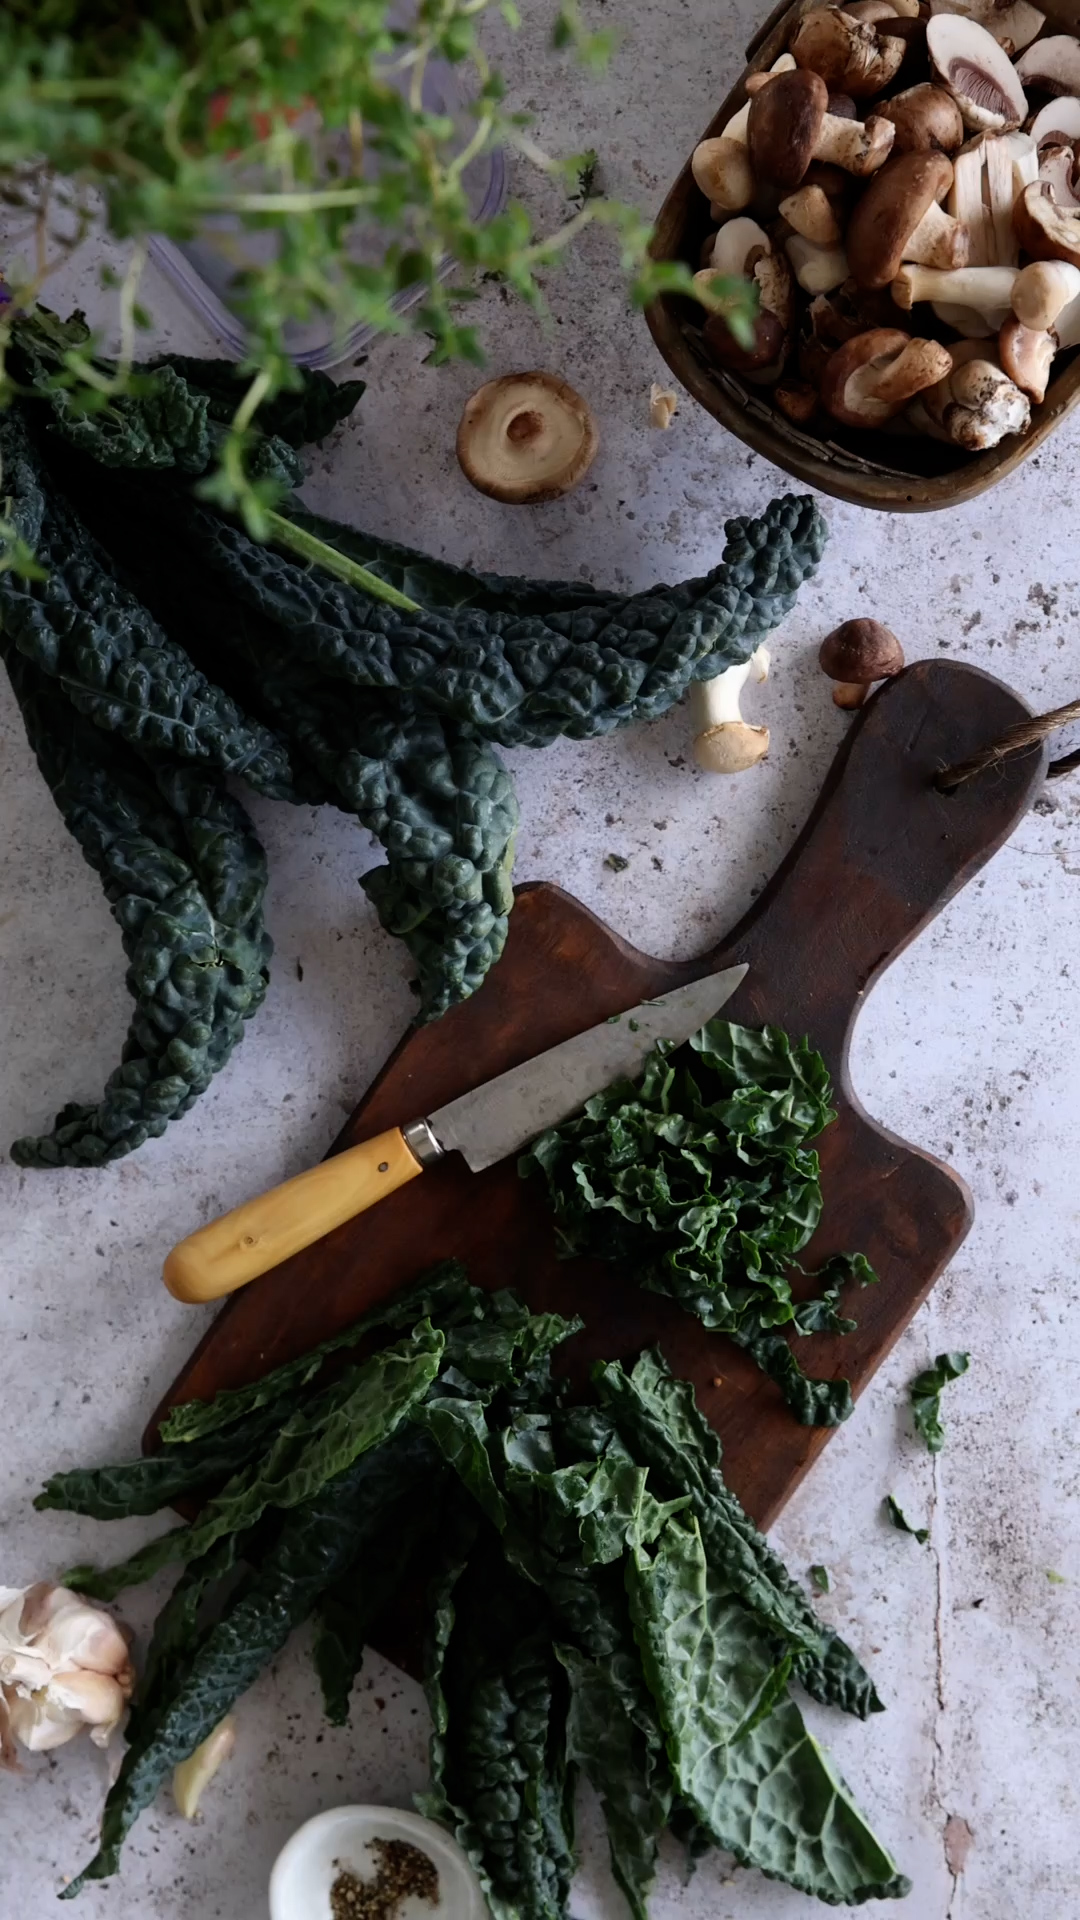
Is it just me, or does January feel like the longest month ever? It feels like we’ve been in January for 4 months now! When the nights are dark and endless, a cozy, satisfying meal makes all the difference—and this Mushroom, Sausage, and Kale Pasta delivers.
Over the years, my taste buds have changed. I never used to love mushrooms, but now I crave their deep, earthy flavour. Kale? I once avoided it, but now I appreciate that peppery, slightly bitter bite that balances rich dishes like this one.
Keys to Success for Mushroom Sausage and Kale Pasta:
Go big on mushrooms. This recipe calls for a full pound, and using a mix of varieties adds depth. I used oyster, cremini (brown button mushrooms), and shiitake, but any combination will work.
Hold off on the salt. Don’t salt the mushrooms right away—wait until they’re golden brown and caramelized. Salt draws out moisture too soon, preventing them from developing that deep, savory flavor.
Use a potato masher. It’s the best tool for breaking up sausage as it browns, giving you the perfect bite-sized texture.
Choose the right kale. Black kale (also called Tuscan, dinosaur, or lacinato kale) is my favorite for this dish. It’s slightly sweet, delicate, and less bitter than curly kale.
Finish with whipped ricotta. A generous dollop at the end adds a creamy, fresh contrast to the earthy mushrooms and spicy sausage. It takes this dish to the next level.
Pick the right pasta. Any tubular shape works well here—I used rigatoni. The key is choosing something that will catch all the little bits of flavour in every bite.
1Tablespoon Diamond Crystal Kosher salt, or 1 1/2 teaspoons Morton's Kosher salt
350 gramsLacinato kale (also called Tuscan kale or black kale), about 2 small bunches
340 gramsdried pasta,penne or rigatoni
`1tablespoonolive oil
400gramsplant based spicy or sweet Italian sausage, removed from casing
1Tablespoonolive oil
454gramsmushrooms, cut into 1/2 inch slices or pieces,a mix of crimini, shitake, button and oyster is nice
2large sprigsfresh thyme
1teaspoonDiamond Crystal Kosher saltor 1/2 teaspoon Morton's Kosher salt
4mediumshallots,peeled and finely diced
2 clovesgarlic,grated or finely minced
250millilitresdry white wine
50gramsParmesan cheesegrated or shaved for garnish
10 largebasil leaves, for garnish
Instructions
Place ricotta and milk in a medium bowl. Using a wire whisk, whisk until creamy and smooth. Store in fridge until ready to serve finished pasta.
Wash kale leaves. Strip kale leaves from stem. I find the tip of a paring knife is the best job for separating the leaf from the stem. Discard stems. Pile the leaves up and use a sharp chef's knife to slice across into 1/4 inch strips.
Bring a large pot of water to a boil. Add 1 Tablespoon salt and dried pasta. Cook pasta according to package directions for al dente. Reserve 1 cup pasta water before draining. Drain pasta.
While pasta is cooking, heat a large saute pan over medium heat and add 1 Tablespoon olive oil. Add sausage and use a potato masher or wooden spoon to break sausage into small crumbles. Continue cooking and stirring until sausage is browned and cooked through, about 4-5 minutes. Transfer cooked sausage to large bowl or plate.
Put pan back on medium heat and add 1 tablespoon olive oil to pan. Add mushrooms and cook, stirring occasionally, until just slightly softened, about 2 minutes. As the mushrooms release their water, use a wooden spoon to scrape up all the browned bits at the bottom of the pan. Add thyme sprigs and 1 teaspoon salt and continue cooking, stirring occasionally until liquid is evaporated and mushrooms are browned. This will take about 6-7 minutes. Remove thyme stems. Transfer mushrooms to bowl with sausage.
Add shallots and 1/4 cup water and cook over medium heat for 2-3 minutes until softened. Add garlic and cook for another minute or two. Add white wine and cook over high heat for 2-3 minutes until liquid is reduced by about half. Add kale and stir for another 2 minutes until kale starts to wilt.
Add drained pasta and 1/2 cup reserved pasta water to pan. Mix well over medium heat until most of liquid has evaporated. Add reserved sausage and mushrooms and mix well.
Transfer pasta to serving platter. Garnish with shaved parmesan, little scoops of whipped ricotta and fresh basil leaves.
This dish is hearty without being heavy, packed with bold flavors, and exactly what I want on a chilly January night. Hope you love it as much as I do!