Tag Archives: Almonds

Cherry Almond Laminated Brioche Buns

In the world of office supplies, lamination involves sandwiching a sheet of paper between two layers of plastic. In the food world, lamination involves the process of sandwiching a layer of butter between two sheets of dough and then folding and rolling it multiple times. Much more delicious than paper encased in plastic.

It creates a dough with hundreds of alternating layers of butter and dough. When this dough is baked, the heat of the oven converts the water in the dough and butter into steam and the dough puffs up into delicate flaky layers. Croissants are a type of a laminated dough.

For these buns, I’m starting with a brioche dough. Brioche is an enriched dough made with butter and eggs. Then we further enrich the dough by laminating it with more butter. I made a video of the process.

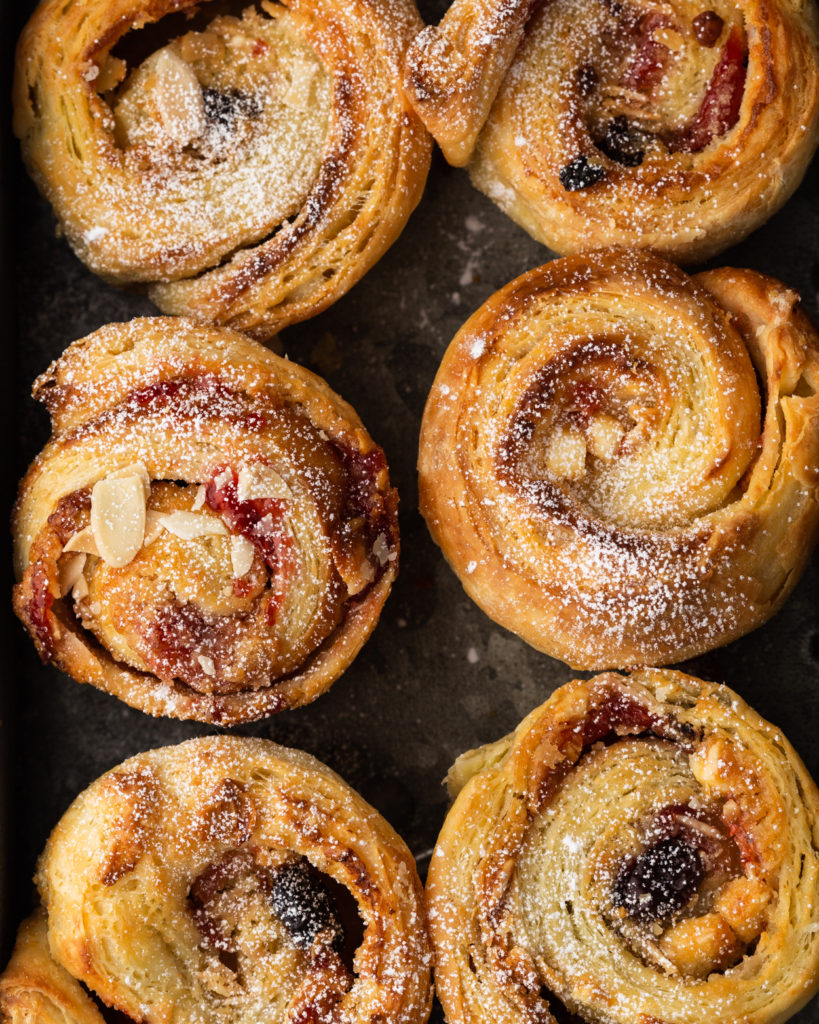
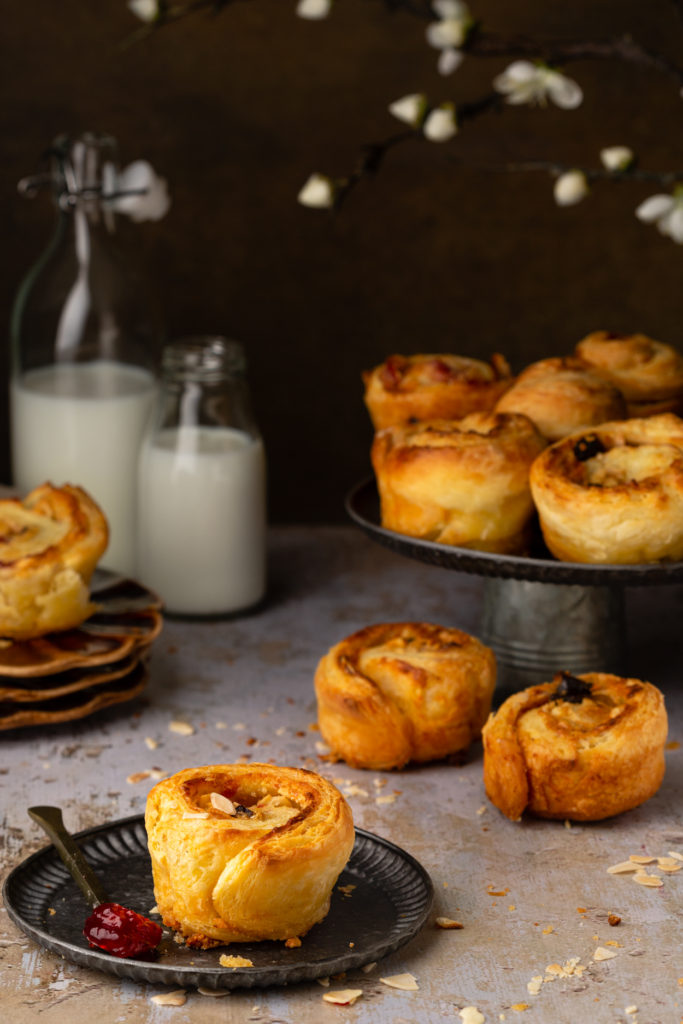
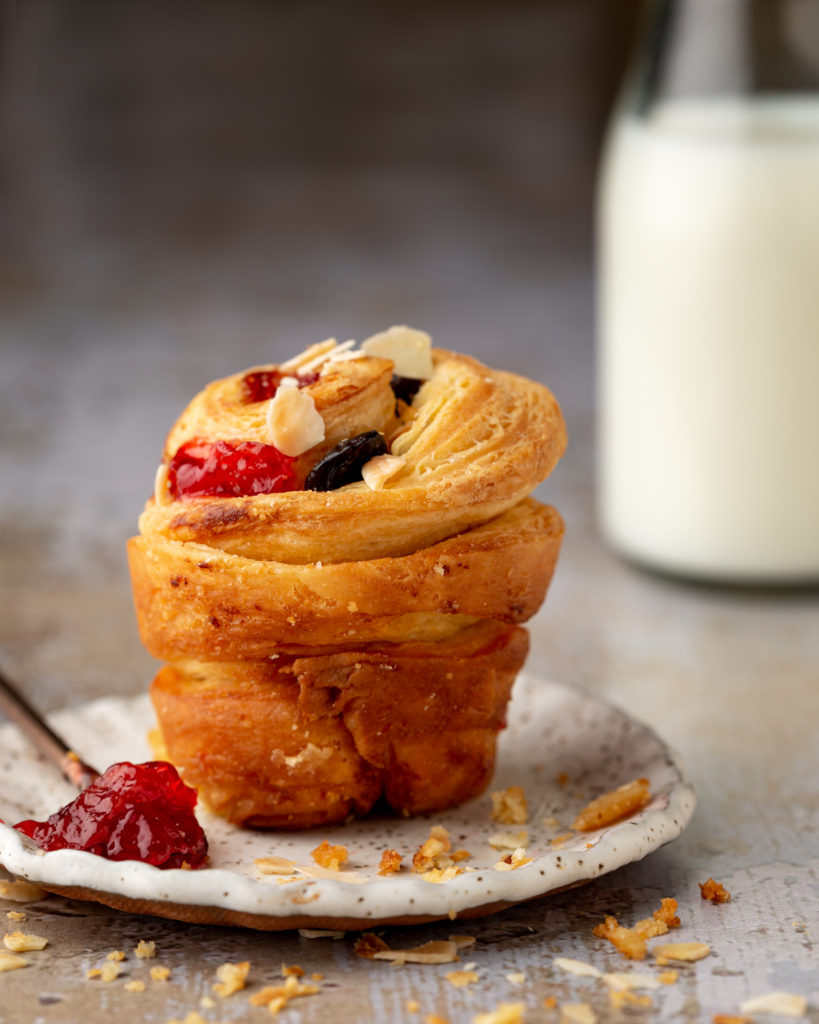
These little buns are a really fun weekend project. Making laminated dough takes time but the results are worth it. I mean, look at those flaky, buttery layers.

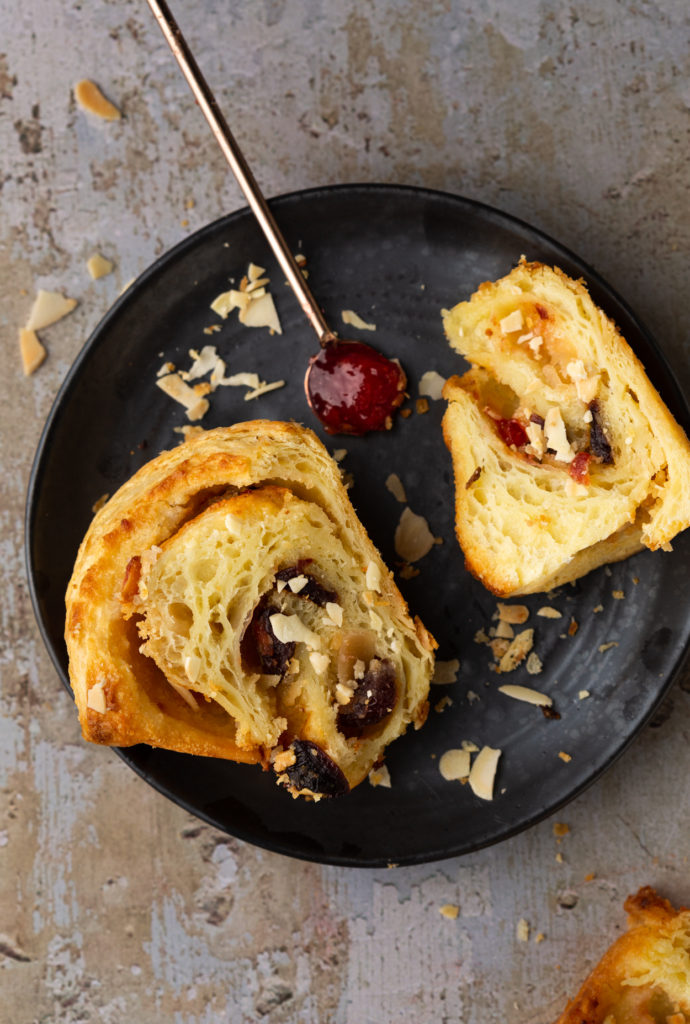
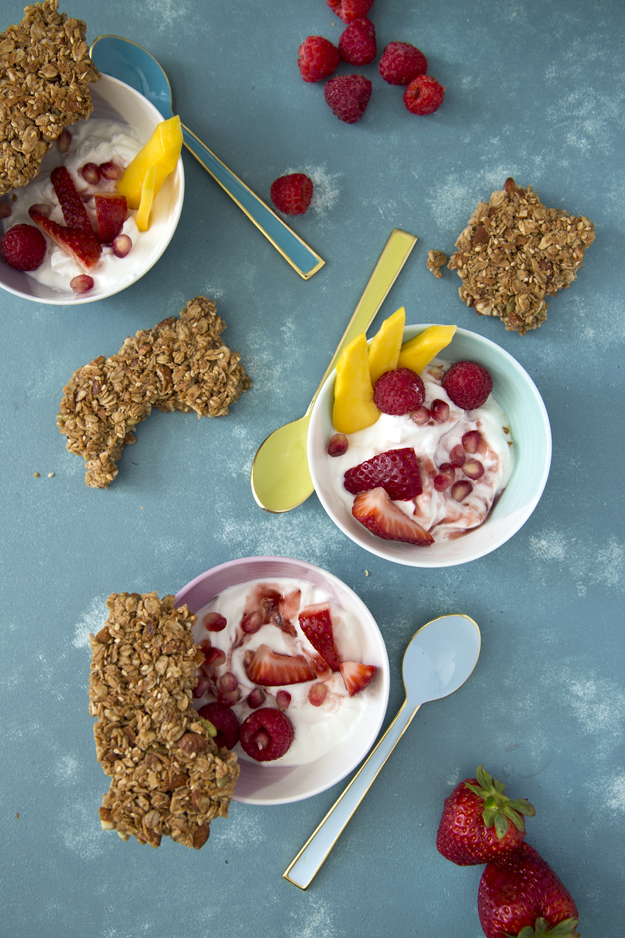
You can divide the work over 2 days. Make the brioche dough and frangipane filling on the first day. Then laminate the dough and roll and assemble on day 2. These buns are packed with flavour. Sweet frangipane and white chocolate, sour cherry jam and tart dried cherries and crunchy sliced almonds. It’s a powerhouse of texture and taste.

You may be tempted to skip the chilling between rolls, but I beg you not to rush the process. Without the chilling in between each roll/fold, the butter will get too soft and it will start seeping out of the dough. You won’t get beautiful layers. Once the dough is filled and rolled, a final chill is critical to get nice tidy slices. Trust me. I know this from experience. I rushed it on my first try and had a mess. Still delicious but not so pretty.

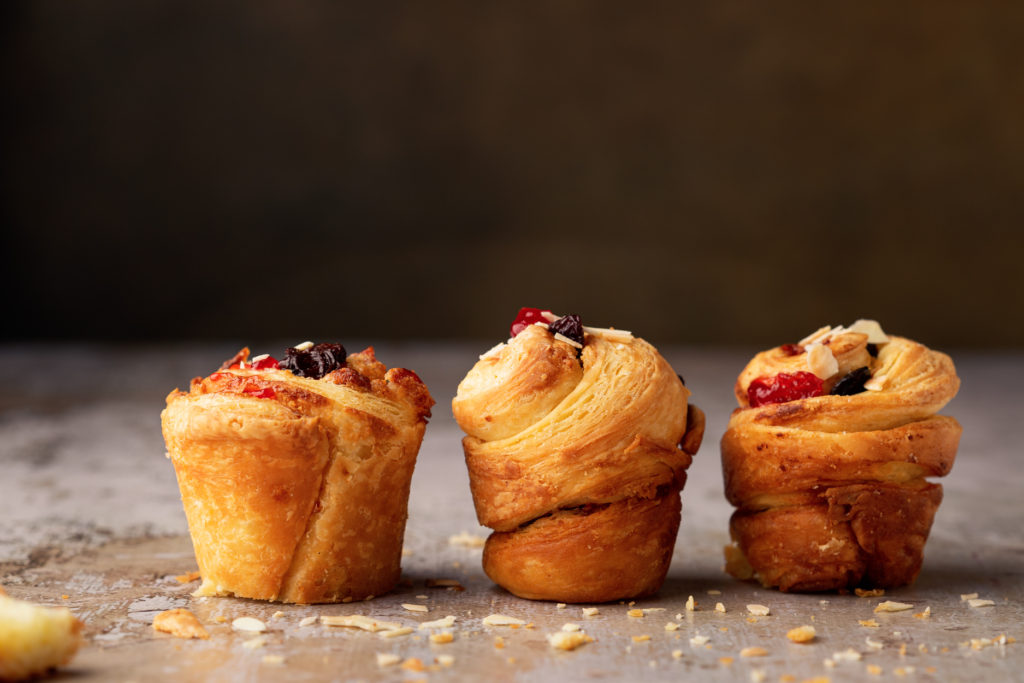
I baked mine in 5 ounce ramekins. I also tested it in a popover pan. The shape will be a bit more cylindrical, like the bun in the above picture. I think you could also use giant muffin tins. The ceramic ramekins are quite inexpensive. I paid $2.50 for each one at my local kitchen store.

They are best eaten the day they are baked. We had too many to eat, so I wrapped each leftover bun in plastic wrap and then put them in a ziploc bag in the freezer. My husband has been removing one each night after dinner and letting it thaw on the counter for about an hour. Then he heats it up for about 7 minutes in a 350°F oven. He goes to bed very happy. Sadly that happiness disappears after watching Lisa LaFlamme regaling us with the latest and greatest Covid news of the day. We are languishing.

Mocha Almond Fudge Swirl Ice Cream

One of my strongest childhood memories, is spending Sundays with my dad. He would take me and my sisters out for the day to give my mom a break. In the summer it would be swimming and then dinner and ice cream. In the winter, it was usually a movie, dinner and ice cream. I recall seeing Mary Poppins 7 1/2 times. The 1/2 was because my little sister threw up and we had to leave.

Dinner was usually at the Copper Kettle. We’d always have fried chicken in a basket. I fondly remember the little packets of honey that we’d open with our teeth, and drizzle all over the chicken and fries. After dinner, we’d go to Bresslers Ice Cream at Bayview Village. That was when Bayview Village was a strip mall, and not the fancy place it is now.

Everyone had their favourite flavour of ice cream. My sisters ordered strawberry (Jody), bubblegum, (Lynne), and maple walnut (Faith). My baby sister (Bo) was too little to come and my baby brother (Jay) wasn’t even born yet! I always got two scoops, chocolate on the bottom and pistachio on top. My dad always got pistachio. He loved all nuts.

When I was a teenager, I discovered Jamoca Almond Fudge Ice Cream at Baskin and Robbins. I adored the deep, slightly bitter coffee flavour, balanced by ripples of chocolate fudge sauce. And the little pop of crunch when you’d bite into a nugget of almond was easily the best part for me.

Thanks to my friend Brigitte, I have recreated this iconic flavour at home. The base coffee recipe is hers. I added swirls of hot fudge sauce and toasted salted almonds. It comes together really quickly. Store-bought fudge sauce will totally work, but it only takes a few minutes to make your own. My favourite recipe is from Deb.

Extra hot fudge sauce and almonds are totally optional, but highly recommended!

Granola Bark

3 bowlsIf you’re one of those people that pick all the big clumps of granola out of the bag, leaving the little crumbs for the rest of your family, then this granola bark is for you.broken into piecesThe recipe comes from the cookbook Tartine All Day, by pastry chef Elizabeth Prueitt. She and her husband, bread baker extraordinaire, Chad Robertson, are the owners of the Tartine Bread empire in San Francisco.

I recently sorted through all my cookbooks and got rid of a big pile that just didn’t bring me joy anymore. I wasn’t planning to buy any new ones.  We’re in declutter mode around here these days. But I’m happily willing to make room for this book on my shelf. It is filled with inspiration for way we want to eat now, melding new ingredients with old techniques. These are the recipes that Prueitt cooks for her family everyday.

Start by gathering the dry ingredients. Rolled oats (not quick cooking), pumpkin seeds, unsweetened coconut, golden flax seed, sesame seeds, cinnamon, whole almonds and ground almonds (almond flour). Feel free to substitute other seeds and nuts. Chia seeds and sunflower seeds would be good. Pecans instead of almonds would be delicious. For Nutella fans, try using hazelnut flour instead of the almond flour.Dry ingredientschopping almondsFor the liquid ingredients, maple syrup is simmered with water, coconut sugar, and salt until the sugar dissolves. Prueitt calls for vegetable or olive oil, but I used coconut oil. The final liquid ingredient is an egg white, which helps make the granola bark extra crispy.Liquid ingredientsall mixedspreading out barkBefore baking, it is important to press the granola quite firmly into the pan. The easiest way to do this is to cover the granola with a sheet of parchment paper and press a second pan over the  bark.
compress 1compress 2
.compress 3compress 4
Once baked and cooled, break bark into big pieces and pile them into a big glass jar and set it on the counter for snacking.
in a jarOr crumble it up into your yogurt for breakfast.one bowl

Click here to print recipe for Granola Bark.

with a latte

Blistered Green Beans with Tomato-Almond Pesto

blistered green beansSome people consider green beans boring. I prefer to think of them as a blank canvas. Their neutral flavour is a perfect backdrop for all kinds of culinary profiles. These blistered green beans are ideal for when you just want to crunch your way through something green.

This recipe was featured in the 2015 Thanksgiving (November) issue of Bon Appétit. I wanted to cook and bake almost every recipe in that magazine. While I still mourn the loss of Gourmet, I think that editor-in-chief Adam Rapoport is doing a stellar job at the helm of Bon Appétit. The magazine feels fresh and modern to me and the photography always leaves me feeling inspired.what you'tt needThe pesto sauce for these beans is a riff on a traditional Catalan sauce made with roasted red peppers and almonds. Roasted tomatoes stand in for the traditional peppers. While winter tomatoes are often insipid, roasting infuses them with tons of flavour.roasted tomatoes The green beans spend about 10 minutes in a blisteringly hot pan, until they become lightly charred but still have some crunch. blistering beansCrunchy, fresh, and tangy-sweet, these green beans hit all the right notes. They are sure to become a regular in your weekday rotation.

Click here to print recipe for Blistered Green Beans With Tomato-Almond Pesto.

blistered green beans in a stack of bowls


On the 7th night of Chanukah: Florentines

On the 7th night of Chanukah I baked my true love Florentines. Thin, crispy, lacy, delicate and just drop dead gorgeous! I will warn you that these cookies are a bit of a pain in the ass to make. They require a candy thermometer and you will need to temper the chocolate for them, but they are so pretty (and delicious), that I think they’re worth the effort. on wire dish 5 x 5Ever since I watched Anna create these on her show “Bake with Anna Olsen,” I became obsessed with making them. I have made similar lacy cookies with oats , but these are something totally different.what you'll needThese are essentially an almond cookie. Sliced almonds get coarsely crushed. rolling almondsHoney, cream and sugar are cooked until they reach 244°F.cooking batterThe almonds get mixed into the batter and then the cookies are formed and baked. flattening cookiesmaking perfect circlesThe baked cookies are quite fragile, so they get a coating of melted chocolate on one side, to give them some extra strength. brushing florentines with chocolateThe cookies can then be embellished further, by placing the wet chocolate side of the cookie onto a chocolate transfer sheet. This is an acetate sheet embossed with cocoa butter and powdered food colouring. Once the chocolate hardens, you peel the cookie off the sheet and the design transfers to the chocolate, producing a stunning pattern. They come in a wide variety of designs. There are many different online sources for them.peeling florentine off chocolate transfer sheet

Click here to print recipe for Florentine Cookies.

florentines on slate tile with wire dishThe possibilities are endless with Florentine cookies.

Emily, at a counter space created Potato Chip Florentines.

Sarah at strawberryplum made Pistachio, Orange and Honey Florentines.

Stella over at bravetart crafted Cocoa Nib Florentines,

Spicy-Sweet Green Beans

I wish you were here with me right now in my kitchen. Because I am about to tell you about some of the most amazing green beans I have ever eaten. And I’m not sure my writing and photography skills will be sufficient to convince you. If you were here beside me to smell them and taste them, I could make a believer out of you.

Now you may be wondering why I am raving about green beans. I can almost hear you now, in that disbelieving tone, “Come on, really? Green beans? Is she that hard up for healthy January recipes?”

This recipe came to me in a quiet e-mail from my sister Faith. It was actually a forwarded e-mail from her friend Kerry. Subject line read: Green Beans. The message was a simple one liner, “You’ll love these” and then on the next line was the link to the recipe.

I happen to love green beans. I think they are the Rodney Dangerfield of vegetables. They simply do not get the respect they deserve. They are the perfect canvas for carrying any flavour profile. They are healthy and I think they’re quite pretty to look at. I eat them at least twice a week and I’m always on the look-out for new ways to dress them up. So my sister had my attention.

When I clicked on the link I knew right away this recipe was a winner. When it comes to the plethora of on-line recipes floating around out there, you must always consider the source. And this time the source was Mark Bittman. Or Bitty as I like to call him ever since I heard Gwyneth Paltrow call him that on their PBS series “Spain – On the Road Again.”

Mark Bittman, New York Times Food columnist and author of several cookbooks, including the culinary bibles “How to Cook Everything” and “How to Cook Everything Vegetarian”, has yet to steer me wrong. As I went down the ingredient list of this recipe, I started to get excited. Almonds, garlic, dried hot chiles, olive oil, shallots, honey and soy sauce. How could it be anything but spectacular?

The green beans are cooked in boiling salted water for about 2 minutes. Please try salting your vegetable water if you have never done this before. It really makes a difference. Your vegetables will not taste salty, just well seasoned and way more flavourful than if you salt them after cooking. Once the beans are cooked to crisp tender, about 2-3 minutes,  shock them  in ice water to stop the cooking. Costco has been carrying the nicest Kenyan green beans lately (those skinny green beans sometimes referred to as called haricots vert) so I used those.

I used whole, unblanched almonds. I toasted them first, as I believe you get the best flavour from toasted nuts. I think untoasted nuts are a crime! (Sorry, just a little pet peeve of mine) Toasted almonds, garlic, dried red chiles and a bit of olive oil get turned into a paste in the Cuisinart. The recipe calls for 1 or 2 dried hot red chiles. I didn’t have whole dried chiles, just red pepper flakes, so I used about a teaspoon of the flakes. I like spicy but not painful hot, so a teaspoon was perfect for me.

Chopped shallots are sautéed in a bit of olive oil and then the almond-garlic-chile paste gets added to the pan. Honey and soy sauce follow and then the green beans are bathed in this heavenly paste. I couldn’t stop eating them right out of the pan. They possess the perfect balance of flavour and texture. Crunchy from the green beans and almonds, a bit f heat from the red pepper, salt from the soy sauce and sweet from the honey.  This recipe is pure genius. Really! And eating more vegetables and less meat will make Bitty really happy!

Click here to print the recipe for Spicy-Sweet Green Beans.

My Passover Faux Pas (Shmura Matzoh Crunch)

Everyday at 5 pm, in the week leading up to Passover this year, the doorbell would ring. When I opened the door, there would be a flat square box of matzoh left on the front porch. By the end of the week, I had a stack of about 6 boxes. Various Jewish organizations around our city were dropping them off at our house with wishes for a happy and healthy Passover.

These were not like the ordinary boxes of matzoh I bought at the supermarket.  Regular matzoh are about 8 inches square and come 10 to a box. They are machine-made. Shmura matzoh are round in shape, about 12 inches in diameter. They are hand-made. We traditionally ate this matzoh on the first night of Passover, at the Seder.  That was about all I knew about Shmura matzoh.

As I stared at this stack of matzoh boxes, I wondered what we were going to do with all of them. After all, I still had 8 boxes of the regular stuff in the storage room. Suddenly, divine inspiration struck. I didn’t want to let this special matzoh go to waste. I was going to give it the royal treatment. First, I would coat it in a warm butter and brown sugar caramel and then I would slather it in milk chocolate and finally, top the whole thing off with toasted chopped almonds. Who wouldn’t feel special and loved with this treatment. I think there may actually be a spa treatment similar to this somewhere in the world. If not, there definitely should be!

Last year I made Marble Matzoh Crunch with Bittersweet and White Chocolate. This is my adaptation of  Montreal baker Marcy Goldman’s creation. Everyone I feed it to rolls their eyes in ecstasy. When I made it with the square matzoh, I broke it into small rectangular pieces. How beautiful it would be, I thought, to wrap up an entire 12 inch circle of this coated beauty!

I had 6 of these all wrapped and chilling in the fridge, ready to go to Toronto for our family Seders. My husband was packing up the car for our drive and he asked me where all the boxes of Shmura Matzoh were. I proudly showed him what I had created. He was horrified! Apparently my creations were sacrilegious. I managed to calm him down by telling him that several boxes survived unscathed and we could take those boxes to his sister’s house. I fed him small bites of the chocolate almond shmura matzoh crunch during out 4 hour drive and he had forgiven me by the time we arrived.

When we returned home I did some research and discovered that Shmura means “watched” in Hebrew, as in, to watch over something carefully. This matzoh is called shmura because it is made under strict rabbinical supervision, meaning that the rabbi is keeping an eye on the process, which must be completed according to a strict set of Jewish religious rules, and in 18 minutes.

thecitycook.com provided this explanation: “The Seder is the centerpiece of Passover. For some who observe and celebrate this holiday, it is particularly meaningful to replace factory-made matzoh, the unleavened bread so essential for the Seder meal, with shmura — or shmurah — matzoh. Shmura means watched from the harvest, which signifies that every step of the process of making this matzoh, from harvesting the grain to the final baking, has been supervised by a rabbi. It also means that when the bread is being made in its small batches, the flour and water are kept in separated cubicles as extra insurance that there is no premature contact between them until the last possible moment, thus preventing any leavening.”

I also discovered that a box of 3 Shmura matzoh, will set you back about $15.00 -$20.00. Shmura matzoh is expensive, because producing it is very labor intensive. Every piece is made by hand, not machine. The production of shmura matzoh is a labour of religious love. Think of it as Artisnal Matzoh.

Whether you decide to give regular or Shmura matzoh the royal treatment, you will not regret it!

To print the recipe for Shmura Matzoh Crunch, click here.