Watch what happens when challah and babka collide.
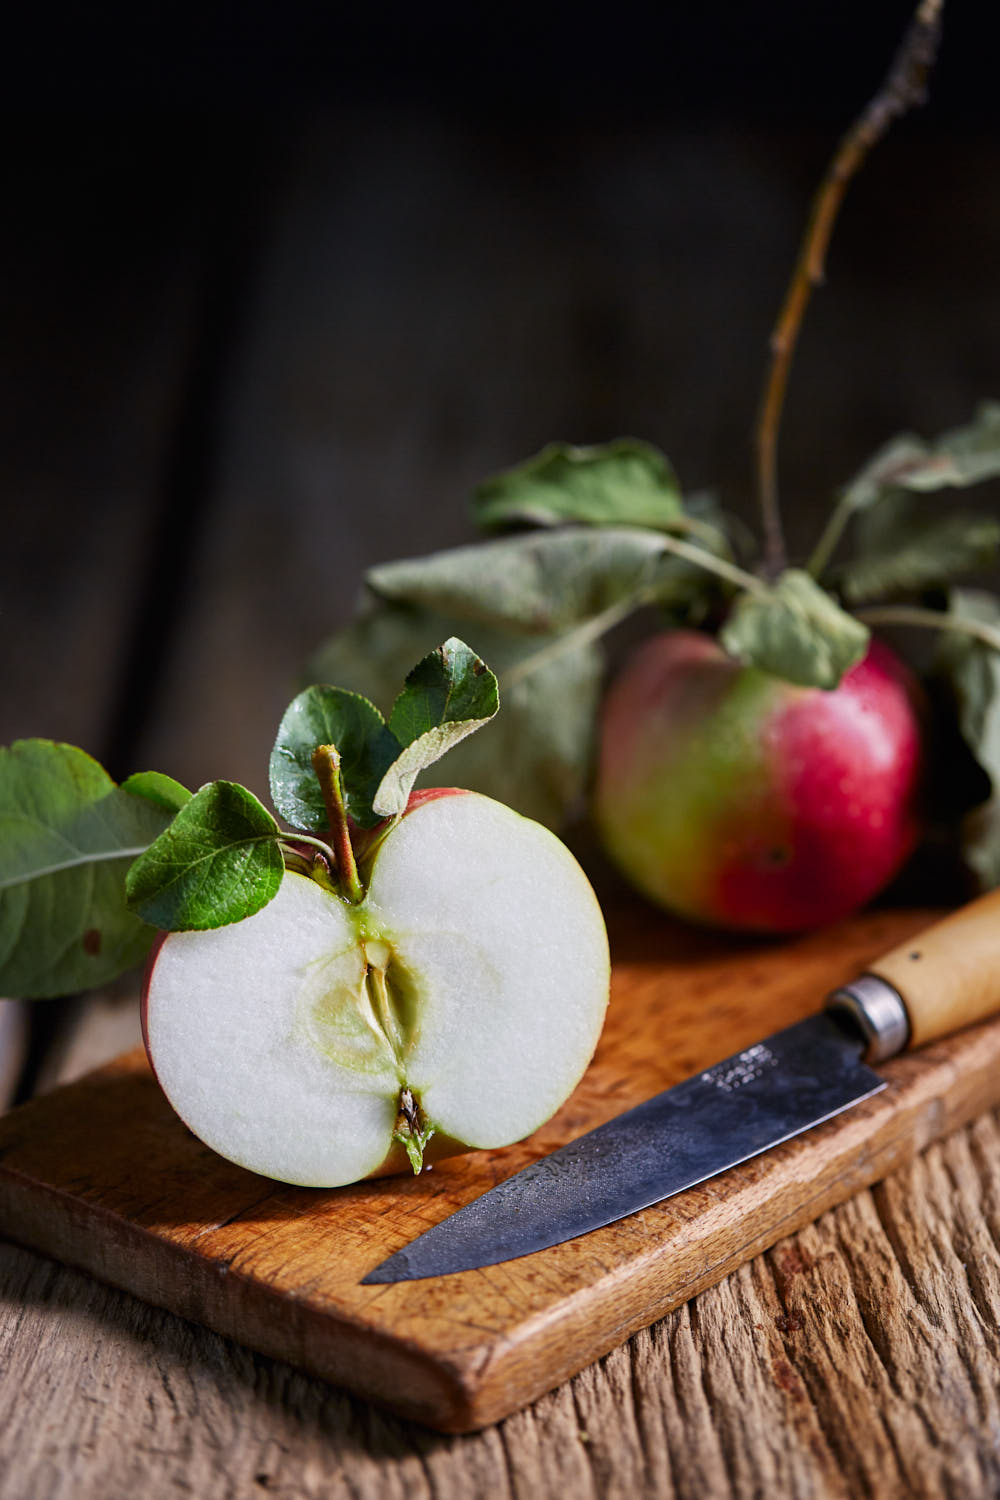
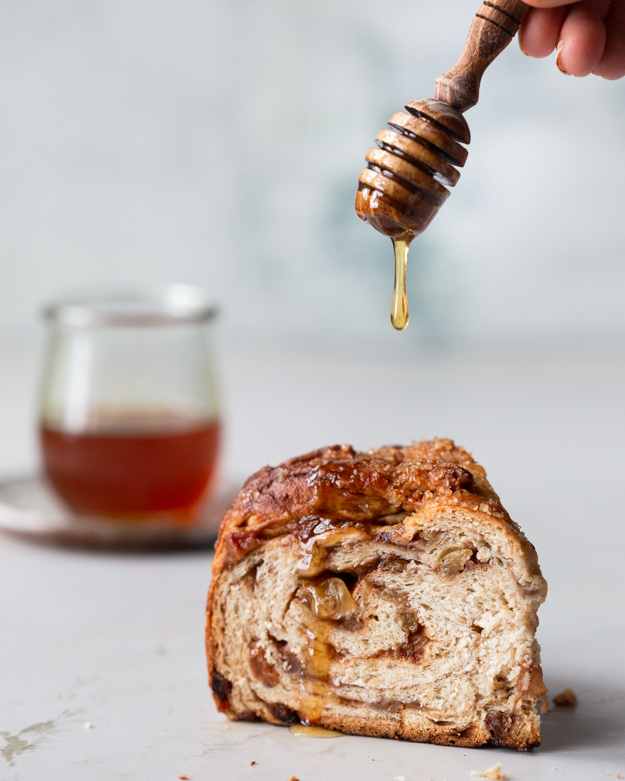
On Rosh Hashanah, it’s traditional to dip apples in honey, to symbolize our desire for a sweet year ahead. In my quest to be efficient and practical, I thought it would be clever to bake my honey and apples right into the challah.
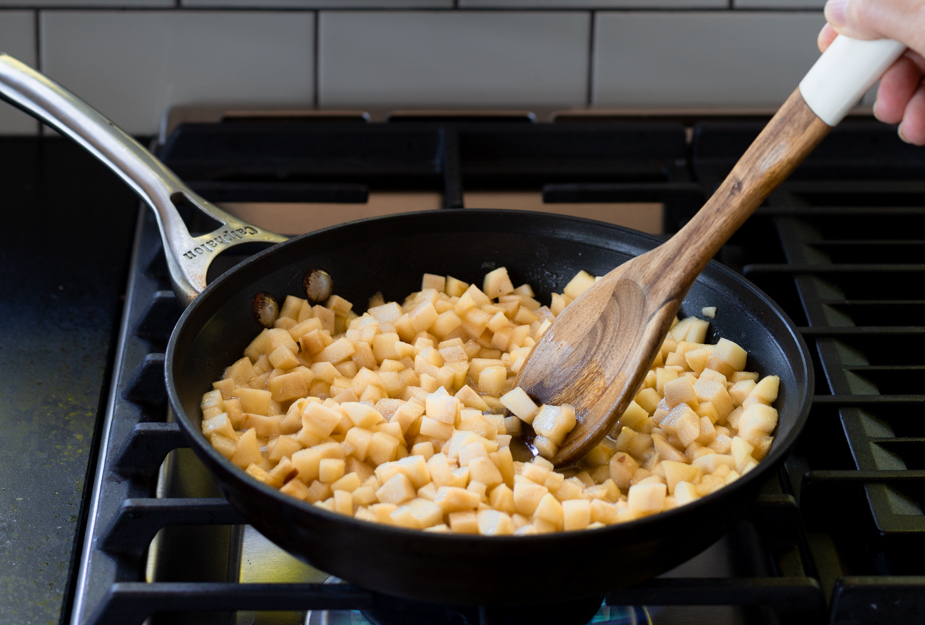
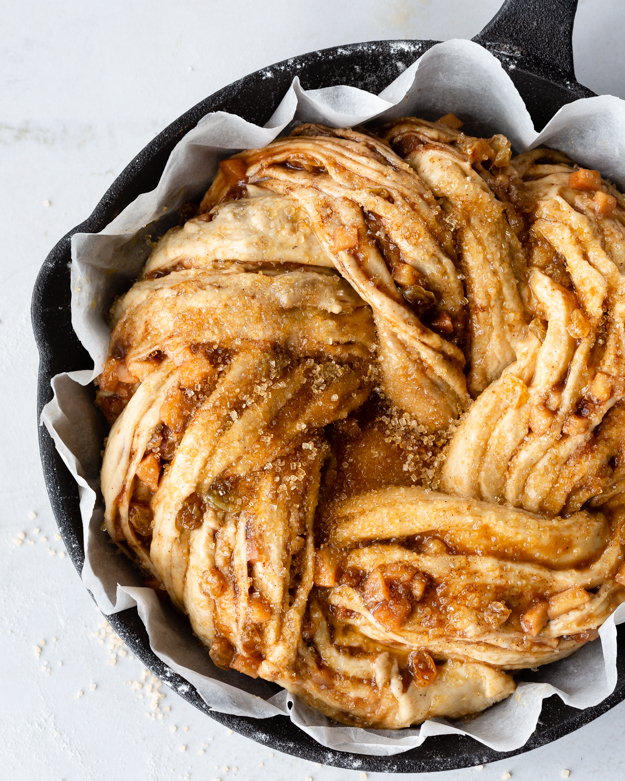
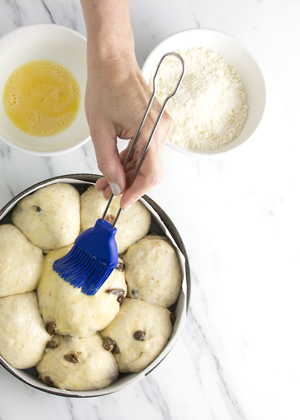
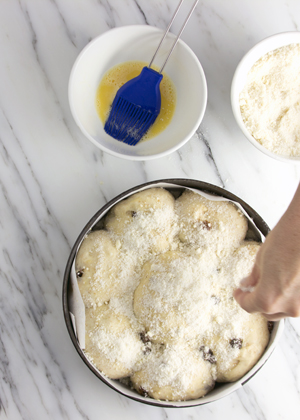
Adding apples to challah dough is tricky. Raw apples would leach too much moisture into the dough and make the challah soggy. Sautéing them first, solved that problem. To further boost the apple flavour, I spread some apple butter onto the dough. Apple butter does not actually contain any butter. It is made by cooking down apples into a very concentrated state. it’s quite tart, as no sugar is added to it.
I sprinkled my dough with golden raisins, but I know how contoversial raisins are, so leave them out if you have a family of raisin haters.
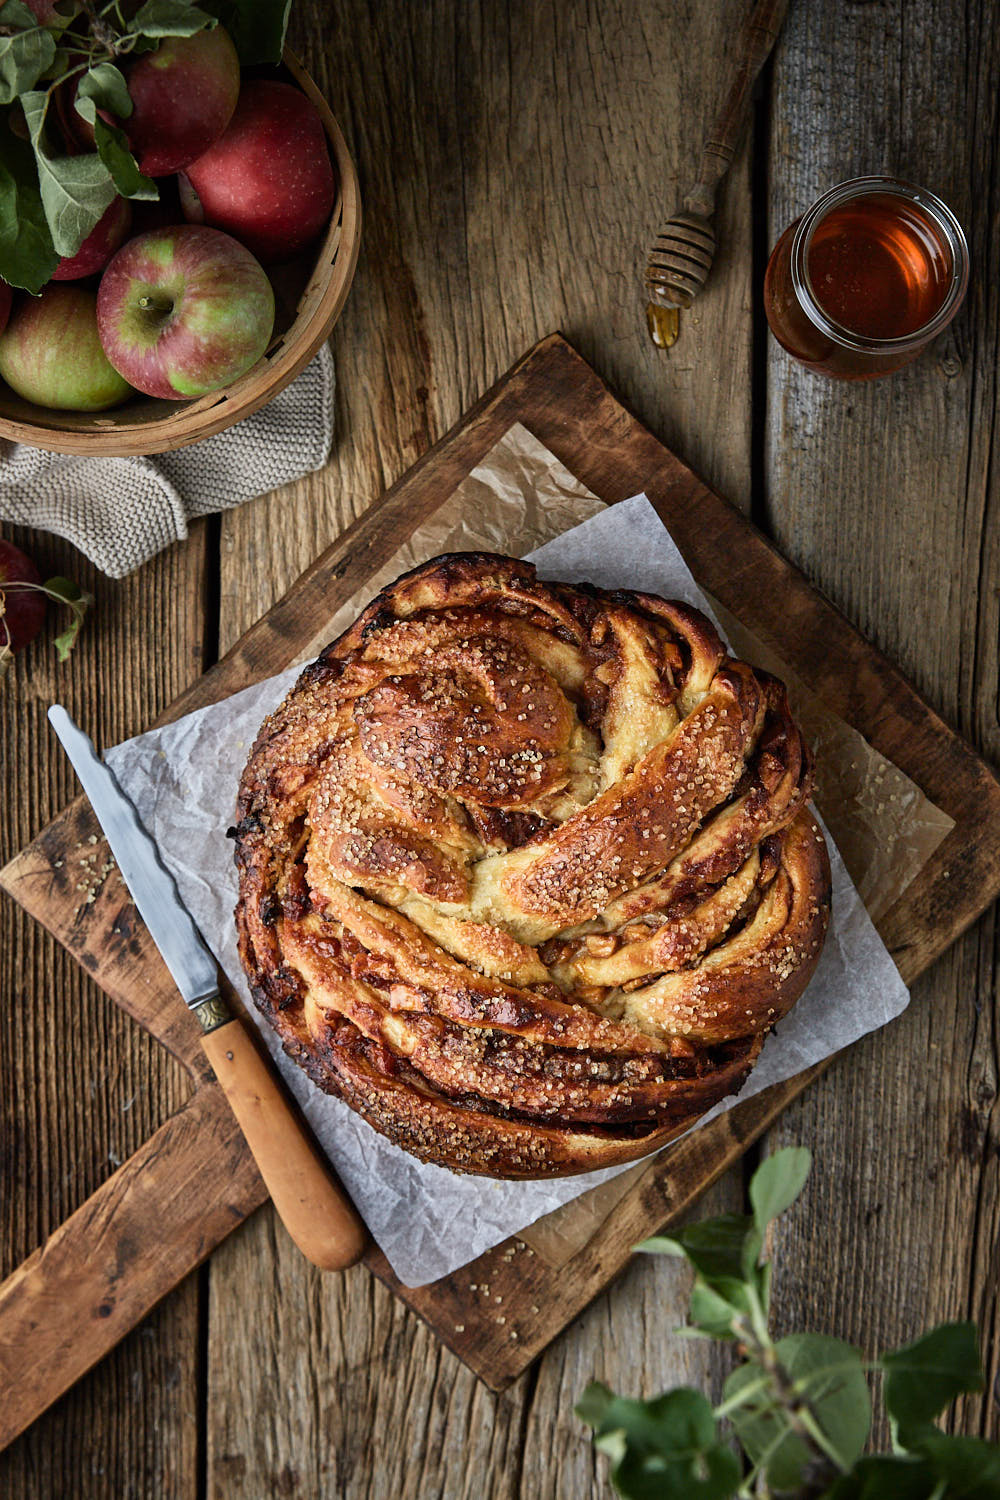
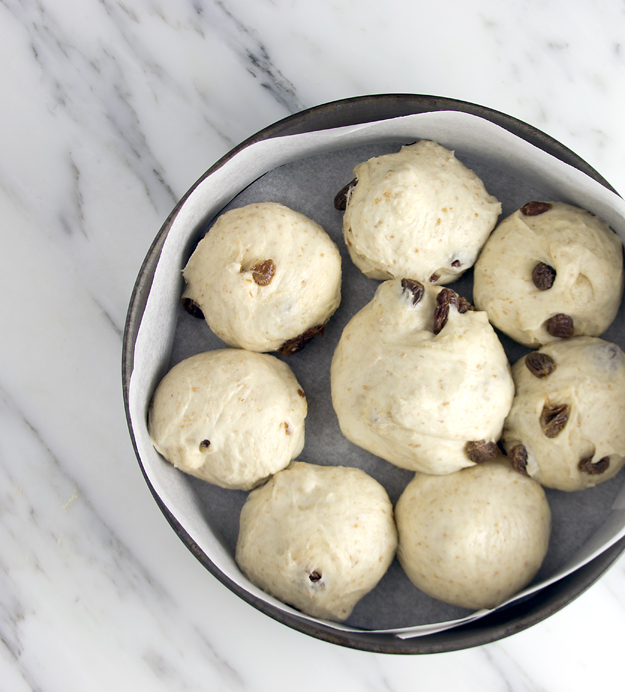
While a babka is traditionally baked in a loaf pan, on Rosh Hashanah, challah is round, a circle without an end, to symbolize our wish for a year in which life and blessings continue without end. So once the dough is twisted, just coil it into a knot.
Rosh Hashanah, the Jewish New Year, is just a few weeks away. It’s traditional to dip apples in honey, to symbolize our desire for a sweet year ahead. In my desire to be efficient and practical, I thought it would be a brilliant idea to bake my honey and apples right into the challah. I have been hard at work the past two weeks, figuring out just how to achieve that.
My starting point was my favourite challah dough. On Rosh Hashanah, challah is round, a circle without an end, to symbolize our wish for a year in which life and blessings continue without end. I was inspired by cloudykitchen’s Mixed Nut and Dulce de Leche Brioche Knot. Her clever twisting method was perfect for Rosh Hashanah.
After baking 5 versions of apple and honey challah, I believe I have nailed it. My husband, my chiropractor and my UPS man were happy to eat my experiments. None were a total fail, but there were a few issues along the way. The first hurdle to overcome was how to add the apples. Raw apples leached too much moisture into the challah, and made for a soggy bread. Sauteeing them first, solved that problem.
The apple flavour was kind of muted in the finished bread. In order to amp up the apple volume, I spread the dough with a thin layer of apple butter. Apple butter is simply very concentrated applesauce. There is actually no butter in it, only apples. It’s tangy and really packs a wallop of flavour. Some brown sugar, cinnamon and golden raisins provided a perfect counterpoint for all that zingy apple flavour.
Check out my video to see how it all came together.
Any leftover bread makes amazing toast the next morning. It’s a perfect way to segue gently from summer into fall. I’m not quite ready for pumpkin, but I will happily embrace apples in any form.
Last week, as I was watching TV, this commercial caught my attention. It featured a young woman, staring wistfully, at the bountiful bread counter at Whole Foods. As they panned across the crusty artisan loaves, the tagline, “Maybe bread and you should be a thing again”, scrolled across the screen.
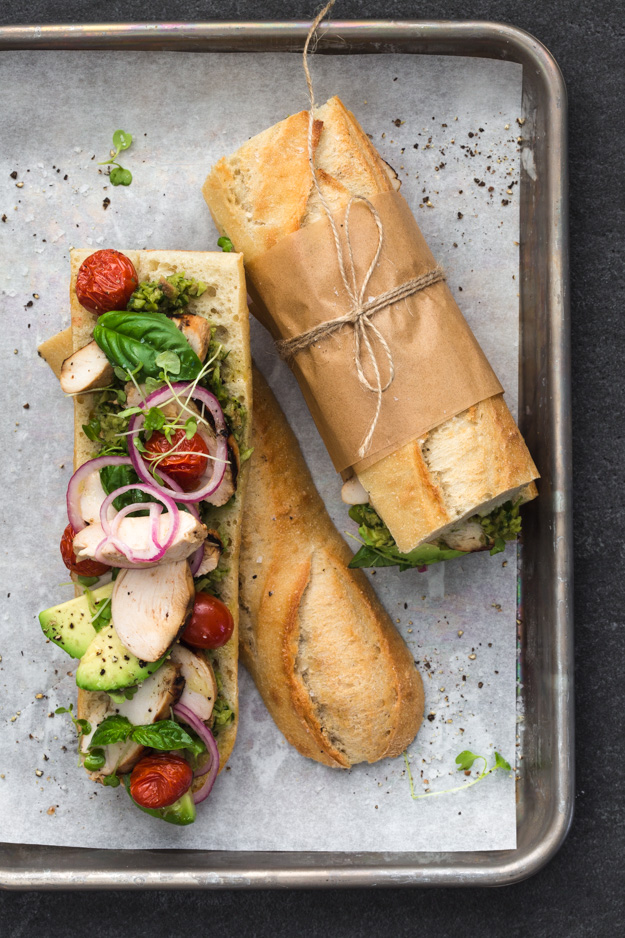
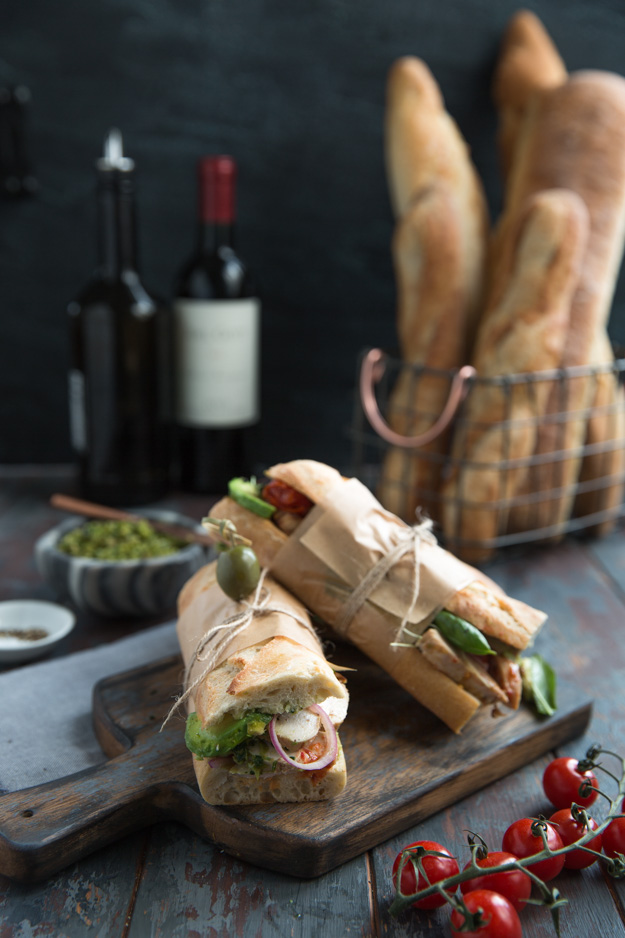
I’m a big believer in Julia Child’s credo, “Everything in moderation…including moderation.” So many people I know are abstaining from bread. While I don’t indulge in it everyday, I believe that if it’s good bread, I have a responsibility to eat it. The burnished crust on the baguettes at my local bakery were too calling my name.Sandwich making is not as simple as slapping a filling between two slices of bread. There’s an art to it. I’ll fill you in on how the pros do it.
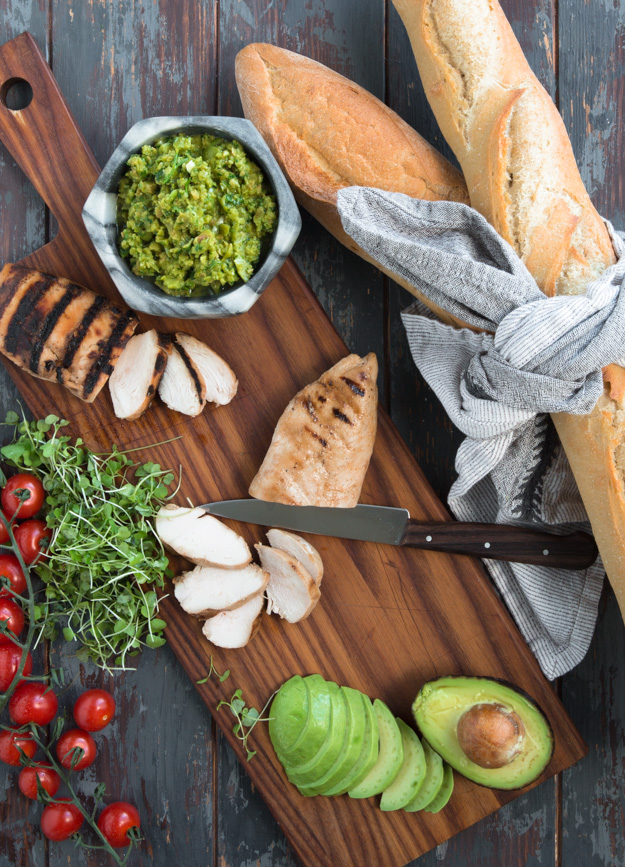
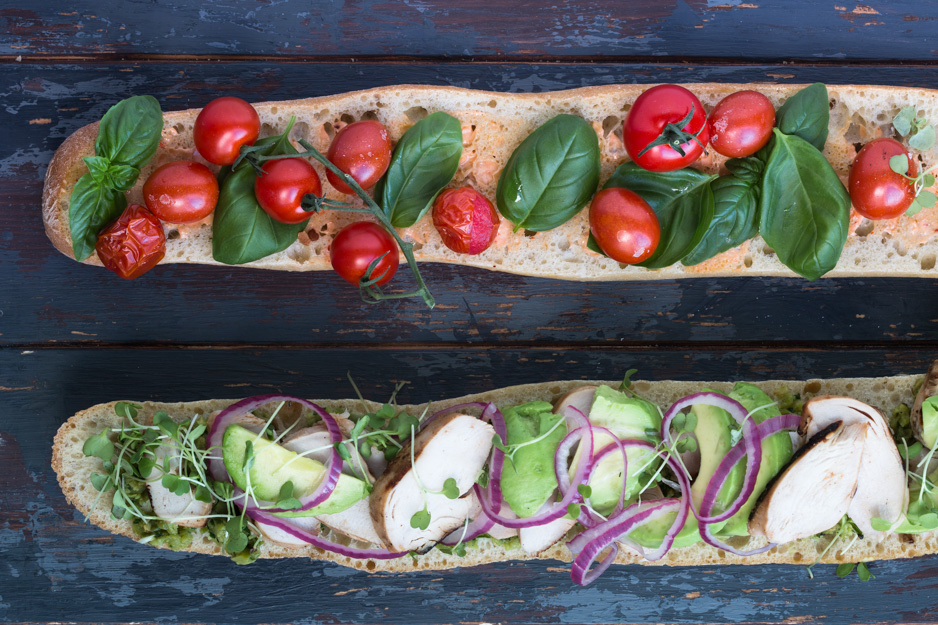
Use two sauces instead of just one. Elevate plain mayo by adding a teaspoon of chipotle chiles in adobo sauce. Their smoky mild heat takes plain mayo from drab to fab. Slather this on one side of the baguette. On side two, spread some olive tapenade for a punch of umami. You can make your own, or purchase some from the olive cart at the supermarket.
If it’s not the height of tomato season, roast some little cherry or grape tomatoes. Make sure you oil and season them well. Every layer of the sandwich should be seasoned. Slice some roasted or grilled chicken. A supermarket rotisserie chicken is perfect for this.
Even if you aren’t an onion fan, I urge you to try pickling some onions. It takes about 15-20 minutes and is simple to do. It removes all the harshness of raw onions and becomes quite mellow. I’ve included instructions in the recipe. Don’t forget to show your avocado some seasoning love as well. A squeeze of lemon or lime juice, some salt and pepper are all that’s needed. Finish with some fresh basil and some peppery arugula or a handful of micro greens.Dagwood would be jealous!
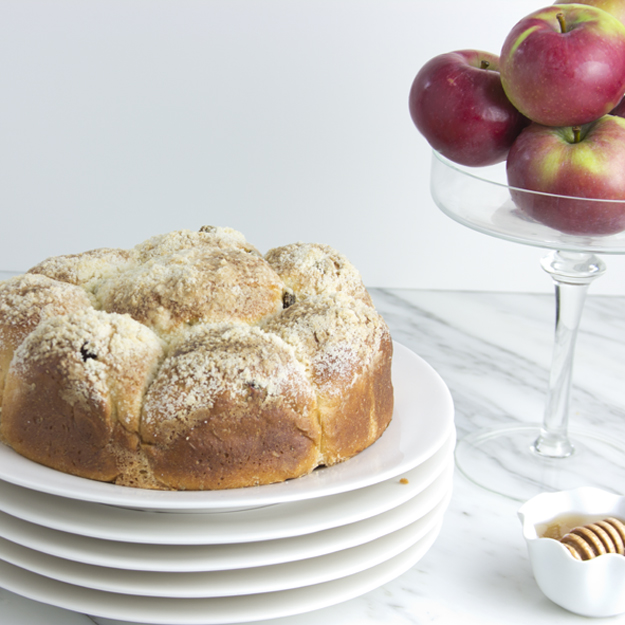
Having baked over 1000 loaves of challah in my life, I think it’s fairly safe to say that I know a thing or two about this Friday night Shabbat dinner staple. 51 weeks of the year, I make a simple 3 strand braided challah covered with a crumble topping. (If you want to be really humbled, check out Rivka Malka Perlman’s you tube video, where she braids 6 strands! That is punching way above my weight!) However, one week each year, for Rosh Hashanah (the Jewish New Year) , I make a round challah. The round challah of this holiday symbolizes continuity and the endless cycle of life.
My challah recipe has not changed in over 8 years. The dough recipe comes from my friend Margo and the topping, crafted from sugar, flour and butter (or margarine), comes from my sister’s cousin’s friend, Elaine. As far as I know, Margo and Elaine do not know each other, but I am sure if they met, they would become great friends as the marriage of their recipes is a beautiful and delicious thing to behold.
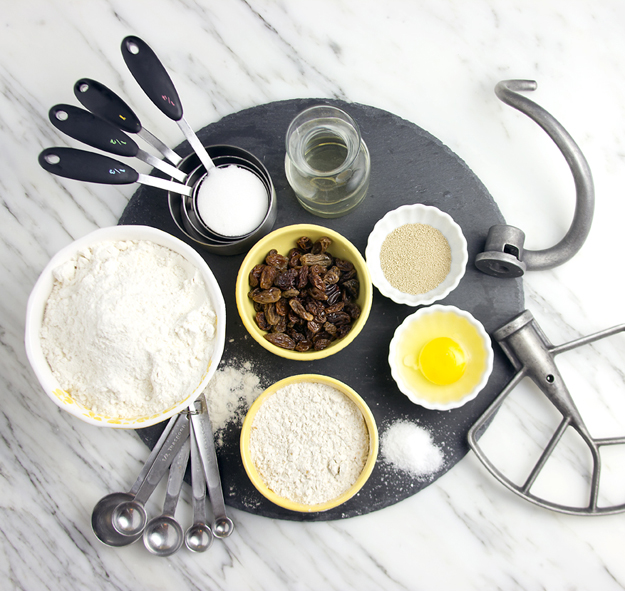
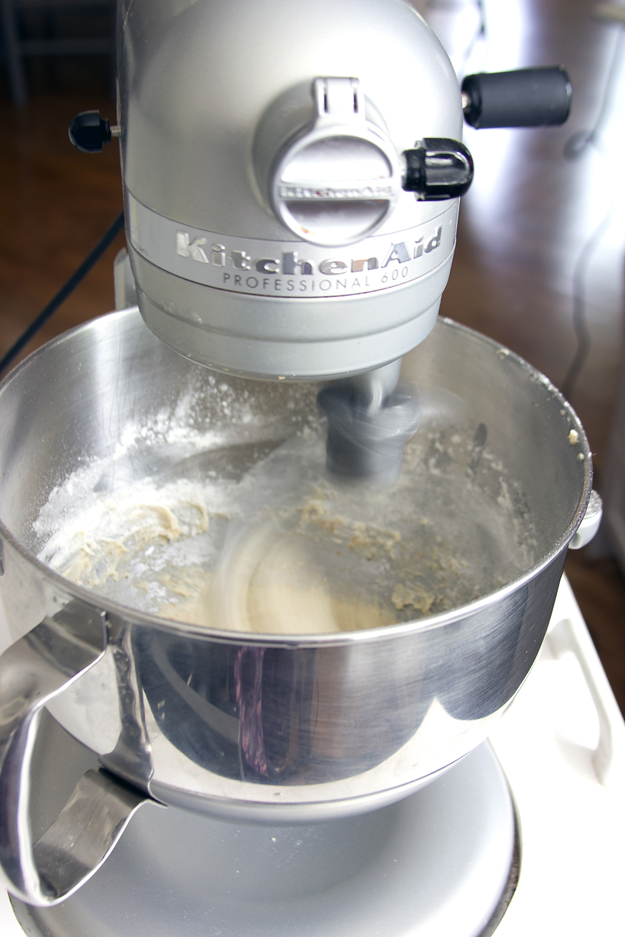
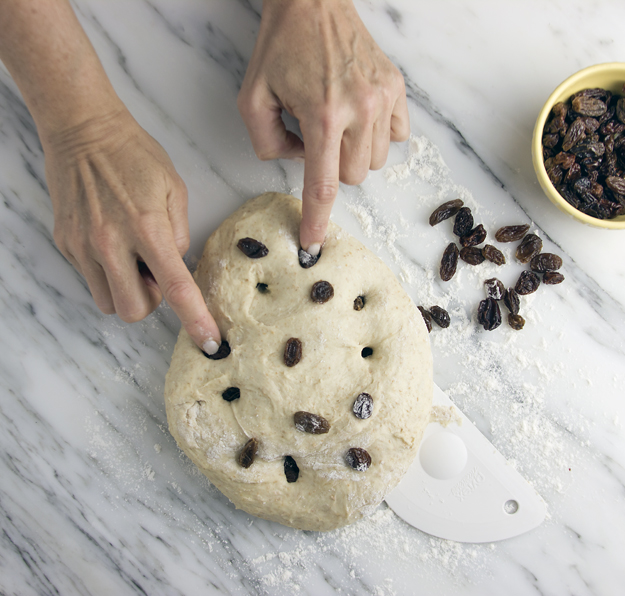
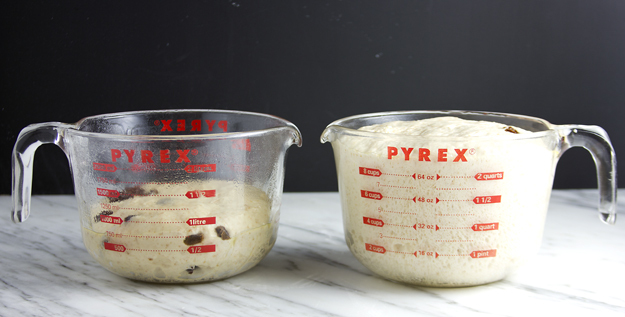
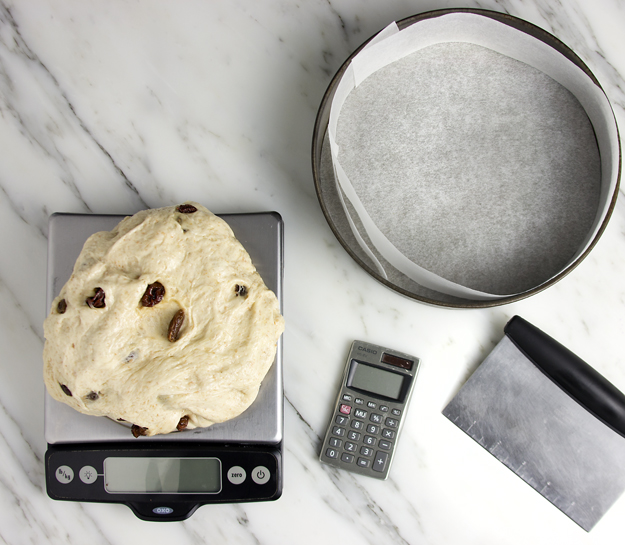
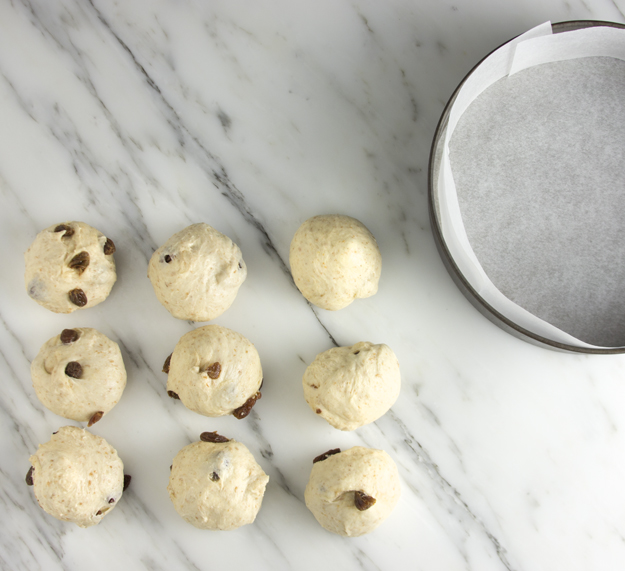
The dough uses 2:1 ratio of white to whole wheat flour. I love the nuttiness that whole wheat adds to the finished bread. l make the dough on Wednesday or Thursday, cover it and put it in the fridge until Friday morning. The slow rise in the fridge really helps to develop the flavours of the bread. And, as a bonus, there is less to do on Friday! We always add raisins to our challah, you raisin haters can leave them out. I remove the dough from the mixer and push the raisins in by hand. They are more evenly distributed this way.The dough will double in about 90 minutes on the counter at room temperature, or you can cover and refrigerate for up to 48 hours.If you are making a round challah, a kitchen scale will make your life much easier. if you have ever been on Weight Watchers, then you have a scale lurking in the back of a cabinet somewhere.
A slice of this, drizzled with some honey is a very sweet start to the New Year. L’Shana Tova.
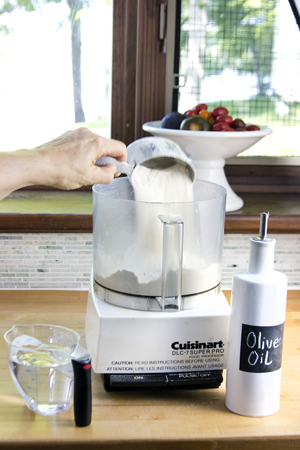
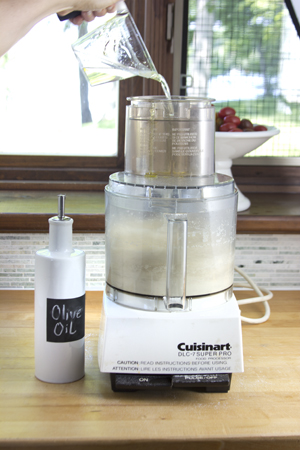
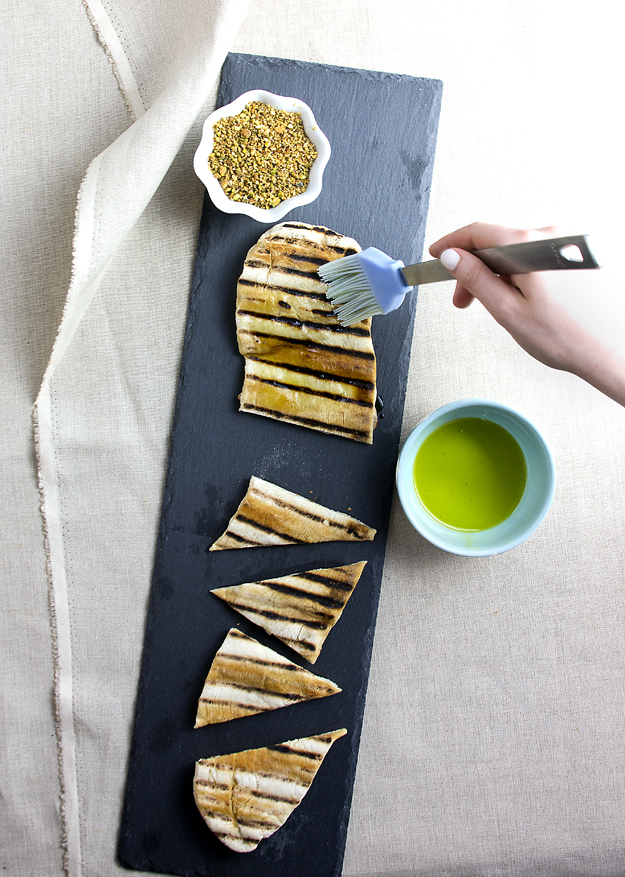
Aside from baking challah every week, it’s been way too long since I’ve had any fun with yeast. I have really missed that culinary alchemy that happens when you combine flour, water, salt and yeast. I decided to take it outside and grill some flatbread.
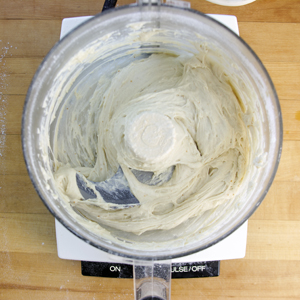
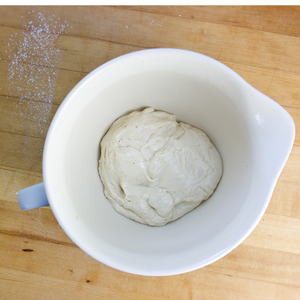
This is a gorgeous dough that comes together in the food processor in about 2 minutes flat. Made with bread flour and just a touch of nutty whole wheat flour, this dough is super hydrated with water and olive oil. A wet dough is how you achieve, what bread freaks call, an “open crumb structure”. That just means that the inside of the grilled flatbread has those airy bubbles, that make it so chewy and delicious to eat.
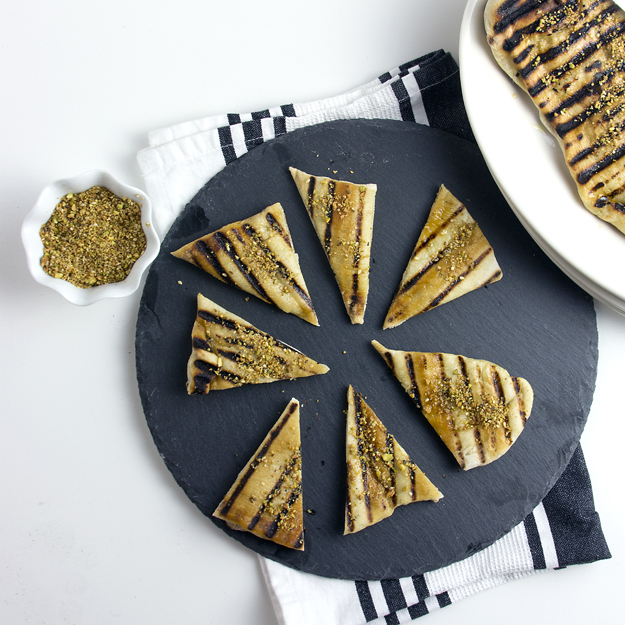
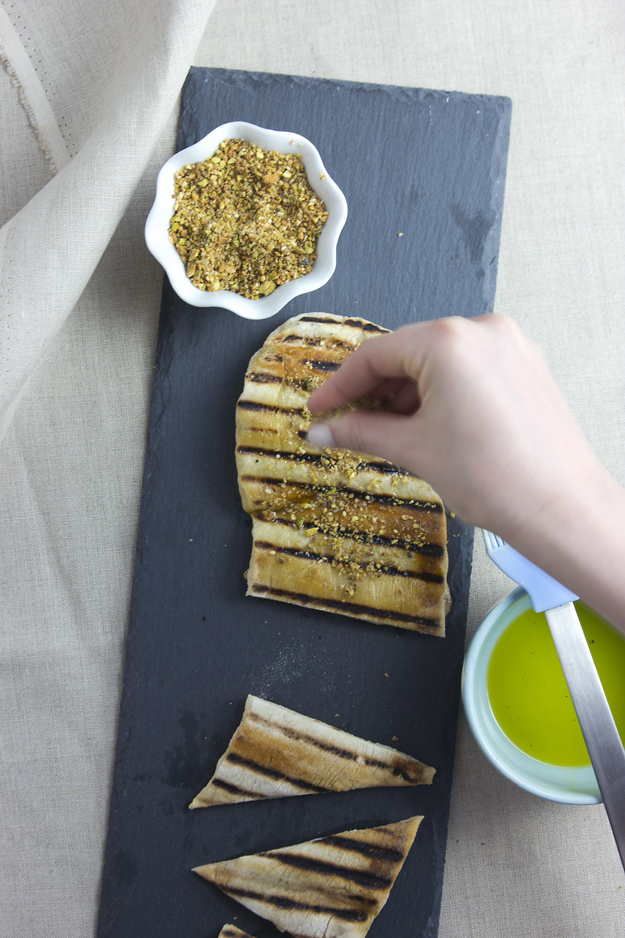
I will admit it takes a leap of faith to put this thin super stretchy dough onto the BBQ and not be riddled with anxiety that it will fall right through the grill. But, miraculously, it doesn’t. In about 4 minutes the flatbread is charred to perfection. I like to brush it with a really fruity olive oil as soon as it comes off the grill and then sprinkle it with Dukkah.
Dukkah is a Middle Eastern nut and spice mix. The first time I had it was at Mahane Yehuda Market (The Shuk) in Jerusalem. Vendors there sell small paper cones filled with dukkah, along with strips of grilled pita bread. You dip the bread into the vendor’s bowl of olive oil, dunk it into the cone of dukkah and then joyfully crunch and munch your way to a very happy place.
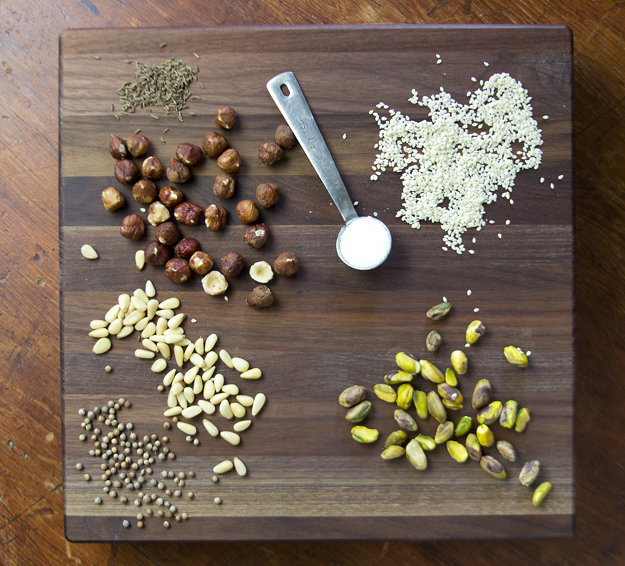
The name dukkah originates from the Egyptian word “dakka,” which means “to crush,” which is what you do to many of the ingredients that go into the mix. There really is no classic recipe for dukkah. Just follow the basic ratio of 1 cup nuts: 1/2 cup sesame seeds: 4 tablespoons spices: 1 teaspoon kosher salt.
I settled on a combo of hazelnuts, pine nuts, pistachios, sesame seeds, cumin and coriander seeds and salt. Go wild and create your own custom Dukkah mix. Peanuts or macadamia nuts would be fantastic. Fennel or caraway seeds would add a really unique flavour. When I am having family or good friends over, it is great fun to watch them greedily dip the warm chewy charred bread into fruity olive oil and then into the bowl of dukkah. Double dipping almost always ensues as this mix has all the hallmarks of an outstanding snack; crunchy, spicy and just a little bit salty.
And hey, if you decide not to make your own flatbread and just buy some pita bread to serve with the dukkah, I won’t judge. One of my very best friends called me after reading my post about Lemon Poppy Seed Baby Bundts to tell me that she was going to buy a few of of those adorable mini bunt pans and fill them with Duncan Hines Lemon Poppy Seed Cake mix!
After reading the title of this post you may have either one of two reactions. If you are a fellow bread freak you may be saying to yourself, “What?? Who is she kidding? That is so last decade. Mark Bittman wrote about Jim Layhey’s revolutionary no-knead bread in 2006! Every food blogger worth her salt has reported on this bread.” If you are not a bread freak, you may be saying, “What?? No knead bread. She’s been inhaling too much bleached bread flour. How could that be possible?” So, to the bread freaks reading this, I apologize for reporting on something you have already heard about ad nauseam. To the rest of you, I say, yes, this is possible and it’s spectacular. (sorry, couldn’t resist that link!)
Although I first heard about this no-knead bread over two years ago, I only just tried it for the first time last week. I then made it a second time, 4 days later because I just couldn’t get over how simple it was to produce such amazing bread. There are 2 major factors at play here that help create this wonderful bread. The first is mixing up a very wet dough and letting it sit, at room temperature for 18 hours. Food scientist, Harold McGee, explained it like this, to Bittman,
“It makes sense. The long, slow rise does over hours what intensive kneading does in minutes: it brings the gluten molecules into side-by-side alignment to maximize their opportunity to bind to each other and produce a strong, elastic network. The wetness of the dough is an important piece of this because the gluten molecules are more mobile in a high proportion of water, and so can move into alignment easier and faster than if the dough were stiff.”
The second major factor involved in making this bread is where Jim Lahey’s real genius comes into play. He discovered that by baking the bread in a covered preheated cast iron or enamel pot (like a Le Creuset), you mimic the steam ovens that professional bakers use to develop that crisp crackling crust so desirable on artisan breads. During my 18 month journey through the Bread Baker’s Apprentice Challenge, I tried all sorts of methods to produce steam in my home oven. I put a pan of hot water at the bottom of the oven, I sprayed the sides of my oven wall with a plant mister during baking, I added ice cubes to the oven during the baking process and I even tried adding lava rocks to the pan of hot water, to mimic a sauna. I never did achieve that holy grail of crackling crust.
I discovered a version of the original recipe with some wheat bran added to the dough. (Chatelaine Magazine Feb. 2011 issue) I really loved the addition of the wheat bran. Truly, the only thing difficult about making this bread is remembering to start the night before you want to serve it. It had been awhile since I last baked bread so I was excited to get back to it again.
Over the past two years I have accumulated quite a bit bread making paraphernalia, so it was great to use some of it again. In Jim Lahey’s video he says to just use your hands to mix up the dough but I was excited to use my special King Arthur bread whisk again. If you plan to make lots of bread, get one of these. If not, your hands work just fine.
Once mixed, the dough will appear quite shaggy and rough-looking. That’s ok, it’s supposed to look that way. Just cover the bowl with plastic wrap and leave it on the counter for 18 hours. It is a big leap of faith to take, I know, but trust me, it works. After 18 hours, it will have all smoothed out and the surface will have fine bubbles on it.
In the original recipe, Jim says to just form a ball and place it on a cotton towel, cover it and let rise. Since I had a special bread rising basket in my cupboard (a banneton) I decided to use that. A banneton is woven bread mold, usually made of made of cane and is used to form and shape artisan loaves during the proofing/raising stage. The basket imprints its shape and ribbed design on the finished loaf. They can be ordered online from Brotform (U.S.) or Goldas Kitchen (Canada). You can also just line a colander with a clean cotton towel, although you won’t get the cool design on your bread.
I found it best to lightly flour the counter and then wet my hands to scrape the dough out of the bowl. I did not want to add too much more flour as the high hydration level of the dough is what gives you the big open crumb structure (ie: big holes) of the finished bread. Bread freaks aim for big holes in their finished bread. If you are at all interested in reading more about this subject and finding our why big holes are desirable, visit The Fresh Loaf’s website. A very animated discussion on this very topic has been raging for the past week. Yes, bread freaks are a strange and wonderful breed!
Once the dough is dumped out onto the counter, just fold it over itself, sort of like a business letter. Then, cover with plastic wrap and let rest for 15 minutes.
Then you want to shape the dough into a ball.
After dough is shaped you can just place it on a floured towel and cover it with a second towel, or you can put it in a basket or colander to let it rise for about 2 hours. I heavily floured my banneton with rice flour and then dumped out the excess, and set my dough in there to rise. You will notice I put the dough in seam side up. That is because after it has risen, I will dump it into the hot pot for baking and the top (with the pinched seam) will hit the pot first and become the bottom and then my pretty ribbed design, from the basket, will become the top.
A few words about the pot to cook the dough in. Just about any covered 6-8 quart covered pot will work here. Cast iron or enameled cast iron (like Le Creuset) work very well for this job. I have also read that ceramic and Pyrex would work also, but have not tried them. These are the kind of pots I am talking about.
The pot with lid must be preheated in a 450º F oven for at least 30 minutes before baking the bread. It is a bit scary dumping the bread into the hot pot, but just wear oven mitts and dump quickly. If it goes in a bit uneven, just wiggle the pot back and forth a bit to straighten it out. It will all turn out fine.
Resist all temptation to slice the bread as soon as it comes out of the oven. It continues to cook a bit more as it cools. It will be gummy in the centre if you slice right away.
Tonight’s dinner was inspired by a long ago and almost forgotten memory. My daughter is spending the year travelling the globe and early this morning she texted me from Berlin. “Apparently it’s white asparagus season here. It lasts for 3 weeks then goes away. It’s a big deal. Thought you’d like to know.” Believe me, I know what a big deal white asparagus is!
I was so traumatized by white asparagus that I am unable to eat or prepare it ever again. In between my first and second year of culinary school I worked at a restaurant in Toronto called Orso. I was the garde manger chef. Garde manger means “keeper of the food”. In short, I was the salad and cold appetizer chef. It is an entry level position. The executive chef was named Helmut, an school stern German chef. Kind of scary. One of my jobs was to peel the white asparagus stalks. I was givena peeler and set to work. Everytime I tried to peel them, the stalks would snap in half. The chef kept yelling at me that these were very rare and expensive asparagus and they were only available for a few weeks every year. I brought in my colorful peelersfrom home which were way easier to use. But the chef yelled at me for using the wrong peeler. I was never so happy to see white asparagus season come and go!
In case you were wondering, how white asparagus differs from the more common green variety, here’s the explanation. White asparagus comes from the process of etiolation, which is the deprivation of light. While the asparagus grows, farmers mound earth uparound the beds to keep the vegetable completely covered. This prevents any contact with sunlight, which would trigger the process of photosynthesis, and thus stimulate the production of chlorophyll, the pigment that lends plant matter its characteristic green colour.
Needless to say, I do not eat white asparagus. But I love green asparagus. (aside from the effect it has on the aroma of your pee!) I had bought a beautiful big bunch of it at the market yesterday and was planning to have it for dinner. I also had a loaf of Tuscan breadin my freezer from last week. Tuscan bread contains no salt so it needs very flavourful food to accompany it. I found inspiration from Chef Massimo Capra’s Asparagus Milanese French Toast. My flavourless tuscan bread was the perfect loaf for this savory dish, although challah or a white hearty country bread would be great as well.
Asparagus Milanese on French Toast
Adapted from Chef Massimo Capra
1 bunch green asparagus
3 tbsp butter
5 eggs
4 tbsp Parmigiano, grated
4 slices bread
1/2 cup milk
Salt & pepper
1. Preheat oven to 350º F.
2. Break the ends off the asparagus and peel the stocks if desired. (I never do if they are fresh and young). Bring a large pot of water to the boil and add asparagus. Boil uncovered for 2-3 minutes. Drain and immediately rinse under very cold water. Set aside.
3. Melt 2 tablespoons of butter in large frying pan. Prepare the French toast: Mix 1 egg with the milk and season to taste. Dredge each slice of bread into the mixture and sauté in a frying pan with until golden. Set French toast aside in a large Pyrex baking dish.
4. Melt 1 tablespoon of butter in large frying pan. Fry 4 eggs, sunny side up, gently remove from pan and set aside.
5. Top each slice of French toast with several spears of asparagus. Sprinkle some parmesan cheese over asparagus. Top asparagus spears with fried eggs and sprinkle more parmesan cheese over the eggs. Place Pyrex baking dish in preheated oven for 3-4 minutes, just until cheese melts. Serve immediately.
Who knew that a German fruit filled bread could demonstrate my learning deficiencies so clearly? As I read through the recipe for Stollen, this week’s bread in Peter Reinhart’s The Bread Baker’s Apprentice, I knew that I had a real challenge on my hands. I could not, for the life of me, figure out how to shape this loaf. I read through the directions at least 4 times and it just didn’t make any sense to me. There were even some pictures to demonstrate the method but I still could not figure it out.
Full disclosure here, I am not really great with written instructions. (I can see my husband laughing his head off right about now as he reads this). I never the read instruction manuals that come with anything new I buy. I believe that things should be designed so that they are intuitive. Usually I end up breaking something before I give in and pull out the manual. I have never assembled anything from Ikea where I did not have at least 3 or more extra bolts or screws left over, leaving me wondering about the stability of whatever I just put together.
Sorry, got a little off track there. I proceeded to make the dough for the Stollen, without a clear plan on how I was going to shape it. I figured that I’d just wing it when I got to that part. The recipe begins with mixing some warm milk with flour and instant yeast to make a sponge.
This mixture is set aside for about an hour, to get all bubbly. The recipe called for golden raisins and candied fruit mix to be soaked in brandy or rum and orange or lemon extract. I remembered my experience with the Panettone bread I made back in November. I hated that bread with the dried fruits soaked in alcohol so I decided to forgo this step. As well, I decided to leave out the citrus extract. I figured I’d get enough citrus flavour from orange and lemon zest. I decided to skip the candied fruits as well and went with a combo of golden raisins, sultana raisins, dried cherries and dried apricots.
Once the sponge was all bubbly, it is added to all-purpose flour, sugar, salt, orange and lemon zest and cinnamon. Butter, an egg and a bit of water are added until a sticky dough is formed. Then about 3/4 of the dried fruit is added. The remainder gets added during shaping. I was feeling a bit lazy and decided to knead the fruit in by machine but it soon became apparent that hand kneading was in order. I dumped the mixture onto the counter and kneaded for about 5 minutes until I had a silky dough and all the fruit was evenly incorporated.
Then the dough was set aside to rest, covered for about 45 minutes. At that point I figured I’d better do some research to figure out what I was going to do about shaping this bread. I googled Stollen and came up with several variations and shaping suggestions.
There was a wreath shaped stollen from Martha Stewart’s mother. David Lebovitz formed his stollen into simple batards (oval-shaped loaves). My favourite, however, was the stollen shaped like Mick Jagger’s lips from Philadelphia Chef John Gallagher. Once baked, his version is dipped in melted butter and then rolled in a sugar-cinnamon mixture.
I was just about to make the Mick Jagger version when I decided to read the shaping instructions in the Bread Baker’s Apprentice book one last time. Eureka! After my 5th read through I thought I finally understood how to do this. It seemed that the shaping instructions were describing a simple letter fold. Because I am a visual learner, I videoed myself shaping the bread for all you other visual learners out there.
I was quite proud of myself for figuring out how to shape this bread, and I only had to read the instructions 5 times. I was just about to slide the stollen into the oven when a phrase in the instructions caught my eye, “Turn the dough seam side up….” Huh?? I read it one more time and it was on my 6th read through that I finally understood that Peter Reinhart was describing an accordion style fold. So I opened up my stollen and reshaped it.
Although the recipe called for brushing the baked bread with vegetable oil, I opted for melted butter. Then 2 coats of icing sugar and it’s done.
As I baked this bread on Friday, I used it as our Sabbath challah stand-in. I believe that the finished loaf is supposed to symbolize the blanket of baby Jesus. Oh well, the world needs a little more culinary coexistence. It was delicious and a nice change from our usual challah. It was even better toasted with butter for breakfast the next day.
P.S. I just discovered that fellow BBA challenger Kelly of Something Shiny figured out the accordian fold about a month ago and posted about it on her blog. She also originally thought it was a letter fold and only after making it a second time worked out the proper shaping technique.
This is the last bread in the sourdough section of the Bread Baker’s Apprentice Book. I will be a little sad to say goodbye to the sourdoughs. Baking them has been a new and thrilling experience for me. I must admit, sunflower seed bread did not really sound like a loaf you want to go out on a bang with. No offence but sunflower seeds are not exactly exciting. Well that is until I remembered that I had honey roasted sunflower seeds in my freezer. I had bought them a few months ago to make a Crunchy Coleslaw recipe from my friend Lanie.
When I went to the bulk food store to buy the ingredients, I saw that right next to the bin of regular shelled sunfloweer seeds was a bin of honey roasted sunflower seeds.
Of course I had to taste them. I don’t believe that those “NO SNACKING” signs really apply to me anyways.
Besides, I put on one of those plastic gloves they supply before sticking my hand in, so it’s okay, (isn’t it?) I was blown away by the sweet and salty crunch of these little seeds. They made a wonderful addition to the coleslaw and I thought they’d really wake up this sleepy little bread.
The day before making this bread you mix up a “soaker” containing pumpernickel grind rye flour and water. This is left to sit out on the counter overnight.
We are also instructed to make a “firm starter”, which just means adding some bread flour and a touch of water to some of the sourdough starter (barm) you have in fridge. I only just discovered that there are firm and wet starters. My starter (Phyl) is a wet starter. I have not quite learned all the differences and advantages of one type over another (that topic could cover several volumes according to what I have uncovered in my rudimentary research!). Suffice it to say that Peter Reinhart assured me I could substitute my wet starter (which he calls a Barm) for the firm starter and just use less water in the final dough. That’s what I decided to do.
Day 2 I mixed the soaker with my wet starter and the other dry ingredients (high gluten bread flour, a touch of instant yeast and salt). No addditional water was needed. I was careful when kneading this dough as overworking it could cause the rye flour to go gummy. After about 4 minutes the sunflower seeds were kneaded in . Another 2 minutes of hand kneading and the dough was ready for proofing.
After about 90 minutes, the dough was ready for shaping. The dough is divided into two and each piece is shaped into a boule.
Then you poke your thumb through each boule and stretch it out into a big bagel shape. Unfortunately the video does not show the stretching process as my video skills need some work!
Finally, a chopstick is used to create indentations in the dough to form a design.
Into a hot oven for about 15 minutes and they were done. Gloriously brown on top.
And beautifully browned and crisp on the bottom:
I was not prepared for how much I would love this bread. It was chewy and slightly sweet from the honey roasted sunflower seeds. I will be visiting this one again very soon.
The 34th bread in the Bread Baker’s Apprentice Challenge is Pumpernickel Bread. I just love saying “Pumpernickel”. The word always makes me smile . It makes me remember Saturday night dinners when I was growing up. We would have sliced Pumpernickel Bread from Open Window Bakery (in Toronto), creamed cottage cheese and several different types of smoked fish (which I never would eat). My mom would have a big platter of sliced tomatoes and cucumbers, a bowl of tuna salad and sliced cantelope. I would eat one slice of pumpernickel with tuna, cucumber and tomato and a second with creamed cottage cheese and jam. Sometimes she would get the Pumpernickel rye rolls which I really loved. Oh my!! I haven’t thought of those pumpernickel rolls in years. I just did a google search to see if they still make them and YES, they do. They also make a light rye roll that is killer with butter and jam. Here is a picture of both of them.
I just want to get in that car right now and drive to Toronto to buy some. But it’s a 4 1/2 hour drive from Ottawa and probably by the time I got there my craving would be gone, or possibly, even worse, I’d eat too many and go into a bread coma.
Peter Reinhart’s pumpernickel bread begins with a rye starter, made up of some of my sourdough starter, pumpernickel grind rye flour flour and water. This is mixed up and left out on the counter for several hours until bubbly. Then into the fridge for an overnight rest. The addition of the rye flour to the starter creates an acidic environment which helps to make the final bread more flavourful and more easily digested.
One of the ingredients called for in this recipe is bread crumbs made from rye bread. Kind of an unusual thing to add to a bread dough. Peter Reinhart promised that it adds wonderful texture to the final bread. I had some rye bread in the freezer so I defrosted a few slices and put them into the food processor to produce rye bread crumbs.
Next all the dry ingredients are dumped into a big bowl. These include clear flour, brown sugar, caramel powder, salt, instant yeast and rye bread crumbs. In case you were wondering, clear flour is not transparent flour. This is the flour that clears the first sifting (to separate out the bran and germ), still retains some of the finer bran fiber from the outer endosperm of the wheat berry and is thus coarser and contains higher levels of ash. This is the flour New York City bakers have always used for their signature Jewish-style rye breads. The caramel powder gives the bread it’s dark brown characteristic colour. It looks a bit like like instant coffee granules.
The rye starter, vegetable oil and water are added to the dry ingredients and mixed up to make a tacky but not sticky dough. As with all doughs that contain rye flour, great care has to be taken not to overmix or else the dough will get gummy. The dough was dumped out of the bowl onto the counter and then hand kneaded for about 5 minutes until the dough was smooth and supple.
After that the dough is left to rest in an oiled container for about 2 hours until doubled in size.
Once the dough is doubled, it is divided in half and formed into 2 boules. They are covered and left for about 90 minutes for the final proofing.
Then I scored them. I think I got the timing just perfect for the scoring as there was almost no drag to the lame (scoring tool). It was very smooth!
Into a hot oven they went. I baked them on a preheated baking stone and had a pan of water below the breads to create steam in the oven.
Fresh out of the oven:
We had the bread for dinner that night. I have to admit that while the flavour was great, the texture was not what I was expecting. It was a little light and fluffy. I was hoping for a denser, chewier bread, like what I remember from my childhood. Looks like a trip to Toronto is in order!


