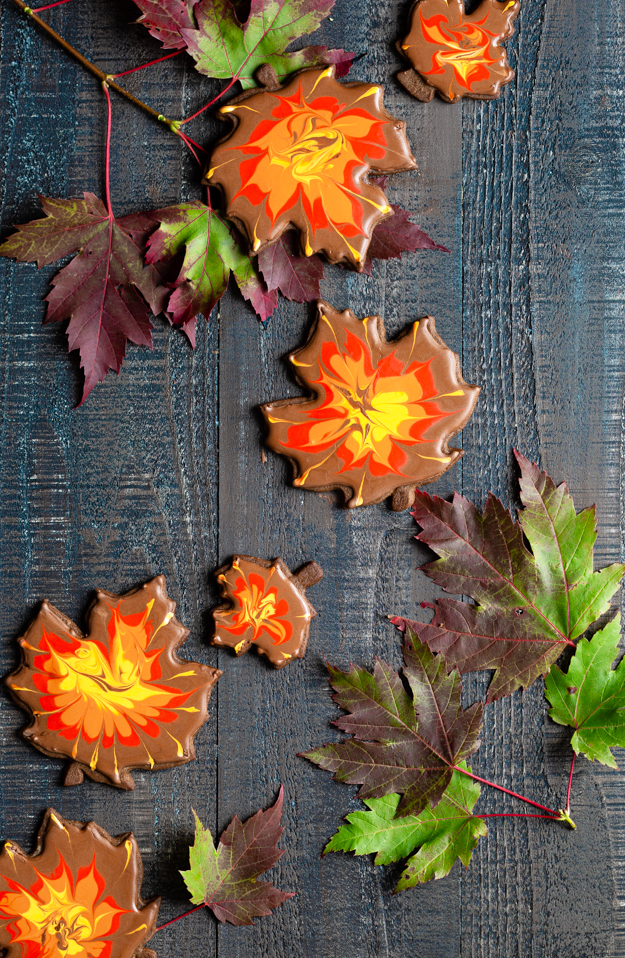
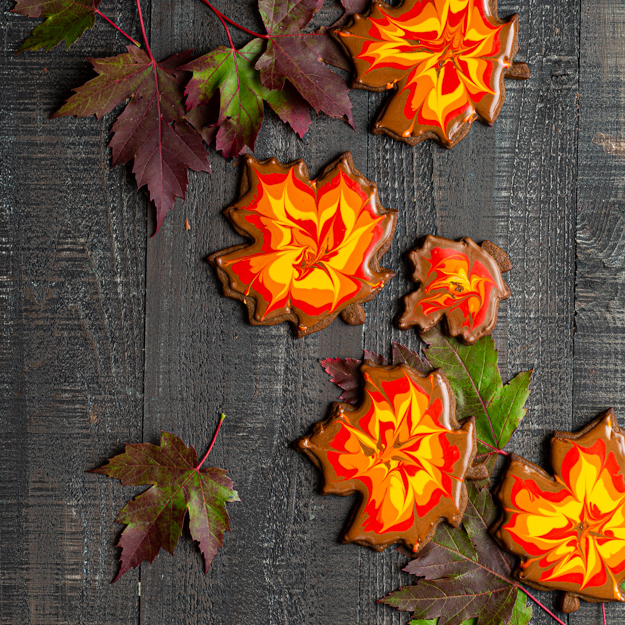
A few years ago, I posted a gluten free version of these cookies. I wanted to share a gluten version for those not avoiding wheat. This gingerbread recipe comes from the genius folks over at Cook’s Illustrated. Thick and chewy and loaded with ginger and cinnamon, they are perfect. If you like them crispy, just bake them a bit longer.
Even though gingerbread is usually associated with fall and winter, I bake it all year long. I love to sandwich dulce de leche icecream between 2 cookies in the summer!
Decorating these cookies makes me feel like a real artist and the method is simple and fairly idiot proof. Check out the how-to video.
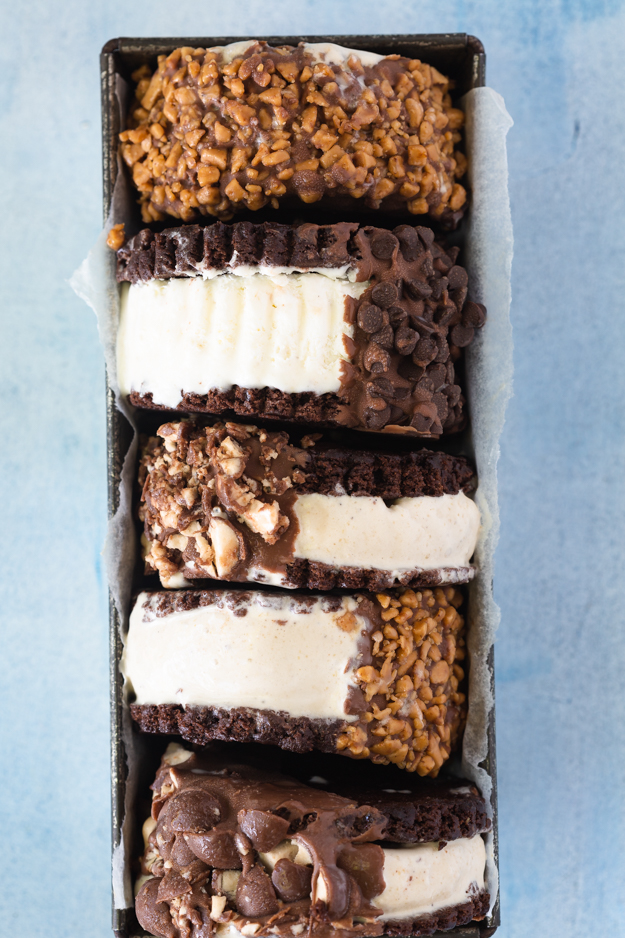
If you’re not a food photographer, you might think that shooting ice cream sandwiches is fun. Nothing could be further from the truth. Photographing ice cream is one of the most challenging foods, because it melts so quickly.
I made the mistake of trying to shoot this last Saturday at the cottage, where it was a sweltering 32°C, with a humidex of 41°C! The ice cream wasn’t the only thing melting. We were sweating just standing still. I finally shoved the sandwiches back into the freezer and spent the afternoon on the hammock, in the shade. I got up very early Sunday morning before the heat got too bad and managed to get a few good shots.
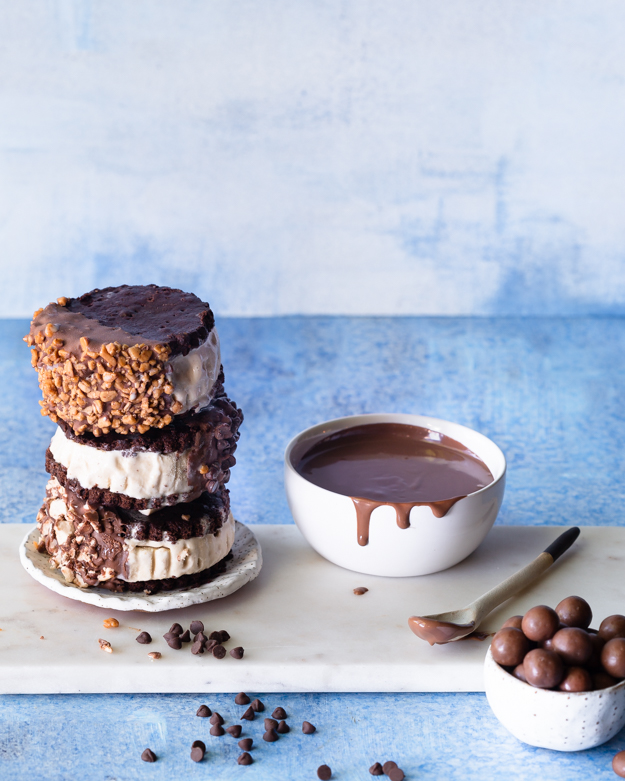
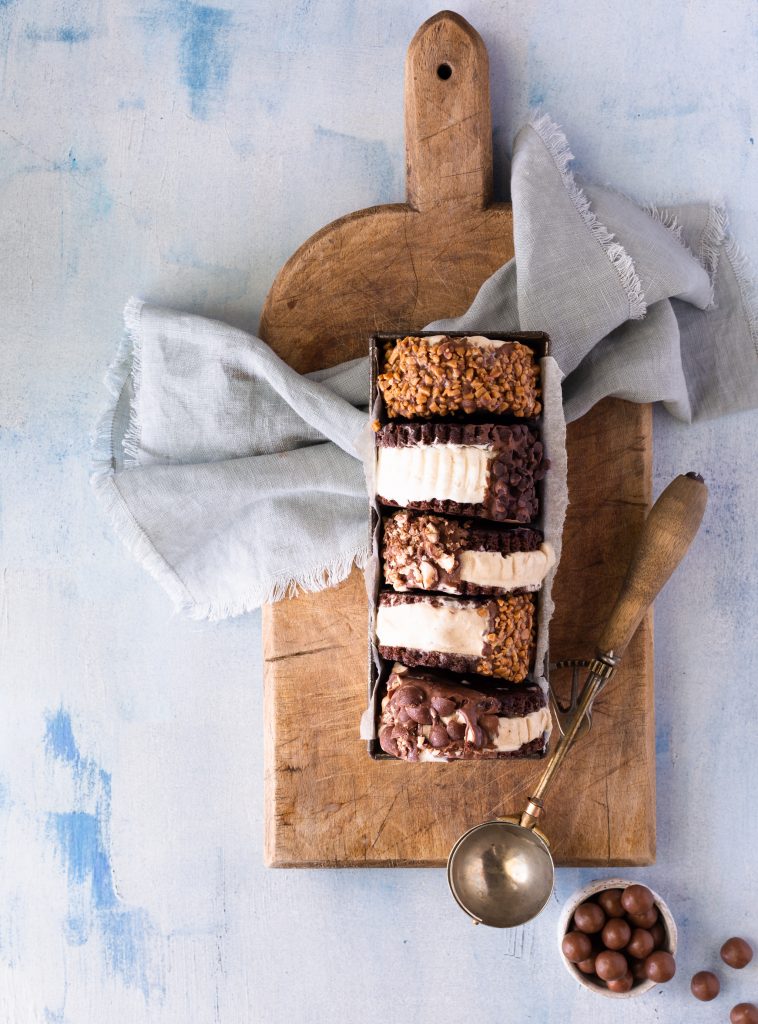
Do you remember ice cream sandwiches before they got all fancy? That squidgey chocolate wafer, so moist, it stuck to the paper wrapper. How you had to lick the chocolate crumbs off your fingers after you were all done. The familiar, bland, slightly too sweet, vanilla ice cream center.
I wanted to recreate the ice cream sandwiches of my youth, but with a bit of an update. I’d keep the fudgy chocolate wafer but elevate the ice cream center. I decided to fill mine with malted milk ice cream.
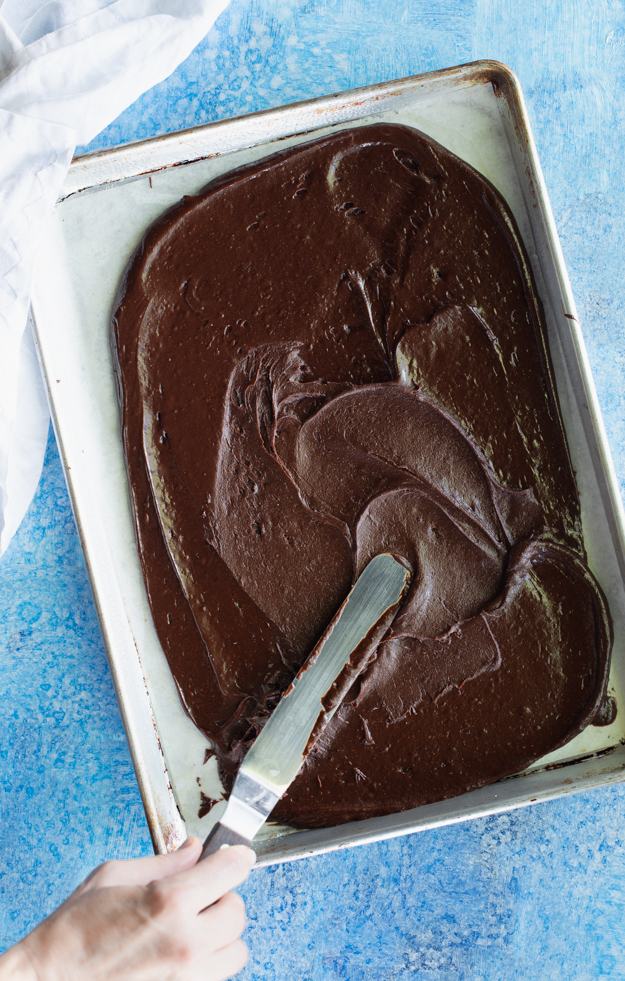
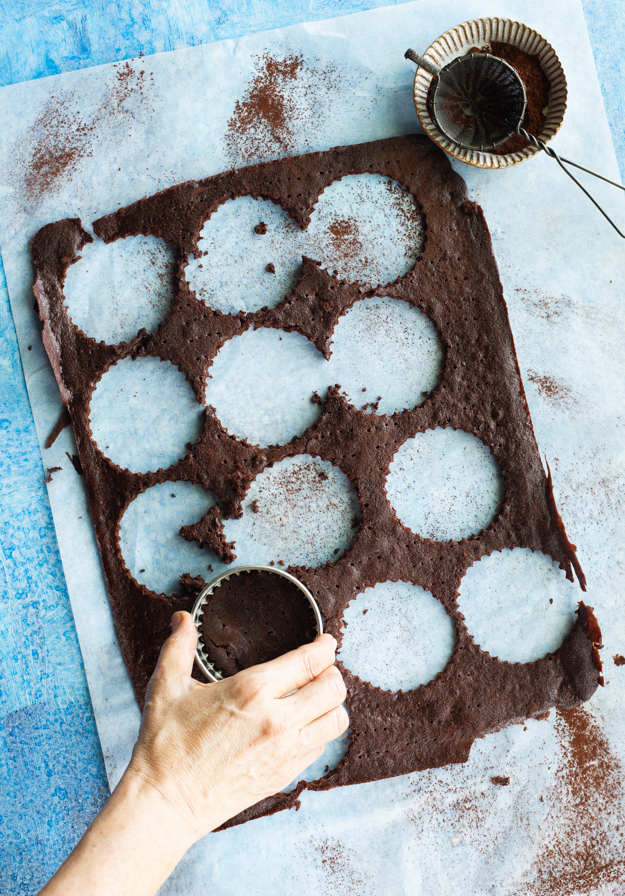
Cook’s Illustrated has a fantastic recipe for the chocolate wafers. The addition of chocolate syrup keeps them super fudgy. All the ingredients are mixed in a bowl and spread into a thin layer on a baking sheet. Once they are baked and cooled, you can cut them into any shape you like.
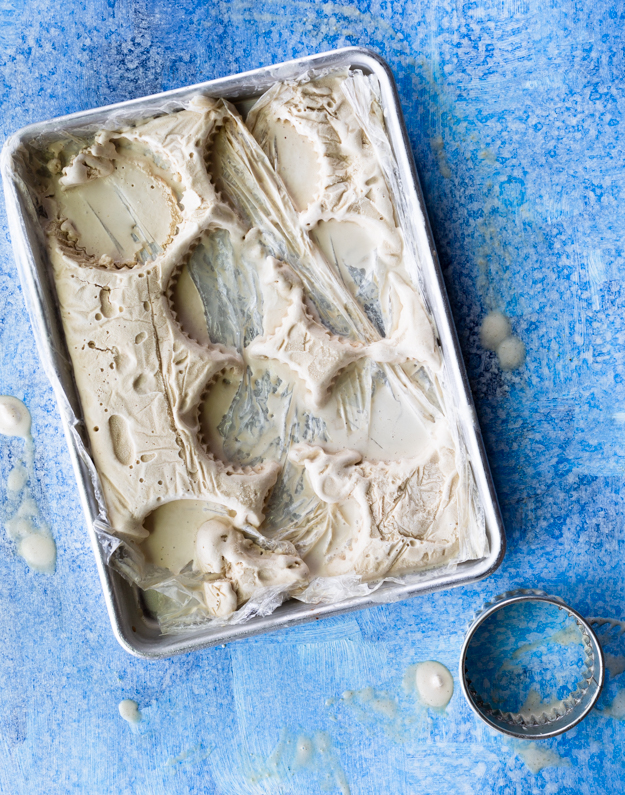
If you would prefer not to make ice cream, just soften some storebought and spread it out onto a baking sheet. Freeze until solid and then cut into the same shape as the chocolate wafers.
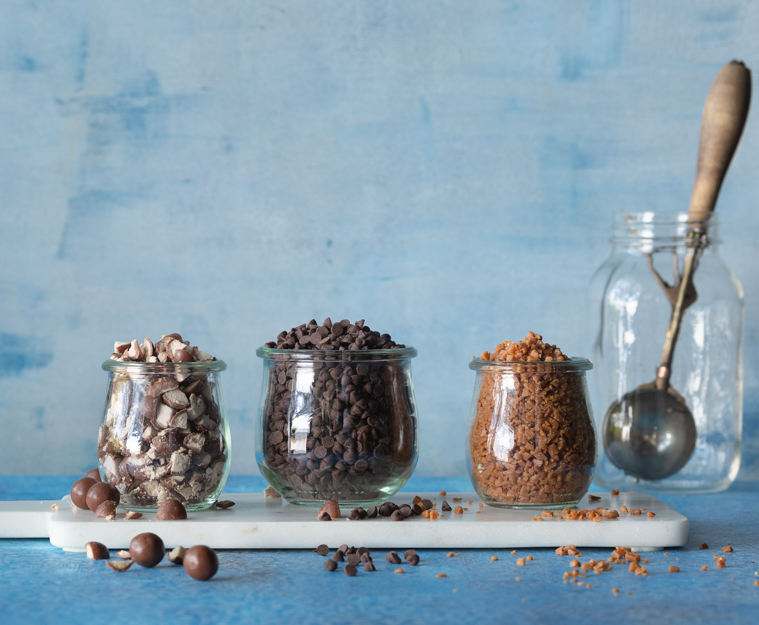
They are delicious as is or you can go deluxe and embellish them with melted chocolate and various toppings. I used chopped Malteasers, mini chocolate chips and Skor bits.
Making falafel at home is not something I ever considered doing until recently. Falafel eating was reserved for trips to Israel. Where the falafel originated is up for debate. Israelis, Egyptians, Palestinians and Lebanese all claim it as their own. But no matter the origin, finding falafel in Israel is as easy as finding a Timmy’s in Canada.
Everyone has their own favourite falafel joint. During one of my first trips to Israel, I fondly recall exceptional falafel in the town of Abu Gosh at The Lebanese Restaurant. On our last trip, we inhaled the falafel at Falafel Hakosem in Tel Aviv. A great falafel has a nubbly texture, moist and fluffy on the inside with a crunchy shell.
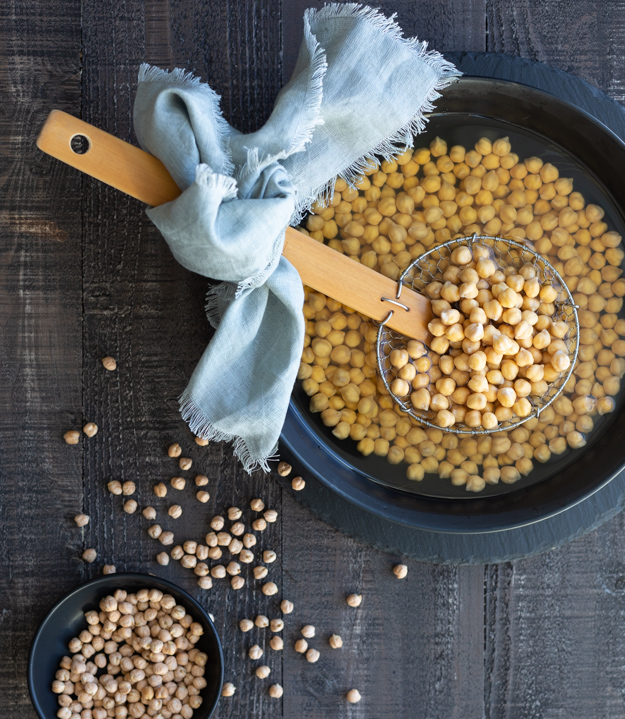
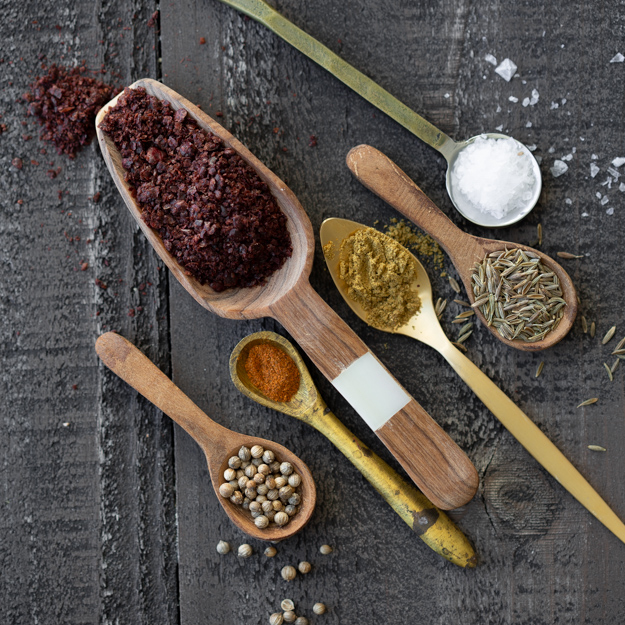
The main ingredient in falafel is chickpeas. You must use dried chick peas. Canned chickpeas will give you mushy falafel. Start with soaking dried chickpeas overnight. Once they have soaked for at least 8 hours (and up to 24 hours), drain them and transfer them to a food poriocessor. No need to cook the chickpeas. Chickpeas are quite bland so load up on the flavour. Cumin, dried corriander, sumac, salt and a pinch of cayenne to bring the heat. You need lots of onion and fresh herbs for flavour and freshness. I like the combo of cilantro and parsley, but feel free to just use parsley if you are cilantro averse. The problem is that all this moisture makes them fall apart. Flour is a commonly used binding agent, to help hold the falafel together. However, flour alone as a binding agent leads to dense falafel. The genius folks at Cook’s Illustrated borrowed an Asian bread-baking technique called tangzhong. It involves mixing flour with water and then cooking it briefly in the microwave until it forms a paste.
Here’s the scientific explanation from Cook’s Illustrated, if you geek out like I do at this stuff:
“When the paste is cooked, the flour’s starch granules burst and form a gelatinous web that locks the water in the paste in place, preventing it from making the mixture even looser. Meanwhile, cooking the flour also greatly increases its ability to absorb water, so we can add less flour overall to act as a binder. The result: fritters that are well seasoned, moist, and easy to form.”
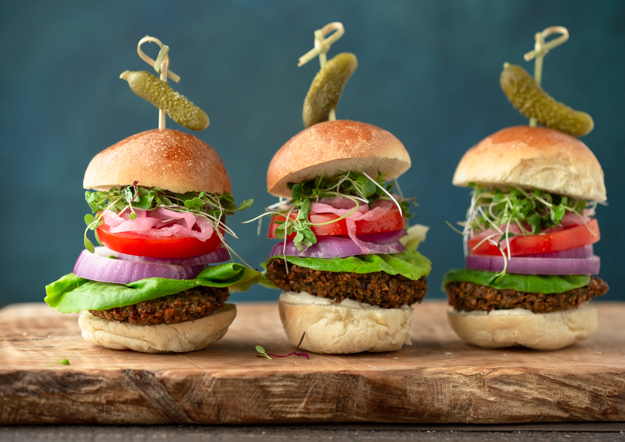
Traditionally, falafel is shaped into balls, fried and served stuffed into a pita. I decided to go a bit rogue and make falafel slidfers. I formed them into patties and fried them.Let’s build a slider.
Lettuce, tomatoes, pickles, onions (raw or pickled), tahini sauce or tzatziki are all fine additions. Pickled beets or turnips would also be delicious. In Israel, you can top your stuffed pita with fries. Although I am a french fry lover, I draw the line on stuffing fries into my falafel. It makes them too soggy. I just ask for them on the side!!
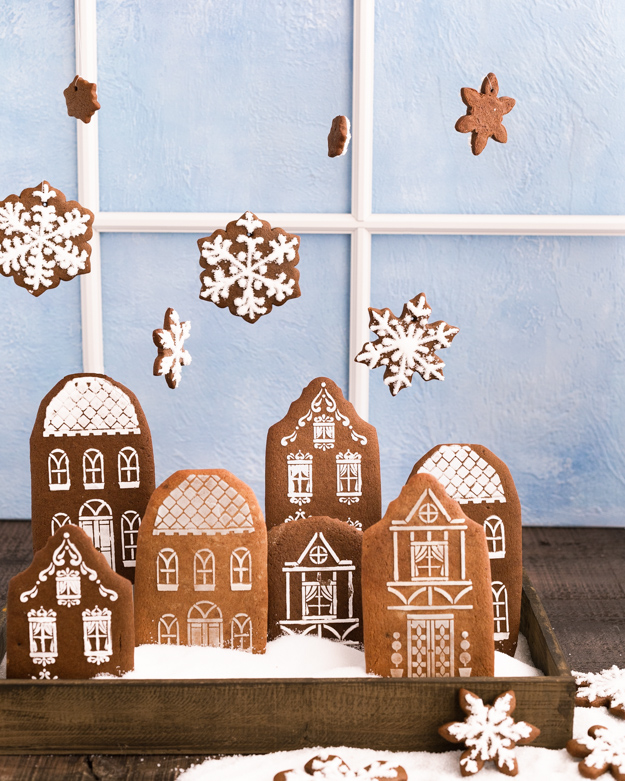
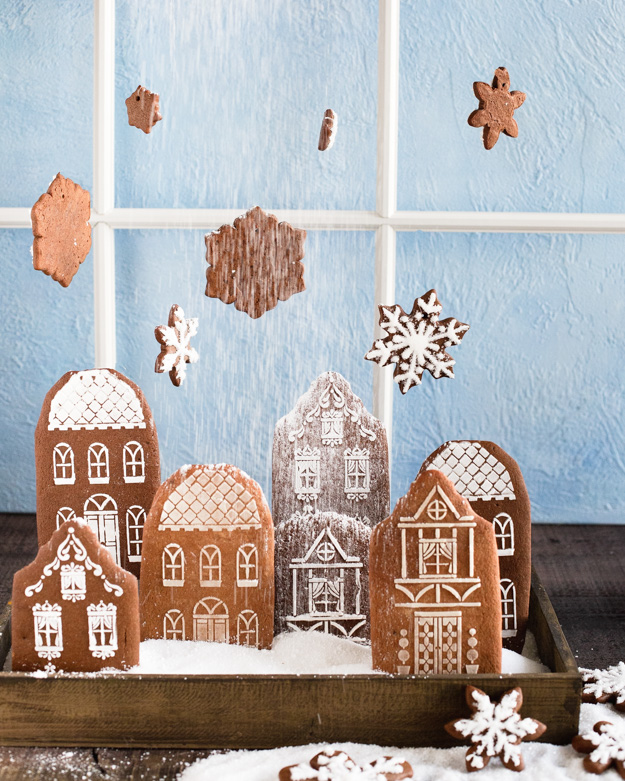
They say it takes a village to raise a child. I say, it takes a child to build a village. Luckily my daughter was visiting this week to help me create this gingerbread village.
We had a lot of fun putting this together. We started with a big batch of my favourite thick and chewy gingerbread dough, from Cook’s Illustrated. I cut some of the dough into houses using these cookie cutters. Instead of piping the doors and windows, I discovered these stencils. You do not require any special skills to use them. They are so simple and the results are quite dramatic.
A few tips for stenciling success:
Practice a few times on parchment paper, so you don’t waste cookies.
Your royal icing should be the consistency of toothpaste.
A small offset spatula makes the job a bit easier than a regular knife. Put the icing on the bottom-side of the spatula.
Use one hand to hold the stencil in place and the other hand to gently spread icing. I found it easiest to start in centre and work my way to one end, then switch and do the other half.
Scrape off excess icing, but don’t scrape it clean. Just a thin coat is enough.
Try not to let stencil lift while applying icing. If you mess it up, remember that mistakes still taste good.
Wash stencil between cookies. Just place wet stencil on towel and pat dry. Be gentle with stencil.
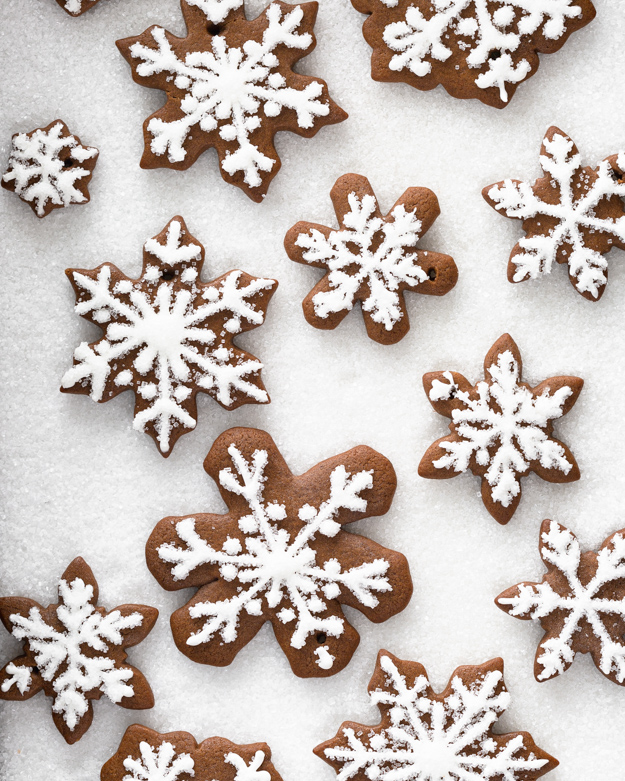
For the snowflakes, I used these cookie cutters. I wanted an assortment of sizes and shapes, as no two snowflakes are alike in nature! If you want to hang your snowflakes, be sure to put a hole in them before baking. I used the small end of a size 3 piping tip. We piped simple decorations on these cookies and sprinkled on coarse sanding sugar while they were still wet.
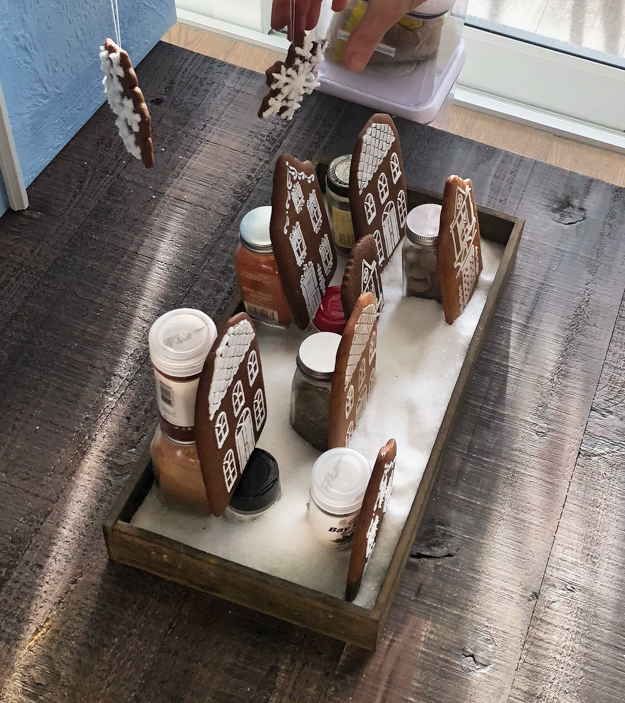
We filled a wooden box with” snow” (coarse sanding sugar) and used spice jars to support the houses. I trimmed some of them to have varying heights.
To hang the snowflakes I built two towers from my oxo good grips containers. Then I duct taped three wooden dowels across the top of the containers. We threaded the snowflake cookies with fishing wire and hung them. The tricky part was getting the snowflakes to all face front with their pretty icing side. My daughter turned them the right way and I was behing the camera ready to hit the shutter as soon as she moved her hands. We were almost successful. I photoshopped out the fishing wire in editing.
We decided to try making it snow. It made a huge mess but we got the shot!
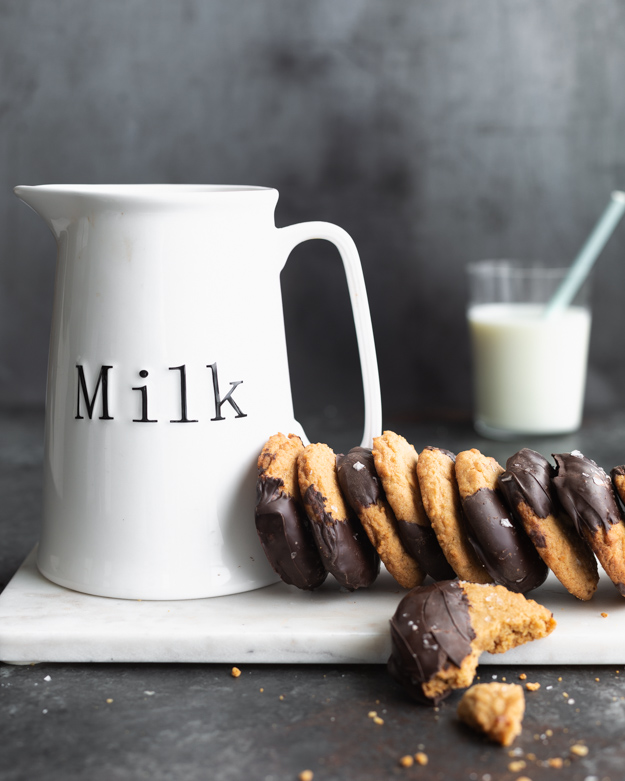
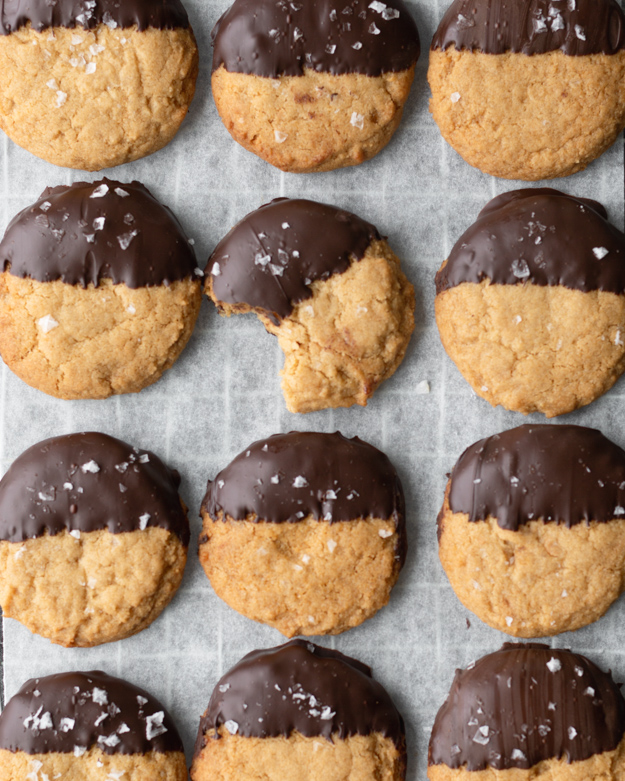
These cookies are vegan. If you don’t follow a vegan lifestyle, I realize that’s probably not the best opening line if I’m trying to pique your interest and keep you reading this post, but stay with me here. I promise you it will be worth it.
My experiences with vegan baking have been lacklustre. I will take the proffered sweet, politely take a bite, and say “it’s good”. And what I really mean is, it’s good, for vegan. You need that qualifier.
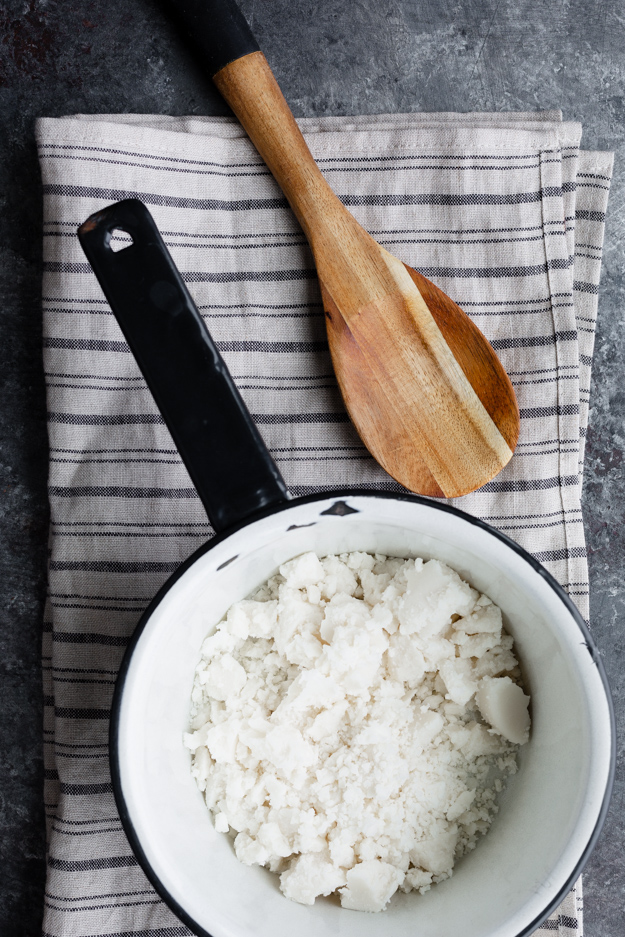
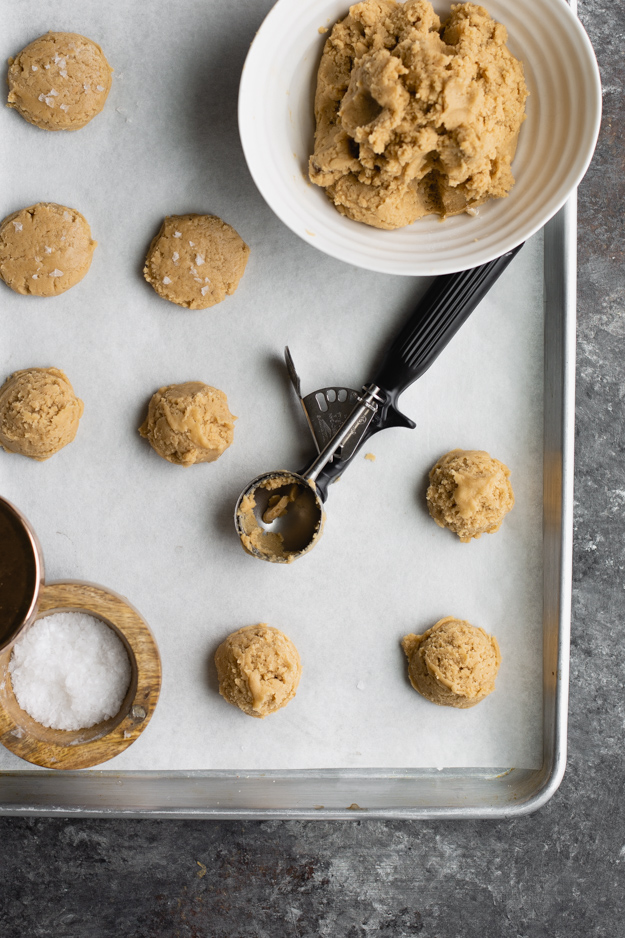
With these cookies, that qualifier is not necessary. These cookies are good. Actually, they’re great. They’ve become one of my favourite cookies. And that’s high praise coming from someone who has over 75 cookie recipes on her blog.The secret ingredient is coconut butter, not to be confused with coconut oil. Coconut oil is just the oil extracted from coconut, whereas coconut butter is ground-up coconut. Coconut butter is available at many health food stores, and online, or you can make it yourself. The talented Dana, over at at minimalist baker has a foolproof recipe.
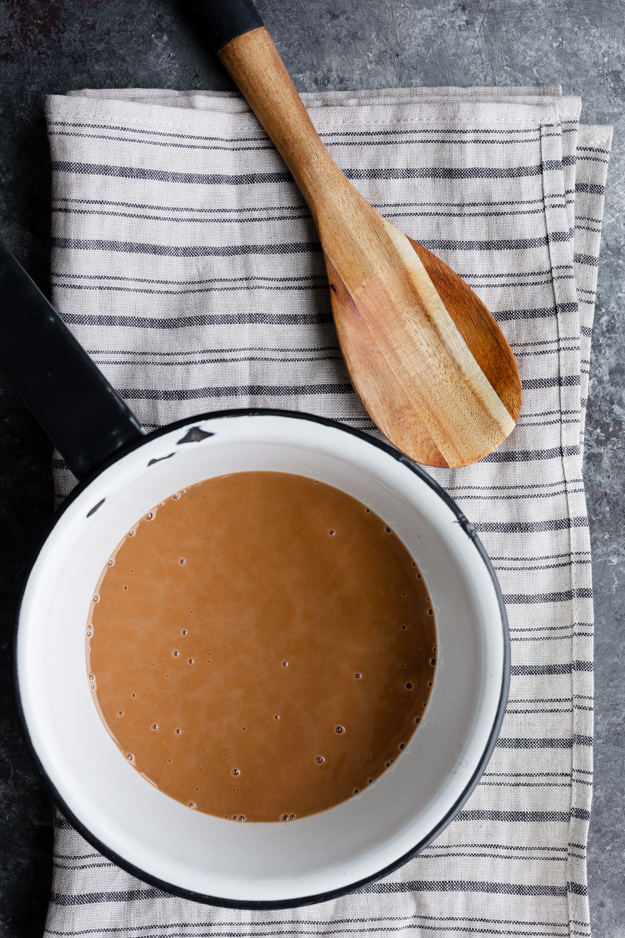
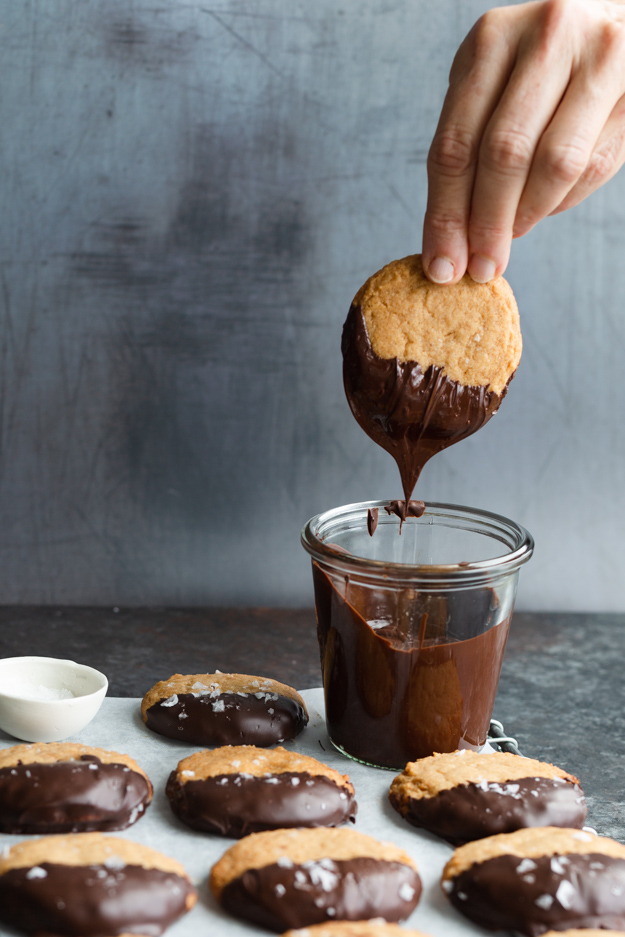
Those clever folks over at Cooks Illustrated figured out that if you melt and cook the coconut butter, it becomes brown and nutty and delicious. Right out of the jar, it’s almost pure white.Give it some heat and about 7 minutes and this is what happens. And big bonus, your house will smell amazing!No need to pull out the mixer for these cookies. Just stir everything together in a big bowl. You need all purpose flour, of course. Some brown sugar adds to the chewiness. Baking soda and baking powder give lift. No eggs or butter are needed. The coconut butter holds these cookies together. Oh, and don’t forget a pinch of salt!Pro-tip: Use an ice cream scoop to get even sized cookies that will bake evenly. Gently flatten the cookies and sprinkle lightly with flaky sea salt. Not too much, as you’ll add more after dipping in chocolate.The original recipe at Cook’s Illustrated did not include dipping them in chocolate, but coconut and chocolate just belong together! I tempered my chocolate for dipping, and if you have an instant read thermometer and a bit of patience, you should temper your chocolate as well.
Tempering the chocolate before dipping will give the cookies a smooth, glossy evenly coloured coating. Biting into into the chocolate coating, will produce that crisp satisfying snap . Without the tempering process, the cocoa butter separates out and you get a streaky, dull grey coating. I give detailed instructions on how to temper, in the recipe.
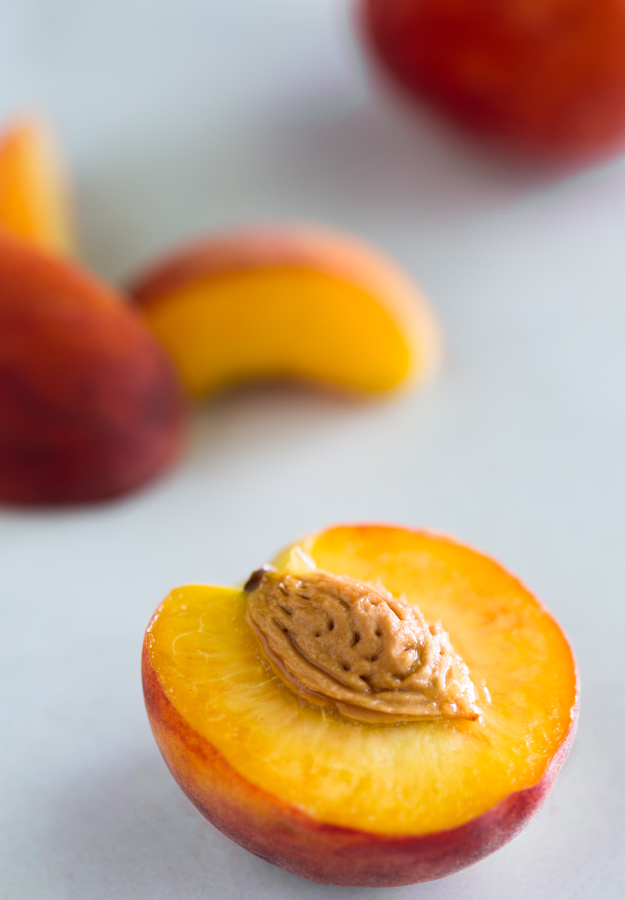
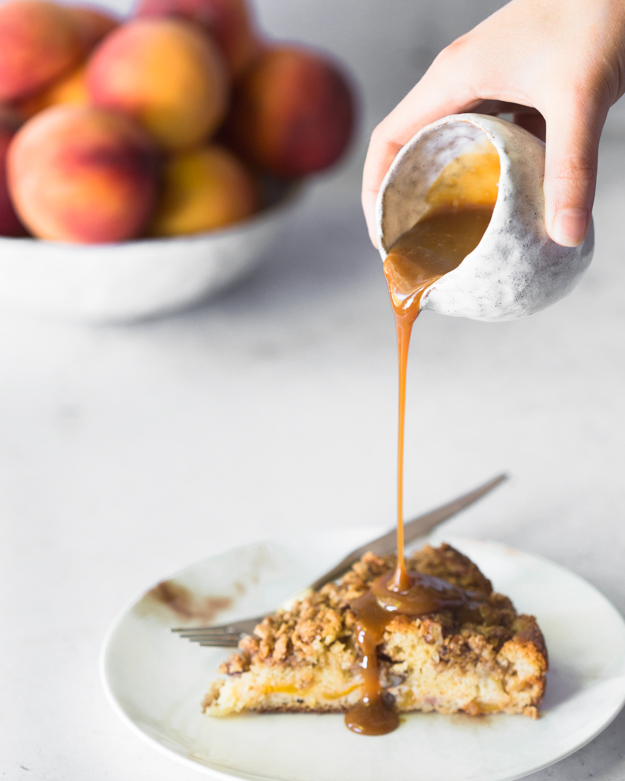
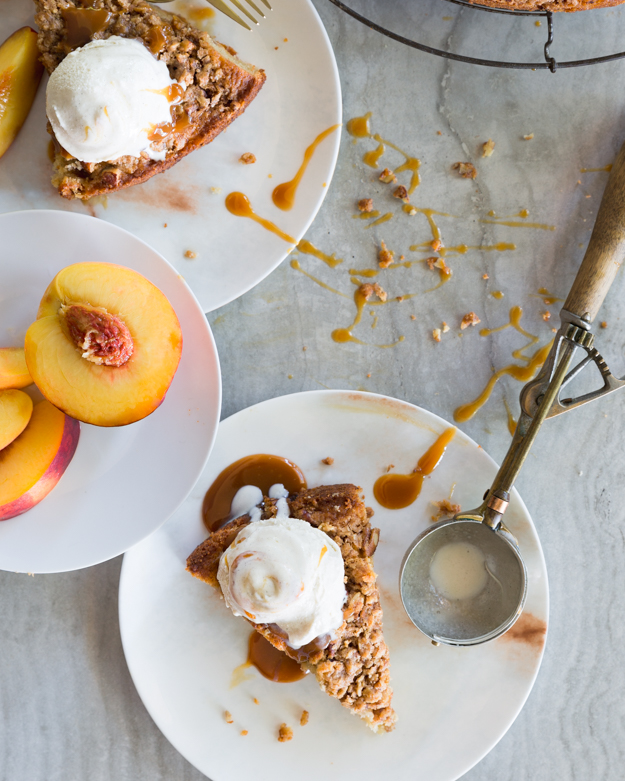
It happens every summer. I get carried away when local peaches finally arrive. The rest of the year they are like rocks with absolutely no flavour or aroma. For a few short weeks each August, they are perfect. The flesh gently yields as you take a bite, and the juice drips down your chin and stains your shirt. But it’s worth it. I always buy more peaches than we can possibly consume. Last year I peeled and pitted the extra peaches and tucked them away in the freezer to use during the winter. Of course I completely forgot about them, until I was cleaning the freezer in June and pulled out a frost covered bag.
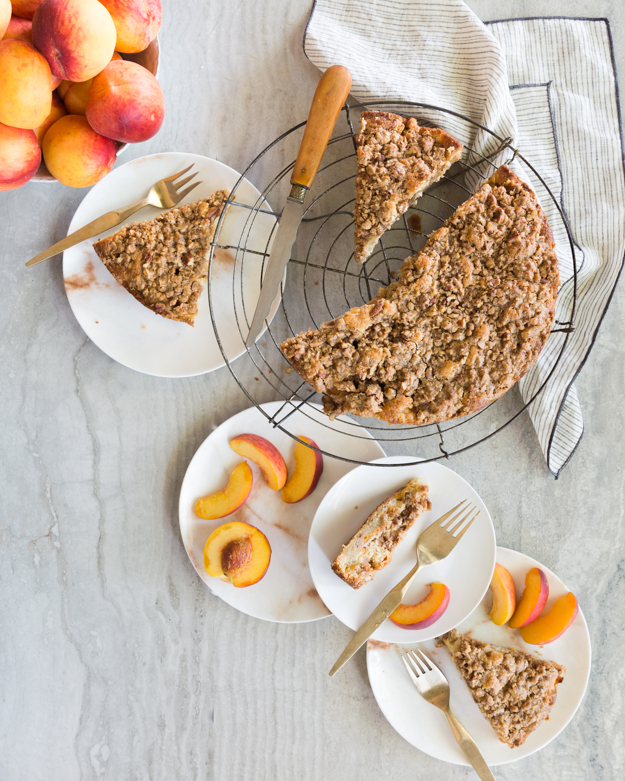
This summer, I decided to take action and bake a cake with my peach windfall. The problem with most peach cakes is that the peaches exude so much juice that the cake has a wet, gummy texture. Cook’s Illustrated cracked the code on that problem by suggesting that you roast the peaches first, and then mix them with Panko breadcrumbs.
I tarted up the Cook’s Illustrated version of this cake with a delicious streusel topping, crafted from pecans, oats, butter, brown sugar and maple syrup. I love a little crunch on top of my cake.
A drizzle of some salted caramel sauce wouldn’t be a bad idea. And a scoop of vanilla ice cream, because it’s the last week of summer and I propose we go out with a bang!
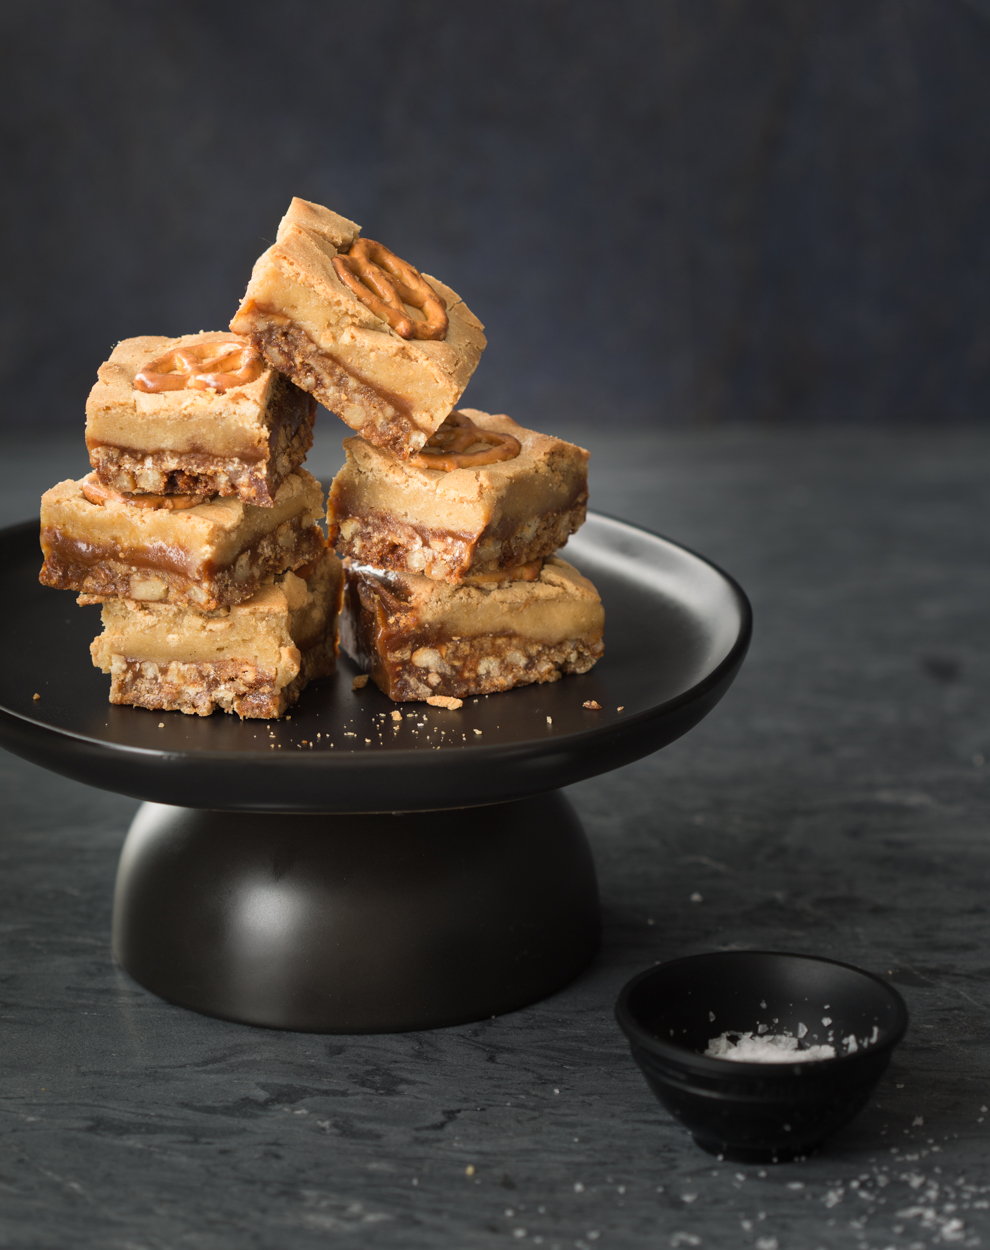
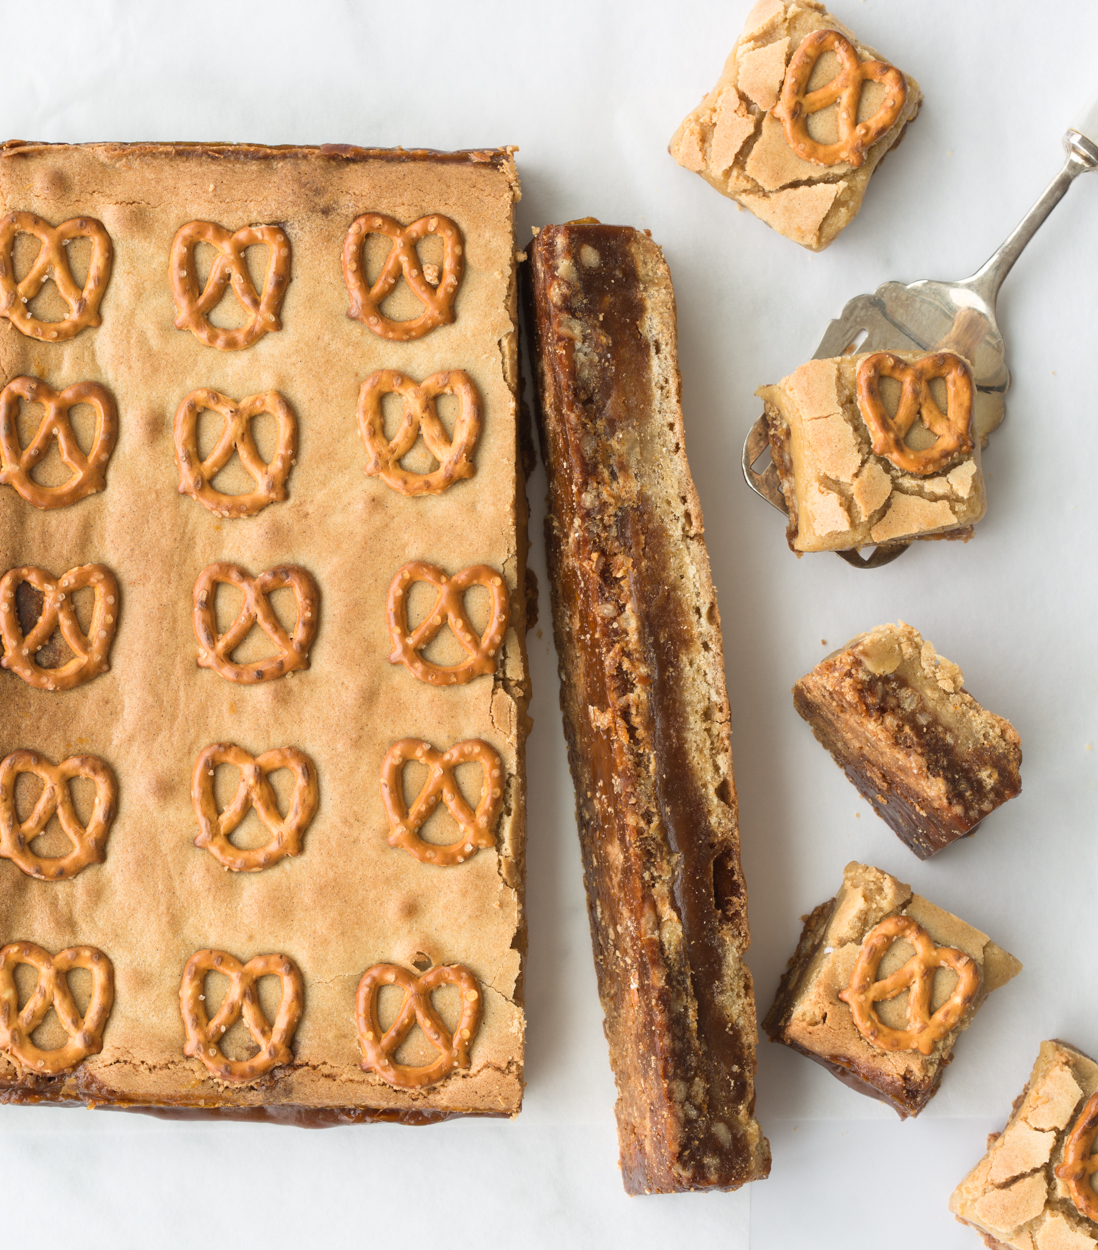
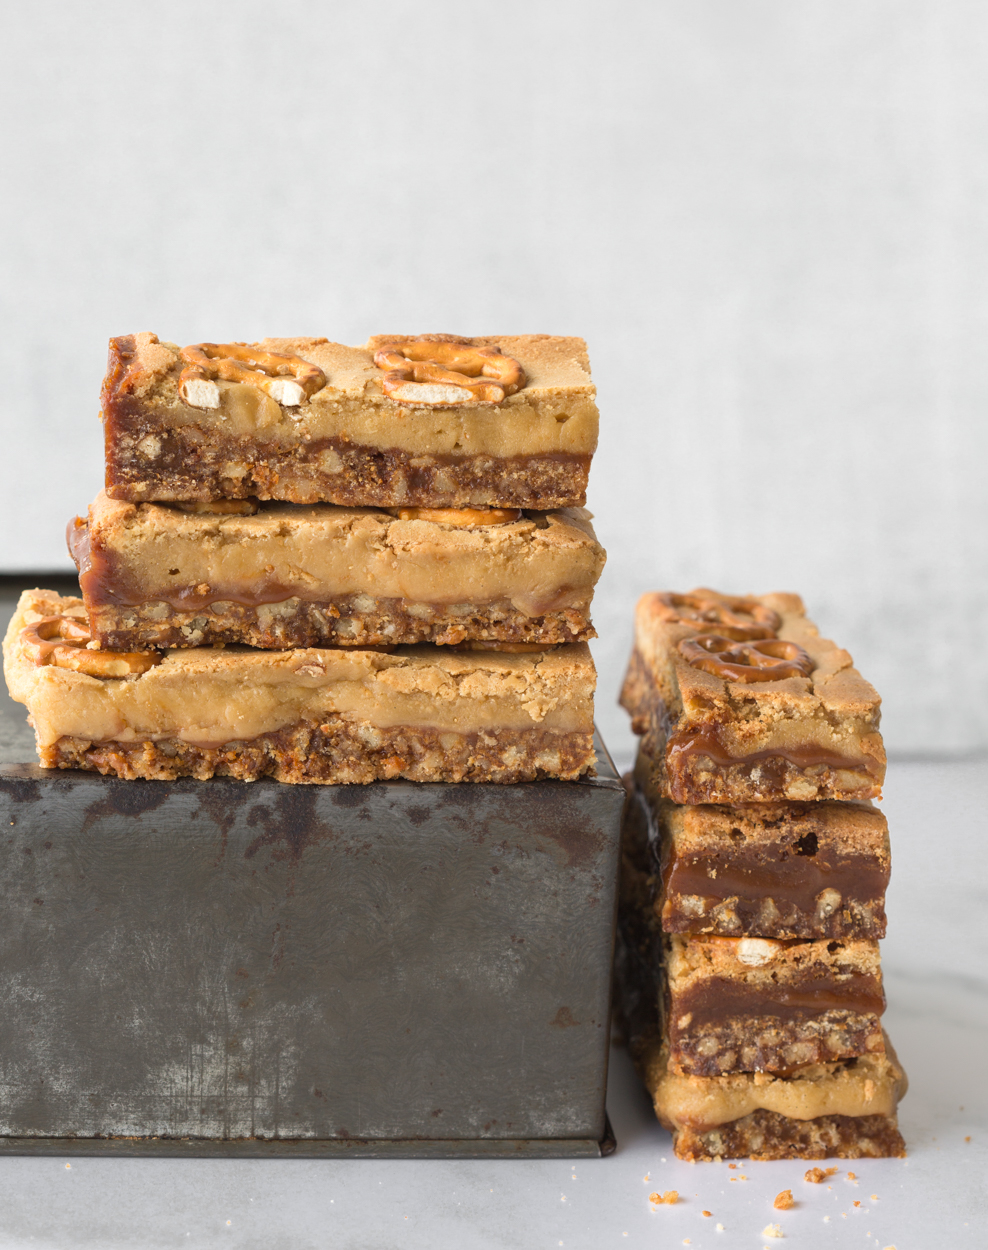
Blondies are often described as brownies without chocolate. I think that definition is insulting to Blondies. It’s like saying that women are men without penises. No, blondies have their own distinct charm and personality and it’s all about the brown sugar.Whereas brownies depend on chocolate for their flavour, for blondies it’s all about the brown sugar, giving the blondies their unique molasses flavour. Rich and chewy, with caramel undertones, they are a special dessert in their own right. If you are asking me to choose between a Brownie and a Blondie, I am team Blondie all the way. Although my sister Jody’s brownies are unparalleled!
A few weeks ago, I stumbled across a recipe on the Valrhona web site for blondies studded with chopped blonde chocolate. I have written about the glories of blonde chocolate here before. The folks at Valhrona roast white chocolate to coax out its caramel/butterscotch notes. Typically, butterscotch chips are added to Blondies. I loved the idea of using chopped blonde chocolate instead.
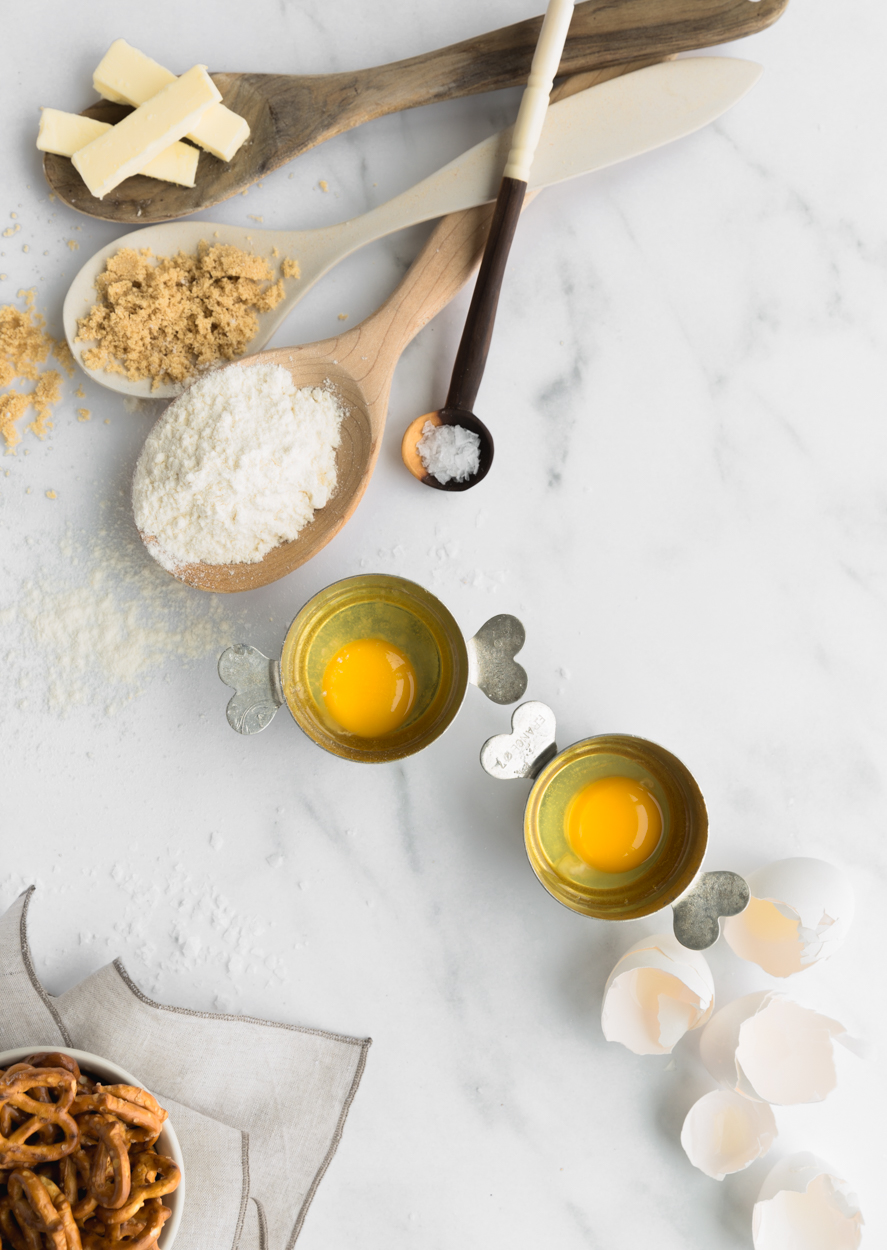
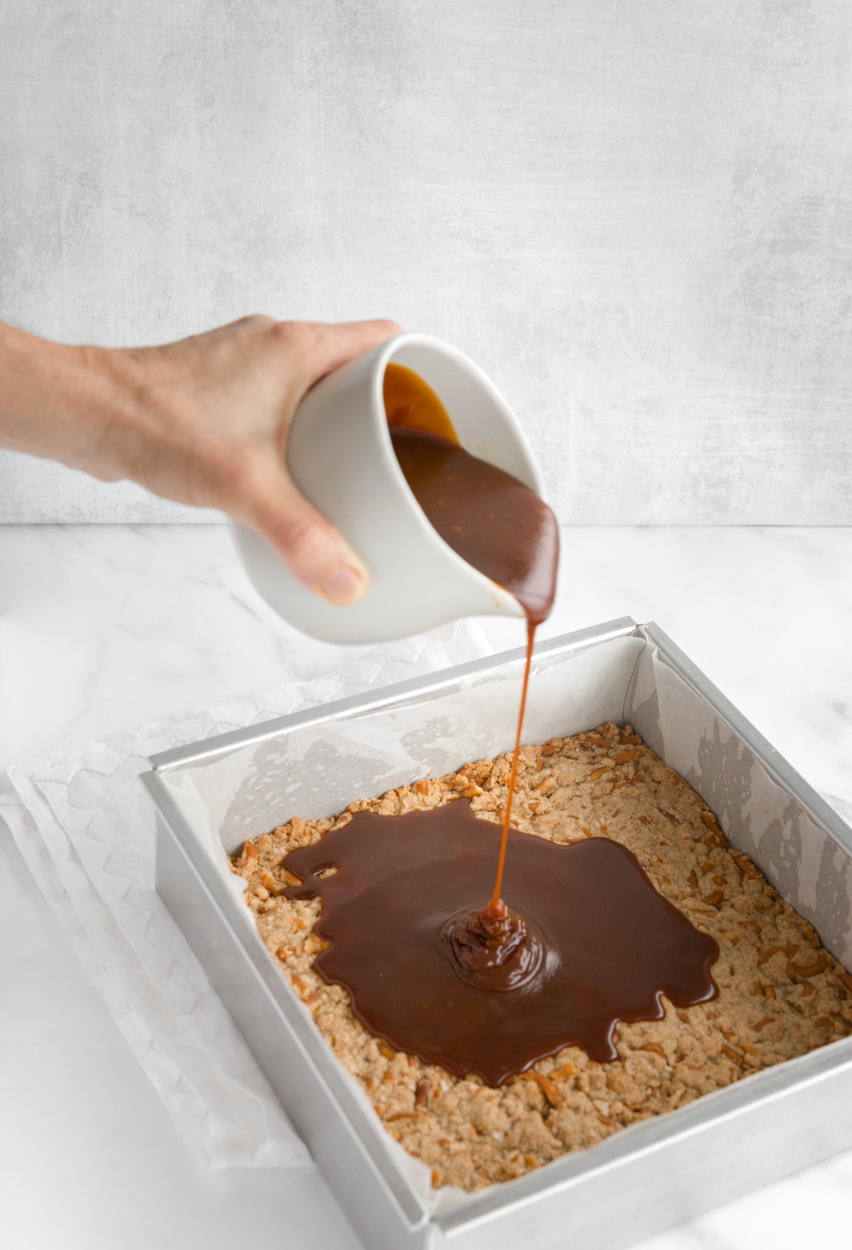
I wanted to put my twist on these Blondies. In my mind, I was envisioning a triple layered treat. A crunchy salty pretzel base and a chewy Blondie top layer sandwiched together with a blanket of salted caramel.It took me five tries to get this right. The first time, I baked the pretzel crust for about 10 minutes, added a layer of slightly cooled salted caramel and topped that with the Blondie batter. I baked the whole thing for 20 minutes, let it cool, and then sliced it into squares. As I cut it, I realized that the Blondie batter was under baked, and too gooey. They were still delicious but not what I had envisioned. Into the freezer the first batch went, for snacking.
The second time, I baked them for 30 minutes and a toothpick inserted into the top layer tested done. I let them cool, and proceeded to slice them into squares. The caramel oozed as I cut and I noticed that it had seeped under the pretzel crust. My vision of 3 distinct tidy layers had not been achieved. Again, still very delicious, but not what I had in mind. Batch 2 went into the freezer, making my husband very happy. In case you were wondering, they are absolutely fantastic straight from the freezer.
I realized I was compounding the problem, by baking the caramel sauce between the two layers. What if I baked the pretzel crust and Blondie batter layer separately and then sandwiched the two together with the caramel sauce. Yes, a bit more work, but it would be worth the effort if it worked. This trial was en epic fail. The layers did not hold together and it was just a big gooey mess. This batch went straight into the garbage.
These blondies were keeping me up at night, and not just from the sugar rush because I couldn’t stop snacking on them. I just couldn’t let go of my vision of three separate layers. It’s all about the photographs these days, and these just weren’t camera ready.
My husband came home that night to a very excited me, babbling on about a brilliant solution I had come up with to my big problem. I entered “Thick caramel layer that slices neatly” into the search box and Dr Google prescribed the Australian treat, “Caramel Slice.”
In this treat, sweetened condensed milk is cooked with brown sugar to make the caramel layer. It is meant to be baked in the oven. I replaced my traditional caramel sauce recipe with this version and tried again. Sure enough, these sliced up beautifully, and the three layers, (pretzel crust, caramel filling and blondie topping) were visible and distinct. We tasted them and while they were quite good, they didn’t have the deep caramel/toffee flavour that you can only get from cooking sugar to 380°F and making real caramel.
And then I remembered an article I had read in Cook’s Illustrated for a Chocolate Caramel layer cake. They described the problem of the caramel oozing when the cake was cut. They solved it by adding additional butter to the caramel sauce so that it would set up more firm at room temperature. I decided to try one last time. I made my favourite caramel sauce recipe from Rose Levy Beranbaum, and I doubled the butter. This batch was a home run. It was perfectly balanced. it sliced up into three distinct layers. The almost bitter caramel layer in the center is the perfect bridge for the crunchy, salty bottom layer and the sweet, chewy top layer. Just a word on cutting these into squares. A very sharp knife, run under hot water and then dried, before each cut will give you those pristine clean edges. You know who you are and you will either follow my advice because pristine neat tidy edges are important to you (Hello Jody), or you don’t care about such things and will hack them into bite sized pieces, willy nilly, because they are still delicious no matter how you cut them (hello Bo). No judgment here, Just make them and enjoy them.
P.S. This morning, I heard my husband cursing these Blondies, as he stepped on the scale. I promised to stop making them.
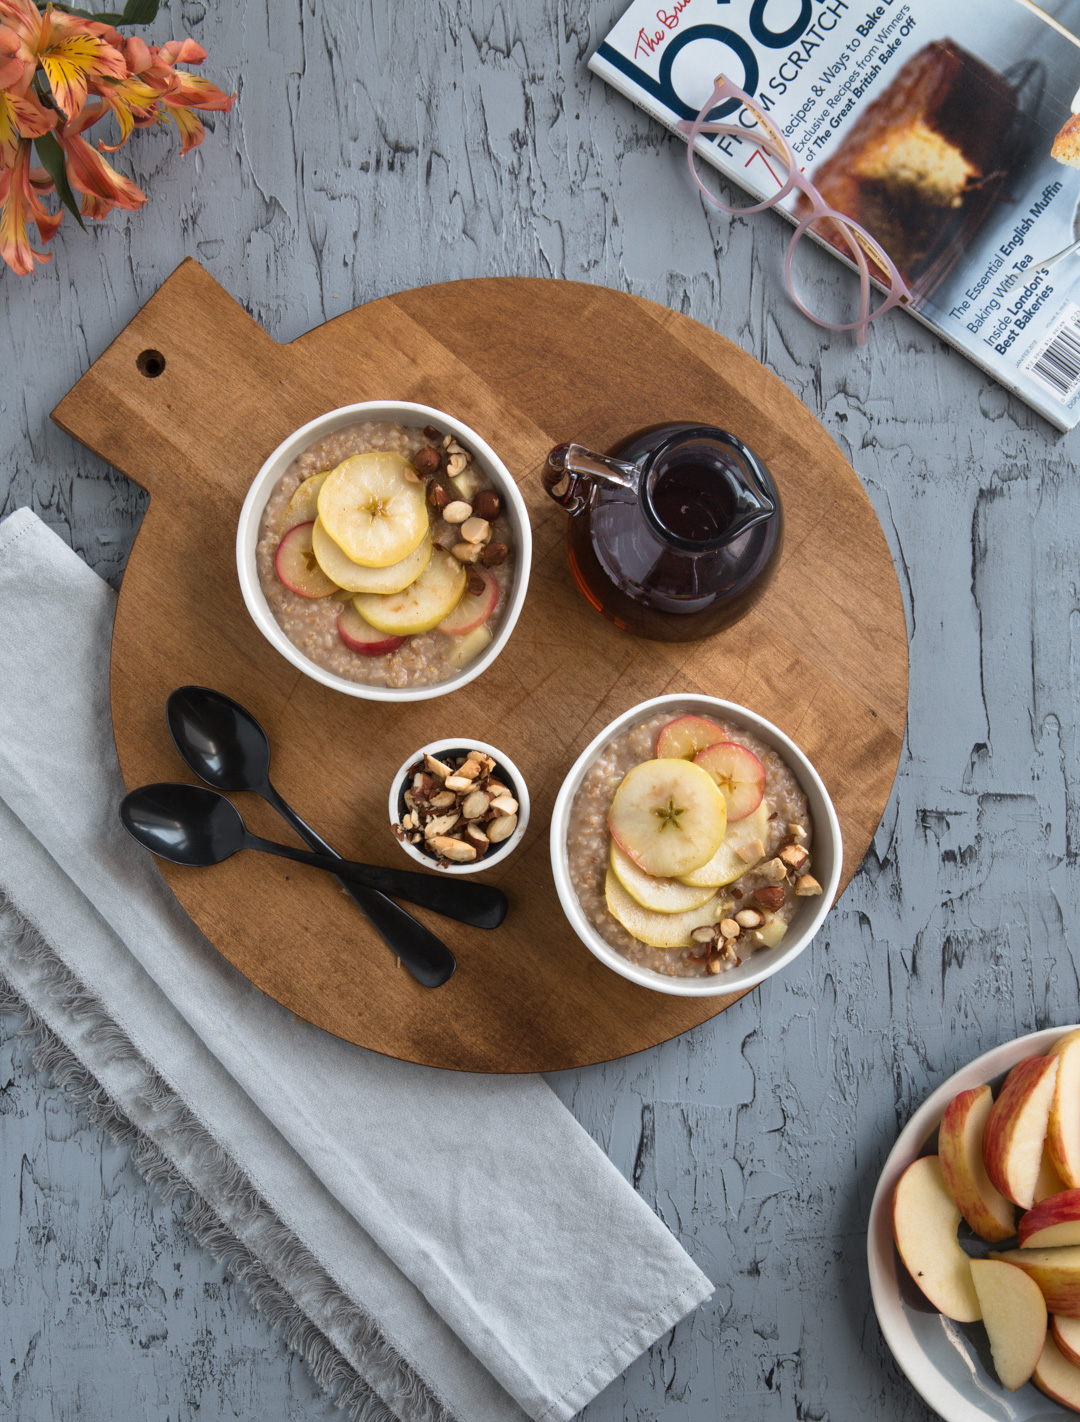
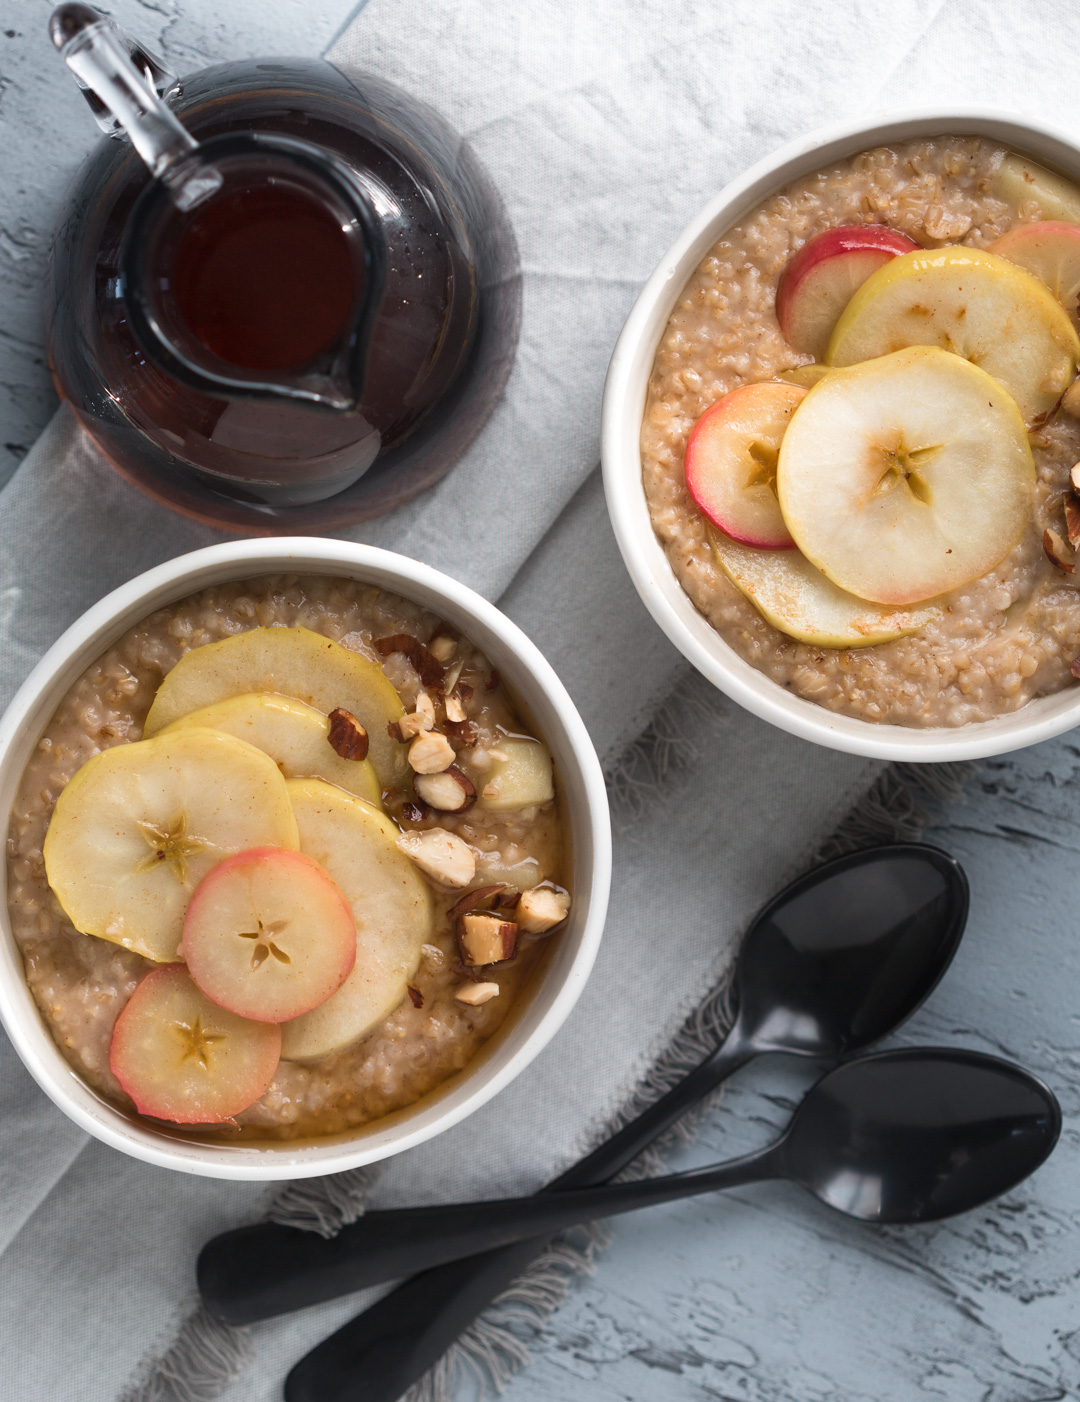
We have been eating overnight oats for breakfast, lunch and dinner this week, as I have been testing different variations. So far, no one has complained. This version is adapted from a Cook’s Illustrated recipe. They sweetened the oats with brown sugar but I switched it for maple syrup. I also added chopped apples to the oats while they were cooking. Their recipe used shredded apples but I found that I liked the texture better with little bites of diced apple.
The final change I made to their recipe was to sautee some apple slices in a bit of butter and maple syrup, because, well… butter and maple syrup on apples! It’s a fancier version, and those sliced apples look so pretty on top, but feel free to leave it out if that’s not how you roll. No judgement here. The night before, bring 3 cups of water and a good pinch of salt to a boil. Remove from heat and add 1 cup steel cut oats. Cover pot and let it sit on the counter all night. In the morning , add apple cider or juice, milk, cinnamon and some diced peeled apples. Cook for 5 minutes. Let sit for a further 5 minutes. Top with sauteed maple apples and some toasted almonds or pecans.
Drizzle with extra maple syrup because you deserve it.
When I was growing up, oatmeal meant Quaker Oats Instant Oatmeal in the package. We had an instant hot water tap, (the water never really got all that hot) so there wasn’t even any cooking involved. My mom would buy the variety pack, but my sisters and I only liked the maple and brown sugar, and I think we probably added extra maple syrup and brown sugar. My poor dad got stuck eating the unwanted apple cinnamon flavour. I recall that the dried apples always got stuck in your throat.
Fast forward a whole bunch of years and, “We’ve come a long way baby.”Now I’m eating oatmeal made with steel cut oats that you actually have to cook!
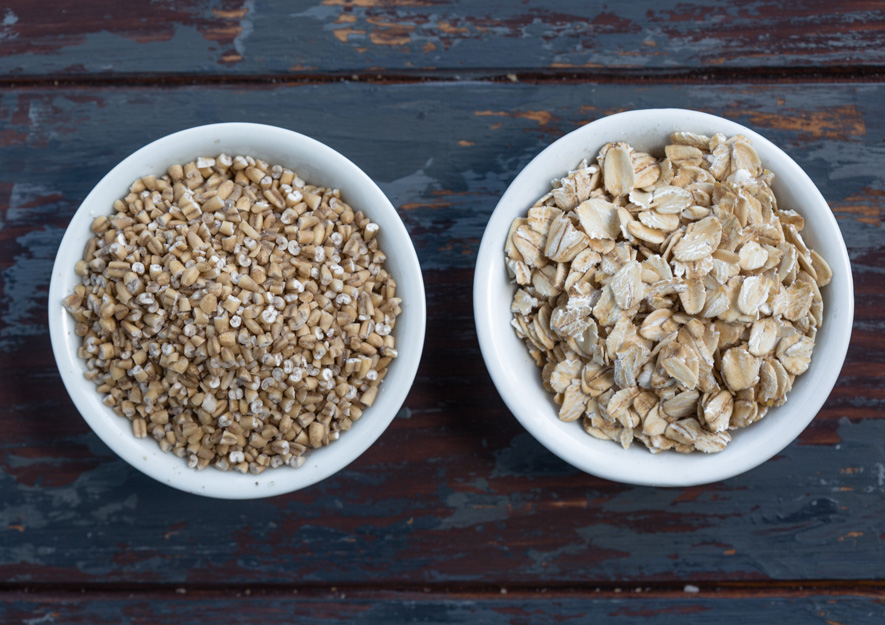
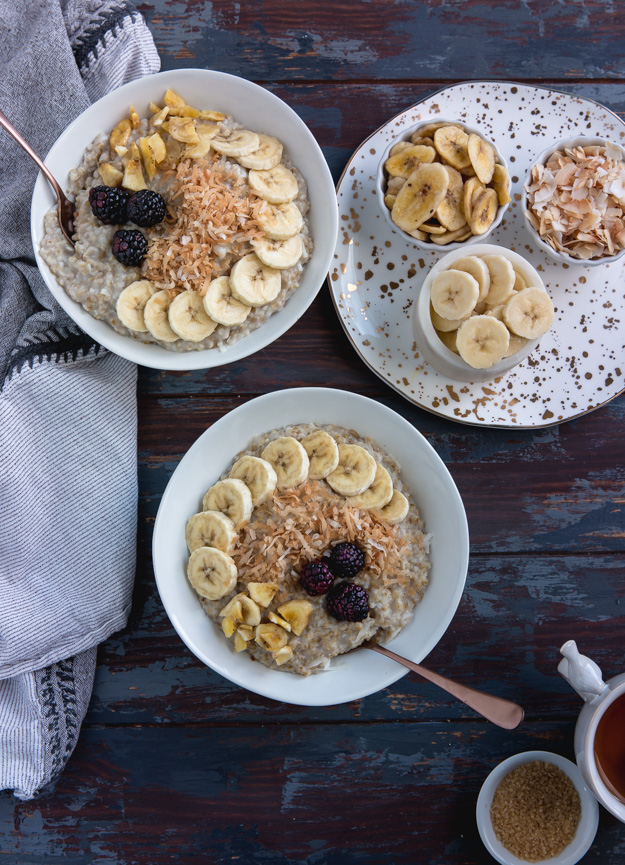
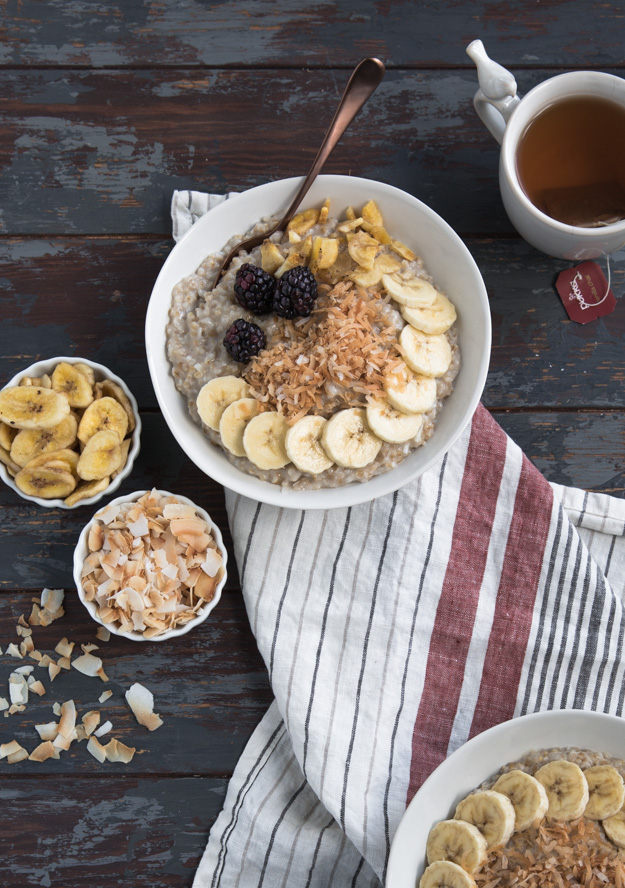
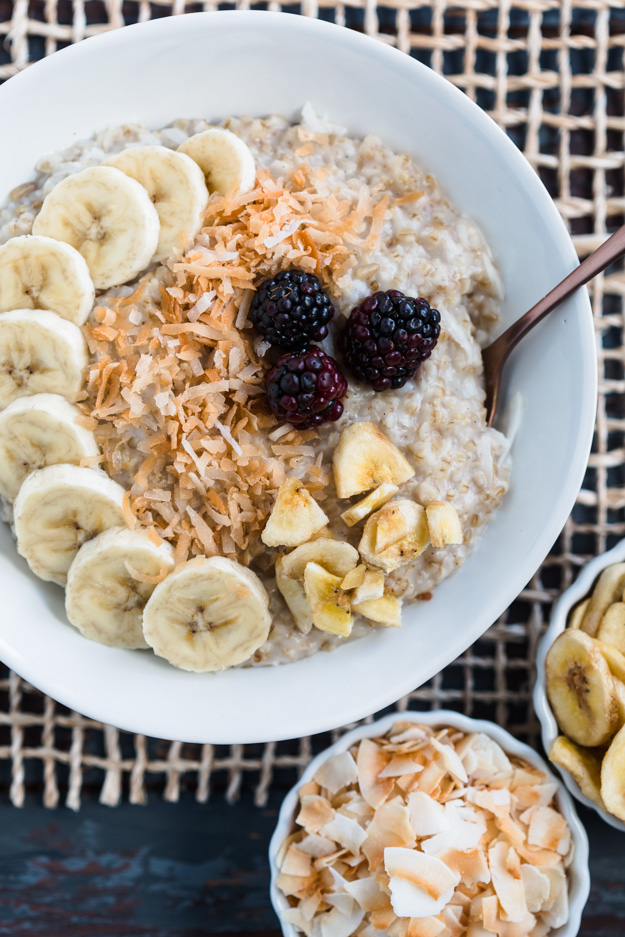
So, a little oats primer here. Whole oats, that have been cleaned and hulled, are called groats. They are a little too coarse for oatmeal. Groats that have been coarsely chopped are known as steel-cut oats (bowl on the left). Groats that are steamed and pressed are called rolled oats or old-fashioned oats (bowl on the right). Instant oats are pre-cooked, dried, and then rolled and pressed slightly thinner than rolled oats.Steel-cut oats have a wonderful nutty taste and chewy texture, but they take 40 minutes to cook, and who has time for that? Enter the overnight method. I learned how to make these from those clever folks over at Cook’s Illustrated.
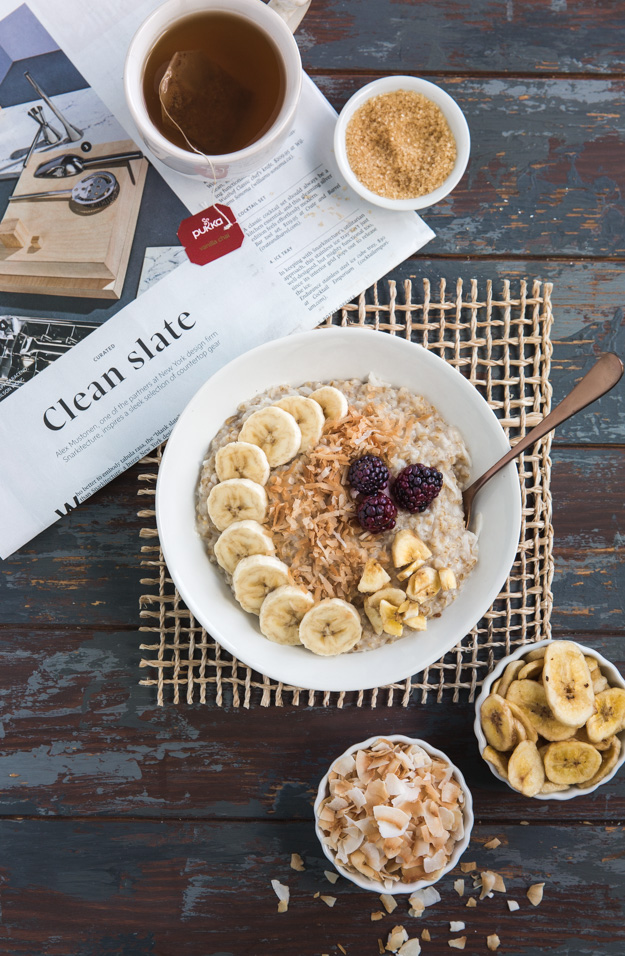
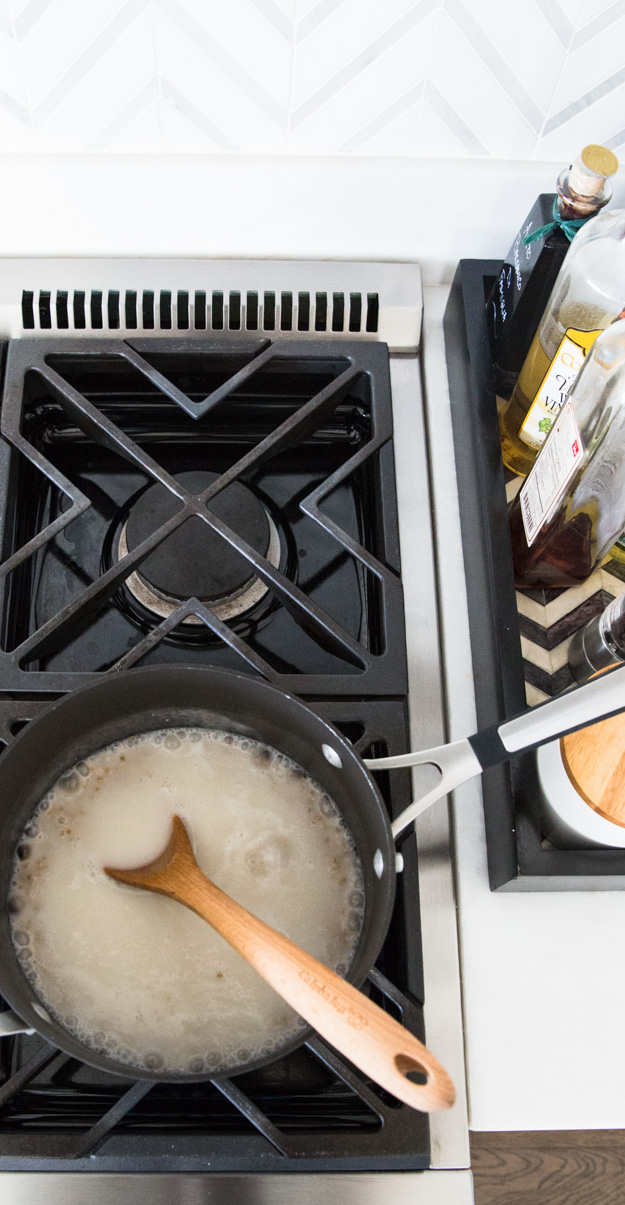
Bring 3 cups of water and a teaspoon of salt to boil. Please don’t omit the salt. Your oatmeal will taste flat and lifeless. Take pot off heat, stir in 1 cup of steel-cut oats , cover pot and let sit overnight while you sleep. In the morning add 1 cup of coconut milk, bring to boil, reduce heat to medium and cook, stirring occasionally, until oats are softened but still retain some chew and the mixture thickens slightly. This will take about 5 minutes. Cover the pot and let sit for 5 more minutes. The oatmeal will continue to thicken as it rests.
Mix in sliced bananas, shredded coconut and vanilla extract. Top with banana chips for some added crunch.
Mornings got a whole lot better around here. Stay tuned for an apple-cinnamon version with maple syrup!
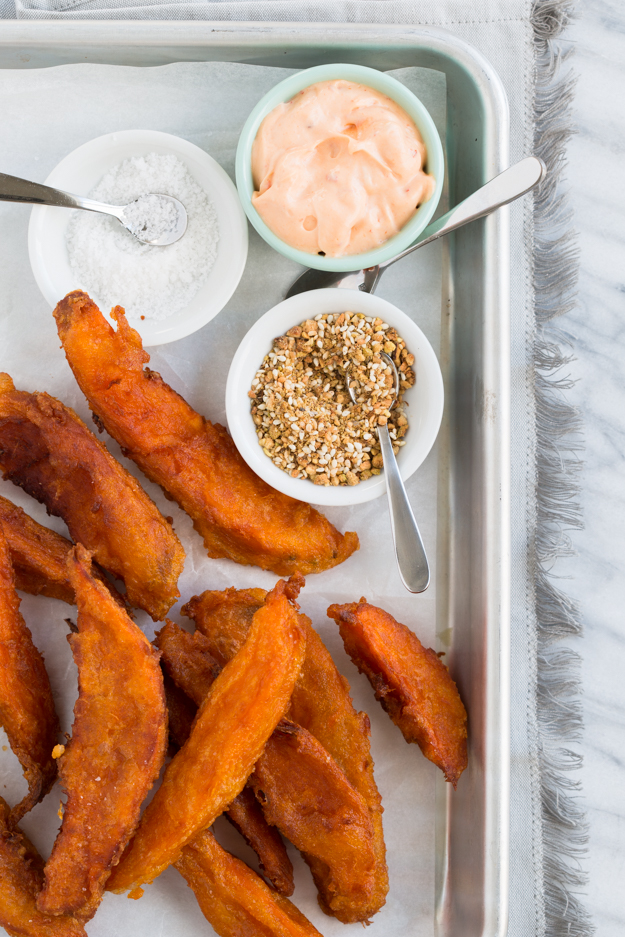
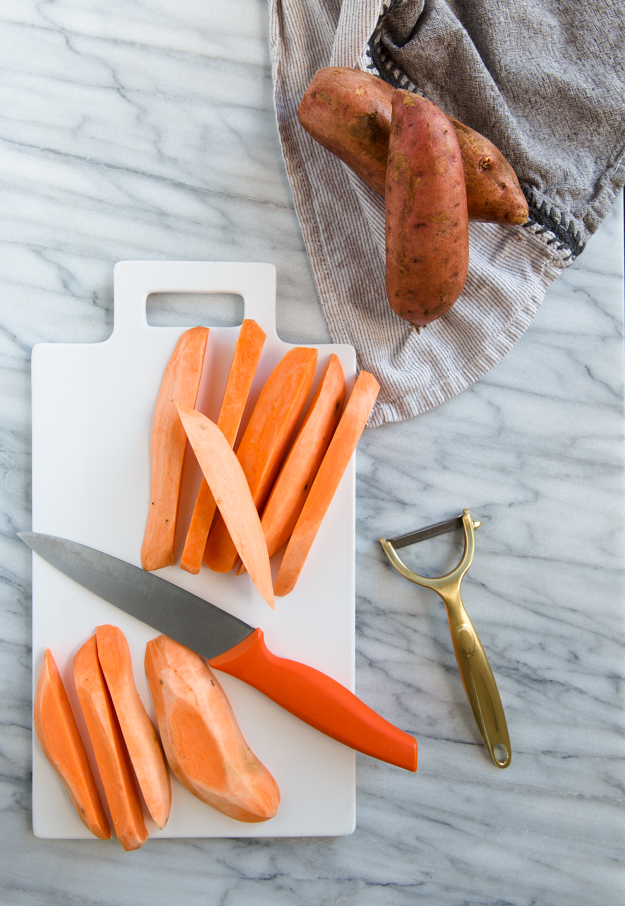
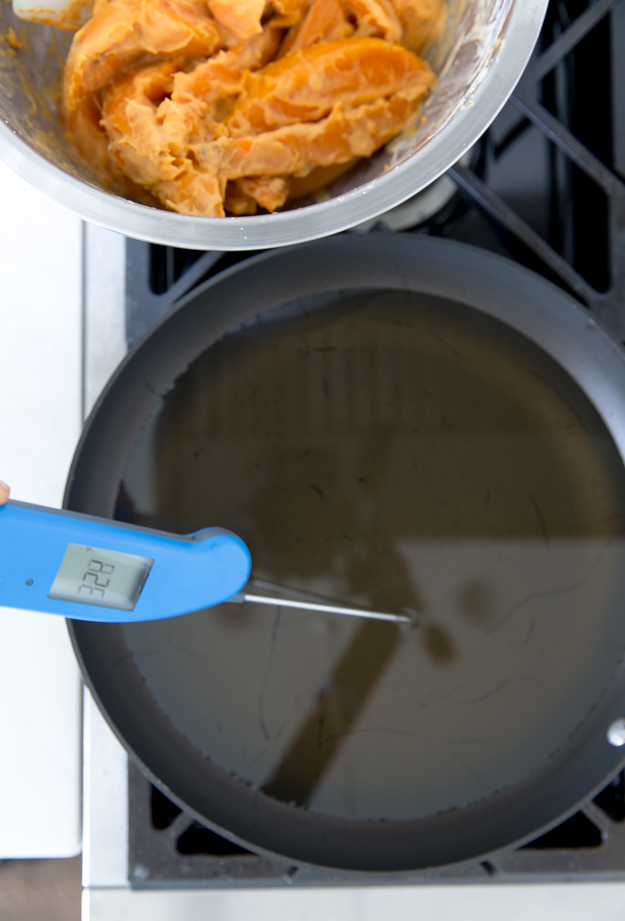
Cracking the code on making crispy sweet potato fries has been an elusive goal of mine for a while now. (Yes, I know I have lofty goals!) I have mastered regular fries, but sweet potato fries are a real challenge. Even when deep-fried, they only remain crispy for about a minute before they go limp. The issue, I have discovered, is that sweet potatoes are higher in sugar and lower in starch than Russett potatoes (the best potato for french fries, by the way).
Leave it to Cook’s Illustrated to figure out how to do it. Cornstarch is the secret ingredient. To counterbalance the low starch content, the sweet potatoes, are given a bath in a cornstarch-water slurry.
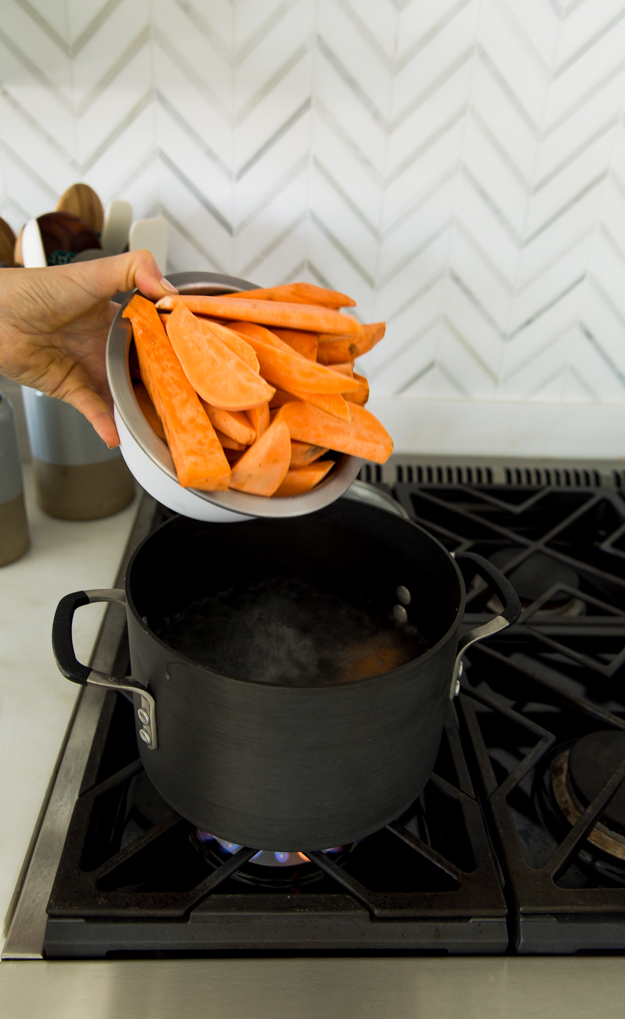
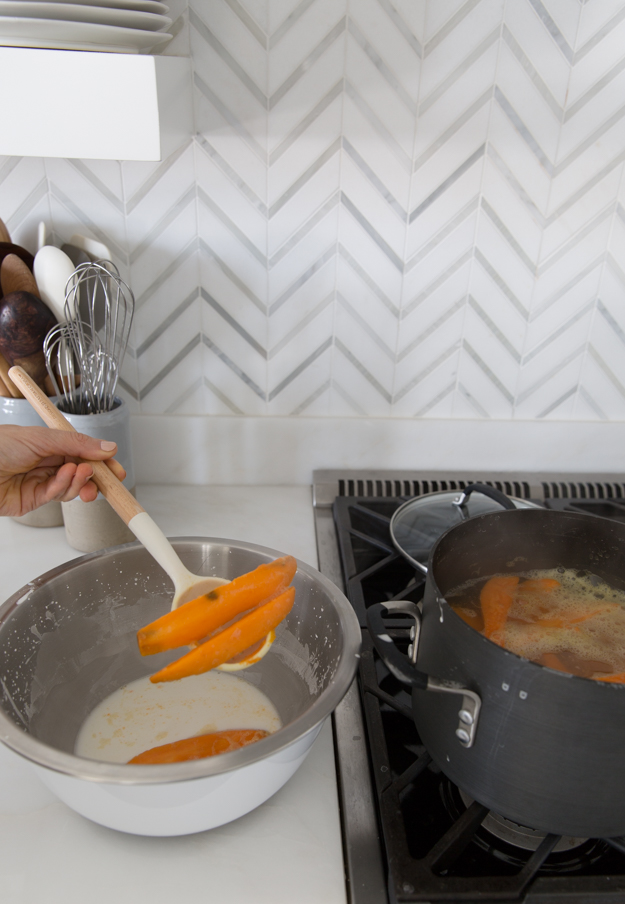
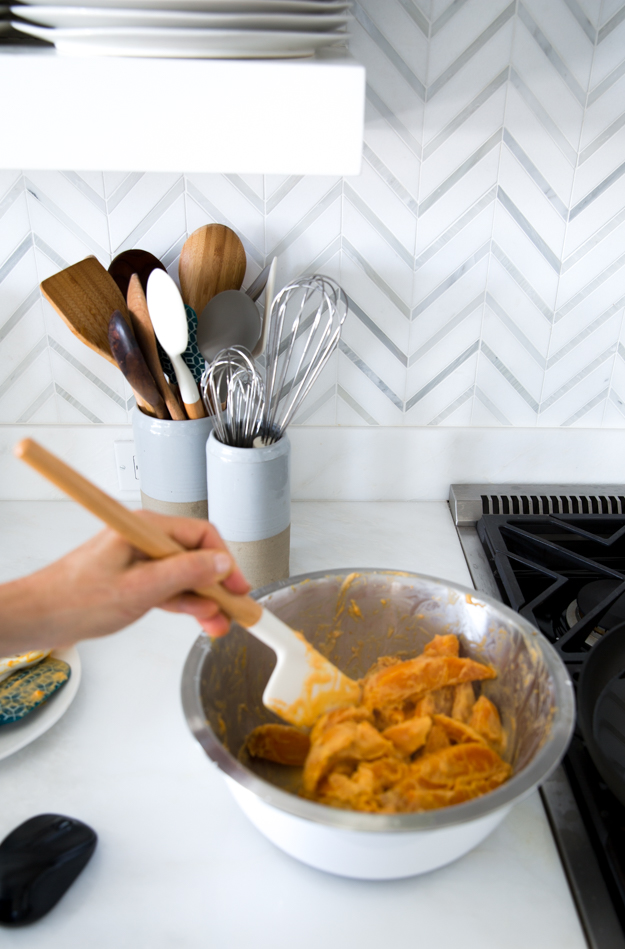
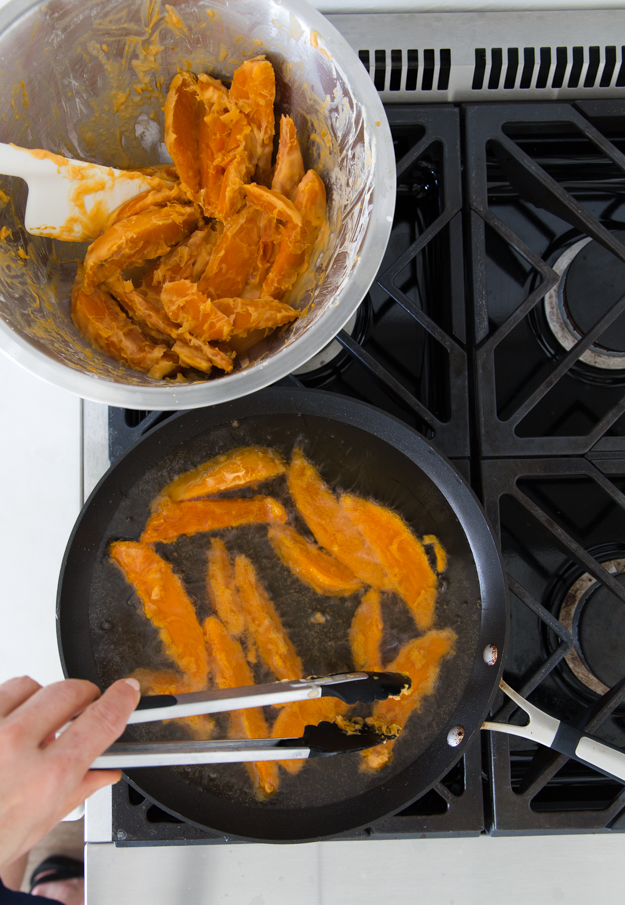
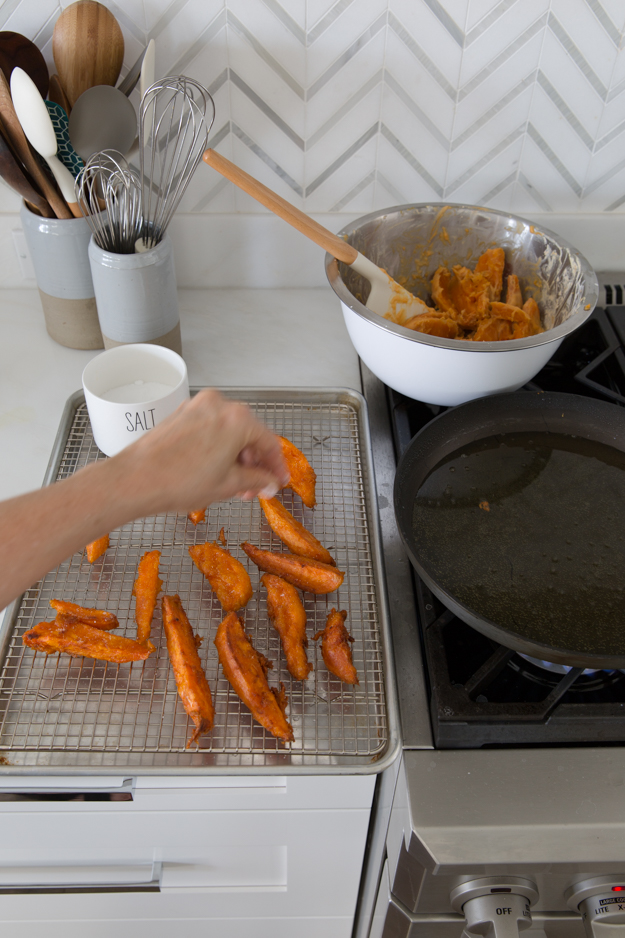
Start with peeled sweet potatoes cut in half lengthwise, and then into 3/4 inch wedges. In order to ensure that the interior of the sweet potatoes become tender, they are blanched in salted boiling water with a teaspoon of baking soda. The baking soda makes the surface of the potatoes a bit sticky so that the cornstarch has something to grab on to. Initially, the cornstarch mixture will be quite thin. Keep stirring gently and the heat of the sweet potatoes will thicken the water-cornstarch mixture and coat the sweet potato wedges perfectly. That unsightly orange sludge coating the wedges will be converted into a shatteringly crispy exterior once fried.Heat oil to 325°F for perfect frying. You’ll have to fry them in batches. Salt them as soon as they come out of the oil. The first batch can stay warm on a rack in a 200°F oven while you fry the rest. Admittedly, these sweet potato fries take some work to prepare. Creamy and soft on the inside, and audibly crunchy on the surface, they are worth both the effort and the calories. These aren’t something you’ll prepare on a weekly basis, but for a special occasion, please reward yourself. They will be making an appearance on our new year’s eve table.
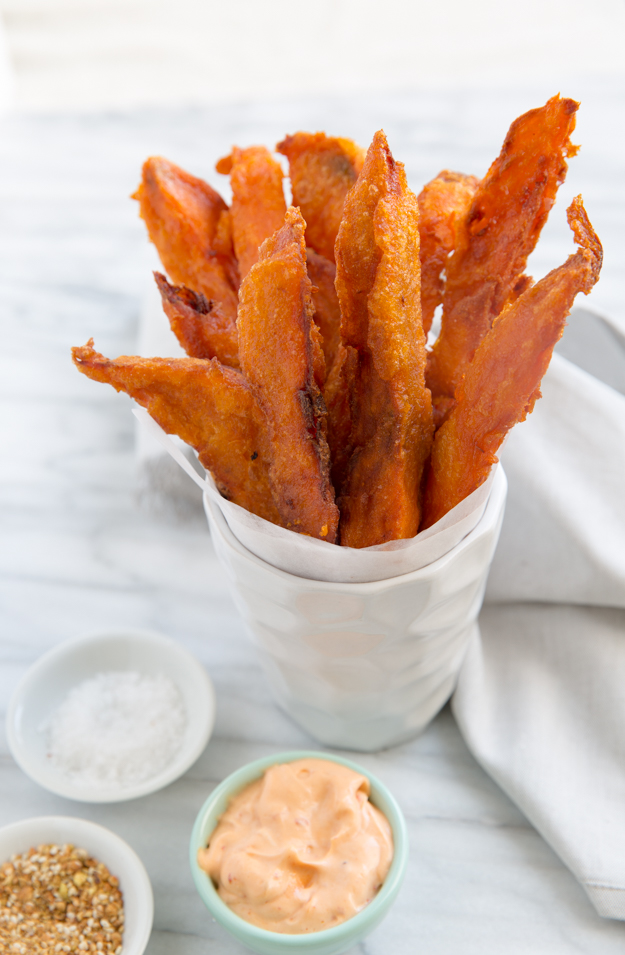
My photo shoot took over an hour and when I tasted the fries at the end, and they were still crunchy. I like to serve the fries with a chipotle mayo dipping sauce and a sprinkle of dukkah. Take 1-2 chipotle chiles in adobo, remove the seeds and puree. I mix this into 1/2 a cup of Hellman’s mayo (light is perfectly fine, just don’t use the fat-free).

 You need lots of onion and fresh herbs for flavour and freshness. I like the combo of cilantro and parsley, but feel free to just use parsley if you are cilantro averse. The problem is that all this moisture makes them fall apart. Flour is a commonly used binding agent, to help hold the falafel together. However, flour alone as a binding agent leads to dense falafel. The genius folks at Cook’s Illustrated borrowed an Asian bread-baking technique called tangzhong. It involves mixing flour with water and then cooking it briefly in the microwave until it forms a paste.
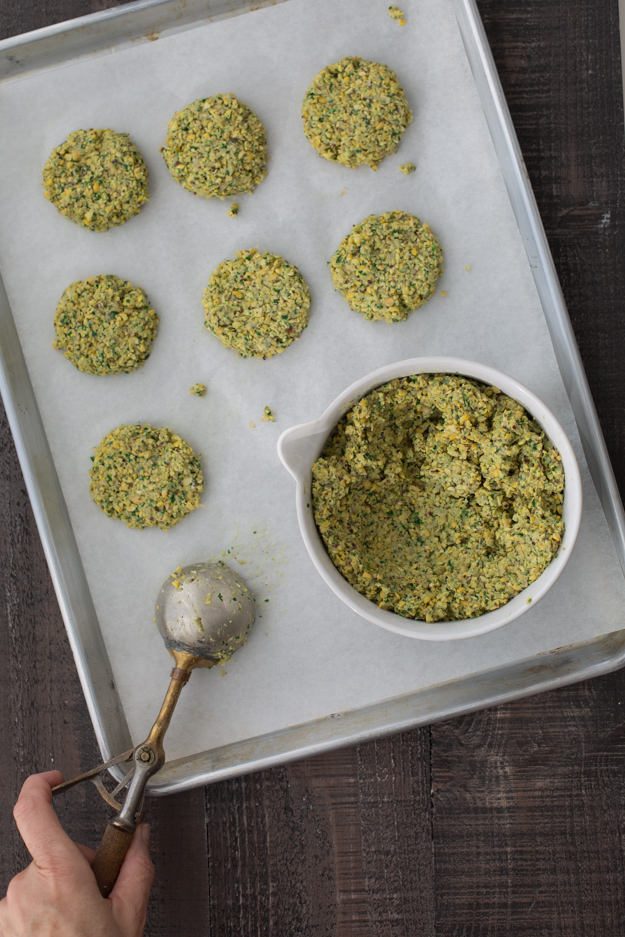 Let’s build a slider.