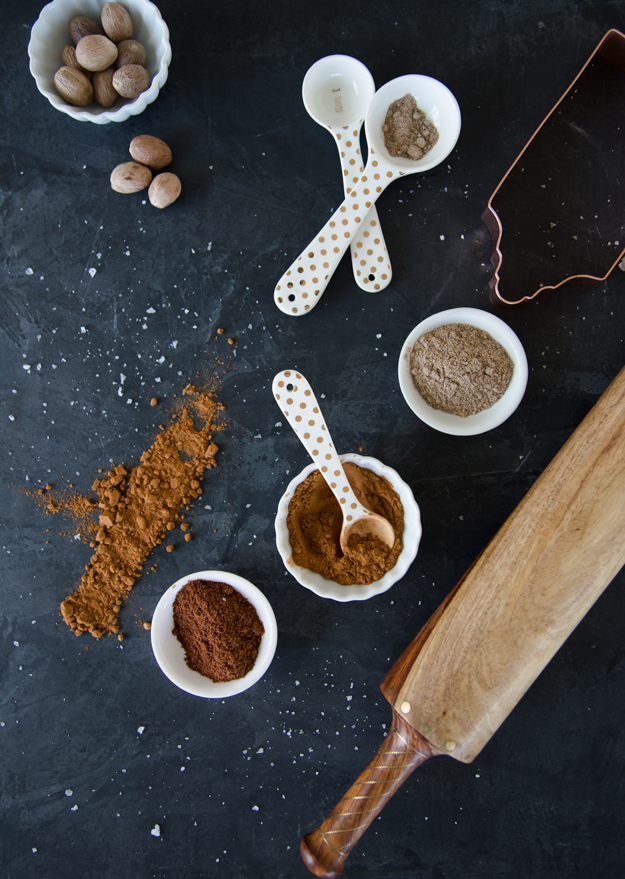
A few years ago, I posted a gluten free version of these cookies. I wanted to share a gluten version for those not avoiding wheat. This gingerbread recipe comes from the genius folks over at Cook’s Illustrated. Thick and chewy and loaded with ginger and cinnamon, they are perfect. If you like them crispy, just bake them a bit longer.
Even though gingerbread is usually associated with fall and winter, I bake it all year long. I love to sandwich dulce de leche icecream between 2 cookies in the summer!
Decorating these cookies makes me feel like a real artist and the method is simple and fairly idiot proof. Check out the how-to video.
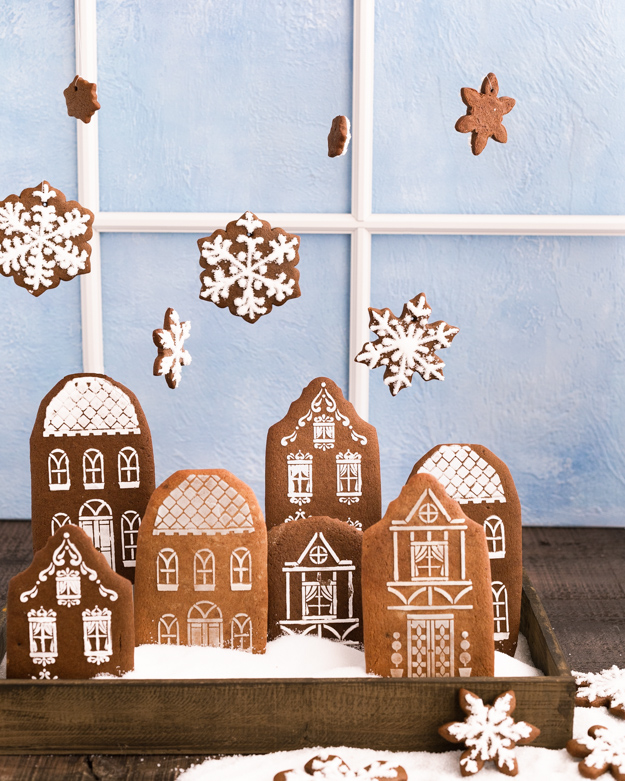
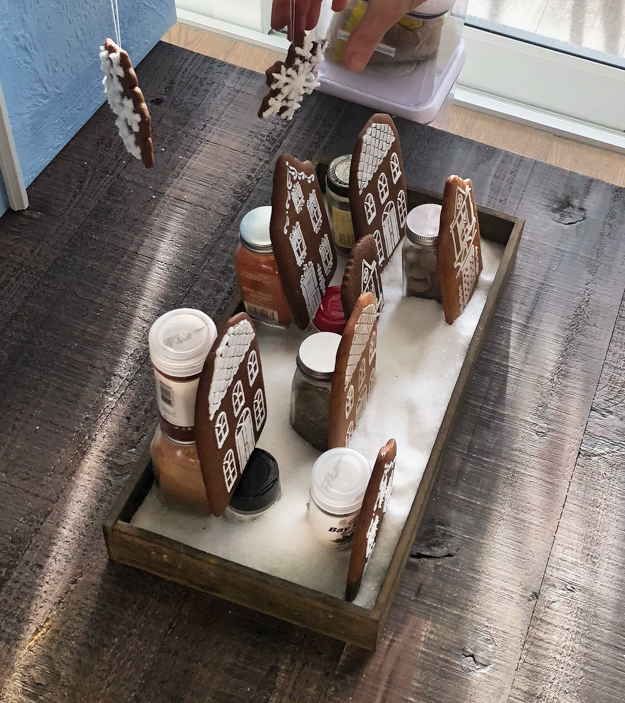
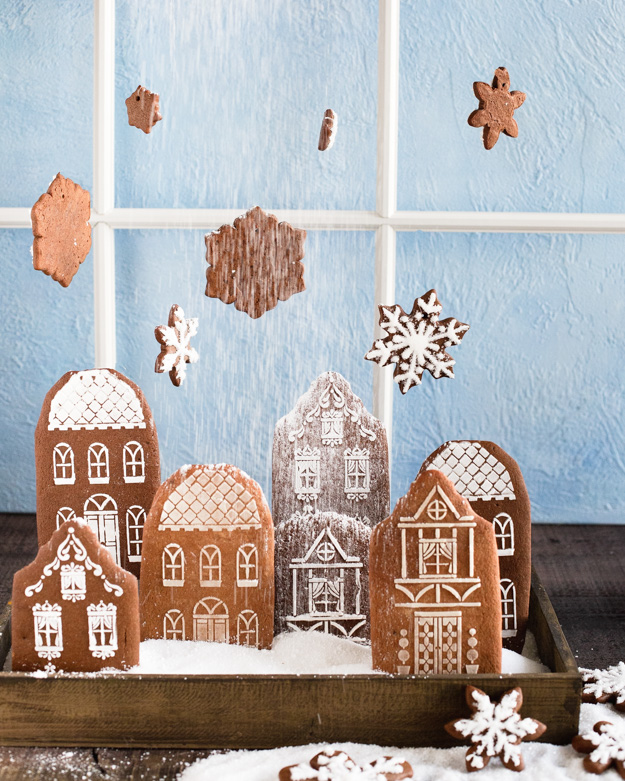
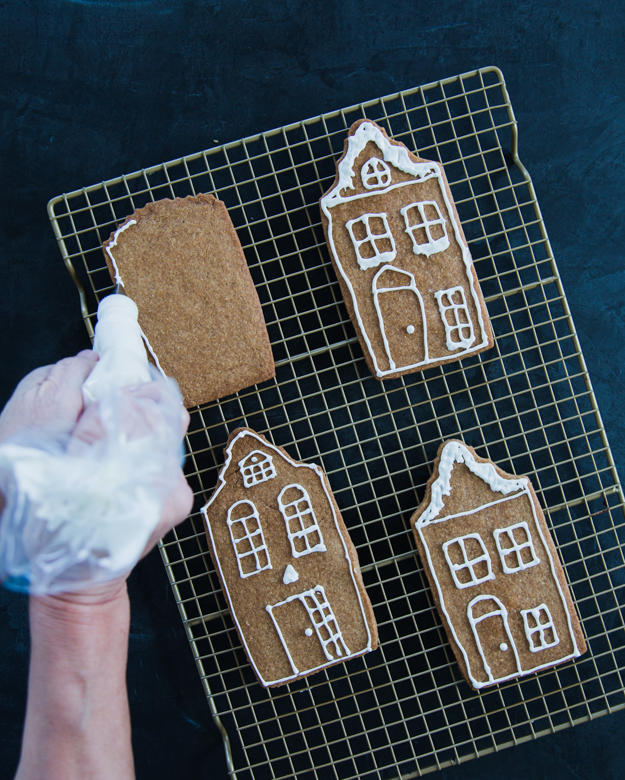
They say it takes a village to raise a child. I say, it takes a child to build a village. Luckily my daughter was visiting this week to help me create this gingerbread village.
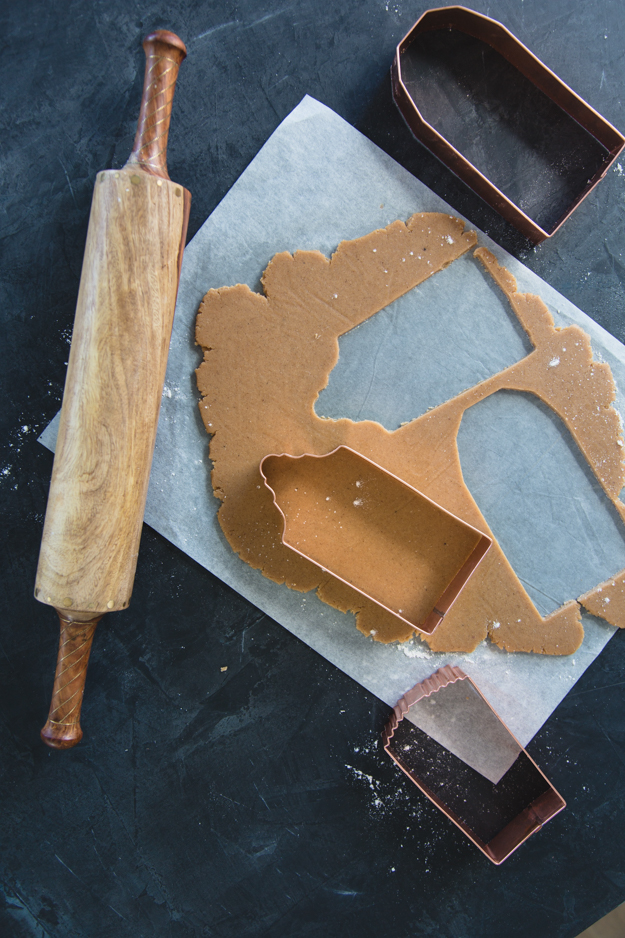
We had a lot of fun putting this together. We started with a big batch of my favourite thick and chewy gingerbread dough, from Cook’s Illustrated. I cut some of the dough into houses using these cookie cutters. Instead of piping the doors and windows, I discovered these stencils. You do not require any special skills to use them. They are so simple and the results are quite dramatic.
A few tips for stenciling success:
Practice a few times on parchment paper, so you don’t waste cookies.
Your royal icing should be the consistency of toothpaste.
A small offset spatula makes the job a bit easier than a regular knife. Put the icing on the bottom-side of the spatula.
Use one hand to hold the stencil in place and the other hand to gently spread icing. I found it easiest to start in centre and work my way to one end, then switch and do the other half.
Scrape off excess icing, but don’t scrape it clean. Just a thin coat is enough.
Try not to let stencil lift while applying icing. If you mess it up, remember that mistakes still taste good.
Wash stencil between cookies. Just place wet stencil on towel and pat dry. Be gentle with stencil.
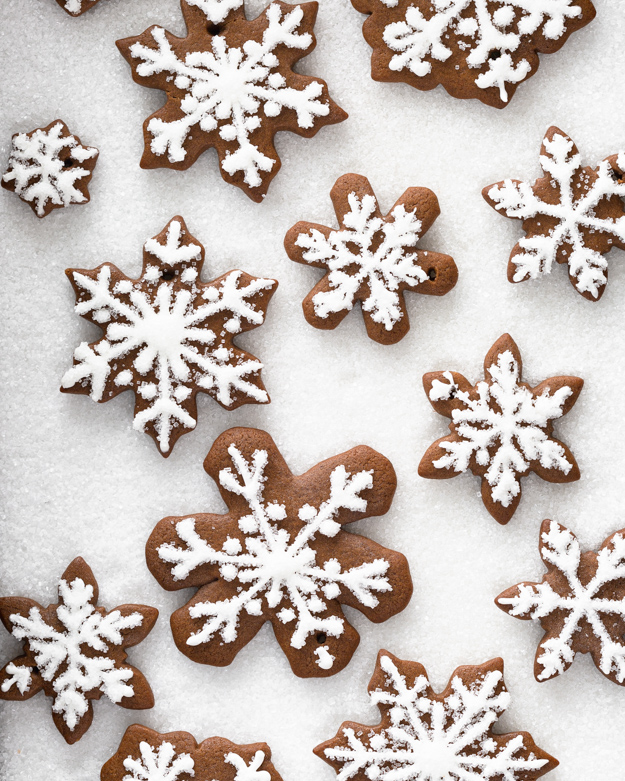
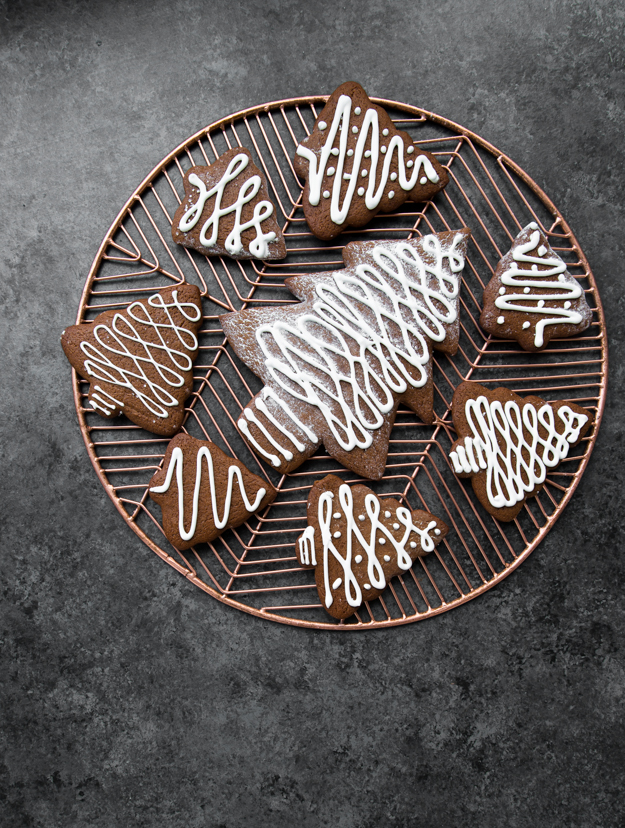
For the snowflakes, I used these cookie cutters. I wanted an assortment of sizes and shapes, as no two snowflakes are alike in nature! If you want to hang your snowflakes, be sure to put a hole in them before baking. I used the small end of a size 3 piping tip. We piped simple decorations on these cookies and sprinkled on coarse sanding sugar while they were still wet.
We filled a wooden box with” snow” (coarse sanding sugar) and used spice jars to support the houses. I trimmed some of them to have varying heights.
To hang the snowflakes I built two towers from my oxo good grips containers. Then I duct taped three wooden dowels across the top of the containers. We threaded the snowflake cookies with fishing wire and hung them. The tricky part was getting the snowflakes to all face front with their pretty icing side. My daughter turned them the right way and I was behing the camera ready to hit the shutter as soon as she moved her hands. We were almost successful. I photoshopped out the fishing wire in editing.
We decided to try making it snow. It made a huge mess but we got the shot!
If you’ve ever tried the joy that is cookie butter, then you know the flavour of a Speculoos cookie. Speculoos (or sometimes spelled speculaas) is a Belgian cookie. Imagine a gingersnap on steroids. Bolder and much more aggressive than typical gingersnaps, Speculoos cookies are brimming with dark brown sugar, cinnamon, nutmeg, cloves, white pepper, ginger, and cardamom.
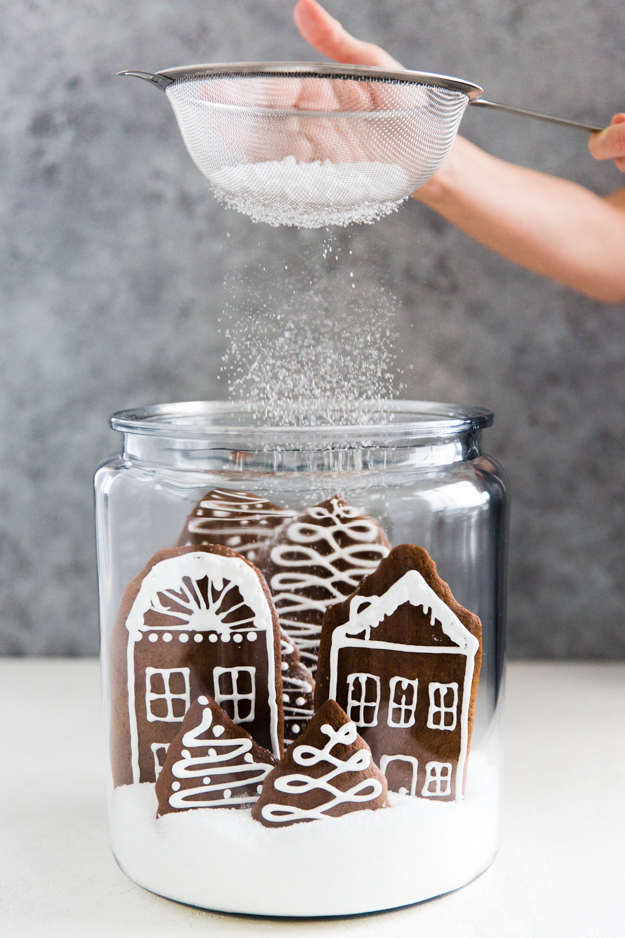
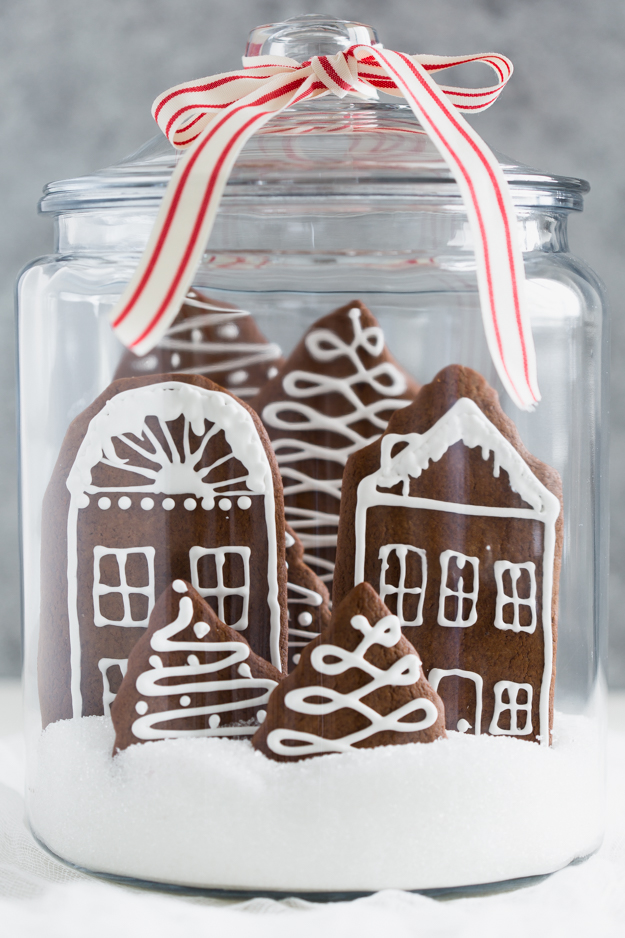
Of course, you can buy ready made Speculoos cookies, so why would you want to make your own? Um, giant townhouse speculoos cookie snow globe! Need I say more? Can you imagine a more adorable holiday centerpiece?When I started researching for this post, I emailed my Belgian friend Brigitte to ask her for her mom’s authentic Speculoos cookie recipe. I figured every Belgian grandmother has her favourite recipe and I’d use that as my starting point. Apparently, her mom has a speculoos cheesecake recipe, a speculoos ice cream recipe, but no speculoos cookie recipe. She never saw the need to make her own. So, I turned to the King Arthur baking website and found a promising recipe. Brigitte helped me make them. While they were good, Brigitte said that they really didn’t taste like the speculoos cookies she ate growing up.
I tinkered with the recipe and came up with my own version. While they’re not exactly like the storebought, they are very delicious!As soon as the dough is made I divide it into 2 pieces and roll each half between 2 sheets of parchment paper, to a 1/4 inch thickness. Then I freeze the dough for about 30 minutes before cutting it into shapes. So much easier to roll soft dough.The townhouse cookie cutters are from coppergifts.comI also made a batch of my favourite Thick and Chewy Gingerbread dough to create some trees for my landscape.
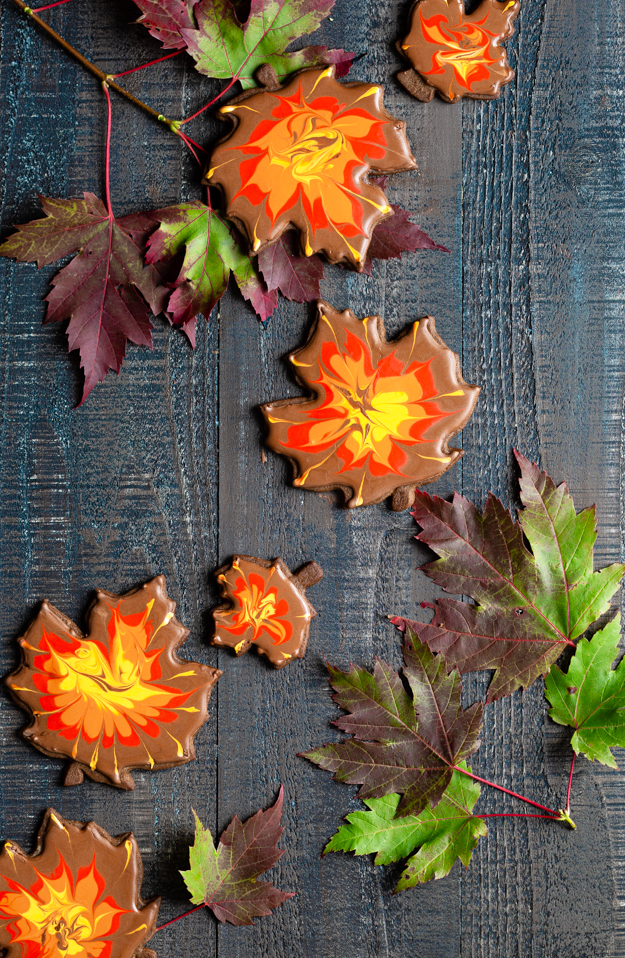
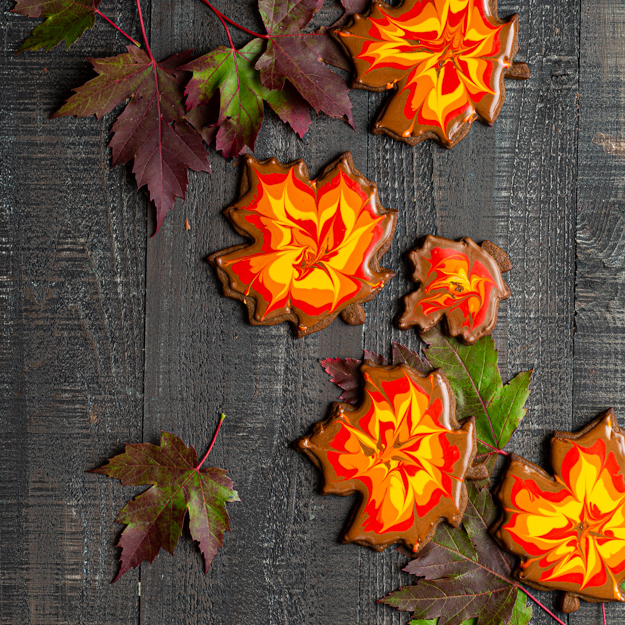
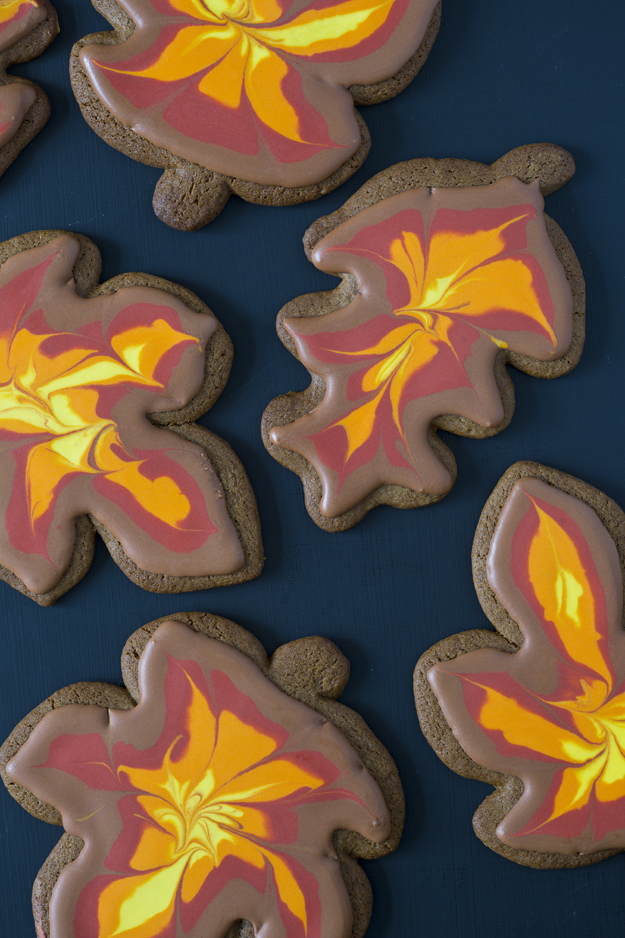
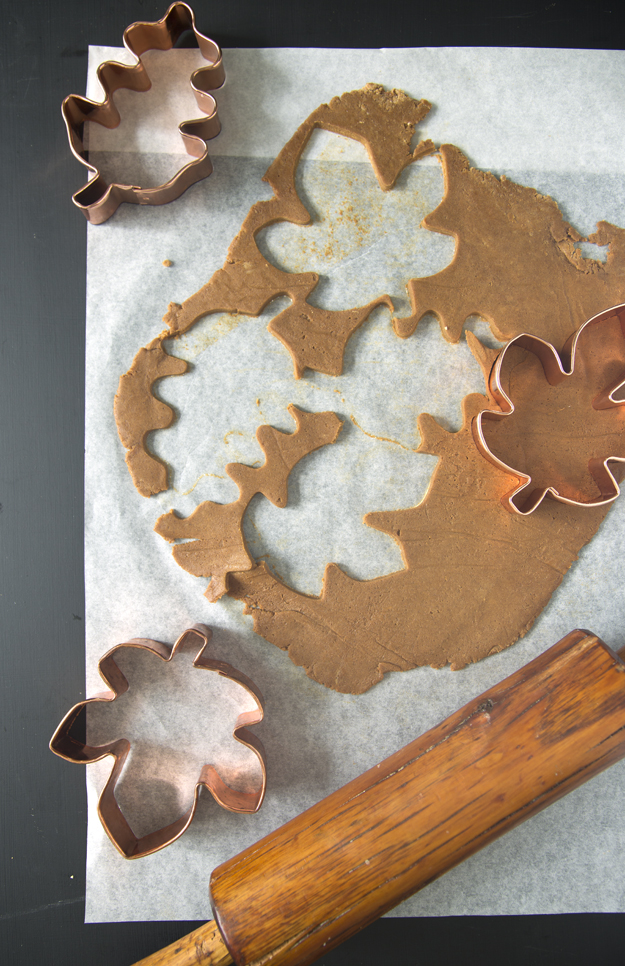
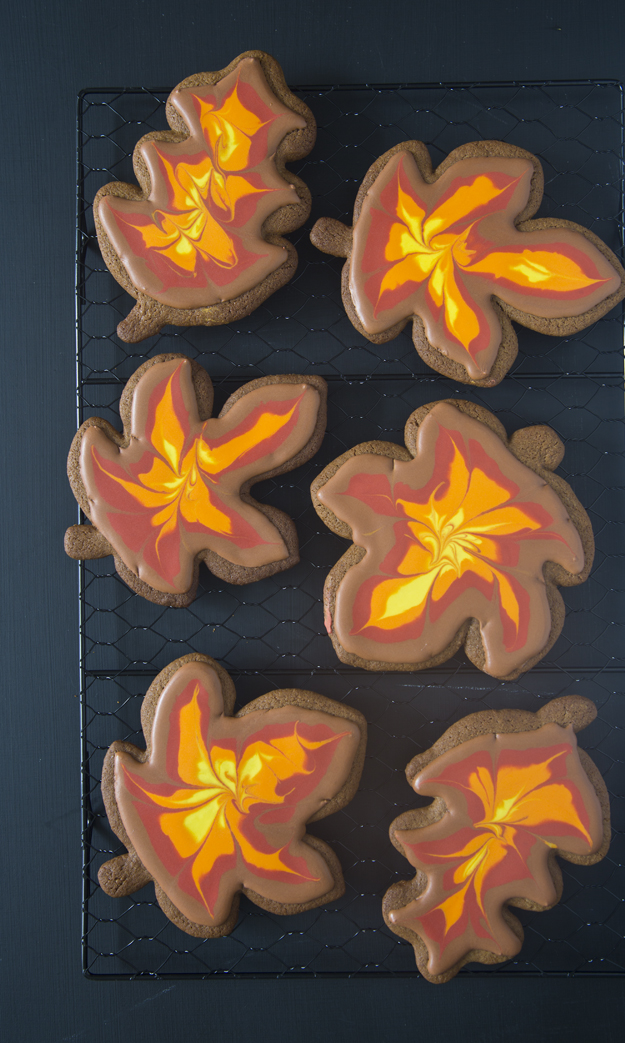
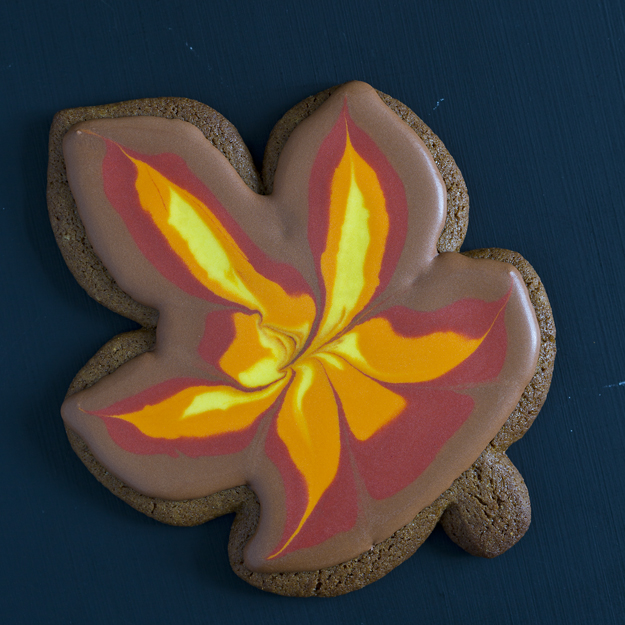
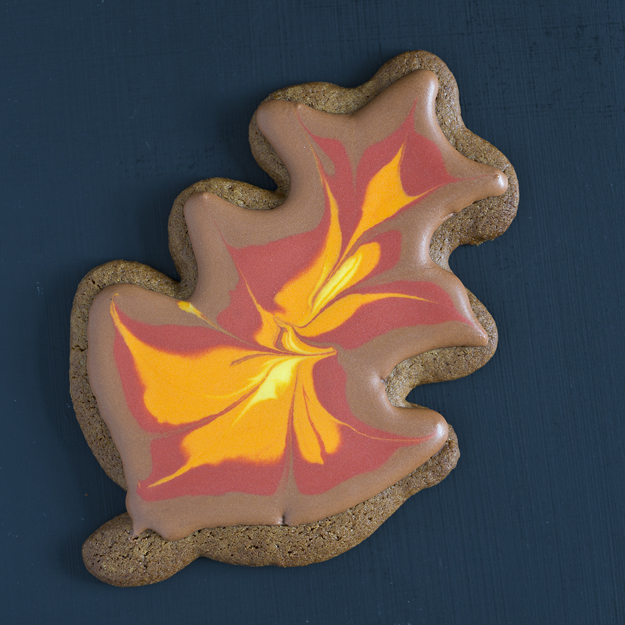
While the leaves have already finished falling where I live, I couldn’t resist making these gorgeous edible ones. It’s just too soon to start making winter cookies. I refuse to get sucked into that vortex this early in the season. I wanted to make the cookies gluten free since one of my sons follows a gluten- free diet and I was curious to try out Bob’s Red Mill 1 to 1 Gluten Free Baking Flour. It is a blend of white rice flour, brown rice flour, potato starch, sorghum flour, tapioca flour, and xanthan gum. You just substitute it cup for cup in your regular recipes.
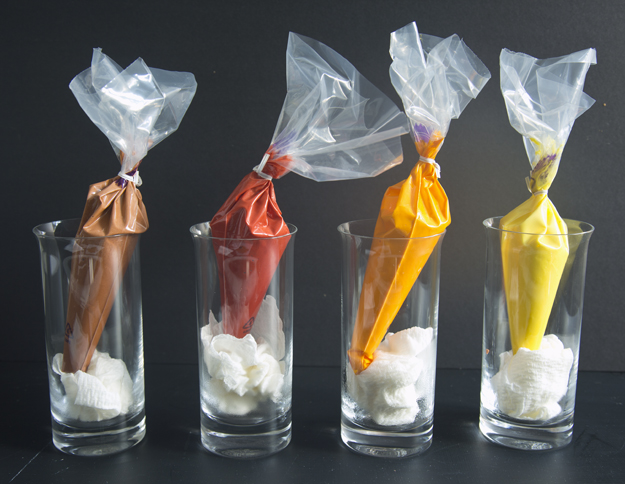
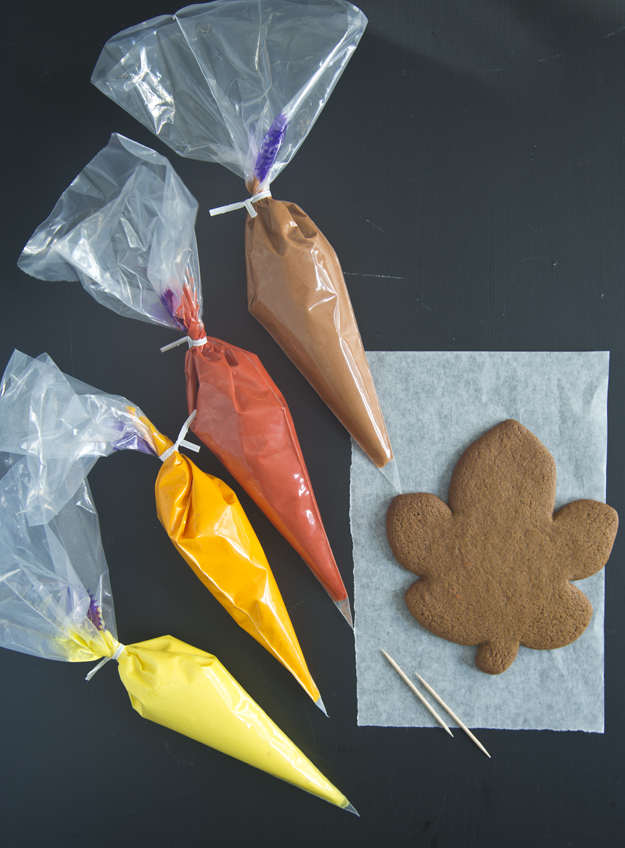
Roll out dough between two sheets of parchment paper and freeze for about 30 minutes before trying to cut out shapes.I got some beautiful copper cutters from coppergiftscom. They have thousands of different shapes. If you are a cookie lover it is easy to spend lots of time (and money!) over at their site. Don’t say I didn’t warn you. I mixed up 4 colours of royal icing for my leaves. The formula to get these colours is in the recipe at the end of this post. I like to place the piping bags in a tall drinking glass. I place a crumpled up dampened paper towel in the bottom of each glass too keep the icing from drying out and getting all crusty, once you cut a hole in the piping bag. You can only decorate one cookie at a time as the icing must be wet to create the marbling effect. You will need toothpicks and a paper towel to wipe the toothpick off after dragging it through the wet icing. I created a video to show the technique.
The cookies will need to dry overnight before you can package them up. They will keep in an airtight container at room temperature for up to 3 weeks. Perfect with a glass of milk or an afternoon latte!
My husband and his five siblings are in a family business together. We decided about 8 years ago that we should begin to educate our children, the next generation, so we founded a family council. We get together twice a year with the goals of fun, family togetherness and enlightenment in mind. Our most recent council meeting took place in Fort Lauderdale several weeks ago. There are about 24 of us who participate in these meetings.
It doesn’t seem to matter how old you are, we all revert back to some fairly petty childhood behaviours when we get together with our siblings. Even though we are all adults now, somehow we regress backwards to our 10-year-old selves, squabbling, poking and just plain irritating the heck out of each other. In order to have a more productive meeting this time around, one of the professionals we are working with suggested a seating plan for the meeting room. As co-chair of our family council, I was a little worried about how this would be received. Some members have control issues and would likely not take too kindly to being told where to sit.
And then I had the brilliant idea of creating cookie place cards. I figured everyone would be so busy admiring them and munching on them that no one would even notice that they were being directed as to where to sit.
I needed a sturdy cookie dough that would survive the flight from Ottawa to Toronto. I decided on making two kinds of dough, Gingerbread and Brown Sugar Cookie dough. I pulled out my alphabet cookie cutters. I can’t remember where I got these, but I do know that up until now, they had only been used with play-doh. I gave them a good scrubbing and got down to work.
It’s best to roll out the dough between 2 sheets of parchment paper while it is still soft and then chill until firm.
A table knife can be used to gently nudge the letters out of the cutter. Give them a bit of room on the cookie sheet as they do swell a bit with baking.
I decided to use royal icing to decorate the letters with. If you are new to decorating cookies, check out Sweetopia’s blog. She is really amazing and she has many videos that really show how to do it well. I used her Royal Icing Recipe for my cookies and it is one of the best I have tried. To colour the royal icing, I bought gel food colours from Americolor. The little squeeze bottles are great.
Here is a little video I made to demonstrate decorating the letters. I clearly need some videography courses!
Once I had all the letters, I needed to decide how to turn them into name cards. I decided to make cookie boards to “glue” the letter onto, using royal icing as the glue.
The icing needs to dry for at least 24 hours, before packaging it up.
I am happy to report that the cookie place cards were a big hit and family harmony was achieved. I think all would agree that the highlight of the weekend, planned by the “Fun Committee” (yes, we actually have a fun committee!) was dinner at a Mexican restaurant followed by bowling. It’s possible that margaritas and tequila shots may have been consumed!
I love it when a product delivers as promised. My friend Brigitte introduced me to a mirror that has changed my life. This little mirror magnifys to the power of 15 making it unnecessary for me to wear my reading glasses when tweezing my brows. (wearing glasses while tweezing your brows is next to impossible because the frames get in the way of your brows) I now have impeccably groomed brows. Should you decide to get this mirror do not use it for anything other than tweezing. Step away immediately after tweezing. Because this is one scary mirror. Everything on your face is super magnified and it’s not a pretty sight. Don’t say you weren’t warned.
One product that didn’t deliver as promised was my Donvier Ice Cream machine. This is a manual machine with a hand crank. Purchased many years ago I thought it would be a fun activity for my dinner guests. I thought wrong! After a few spins, people got bored so I was left alone in the kitchen turning the handle myself. The ice cream was ok, not great. The machine quickly got relegated to the basement storage room.
Then 3 years ago, I decided to purchase an electric ice cream machine. I planned to take it up to the cottage and amaze my family and friends with imaginitive flavour combinations. I decided on the Cuisinart machine because you could make 2 flavours at the same time. And the price was great. (In the States and in Canada too!!) The first summer was so cold I never wanted to make ice cream. Last summer I was baking my way through Peter Reinhart’s Bread Baker’s Apprentice Book, so I never had time for ice cream. But this summer, aaah, this summer is going to be the “Summer of George” Oops! Sorry, I mean the summer of ICE CREAM.
I decided to begin with a vanilla base and add flavours from there. The process is very simple. Whole milk and sugar are whisked together until the sugar dissolves. Then you add heavy cream and vanilla. The mixture gets poured into the chilled cylinder and you hit the on switch and stand back and watch the magic happen.
It has a clear lid so you can see the mixture freezing. After 15 minutes you can add your mix ins. I added Skor bits and dulce de leche sauce.
At this point it has the consistency of a Blizzard. If you want firmer ice cream, transfer it to a container and let it freeze for a few more hours.
The texture was silky smooth and the addition of the Skor bits gave a great crunch. The dulce de leche added an amazing deep caramel flavour. All in all a resounding success. But, it was a touch too sweet. It needed something to temper the sugar. All of the sudden it came to me. I would make gingerbread cookies and create ice cream sandwiches. I’m not sure what I was thinking, turning on my oven at the cottage when it was sweltering (31 degrees C/91 degrees F) outside but once I started thinking about that flavour combo I had to bake the gingerbread cookies. Inside my kitchen it smelled like December but felt like hell. It was so wierd.
Of course I had to gild the lilly and roll the outside of the ice cream sandwich in more skor bits. It was so good!!
Dulce de Leche Ice Cream
(adapted from basic vanilla ice cream recipe in Cuisinart recipe booklet)
Ingredients:
3/4 cup whole milk, well chilled
2/3 cup granulated sugar
1 1/2 cups 35% cream (heavy cream). well chilled
1 teaspoon pure vanilla extract
1/2 cup skor bits
1/2 cup dulce de leche (President’s Choice makes a great one)
Directions:
1. In a medium bowl, use a whisk to combine milk and sugar, whisking until sugar is dissolved.
2. Whisk in heavy cream and vanilla.
3. Pour into ice cream machine and let mix until thickened, about 20 minutes.
4. Add skor bits and dulce de leche. Mix for 5 more minutes.
5. Transfer ice cream to an airtight container. Cover surface of ice cream with plastic wrap and then put on lid container. This will help prevent the formation of ice crystals. Freeze for an additional 2 hours.
Thick and Chewy Gingerbread Cookies
This recipe comes from Cook’s Illustrated Magazine. It makes about 18 large or 30 small gingerbread cookies.
Ingredients:
3 cups unbleached all-purpose flour
¾ cup firmly packed dark brown sugar
¾ teaspoon baking soda
2 teaspoons ground cinnamon
2 teaspoons ground ginger
½ teaspoon ground cloves (totally optional – I leave it out as I hate cloves)
½ teaspoon salt
12 tablespoons (1 ½ sticks) unsalted butter, softened but still cool, cut into 12 pieces
¾ cup molasses
2 tablespoons milk
Directions:
In a food processor, process the flour, brown sugar, baking soda, cinnamon, ginger, cloves and salt until combined, about 10 seconds. Scatter the butter pieces over the flour mixture and process until the mixture is sandy and resembles very fine meal, about 15 seconds.
With the machine running, gradually add the molasses and milk. Process until the dough is evenly moistened and forms a soft mass, about 10 seconds.
Scrape dough out onto a work surface and divide it half. Working with one piece at a time, roll the dough, ¼ inch thick, between 2 sheets of parchment paper. Leaving the dough sandwiched between the parchment layers, stack on a baking sheet and freeze until firm, 15-20 minutes.
Adjust the oven racks to the upper and lower middle positions and heat the oven to 350 degrees F. Line 2 baking sheets with parchment paper.
Remove 1 dough sheet from the freezer; place on work surface. Peel off top parchment sheet and gently lay it back in place. Flip the dough over; peel off and discard second parchment layer.
Cut the dough using cookie cutters of your choice. Transfer shapes to prepared baking sheets, using a wide metal spatula, spacing them ¾ inches apart. Set scraps aside. Repeat with remaining dough until baking sheets are full.
Bake the cookies for 8 – 11 minutes, until they are set in the centers and the dough barely retains an imprint when touched very gently with a fingertip. The baking sheets should be rotated from front to back and switching positions top to bottom, halfway through the baking time. Do not overbake. Cool cookies on the sheets for 2 minutes, then remove the cookies with a wide metal spatula to a wire rack to cool completely.
Gather the scraps; repeat rolling, cutting and baking.