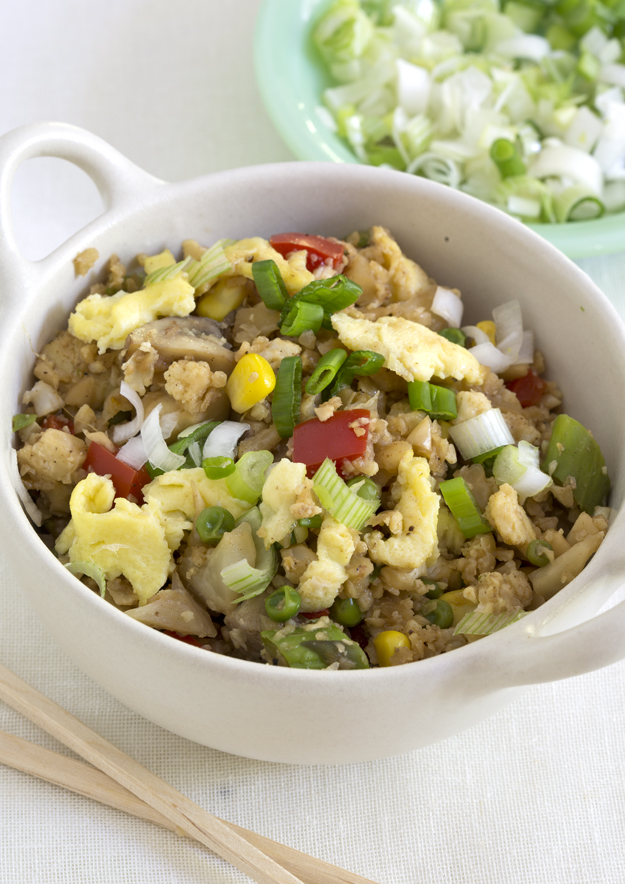
Cauliflower is the darling of the vegetable world this year. It is her chameleon-like qualities that make her such a popular girl. Sliced into slabs and roasted as “steak“, shaved thinly and served raw as slaw, boiled and mashed and served in “stuffed potatoes“, roasted whole so it resembles a “brain”, cauliflower crust pizza, and now, masquerading as fried rice.
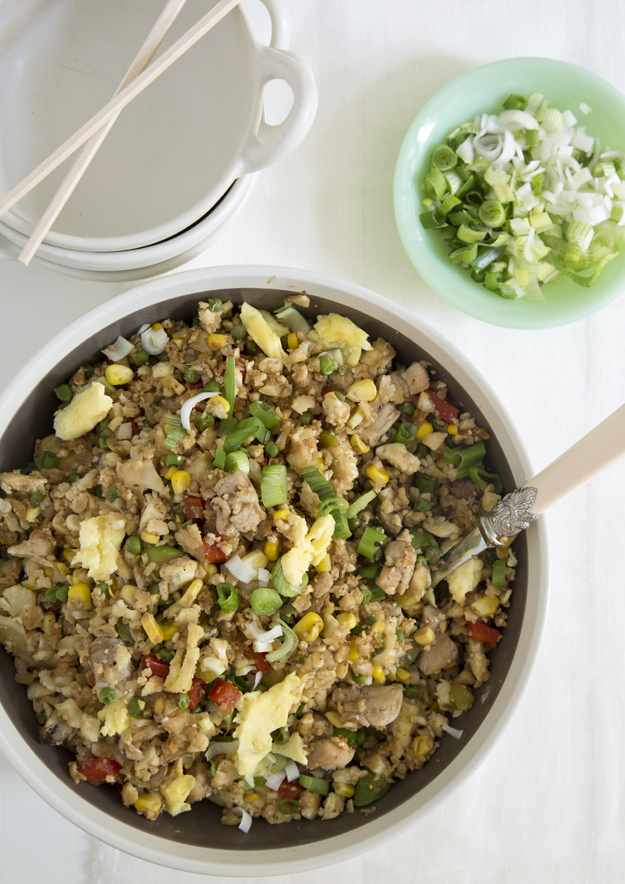
Is this taking carb avoidance too far? I love fried rice, and had my doubts that cauliflower could step up to the plate and replace the rice in this classic dish. But Google “Cauliflower Fried Rice” and no fewer than 566,000 results pop up. I needed to see what all the fuss was about. Making the cauliflower “rice” couldn’t be simpler. Pulse cauliflower florets in the food processor, about 10 times and you’re done. You could also grate the cauliflower on the large holes of a box grater. I used this recipe from chatelaine.com and adapted it slightly. Get all your ingredients chopped and measured before you start cooking, because this comes together quickly once you start the actual cooking.It genuinely looks like fried rice and it tastes delicious. I was worried that the flavour of the cauliflower would be overpowering, but with all the other ingredients, it wasn’t. Soy sauce and hoisin work together to add authenticity. While you know you’re not eating rice, it is still hits the spot. You can have a big bowl and feel satisfyingly full and healthy. I will be making this again very soon!
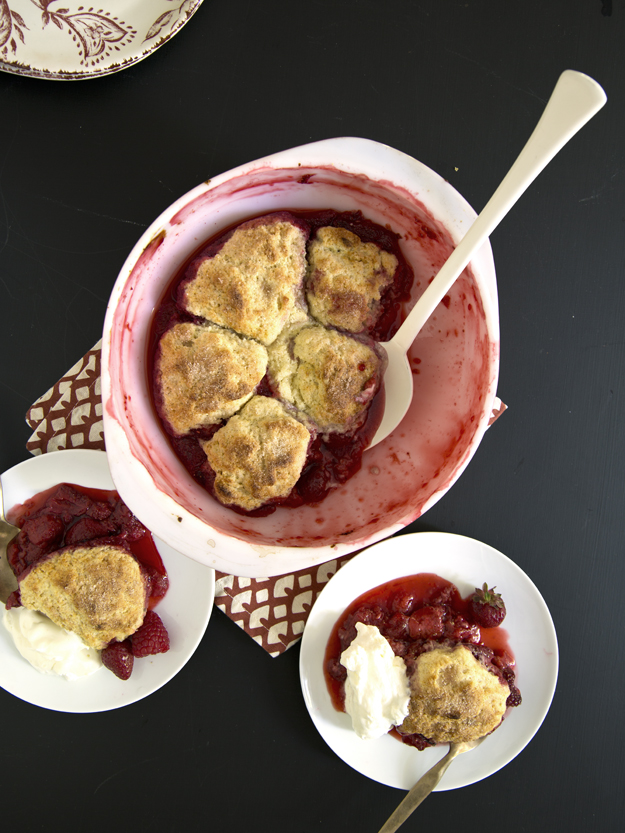
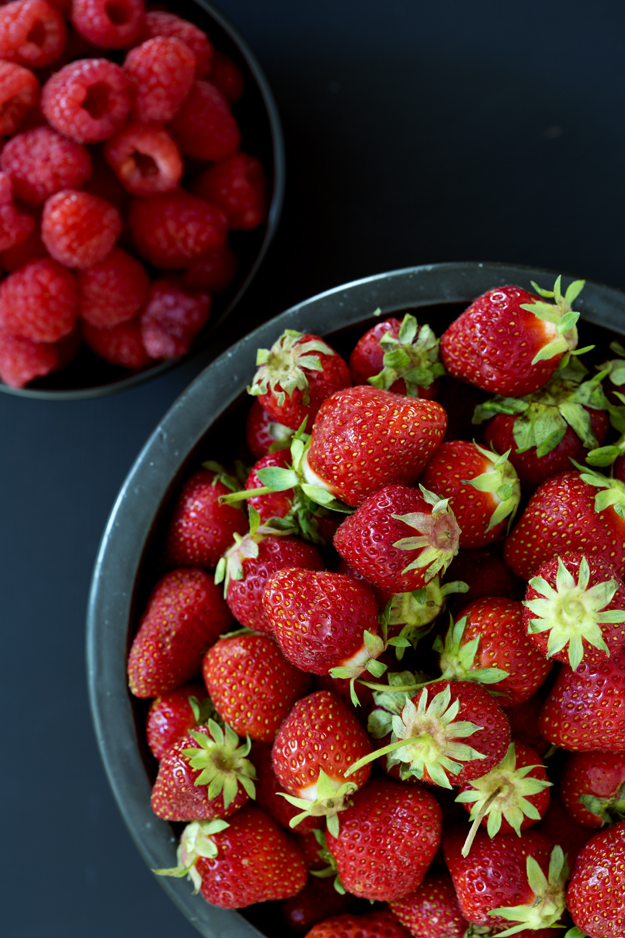
Baskets of local strawberries are overflowing at Farmers Markets all over Ontario this month. I usually exercise no restraint and buy way more than we can possibly eat. Then, I’m left with a fridge full of almost rotting fruit. I blame my mother for this. I grew up in a house where we had a storage room filled with bulging shelves because she never want to run out of anything. We had enough extra toilet paper, KD and canned white tuna (packed in water) to survive for a year without ever having to leave the house. But this week, I showed great self-control and deliberately bought just one quart, exactly what we need for our morning yogurt, berries and double coconut granola. However, my son’s room-mate Polly arrived for dinner on Friday night, with a 3-quart basket of plump local strawberries. So sweet! We ate strawberries with every meal that weekend, but still had a quart of soft berries left over on Sunday night.
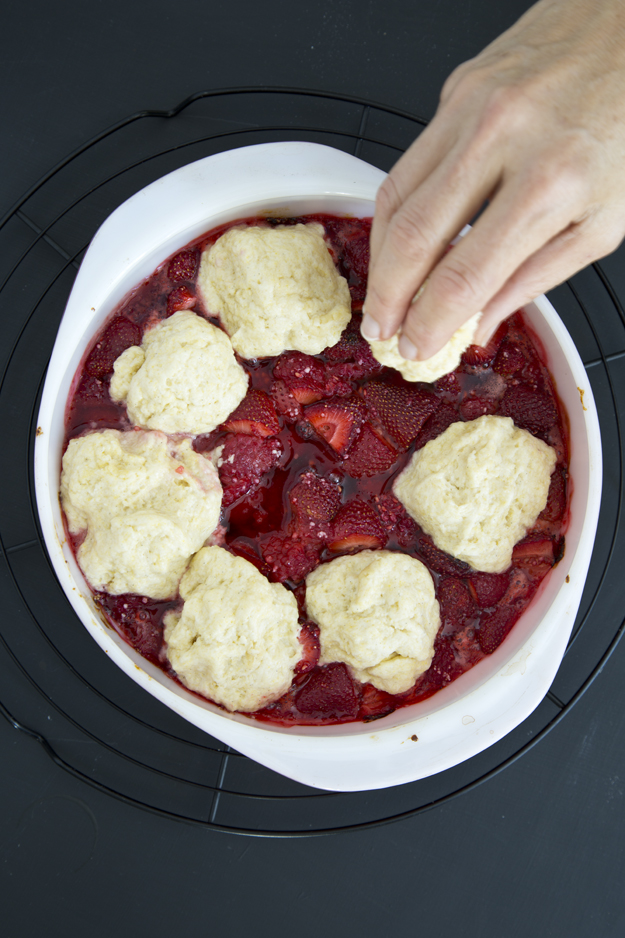
I decided to turn them into a cobbler. I had never made one before and it couldn’t be easier. While a crisp involves stopping of flour, butter, sugar, oats and sometimes nuts, a cobbler is basically a biscuit dough that gets dropped into clumps on top of the fruit and is then baked. Large cobblestone-like nuggets of crunchy dough to soak up all that warm sweet juicy fruit. Are you with me?
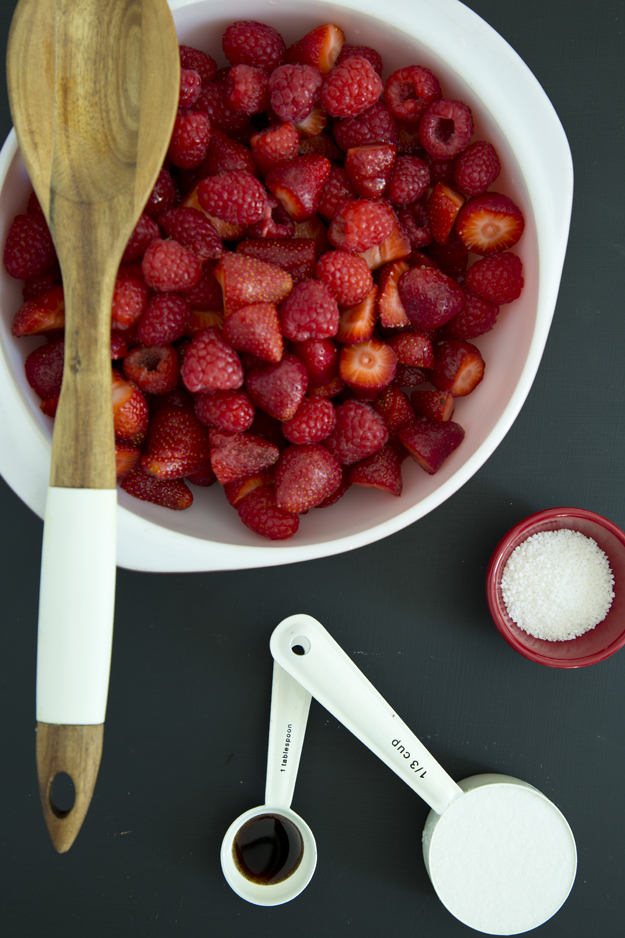
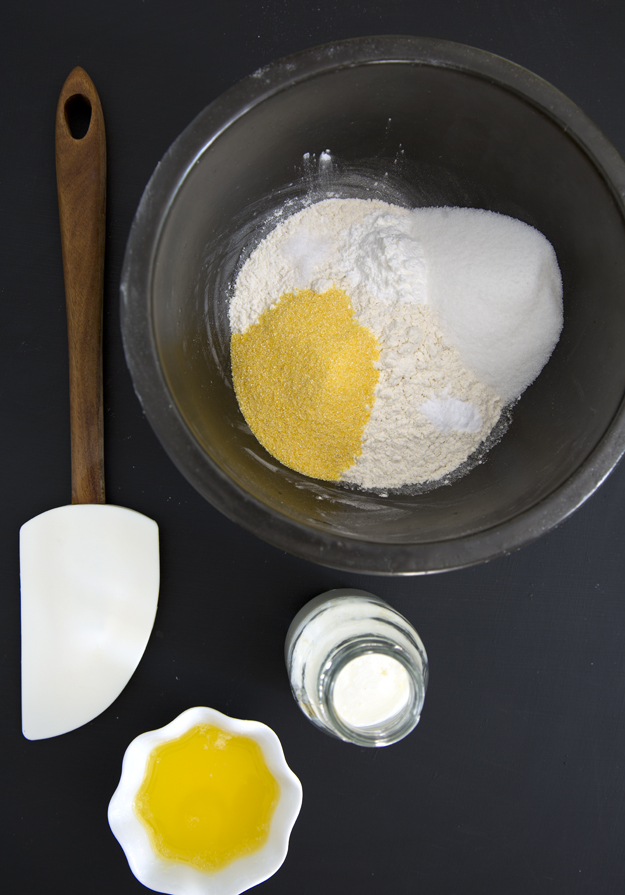
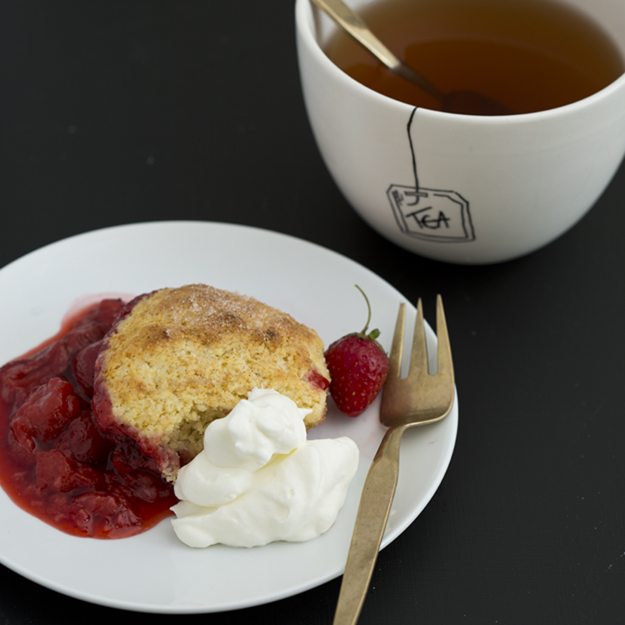
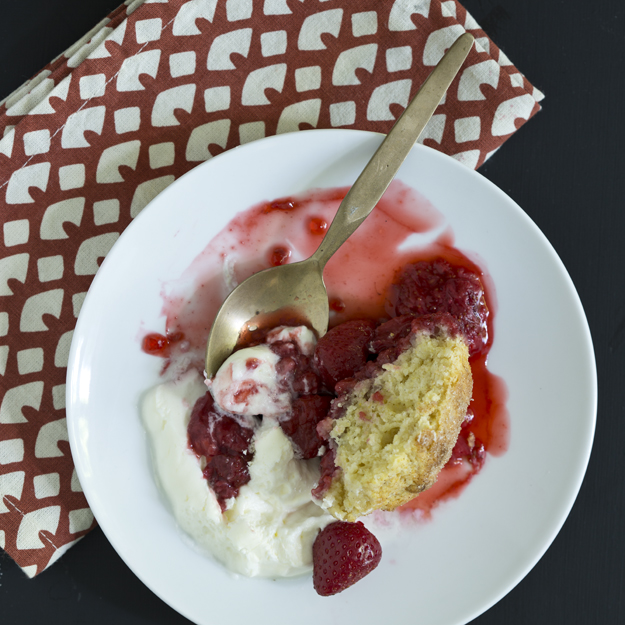
I decided on a mix of strawberries and raspberries. Mix the fruit with just a bit of sugar and some thickener. I like Minit Tapioca better than flour or cornstarch. Let the berries, sugar and tapioca sit for about 15 minutes so that the tapioca can dissolve. The fruit gets a head start in the oven while you prepare the biscuit dough. The original recipe calls for buttermilk, but I never have buttermilk when I need it. I just mixed some milk with a bit of lemon juice to sour it and made my own buttermilk. Flour, cornmeal, sugar, baking powder, baking soda, melted butter and buttermilk are quickly mixed together for form a dough. The cornmeal adds a satisfying little crunch to the dough. Divide the dough into 8 pieces and drop the clumps onto the hot cobbler. Top with cinnamon sugar and bake for another 20 minutes. Show some restraint and wait about 20 minutes before you dig in.No one will complain if you add a scoop of vanilla ice cream or some softly whipped cream on the side. Any leftover keeps very well for a second day. Keep cobbler uncovered on the counter so the biscuits stay crunchy. You can warm it up in a 350°F oven for a few minutes if you like.
If I’m being completely honest, I really only have myself to blame. It all started with a trip to the Amalfi Coast in Italy in 2011. It was there I first discovered the joys of Prosecco and “Aperitivo.” The literal translation is an alcoholic beverage that is consumed prior to a meal with the intention of stimulating the appetite. It almost always involves a few nibbles to have along with your drink, and I’m not talking about a “happy hour” dish of peanuts.
Depending on your location in Italy, the snacks change. In the south it is typically freshly roasted warm salted almonds, a bowl of spicy marinated olives, home made potato chips, or little squares of pizza.
Several years later we visited Umbria in Northern Italy. Aperitivo here meant little crostini topped with pecorino cheese and drizzled with local wildflower honey, suppli (deep fried breaded rice balls stuffed with cheese) and all sorts of amazing charcuterie.
I decided to adopt Aperitivo hour at our cottage. It was recieved quite well by all our visiting friends and family. (What a shock, I know!) It’s gotten to the point that around 6 pm, my husband, children, siblings and friends will ask, “What are we having for aperitivo tonight?” I have conditioned them to expect a little snack along with pre-dinner drinks. Like I said, all my own fault! Truthfully, I love aperitivo hour. Everyone comes together on the back deck, cell phones are put away into pockets and we chat.
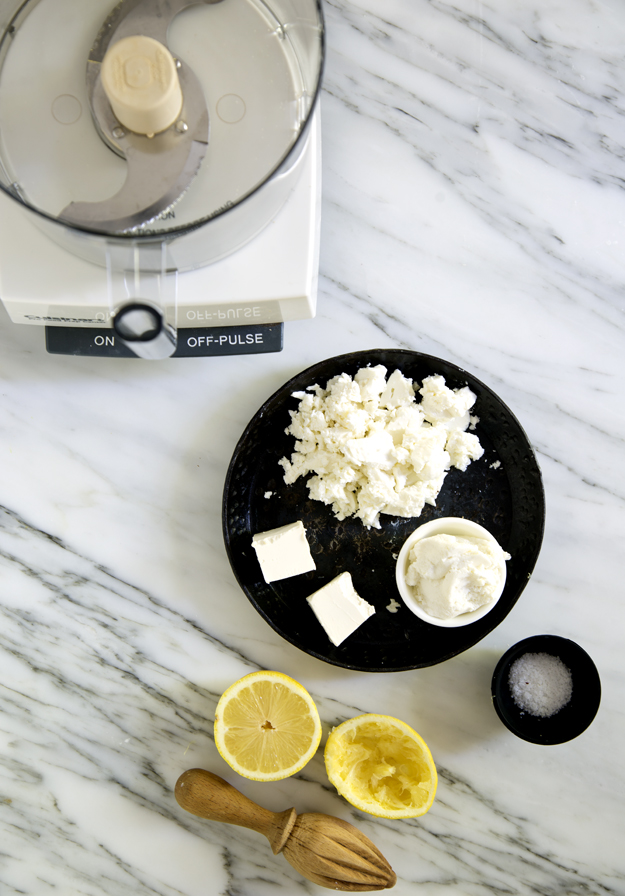
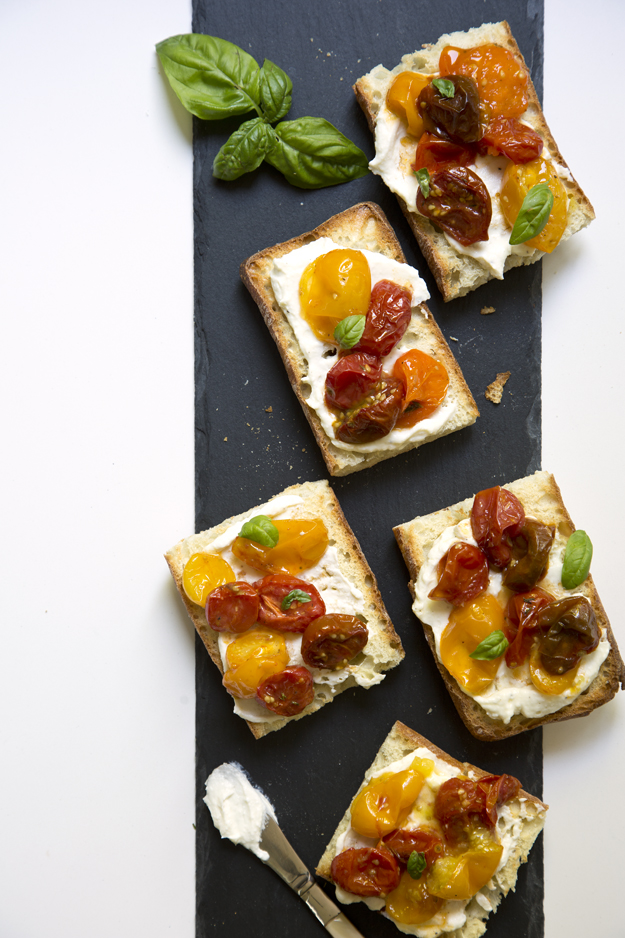
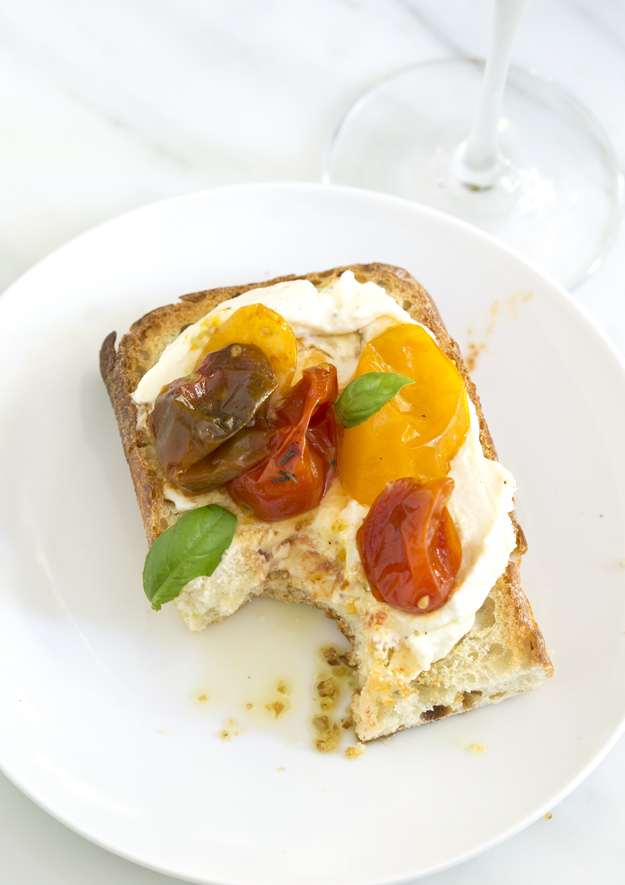
I am always looking for interesting snacks that can be put together without too much fuss or bother. A few months ago, my sister Bo sent me a recipe for whipped feta. I filed it away, thinking it would be perfect, spread on some crusty bread for aperitivo hour.
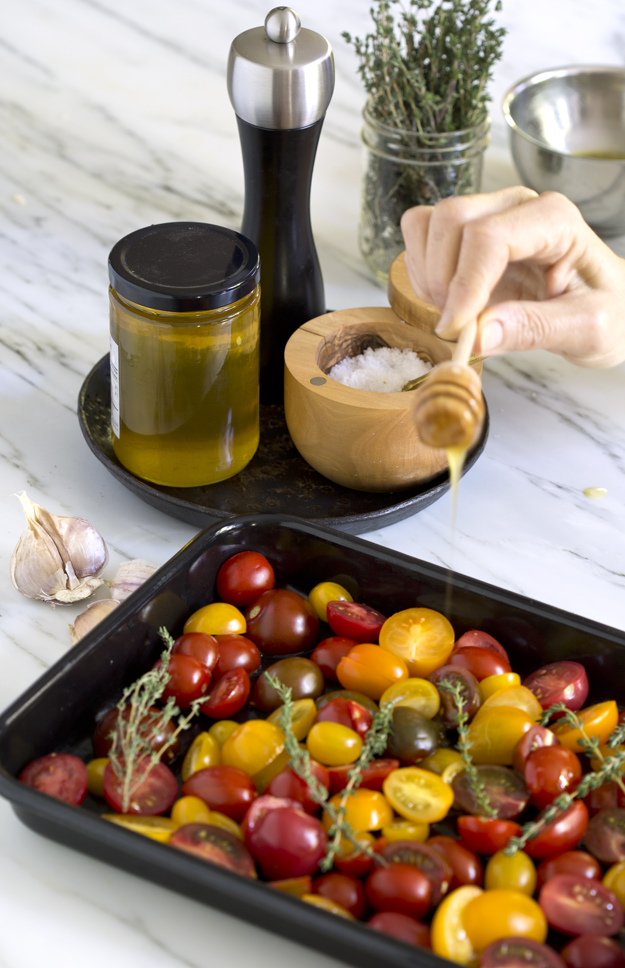
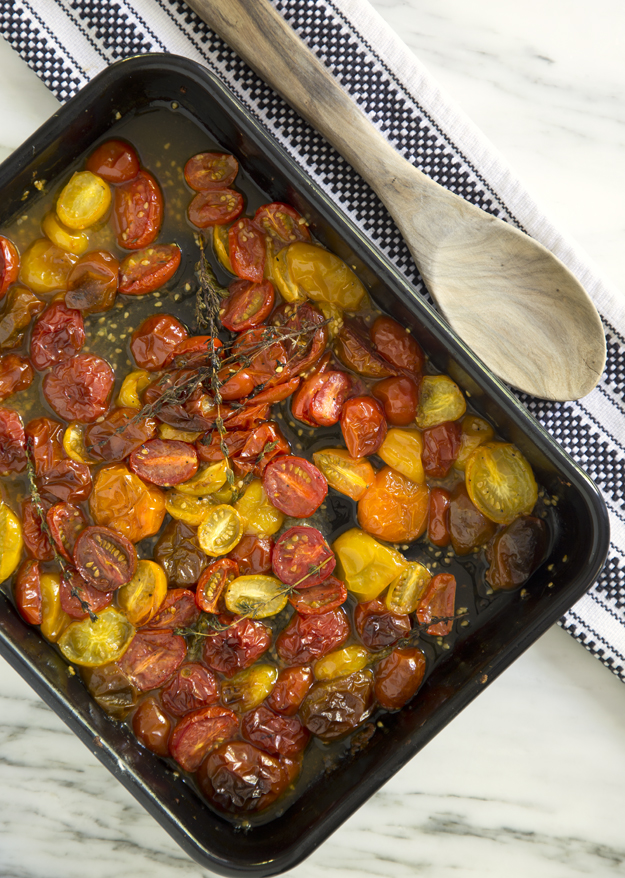
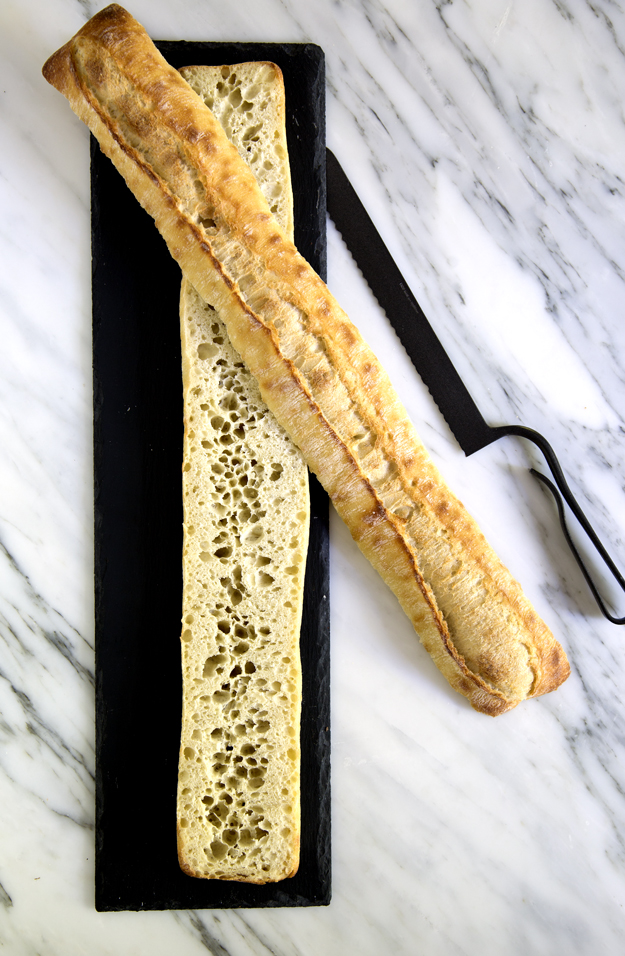
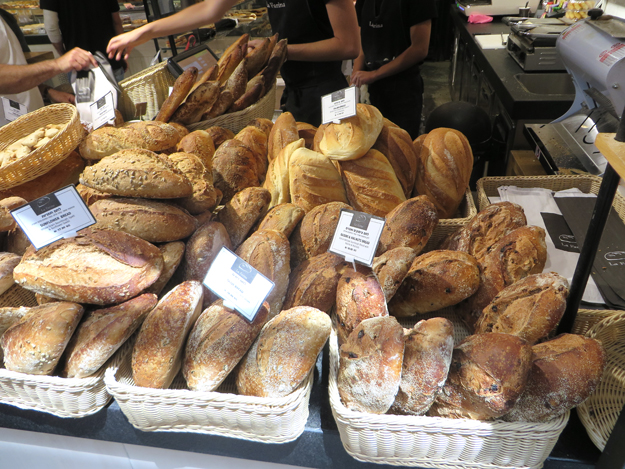
I decided to top the whipped feta with roasted tomatoes. Little grape or cherry tomatoes get tossed with garlic, olive oil, honey and thyme.30 minutes in a hot oven until they are slightly shrivelled and bubbly. You can roast the tomatoes early in the day and just leave them out on the counter until you need them. The whipped feta dip was a recipe from Ina Garten. I adapted her recipe, cut back on the feta and added some whole milk ricotta to the mix. It love the lightness it added to the spread. This can also be made in the morning. Just wrap well and chill until serving time.Start with some really good bread. A baguette or ciabatta loaf are perfect for this. Good quality bread will have big holes in it like this. I bought a ciabatta lunga from Ace Bakery. In bread freak lingo, these big holes are known as “an open crumb structure.” They are achieved by a long slow cold fermentation, gentle handling so you don’t deflate all the built up gas and a high hydration dough.
I like to split the loaf horizontally, toast it gently on a grill or in the oven, and then cut it into serving size pieces before topping them.
I have been experiencing blogging fatigue, struggling with what to write about and feeling like I’m stuck in a rut with my photography and food styling. The opportunity to attend this workshop came at the perfect time. It was great to connect with other like-minded food obsessed women.
I came away feeling inspired to step away from my comfort zone and change my camera angle. (I rely too heavily on the top down shot) Watching Ariel and Valeria maximize the available natural light galvanized me to abandon my artificial lights and set up next to the window.I also left with some great new food blogs and Instagram accounts to follow. Food blogger Katie was there at the suggestion of her mom. Wish my kids listened to my suggestions!! Denine, a photographer and teacher of photography at Algonquin College was there to pick up a few tips about food photography. Food blogger and cooking show host Eva, and cooking teacher and blogger Maria were both looking to hone their photography and food styling skills.
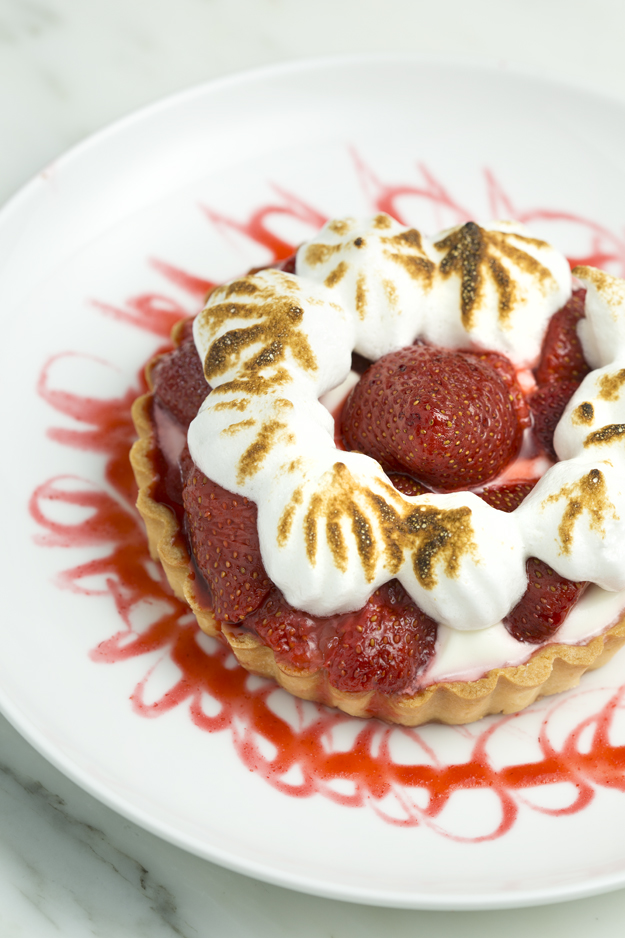
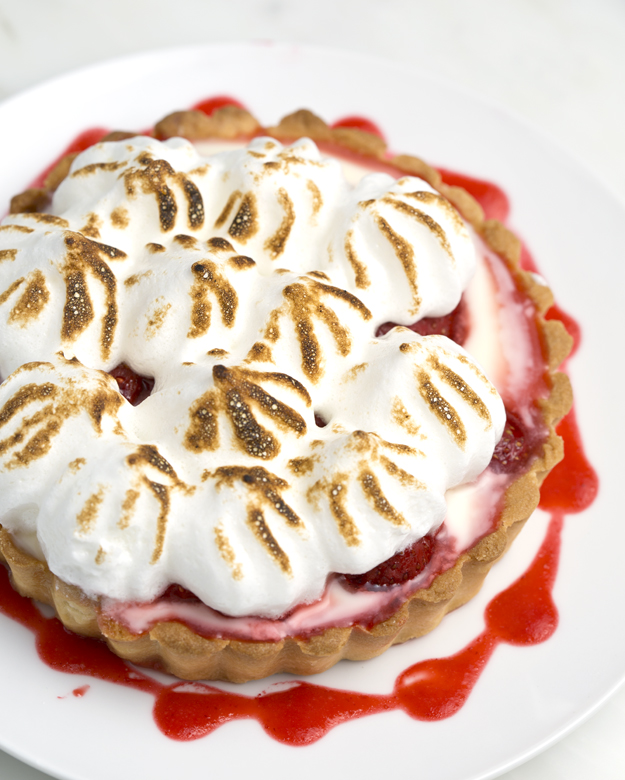
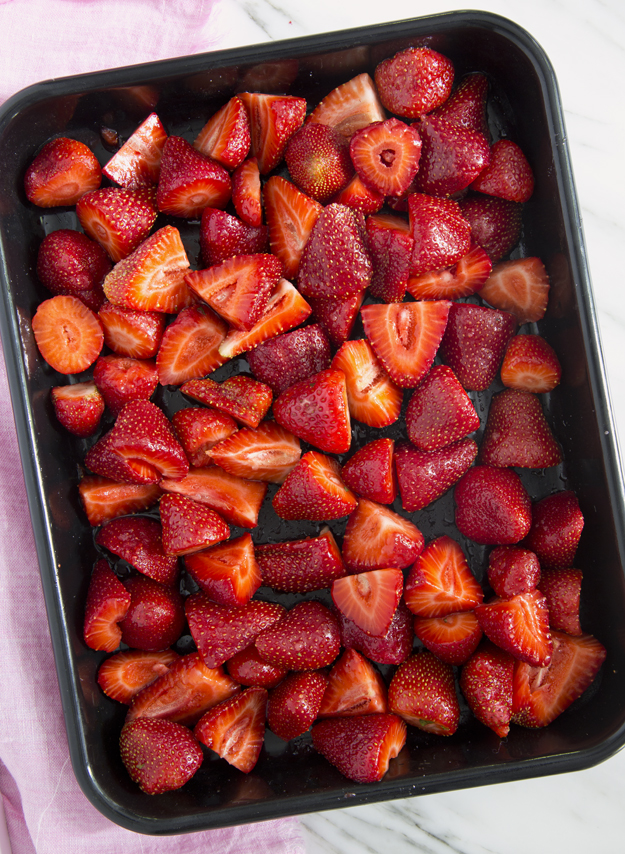
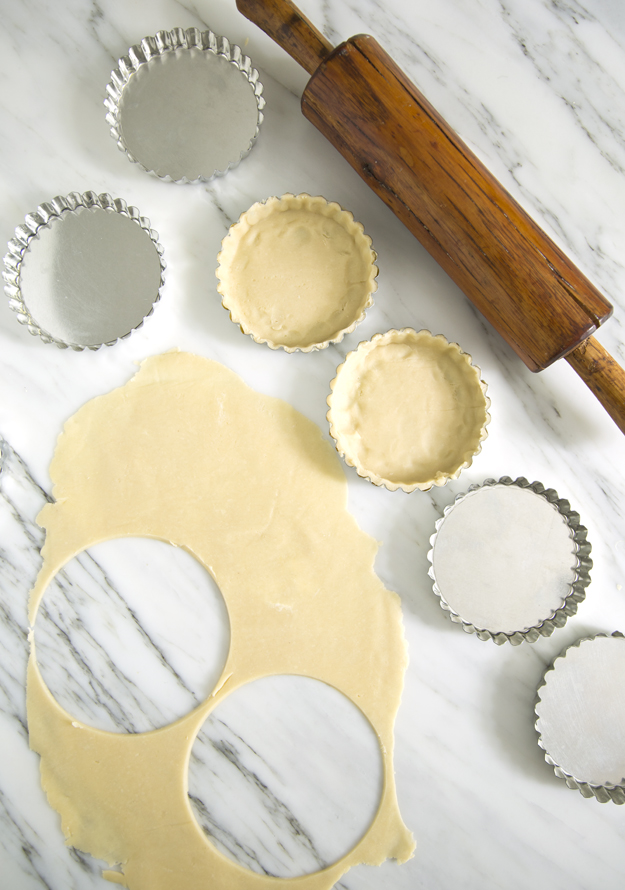
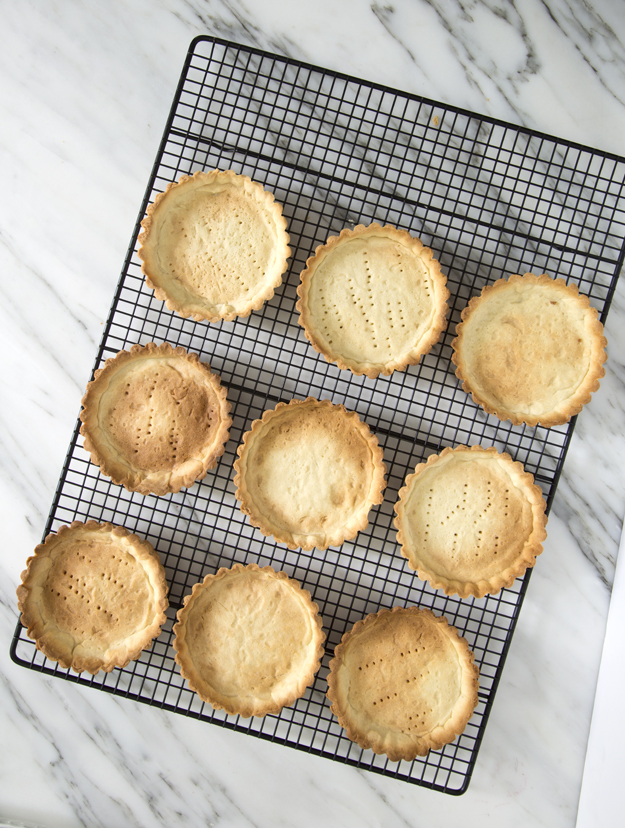
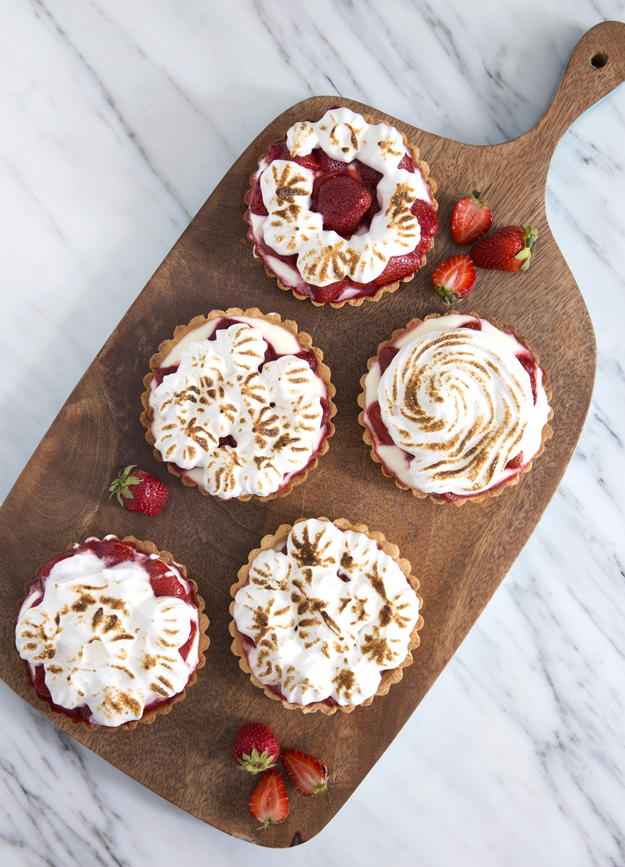
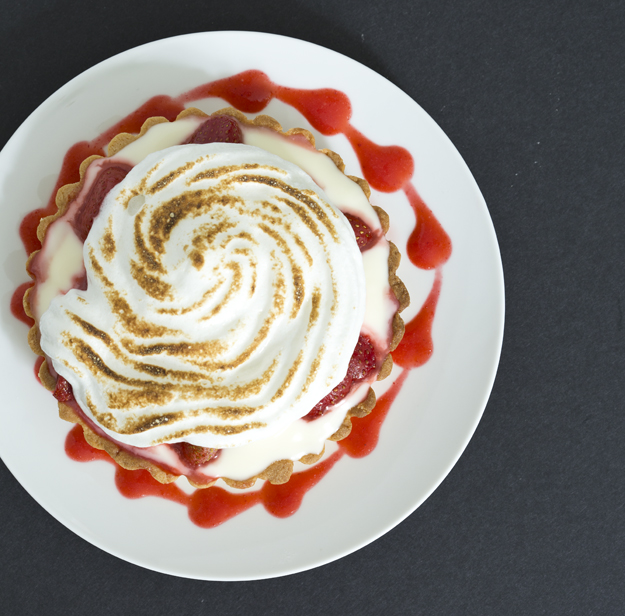
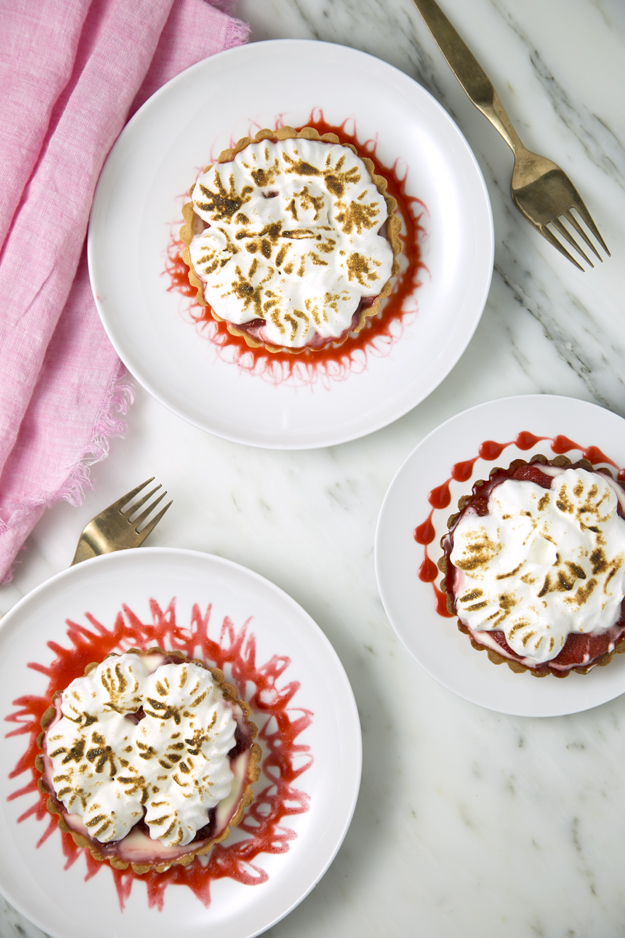
The workshop was mostly hands on, with lots of opportunity to practice the new skills we were taught. In the afternoon session we had the chance to style and shoot a gorgeous lemon meringue tart. With local strawberries just coming into season, I was inspired to create a strawberry lemon meringue tart. The genius idea of roasting the strawberries, to intensify their natural sweetness and juiciness comes from this Bon Appetit recipe.You could of course make one large tart, but I have mini tart pans and I love to use them any opportunity I get.Time to build the tartlets. A tart lemon filling is topped with sweet and juicy roasted strawberries. I filled my tarts with a lemon cream, but I strongly suggest you fill yours with a lemon curd. The recipe that follows has detailed instructions on how to make a lemon curd. A curd is much more stable than a cream and as a result, the tarts will not get soggy within a few hours. I put the meringue in a piping bag fitted with a star tip and greatly amused myself making different designs. You could also just spoon it on, but then you won’t have as much fun. To brown the meringue I used a kitchen torch, because it’s so satisfying and just a bit dangerous to play with fire. (I know, I live on the edge!) If you don’t have one, a minute or two under the broiler will achieve the same result.
When a chef takes a humble ingredient, like the carrot, and makes it sublime, I pay attention. My first carrot experience created by Chef Michelle Bernstein, was 5 years ago, at The Omphoy Hotel in Palm Beach. I was visiting my friend Marla and we went to a killer barre class at the hotel’s Exhale Spa. After class we hobbled over to the restaurant for breakfast.
Once we ordered our poached eggs, the waiter delivered a basket of hot biscuits and house made carrot marmalade to the table. He said we must try the marmalade, and because our mammas raised us right, just to be polite, we ate all the biscuits and asked for a second ramekin of the carrot marmalade. I still have no idea what was in it or how they got it to taste so good. but I think about it often.
My second Michelle Bernstein carrot experience was last month in Miami. I was in town for my nephew’s wedding. We had a spare night so we went to dinner at her Biscayne Blvd. restaurant Cena. I started with the roasted carrots topped with whipped sardinian ricotta and dukkah. Once again, her wizardry with carrots dazzled me. Sadly, I just heard the restaurant closed on May 31.
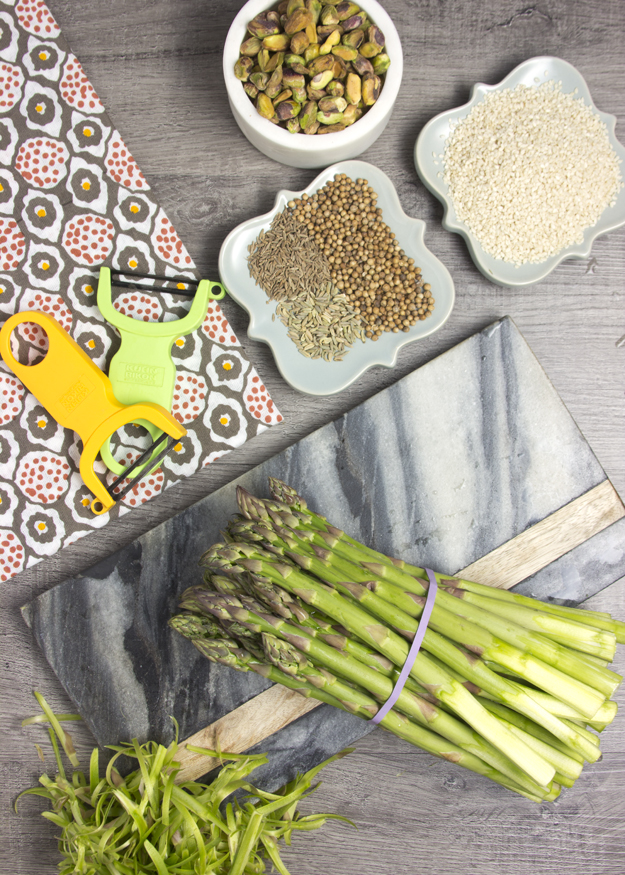
Dukkah is a Middle Eastern nut and spice mix. I have written about it before, a few years ago. One of my favourite ways to eat it is to dip pita in olive oil and then do a second dunk into the dukkah. A very satisfying and addictive little bite. It had never occurred to me to sprinkle dukkah on vegetables, but it totally works.
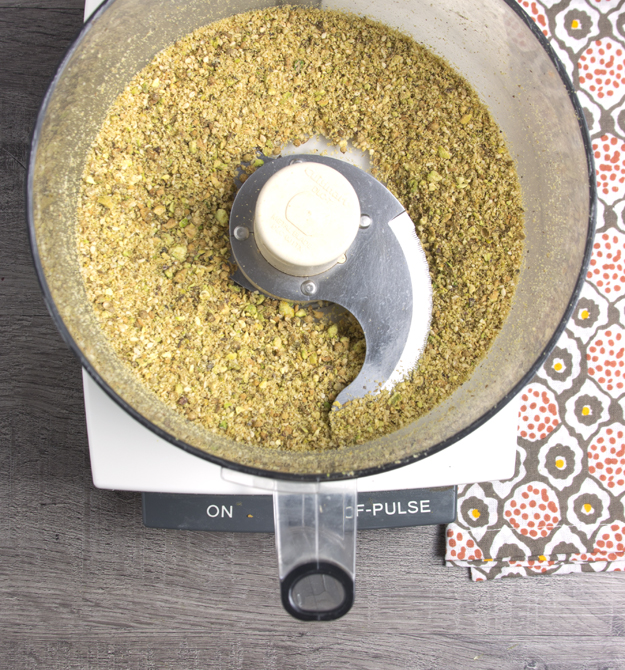
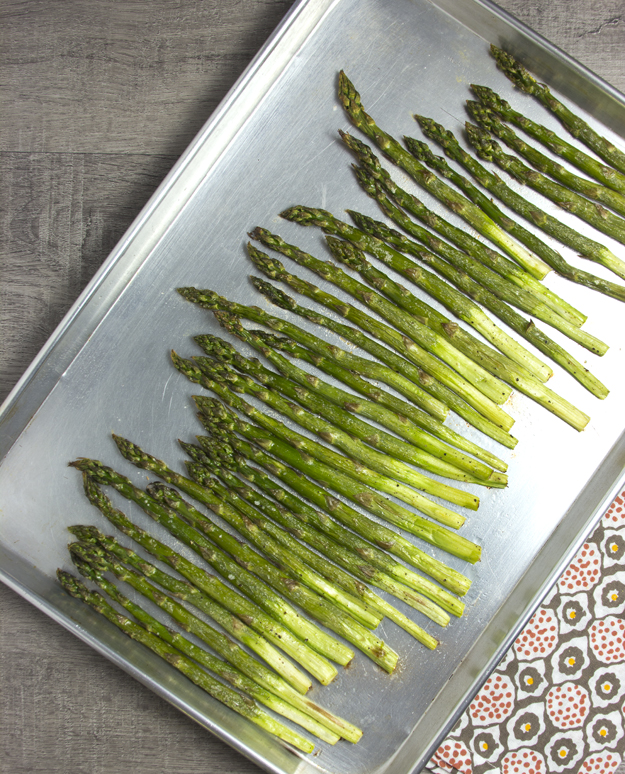
Fat spears of asparagus got my attention at the market so I abandoned all plans of roasted carrots. You gotta go with what looks good that day. I decided on a pistachio based dukkah, but feel free to use any nut you like. Sesame seeds, fennel, cumin and coriander seeds add fragrant deliciousness. Seeds and nuts are toasted and then coarsely ground in the food processor.
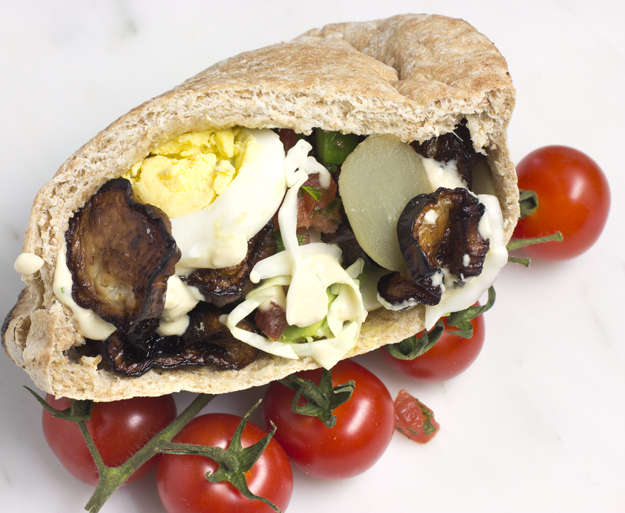
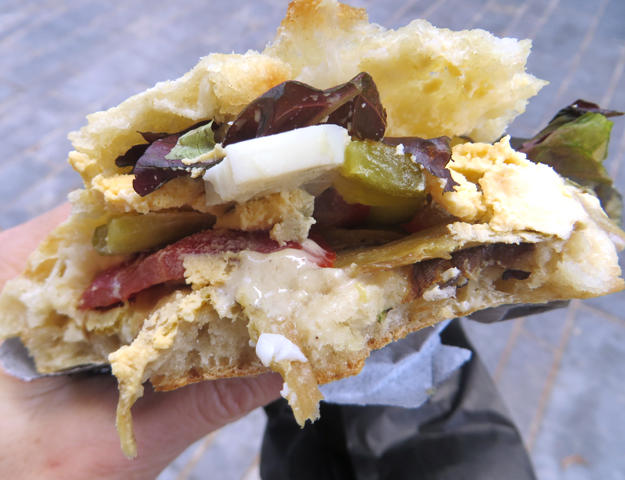
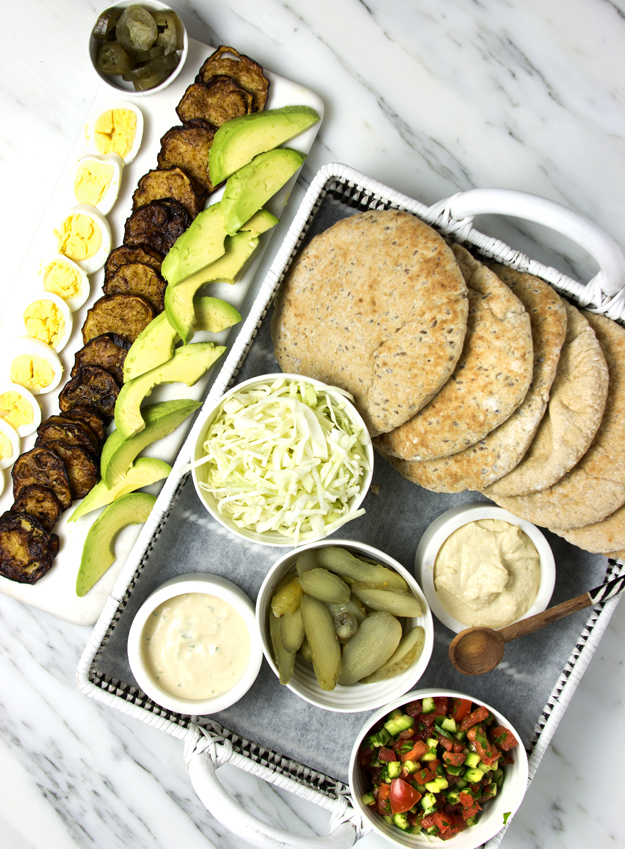
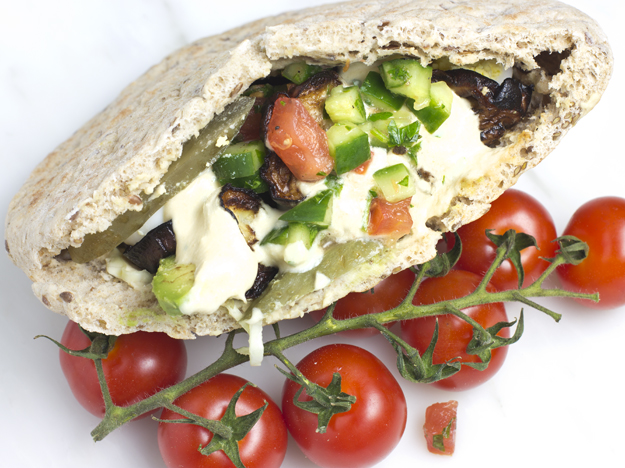
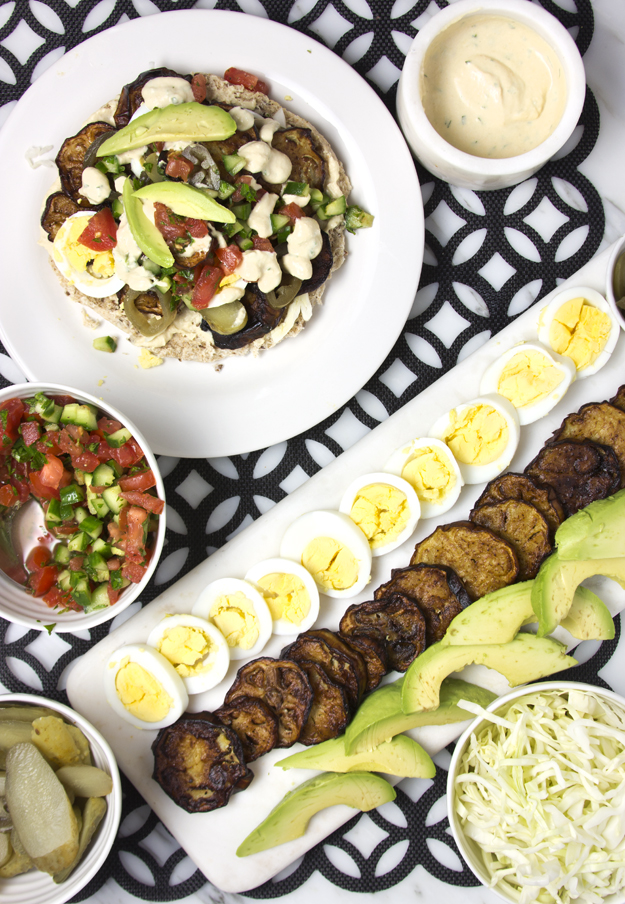
Falafel? Forget about it. Shawarma? So over it. This year I’m all about Sabich, a pita sandwich bursting with fried eggplant, hard-boiled egg, shredded cabbage, hummus, Israeli salad and pickles. Drizzled with tahini sauce and pickled mango chutney (amba), this sandwich is a thing of beauty.
The origin of this sandwich is credited to Iraqi Jews who arrived in Israel in the 1950’s. Most of them settled in the Tel Aviv suburb of Ramat Gan. Since cooking is not allowed on the Sabbath a cold lunch of yesterday’s fried eggplant and hard-boiled eggs was often served for lunch. Natural born entrepreneurs, the Iraqi Jews rolled these ingredients into a pita and started selling them as street food. Cheap and filling, these sandwiches quickly became the country’s version of fast food.
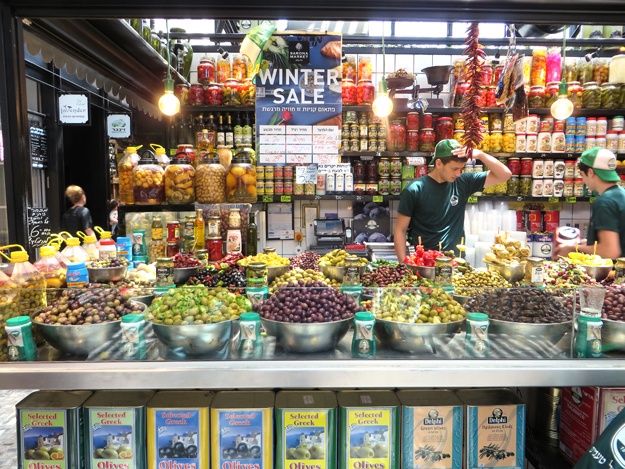
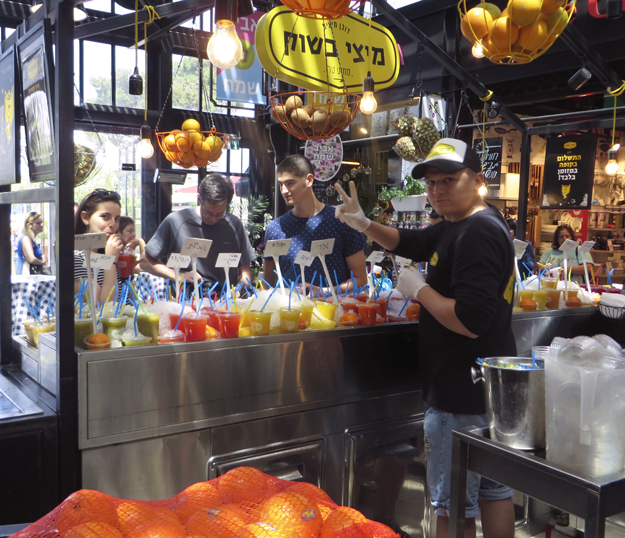
I had my first sabich at Sarona Market, the stunning modern new food market in Tel Aviv. If you have not visited Sarona Market but are familiar with the Shuk (Machane Yehuda Market) in Jerusalem, suffice it to say that they are polar opposites! Not to say that the shuk does not have its charms, such as being elbowed by sabras in a hurry to get their marketing done before Shabbat. Each market is special and unique and both merit a spot as a must visit destination on trip to Israel. Even if food is not your passion, the people watching at both markets are a fascinating window into daily Israeli life.
I didn’t really know what I was ordering. My daughter and I just pointed to this beautiful stuffed pita sandwich in the display case. It looked fresh and promising. We were hooked from the first drippy, messy bite. Crispy, crunchy, soft, creamy, tangy, and spicy, this sandwich is an amazing fusion of textures and flavours. The addition of hard-boiled egg surprised me. My daughter explained that this is typical in some Israeli sandwiches.I knew I had to try recreating this at home. I have made it twice now since coming home. The first time I tried not to stray too far from the original. I was unable to find amba, the pickled mango chutney where I live. I could have ordered it online, but I was too impatient. I substituted in some pickled jalapeños for heat. I added some creamy avocado, which seemed like a perfect compliment.You may be tempted to bake or grill the eggplant slices, in order to keep the calorie count lower. I beg you not to do that. Yes, eggplant soaks up a ton of oil when you fry it. But it is precisely that oil rich flavour and squishy texture you want in this sandwich and only frying can achieve it. Since you’re just tucking just a few slices into the sandwich, so don’t stress about it.
Green cabbage is thinly sliced and simply dressed with salt and white wine vinegar. Sour dill pickles add additional crunch. Tomatoes, cucumbers, parsley, garlic, lemon juice and olive oil are combined in a classic Israeli salad. I jacked up my store bought Tahini sauce with some garlic, and lemon juice and added some hot water to thin it out so that it had the perfect texture for drizzling.
The second time I made it, I mixed up a batch of spiced ground lamb (cumin, coriander, sautéed onions and cinnamon) and formed mini lamb burgers that we grilled along side the fresh pita bread. The addition of the lamb sliders was a big hit at our table.
Happy Victoria Day to all my Canadian friends! Hope this long holiday weekend has left you feeling more relaxed and a pound or two heavier than you were last week! Even though it’s technically still spring, I think of the Victoria Day weekend as the unofficial start of summer. Here in Ontario, the weather co-operated and we had glorious heat and sunshine. We deserve it!!
We came up to the cottage and all three of our kids descended upon us for a visit. Nothing makes me happier than having us all sleeping under the same roof again. My oldest son brought his girlfriend and my daughter brought three friends, so it was a full house.
I had lots of help in the kitchen. My daughter and her friends planned and cooked dinner on Saturday night. We had a Mexican Fiesta complete with frozen lime margaritas. On the menu were fish tacos with slaw, sweet potato and black bean salad, mango salsa, grilled pineapple salsa and guacamole. It was all very delicious and I just sat and sipped my cocktail while they cooked.
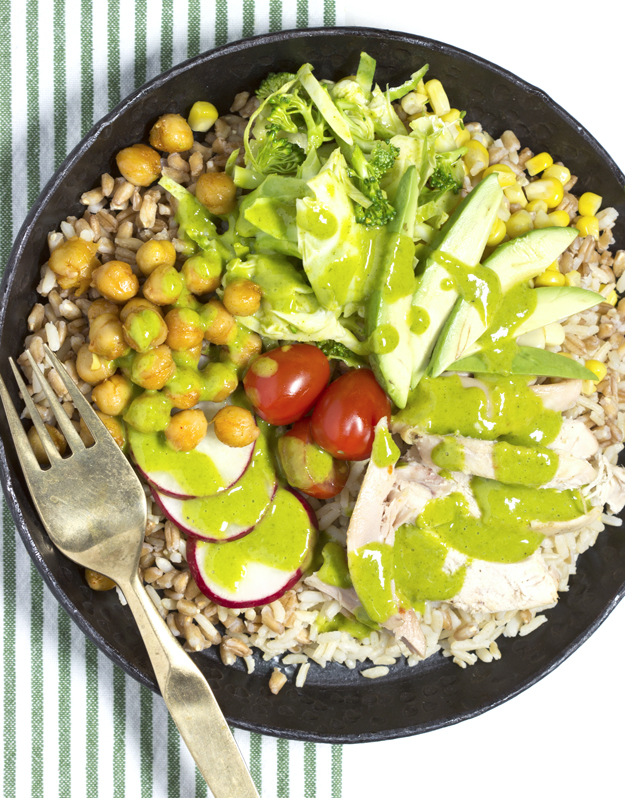
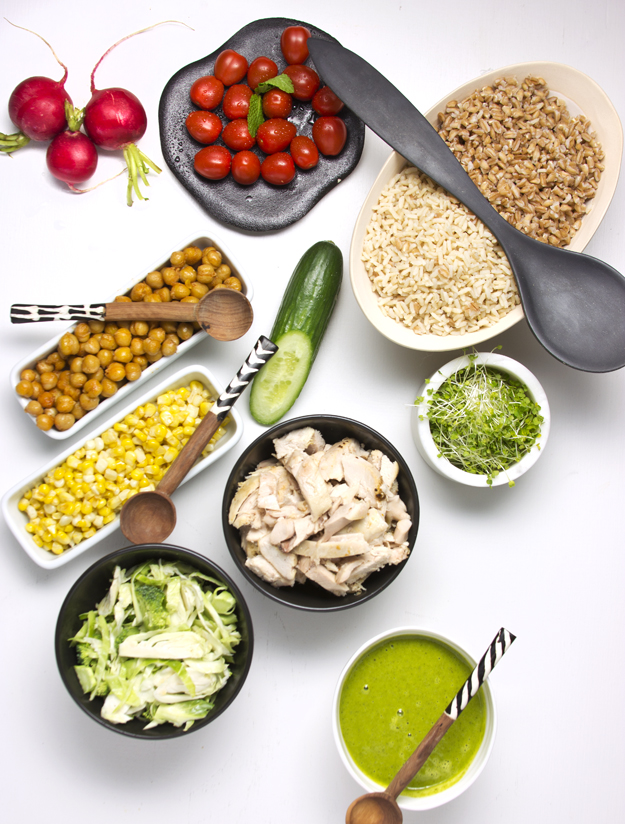
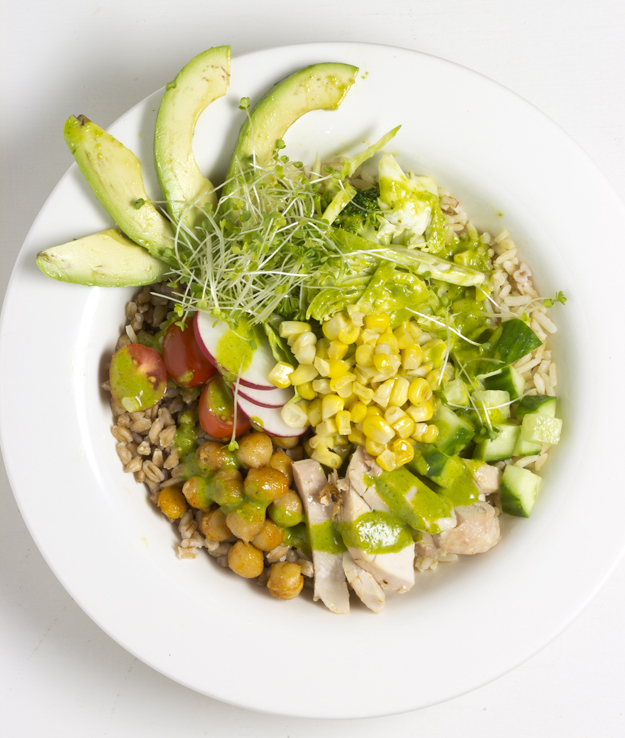
For lunch on Saturday, I served grain bowls. These are perfect to serve for lunch for a large group of people. Everything can be prepared in advance and set out on a buffet. Everyone helps themselves and takes only what they like. Vegans, vegetarians and carnivores are all satisfied. I have provided a recipe but really, just use whatever is fresh and looks good. Just make sure you have a variety of colours and textures. I roasted some chickpeas with cumin and hot smoked paprika for a bit of heat. Sautéed corn and cherry tomatoes provided a bit of sweetness. Raw broccoli and shaved Brussels sprouts added crunch, while radishes added a perfect bitter note. Creamy avocado is always welcome at this party. Toasted nuts or seeds would also be a great addition. The dressing is a fresh and light combo of mint, parsley, lemon juice, honey and olive oil.
For grains, I used brown rice and farro. I have never had much luck cooking brown rice before. It always came out gummy. I recently tried Uncle Ben’s brown rice and it cooked up perfectly. The grains stayed separate and had a beautiful chewy texture. After cooking your grains, spread them out on a baking sheet to allow them to cool. That way, they won’t clump up and get gummy. Feel free to use barley, wheat berries, kasha, and ok, you can use quinoa if you must!
Store any leftovers in little containers, to keep all the ingredients separate and make a breakfast bowl in the morning, topped with a fried egg!
Comfort comes in many forms. When you’re little, nothing soothes like a thumb or a well worn stuffed friend. When you get older, solace for some can be found in a box of Milk Duds mixed with popcorn at the movies. Oh, perhaps that’s just me.
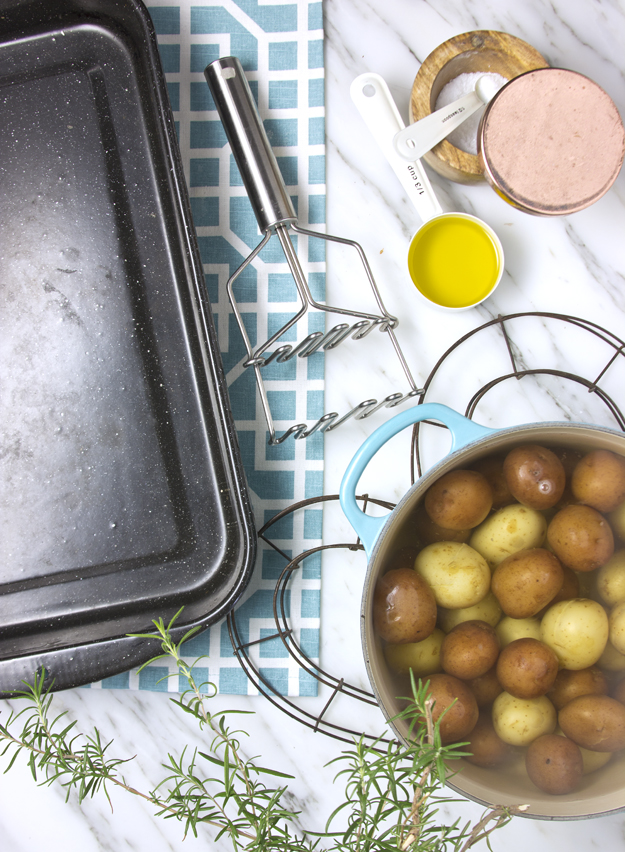
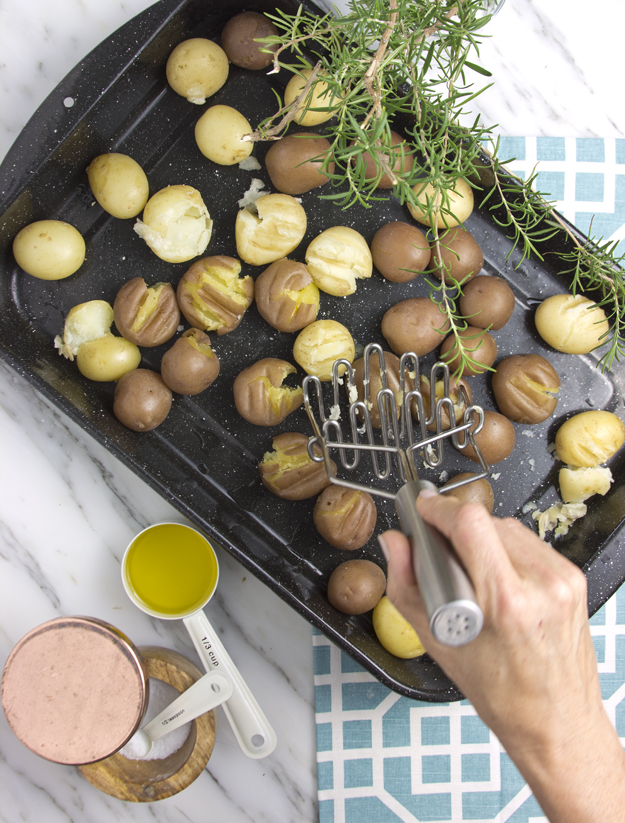
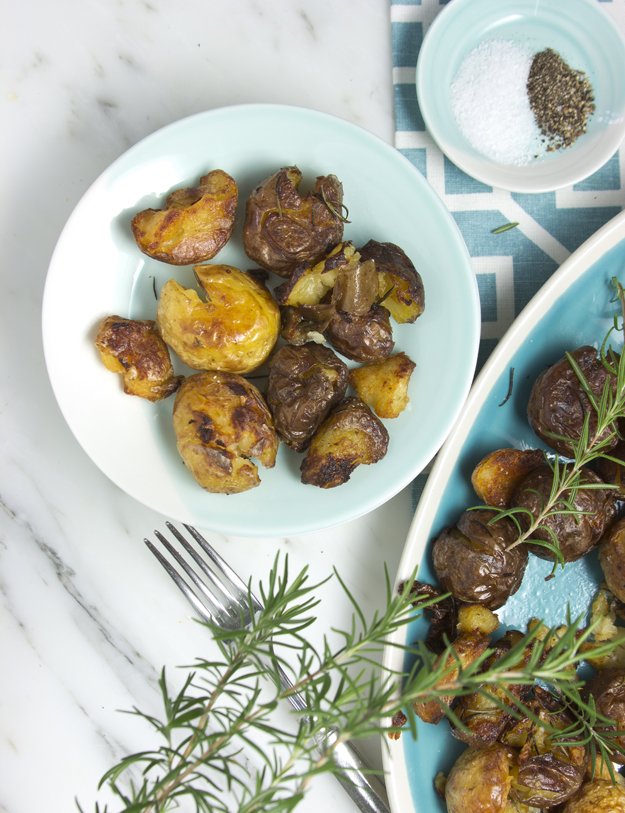
I think we can all agree that roasted potatoes top the list of comfort foods. The ultimate roast potato is a study in contrasts: the outside should be shatteringly crisp, crunchy and salty, while the inside is tender and fluffy.
Start with mini potatoes. Multi-coloured ones are pretty. Rosemary, garlic, olive oil and plenty of salt are part of the plan.Begin by giving the potatoes a head start in a pot of boiling salted water. About 10-15 minutes should suffice. We just want the skin of the potato to be tender.Then the fun begins! Drain potatoes and spread them out on a baking sheet. Use a potato masher or fork to gently break the surface of the potatoes. I love my spring loaded masher. Be gentle here. You are not looking to make mashed potatoes. You just want to break the surface of the skins and allow the flesh to to be exposed. You are essentially creating more surface area, more little nooks and crannies to be crisped up in the oven.
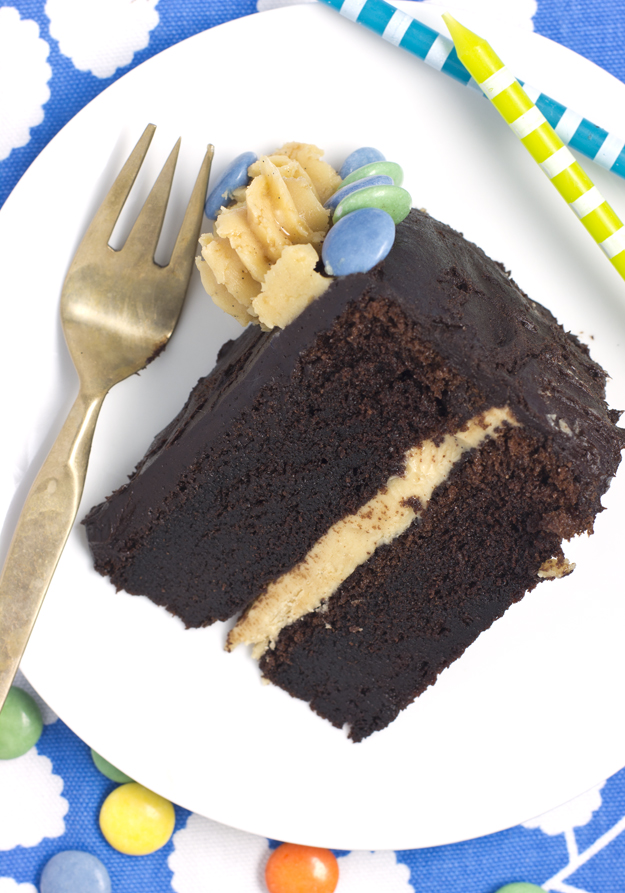
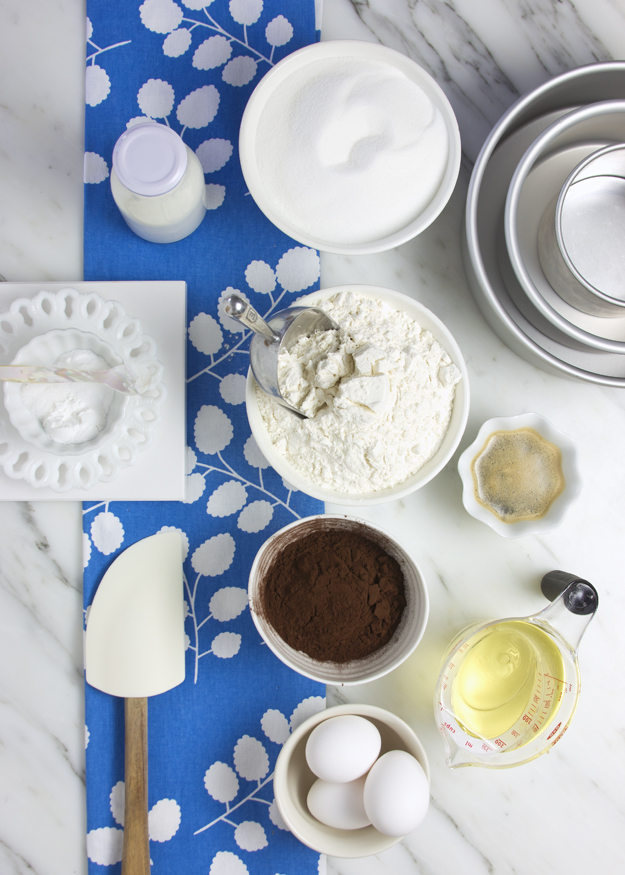
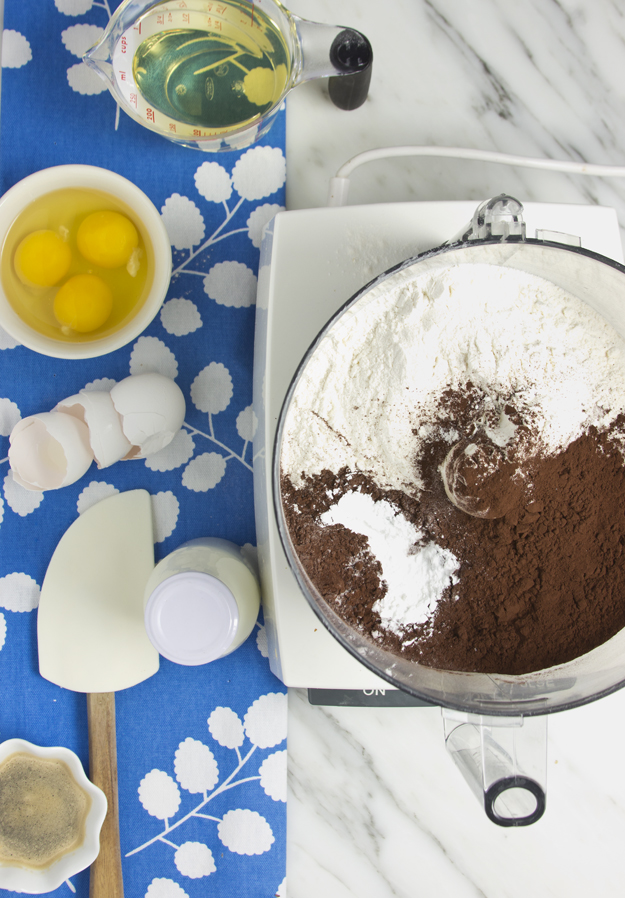
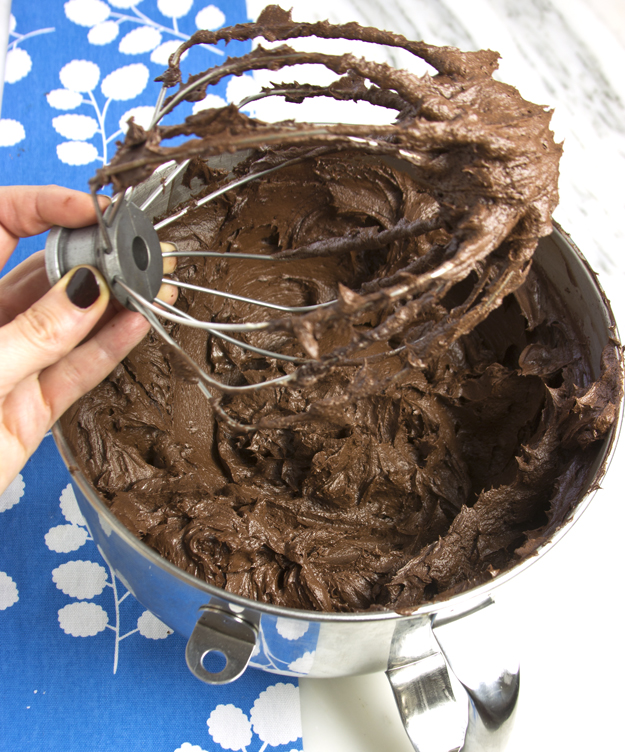
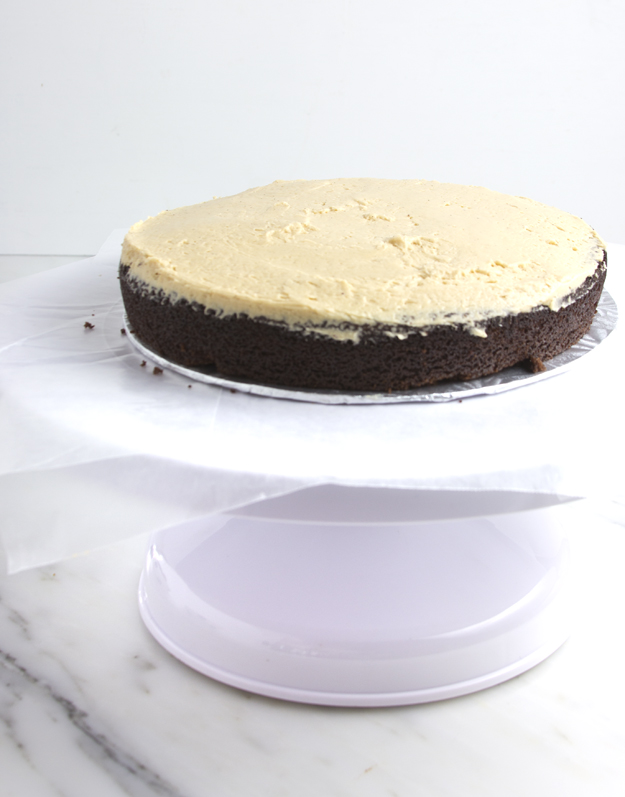
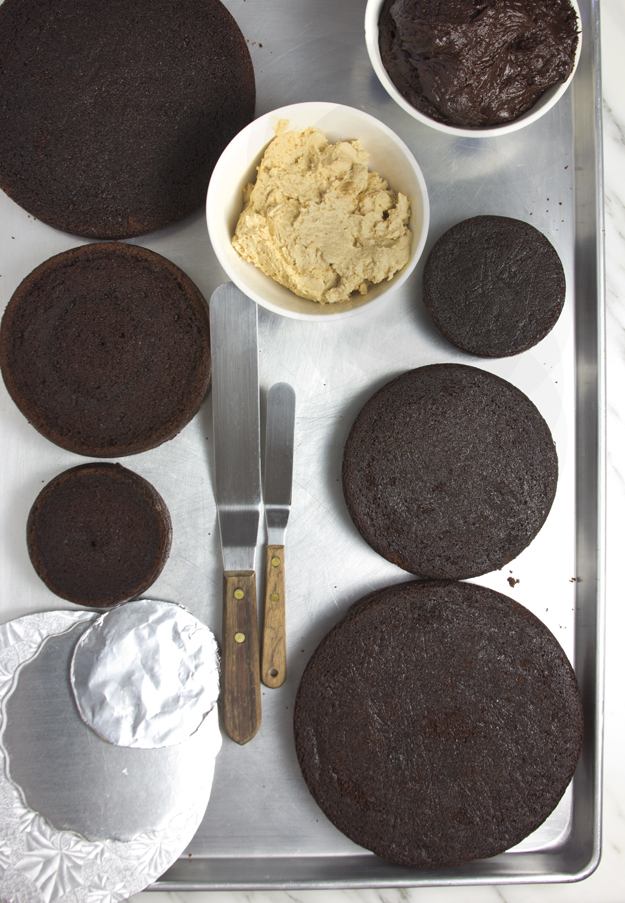
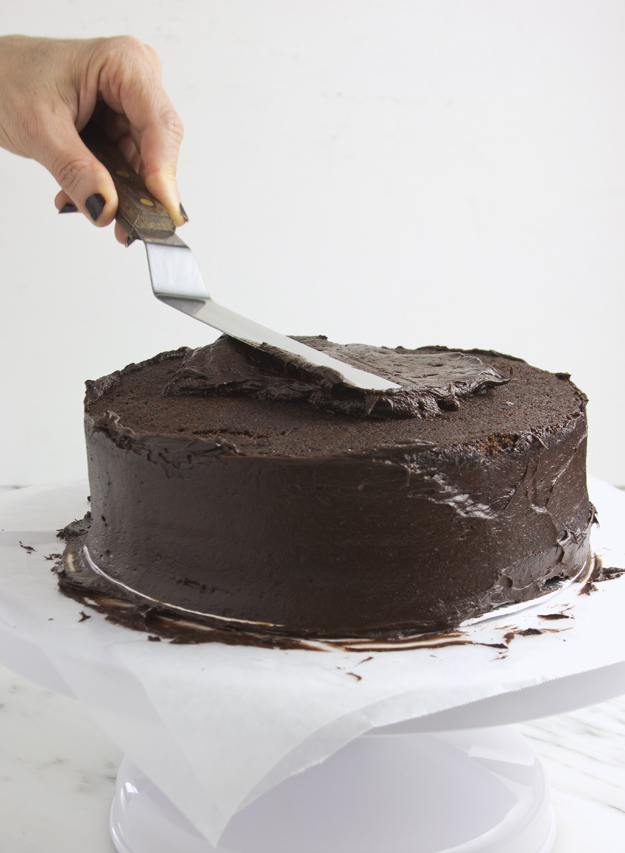
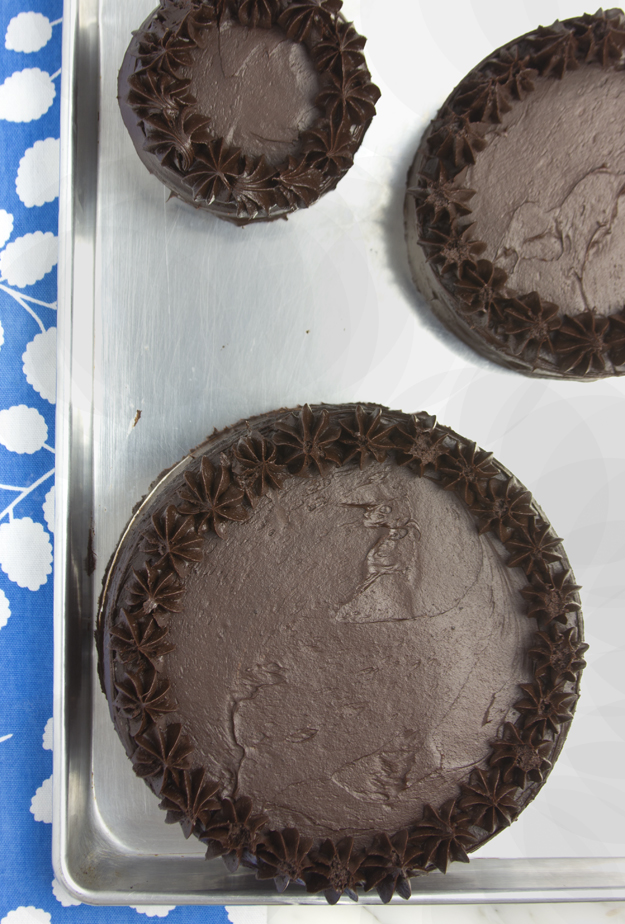
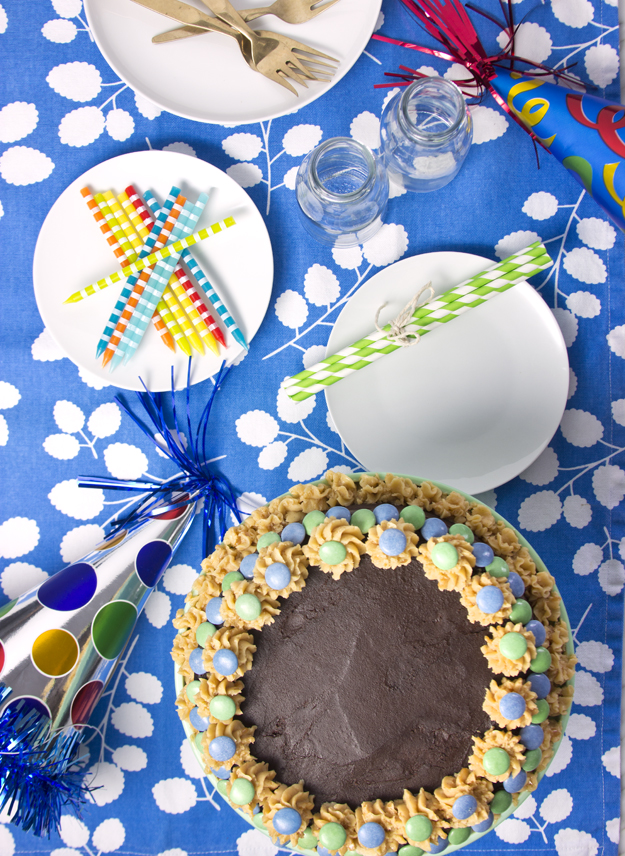
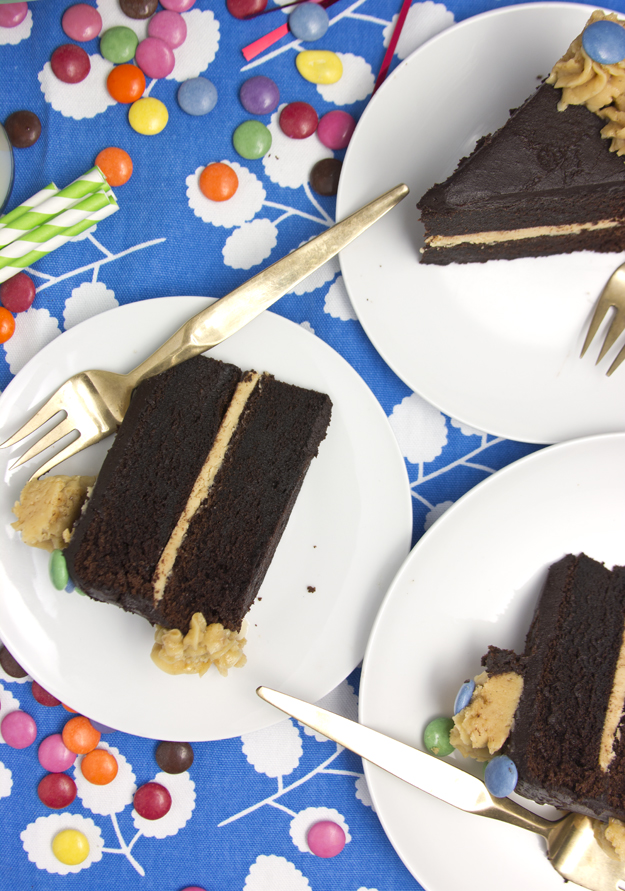
When I watched Ina Garten and Tyler Florence collaborate on this birthday cake for Tyler’s 7-year-old son Hunter, two things occurred to me. The first being, what an odd and unlikely duo! How did Ina and Tyler even come together on this project in the first place? My second thought was, what a cool idea for a birthday cake. For some reason, I only associate stacked cakes with weddings. This off kilter, cake was perfect to help celebrate my youngest son’s birthday. He turned 23 at the end of April.I didn’t use Ina’s recipe because I have a favourite go-to recipe. It was created by Noreen Gilletz, slightly adapted by me, and comes together in the food processor in a few short minutes. It is the moistest chocolate cake I have ever tried. Deep, dark intense chocolate flavour with a fudgy dense texture. Half a cup of strong coffee enhances the chocolate flavour.The deep dark chocolate buttercream is the genius creation of Nila over at www.thetoughcookie.comI had some leftover salted caramel buttercream from making macarons so I sandwiched the layers with it, and frosted the top and sides with the chocolate buttercream. If you don’t feel like preparing two kinds of buttercream, it is still fantastic with just chocolate buttercream.You will need two round 8-inch, two round 6-inch and two round 4-inch cake pans, as well as some cardboard cake circles.If the thought of building this Topsy Turvy cake makes you nervous, just make a double layer 9-inch traditional cake. It’s still very special and quite beautiful.
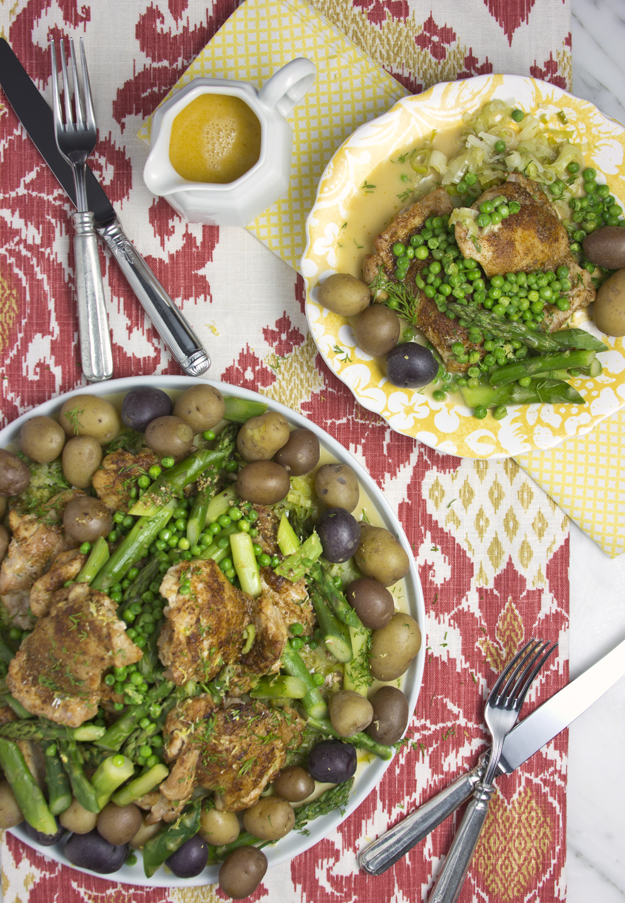
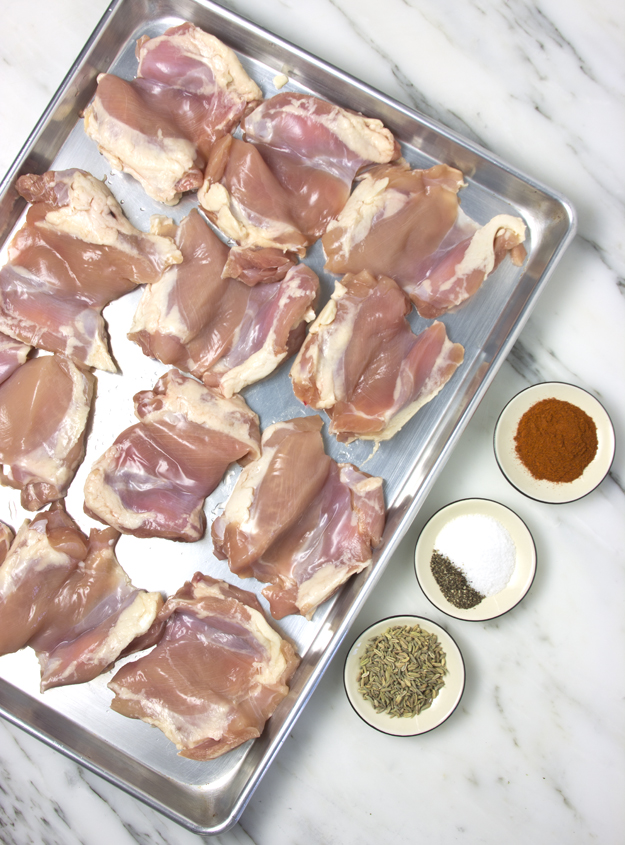
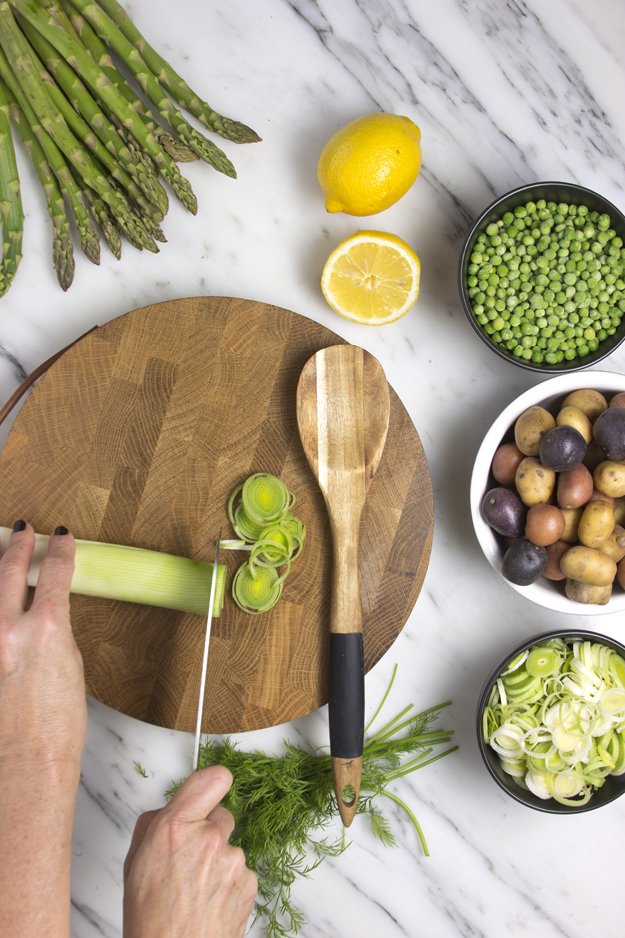
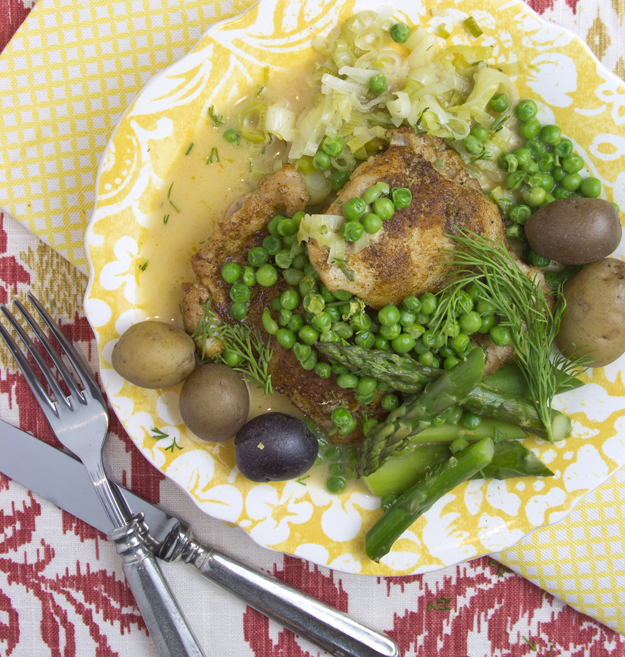
When spring finally arrives, most people don’t normally turn to braising as a cooking method. But you guys don’t read this blog because I’m like most people. I promise I will hustle out to the BBQ very soon, but this braised spring chicken recipe really deserves your attention now. Mindy Fox created this recipe for epicurious.com. I adapted it slightly.
I decided on using boneless skinless thighs for this to hasten the cooking time. Feel free to use bone-in thighs or breasts if that’s how you roll. Just promise me you won’t select boneless breasts. They are not meant for braising. I treated the thighs to a generous seasoning of ground fennel seeds, paprika, salt and pepper.After an initial browning, the thighs are simmered gently in white wine and chicken stock. The proper technique is to have the chicken pieces only halfway submerged in the braising liquid. Don’t drown them.
Leeks are thinly sliced and slowly sautéed until meltingly tender. Fat spears of asparagus and green peas pretty much shout “SPRING”. I used frozen peas because fresh are still a few weeks away for us here in Ottawa. Mini yellow, red and purple potatoes seemed like a good idea so I invited them to this spring fête as well!The braising liquid gets reduced and treated to a squeeze of fresh lemon juice. Scatter chopped dill and lemon zest over everything and celebrate spring.

 Cauliflower is the darling of the vegetable world this year. It is her chameleon-like qualities that make her such a popular girl. Sliced into slabs and roasted as “steak“, shaved thinly and served raw as slaw, boiled and mashed and served in “stuffed potatoes“, roasted whole so it resembles a “brain”, cauliflower crust pizza, and now, masquerading as fried rice.
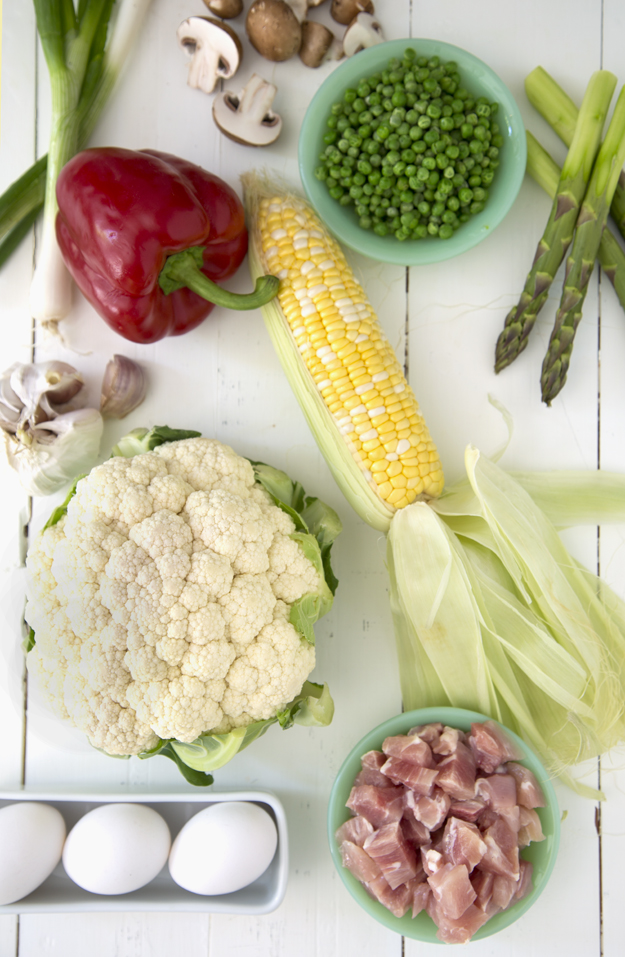 Making the cauliflower “rice” couldn’t be simpler. Pulse cauliflower florets in the food processor, about 10 times and you’re done. You could also grate the cauliflower on the large holes of a box grater.
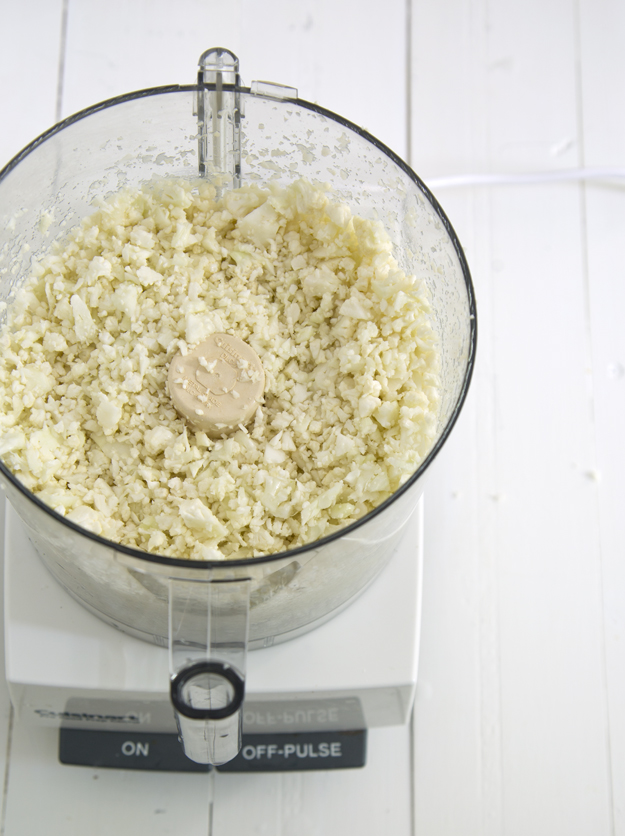
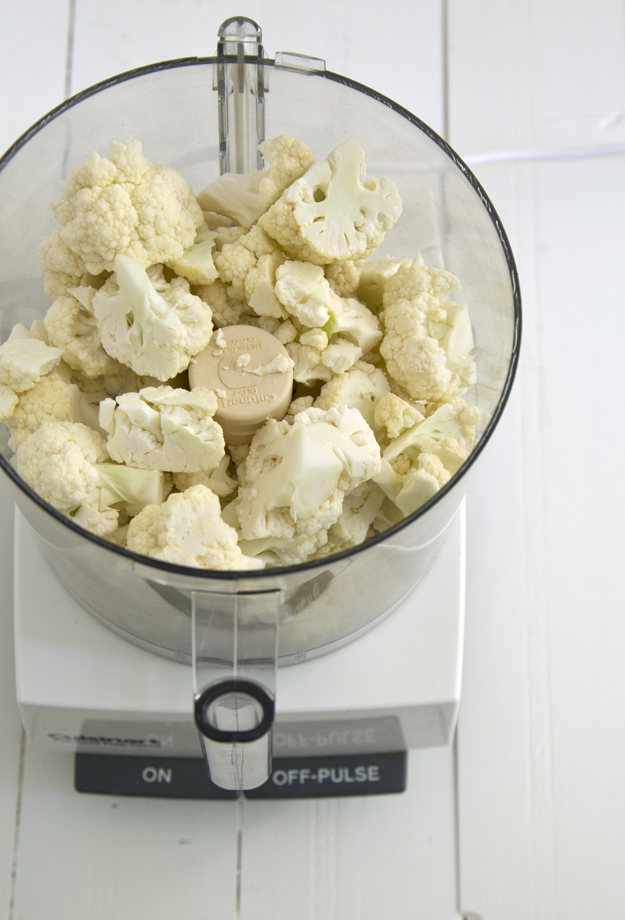
 I used this recipe from chatelaine.com and adapted it slightly. Get all your ingredients chopped and measured before you start cooking, because this comes together quickly once you start the actual cooking.
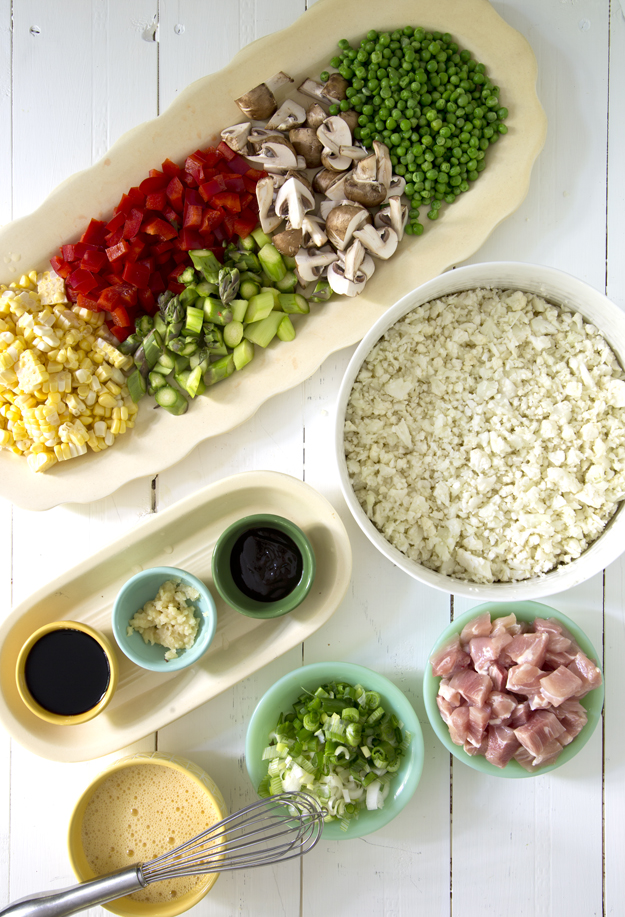
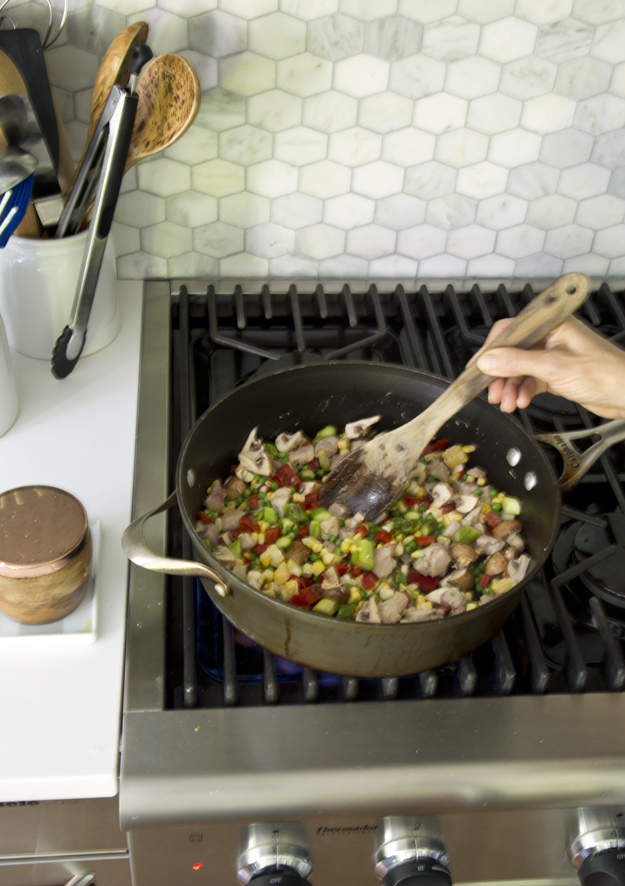 It genuinely looks like fried rice and it tastes delicious. I was worried that the flavour of the cauliflower would be overpowering, but with all the other ingredients, it wasn’t. Soy sauce and hoisin work together to add authenticity. While you know you’re not eating rice, it is still hits the spot. You can have a big bowl and feel satisfyingly full and healthy. I will be making this again very soon!
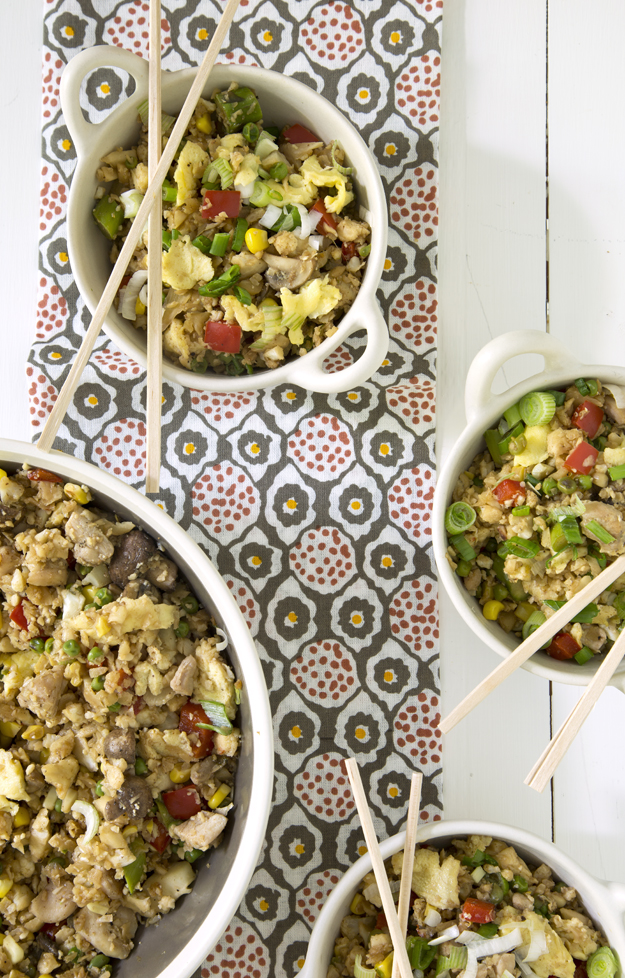
 For more delicious cauliflower recipes, check out this cauliflower post on wellbeingsecrets.com.