Tag Archives: Chocolate

My Passover Faux Pas (Shmura Matzoh Crunch)

Everyday at 5 pm, in the week leading up to Passover this year, the doorbell would ring. When I opened the door, there would be a flat square box of matzoh left on the front porch. By the end of the week, I had a stack of about 6 boxes. Various Jewish organizations around our city were dropping them off at our house with wishes for a happy and healthy Passover.

These were not like the ordinary boxes of matzoh I bought at the supermarket.  Regular matzoh are about 8 inches square and come 10 to a box. They are machine-made. Shmura matzoh are round in shape, about 12 inches in diameter. They are hand-made. We traditionally ate this matzoh on the first night of Passover, at the Seder.  That was about all I knew about Shmura matzoh.

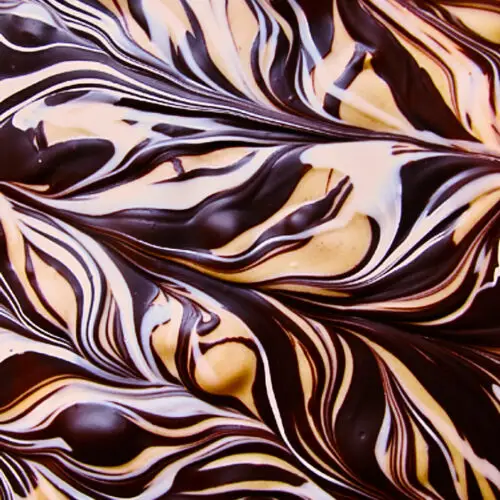
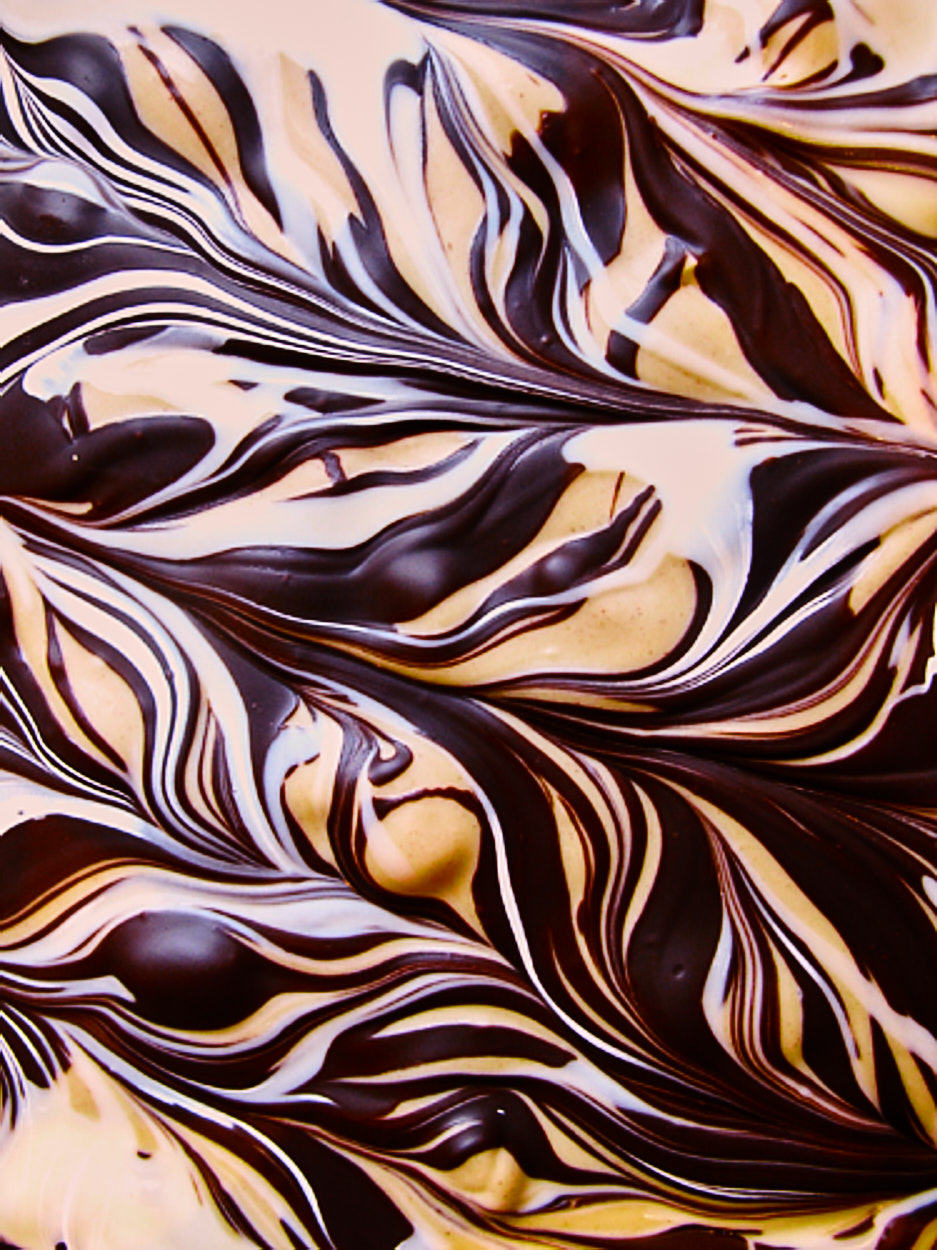
As I stared at this stack of matzoh boxes, I wondered what we were going to do with all of them. After all, I still had 8 boxes of the regular stuff in the storage room. Suddenly, divine inspiration struck. I didn’t want to let this special matzoh go to waste. I was going to give it the royal treatment. First, I would coat it in a warm butter and brown sugar caramel and then I would slather it in milk chocolate and finally, top the whole thing off with toasted chopped almonds. Who wouldn’t feel special and loved with this treatment. I think there may actually be a spa treatment similar to this somewhere in the world. If not, there definitely should be!

Last year I made Marble Matzoh Crunch with Bittersweet and White Chocolate. This is my adaptation of  Montreal baker Marcy Goldman’s creation. Everyone I feed it to rolls their eyes in ecstasy. When I made it with the square matzoh, I broke it into small rectangular pieces. How beautiful it would be, I thought, to wrap up an entire 12 inch circle of this coated beauty!

I had 6 of these all wrapped and chilling in the fridge, ready to go to Toronto for our family Seders. My husband was packing up the car for our drive and he asked me where all the boxes of Shmura Matzoh were. I proudly showed him what I had created. He was horrified! Apparently my creations were sacrilegious. I managed to calm him down by telling him that several boxes survived unscathed and we could take those boxes to his sister’s house. I fed him small bites of the chocolate almond shmura matzoh crunch during out 4 hour drive and he had forgiven me by the time we arrived.

When we returned home I did some research and discovered that Shmura means “watched” in Hebrew, as in, to watch over something carefully. This matzoh is called shmura because it is made under strict rabbinical supervision, meaning that the rabbi is keeping an eye on the process, which must be completed according to a strict set of Jewish religious rules, and in 18 minutes.

thecitycook.com provided this explanation: “The Seder is the centerpiece of Passover. For some who observe and celebrate this holiday, it is particularly meaningful to replace factory-made matzoh, the unleavened bread so essential for the Seder meal, with shmura — or shmurah — matzoh. Shmura means watched from the harvest, which signifies that every step of the process of making this matzoh, from harvesting the grain to the final baking, has been supervised by a rabbi. It also means that when the bread is being made in its small batches, the flour and water are kept in separated cubicles as extra insurance that there is no premature contact between them until the last possible moment, thus preventing any leavening.”

I also discovered that a box of 3 Shmura matzoh, will set you back about $15.00 -$20.00. Shmura matzoh is expensive, because producing it is very labor intensive. Every piece is made by hand, not machine. The production of shmura matzoh is a labour of religious love. Think of it as Artisnal Matzoh.

Whether you decide to give regular or Shmura matzoh the royal treatment, you will not regret it!

To print the recipe for Shmura Matzoh Crunch, click here.

Chocolate Macarons with Chocolate Ganache Filling


Okay, now I’m really confused. In my last post I cleared up the difference between macarons and macaroons. According to my thorough research, macarons (one o) are the French almond meringue sandwich cookie and macaroons (two oo’s) are the American coconut based cookie. In my pretentious little blurb, I even went so far as to instruct you on how to pronounce macaron correctly with a French accent. Imagine my surprise when I visited the web site of Ladureé. They spell the ubiquitous little almond meringue sandwich cookie, MACAROON!!  Huh?

Now, given that it was Ladureé’s first cousin, who at the beginning of the 20th century first thought of taking two macaron shells and joining them with a delicious ganache filling, you would think that Ladureé would know the correct spelling. If anyone out there can clear up this spelling mystery for me, please do!

However you spell it or pronounce it, there is no denying that this is an incredible confection. Light and crisp on the outside and chewy and soft in the center, it is the perfect little mouthful. In my last post I tackled the more complex Italian meringue technique for making macarons, where the egg whites are beaten with a sugar syrup cooked to 230ºF -240ºF. They were delicious but I will admit that there was quite a bit of work and dirty pots and bowls involved.

I have been making a simplified version of macarons for several years now, using an old recipe from Gourmet magazine. But, now that I am more knowledgeable about macarons, I discovered that my Gourmet recipe was not quite authentic. I decided to try the French meringue technique, which is a bit more involved than my old recipe, but not as challenging as the Italian technique.

Here are the main differences between the Gourmet recipe I have been making for several years now, the  French and the Italian.

Gourmet Recipe

French Meringue Technique

Italian Meringue Technique

Ground Almonds Grind Your Own Uses pre-ground Uses pre-ground
Sieve Not forced through sieve Forced through sieve Forced through sieve
Egg Whites Beaten without sugar Beaten with sugar Beaten with cooked sugar syrup

Of course I had to do a side by side comparison between what I have been baking (the Gourmet recipe) and the classic french meringue technique so I prepared both. For the french technique, I used Sue’s recipe from her blog, You can do it at home.

The one on the left is the macaron made using the classical French meringue technique.  The one on the right is the Gourmet Magazine recipe. The classical one is smoother, shinier and has a more complex structure. The outside is crisp and as you bite into it, the shell shatters and gives way to a chewy interior. The Gourmet recipe is much more one-dimensional texture wise. The whole thing is chewy. I much prefer the Classical French Macaron. I urge you to give it a try. You will be thrilled with the results!

Before starting, make sure you have a scale. From all the recipes I read, it seems that you are more likely to achieve success if you weigh your ingredients rather than measure. Weighing is much more exact than measuring. That is how all professional pastry chefs bake. You will need either a stand mixer or a handheld mixer for beating the egg whites. A food processor is needed to grind the almond meal and icing sugar. A pastry bag (disposable is fine) and half-inch plain piping tip will be needed.

Finally, before you begin, if your piping skills are not top-notch, it’s a good idea to make a template so that all your macarons will be the same size. Take a sheet of parchment and trace out 1.5 inch circles (a shot glass is ideal for this), leaving about 1/2 inch space between the circles. Place the template on a baking sheet and then place a second sheet of parchment on top. That way, once you have piped your circles, you can slip out the template sheet and reuse it. It is also a good idea to double up your baking sheets to protect the bottom of the macarons from burning.

Almond meal is essentially ground blanched almonds. It is readily found at bulk food and natural food stores. It is sometimes called “Almond Flour”, although it contains no flour. The almond flour and confectioners sugar are ground for several minutes in the food processor and then pushed through a coarse sieve. This ensures that the batter will not contain any lumps.

I encountered quite a discussion about the egg whites. Most of the experts agreed that the egg whites should be aged for at least 24 hours. What this means is that you need to separate the eggs one day before you plan to make the macarons. Put the egg whites in a covered container in the fridge to age. According to Duncan, of Syrup & Tang, “Egg whites consist of proteins and quite a lot of water. The water can make the final batter unmanageably wet, either in the making or in the oven (where the macarons refuse to dry adequately). Old egg whites have lost some of their water content through evaporation so can yield a more successful batter.”  Remove the egg whites 2 hours before you plan to use them so they can come to room temperature.

The egg whites are beaten to soft peaks and then finely ground granulated sugar is slowly added to the egg whites, while still beating, until the mixture is glossy and holds stiff peaks.

Next the almond mixture is combined with the beaten egg whites. Sue of “You can do it at home” gave one of the best descriptions on how to combine the two so that the batter is not overmixed. “Put the whipped egg whites into the almond meal & icing sugar mixture. Stir vigorously for the first 10 stokes or so. Then continue to mix the mixture until fully combined. At this point, you might wonder if you have deflated your meringue. Don’t worry, we’re not after the air and texture of meringue. It’s more important that the batter is totally blend-in and combined. The batter should have the consistency of thick cake batter and have the ribbon-like consistency…or many website described it as “magma-like consistency”

To make it easy to fill the piping bag, place it in a tall glass or pitcher and turn the bag down like a cuff.  After the macarons are piped, you can top half of them with a sprinkling of cocoa nibs. These will become the tops of your sandwich cookies. The bitterness of the cocoa nibs plays off very nicely with the sweetness of the macarons.

The baking sheets are then tapped against the counter to flatten out the macarons a bit.  Then the macarons sit at room temperature for about 30 minutes before baking. You want them to be dry to the touch before baking. If batter still sticks to your finger when you touch it, let it dry a bit more. This helps to ensure the macarons bake without cracking.

When the shells are baked let them cool completely before trying to take them off the parchment paper. Turn the macarons upside down. Then spoon or pipe the filling onto half the shells and cover with remaining half to make sandwiches. A successful macaron has what they call, “feet”. This refers to that fuzzy little ring around the edge. My macarons grew feet and I was proud!

To print recipe for Chocolate Macarons with Chocolate Ganache Filling, click here.

It is best to make the fillings a day ahead of time and give them a chance to firm up overnight in the fridge. Chocolate ganache is simple to make. Heat 35% cream and butter in a pot until simmering. Add chocolate and stir until melted. Pour into a container and refrigerate until firm.

Double Chocolate Peanut Butter Bark

Double Chocolate Peanut Butter Bark stacked on a dark surface, featuring marbled chocolate swirls and chopped peanuts, with a spoonful of peanut butter beside i

There’s something irresistible about the contrast in this Double Chocolate Peanut Butter Bark: the creaminess of white chocolate and peanut butter, the crunch of salted peanuts, and the crisp snap of dark chocolate. Sweet, salty, smooth, and crunchy — it’s a little symphony of textures in every bite.

But the real magic, for me, happens before the bark even sets. I’ve never been much of an illustrator, so baking became my creative outlet, and this recipe is where that artistic side comes alive. Pulling a knife through layers of melted chocolate to create a marbled swirl feels almost meditative. Even after more than 150 batches over 18 years, it still makes me smile.

Watch it come together:

Keys to Success in making Double Chocolate Peanut Butter Bark

  • Use good-quality chocolate: This is one of those recipes where the chocolate really matters. Avoid chocolate chips — they’re formulated to hold their shape in the oven, which means they contain very little cocoa butter. Because of that, chocolate chips don’t melt smoothly, can turn grainy, and often set with a dull finish. For the best results, use couverture-style chocolate. My favourites are Valrhona and Callebaut (I buy mine from the Vanilla Food Company). For the white chocolate, I love Valrhona White Feves or Callebaut White Callets, and for dark chocolate, Valrhona Manjari 64% is my go-to.
  • Use the right peanut butter: Melt the white chocolate and peanut butter together in a heatproof bowl set over a pot of gently simmering water. And please — don’t use natural or health-food store peanut butter here. You want the classic, creamy, emulsified kind (Kraft or Skippy are perfect) so the mixture stays smooth and stable when it cools. Once melted and silky, stir in salted roasted peanuts for crunch.
  • Line your pan well: Line a jelly roll pan with both foil and parchment. The foil adds structure, and the parchment prevents sticking. Together, they make cleanup almost effortless.
  • Cut the bark cleanly: After the bark has chilled and set, let it sit at room temperature for a few minutes before cutting. Score it gently with a paring knife into roughly 3-inch squares, then use a large, sharp serrated knife to cut through. A brief rest at room temp keeps the bark from shattering and gives you beautifully clean edges.

Double Chocolate Peanut Butter Bark

A creamy, crunchy, sweet-salty bark made with white chocolate, peanut butter, roasted peanuts, and swirled dark chocolate. Beautifully marbled and perfect for gifting.
Servings 18 squares
Calories 519 kcal

Equipment

  • 1 13×18 inch jelly roll pan,

Ingredients
  

Peanut Butter Layer

  • 680 grams white chocolate, coarsely chopped
  • 382 grams smooth or chunky peanut butter, Kraft or Skippy, do not use natural
  • 142 grams roasted, salted peanuts, coarsely chopped

Chocolate Swirl

  • 340 grams bittersweet or semi-sweet chocolate, coarsely chopped
  • 113 grams white chocolate, coarsely chopped

Instructions
 

  • Prepare the pan: Line a 13×18-inch jelly roll pan with foil. Place a sheet of parchment paper on top of the foil.
    (Using both makes removing and cutting the bark much easier.)
  • Make the peanut butter layer: Melt the 680 g white chocolate and peanut butter together in a large heatproof bowl set over a saucepan of gently simmering water.
    Stir occasionally until smooth.
    Stir in the chopped peanuts.
  • Melt the chocolates for swirling: In a separate medium heatproof bowl, melt the bittersweet chocolate over a pot of simmering water, stirring occasionally.
    In a small bowl, melt the remaining 113 g white chocolate over simmering water.
    (Alternatively, you can melt either chocolate in the microwave at 50% power in 1-minute increments, stirring between each.)
  • Assemble and marble bark: Remove all bowls from the saucepans.
    Pour the peanut butter mixture into the prepared pan and spread it evenly to the edges.
    Transfer the melted bittersweet chocolate to a disposable piping bag. Pipe lines or zigzags of dark chocolate across the peanut butter layer.
    Repeat with the 113 g melted white chocolate, piping lines in between the dark chocolate.
    Using the tip of a small sharp knife or tip of a wooden skewer, drag through the piped chocolate to create a marbled swirl pattern.
    Chill the bark until completely firm, at least 2 hours or overnight.
  • Score and cut the bark: Let the chilled bark sit at room temperature for 10 minutes.
    Using the tip of a paring knife, gently score the surface into 18 squares (3 rows by 6).
    Cut along the scored lines with a large sharp serrated knife.
    (Letting it warm slightly prevents the bark from shattering and produces cleaner edges.)
  • Storing: Store in an airtight container in the fridge.
    Keeps for up to 1 month.

Notes

  • For best results, use real white chocolate, not compound coating. Real white chocolate is naturally ivory, not pure white.
  • For the dark chocolate, use a good-quality brand such as Valrhona, Lindt, or Callebaut.
  • Do not use chocolate chips. They contain stabilizers and very little cocoa butter, which prevents smooth melting.

Nutrition

Serving: 1squareCalories: 519kcalCarbohydrates: 42gProtein: 11gFat: 36gSaturated Fat: 15gPolyunsaturated Fat: 5gMonounsaturated Fat: 13gTrans Fat: 0.02gCholesterol: 10mgSodium: 167mgPotassium: 414mgFiber: 3gSugar: 35gVitamin A: 23IUVitamin C: 0.2mgCalcium: 118mgIron: 2mg
Tried this recipe?Let us know how it was!
Close-up of the marbled dark and white chocolate swirl pattern on Double Chocolate Peanut Butter Ba

This bark may be simple, but it delivers every kind of satisfaction: the artistic joy of making those swirls, the sweet-salty flavour combination, and the crunchy-creamy texture that keeps you coming back for “just one more piece.” It’s the kind of holiday treat you’ll make once and immediately add to your yearly lineup — whether for gifting, snacking, or simply admiring how gorgeous it looks. If you try it, let me know… and if you really want to impress someone, slip a few pieces into a cookie box. They’ll think you spent all day.

Marble Matzoh Crunch

This week in the Bread Baker’s Apprentice Challenge I am scheduled to bake Stollen.  However, it’s Passover this week and I’m not eating bread.  So in honour of this holiday I offer my favourite Passover treat, “Marble Matzoh Crunch.”  The original recipe comes from Montreal baker extraordinaire Marcy Goldman.  Her cookbook Better Baking.com is one of my go to standards.

For those unfamiliar with matzoh, it is a cracker-like unleavened bread made of white plain flour and water. The dough is pricked in several places and not allowed to rise before or during baking, thereby producing a hard, flat bread.  Matzoh is the substitute for bread during Passover, when bread and other leavened products are not permitted. There are two major explanations for eating matzoh. One is historic and the other is symbolic.

Historically, Passover is a commemoration of the exodus of the Jewish people from a life of slavery in Egypt. The Israelites left Egypt in such a hurry, they could not wait for their bread dough to rise. The resulting product was matzoh.  The other reason for eating matoh is symbolic.  On the one hand, matzoh symbolizes redemption and freedom, but it is also known as poor man’s bread.  So it serves as a reminder to be humble, and to not forget what life was like as slaves of the Egyptians. Also, leavening of the bread symbolizes corruption and pride as leaven “puffs up”. Eating the “bread of affliction” is both a lesson in humility and an act that enhances one’s appreciation of freedom.

All that history and symbolism for a little cracker!  There are those that compare eating matzoh to cardboard.  I wholeheartedly disagree.  I love Matzoh.  Perhaps it’s because the rest of the year, for health reasons, I spread butter and jam so thinly on my toast  I can barely taste it.  However at Passover I spread both butter and jam on with reckless abandon.  Passover is my excuse to consume butter and jam and matzoh is the perfect vehicle for allowing me to do it.

Marcy Goldman’s Matzoh Crunch is guaranteed to convert any matzoh hater into a matzoh worshipper.  You don’t even need to be Jewish to love this treat.

Ingredients:

6 slices matzoh
1 cup (2 sticks) unsalted butter or kosher for Passover margarine
1 cup firmly packed brown sugar
2 generous cups finely chopped bittersweet chocolate or semi-sweet chocolate chips (about 12 ounces)
1 1/2 cups white chocolate, finely chopped (about 8 ounces)
1 teaspoon sea salt or kosher salt

Directions:

1.  Preheat oven to 350º F.  Cover an 18 x 13 inch rimmed cookie sheet with foil and then cover the foil with a sheet of parchment paper. Do not leave this step out or you will be cursing me when it comes time to cleanup!  Cover the parchment paper evenly with the matzoh.  You will have to trim some of the matzoh with a sharp knife to make it fit into a flat even layer.  You will have some matzoh scraps left over.  Slather with butter and jam and eat.

2.  In a large heavy bottomed saucepan, add brown sugar and butter or margarine.  Cook over medium heat, stirring constantly with a wooden spoon, until the mixture comes to a boil.  This will take about 2-4 minutes.  At one point it will look like the butter is separating from the sugar and it will appear to be an oily mess.  Just keep stirring, it will come together again.  Once mixture comes to a boil, keep stirring for about another 3 minutes.   Carefully pour caramel onto matzoh.  Using a metal spatula, spread it out into an even layer.

3.  Place baking sheet into oven and bake for about 12 minutes until the caramel topping is golden brown and bubbling.

4.  While caramel is baking chop white chocolate into small pieces.  Place in glass measuring cup and microwave on medium power for 2 minutes.  When you remove chocolate from microwave, it will look like the chocolate is not finished melting.  Take a clean dry spoon and stir white chocolate.  It will continue to melt as you stir.  Pour melted white chocolate into a disposable plastic piping bag.  The easiest way to do this, if you are alone, is to place the piping bag in a large glass or pitcher and fold down the top.  Pour in white chocolate and let sit until you are ready to use it.


5.  Remove caramel covered matzoh from oven after about 12 minutes when it is golden brown and bubbly.  Place pan on a wire cooling rack on the counter.  Immediately sprinkle caramel matzoh with chopped bittersweet chocolate or chocolate chips. 


6.   Wait for a few minutes until chocolate has a chance to soften.  Then, using a metal spatula, spread chocolate into an even layer.

7.  Now comes the fun part!  Making a marble design with the white chocolate.  Twist the top of the piping bag closed and using a sharp scissors, cut a small tip off the end of the bag.  Starting in one corner of the pan, pipe white chocolate in a zig zag pattern.  Then starting in the opposite corner, pipe a zig zag pattern in the opposite direction.  Using the sharp tip of a wooden skewer, drag it through the wet white and dark chocolate making a nice design. You can either drag skewer in a circular pattern or go in straight lines.  Below is a video of me demonstrating the process:

8.  While chocolate is still wet, sprinkle with sea salt.  Chill pan for several hours until chocolate is firm.  Peel off foil and parchment paper and place marble matzoh crunch on a large cutting board. Using a very large sharp knife, cut matzoh into large squares.  For an 18 x 13 inch pan, I usually get about 18 pieces.  Store matzoh crunch in an airtight container in the fridge.  It keeps well for about 5 days. (That is as long as no one else in the house knows it’s there!)

For an equally delicious variation, instead of marbling with white chocolate,  sprinkle dark chocolate with toasted chopped unblanched almonds (about 1 1/2 cups).  Or try milk chocolate and almonds, or dark chocolate and dried cherries, or white chocolate and chopped pistachios or macadamia nuts.  The possibilities are endless.  Have fun!


I’m still baking, just not baking bread!


 It’s been 16 days since my last post and lest you think I’ve been slacking off, my fellow bread freaks, I have been quite busy with some other baking projects. As a way of saying thanks to all those who are important to me in my life, I bake sweets for them around the holidays.  It started when I was in my 20’s when my girlfriend Marla and I would become Chocolatiers, turning my kitchen into an artisan chocolate shop, making about 6 different varieties of truffles (including Grand Marnier, Mint, Peanut Butter, Espresso, Milk Chocolate with Almond and Praline).  At the end of about 4 days we’d have turned out over 2000 handmade truffles, hand dipped and decorated.  We’d be covered in chocolate, weigh 5 pounds more than when we started and be thoroughly disgusted by the sight and smell of all that chocolate. We swore we would not do it again next year.  But of course we did!

 Then in 1993 I moved to Ottawa so I had to fly solo.  Without Marla beside me I didn’t have the heart to do truffles so I turned to cookies.  In those early years the main beneficiaries of those treats were my kid’s teachers and the staff at the pediatrician’s office.  You’d be amazed how effective a big basket of cookies is in getting your sick child in to see the doctor before 10 other screaming, sneezing, coughing kids in the waiting room!  Each year I’d add a few more people to my list and now I have about 45 people I send to each year.

This year I made:

 Gingerbread Snowflake Cookies.  I piped white royal icing and sprinkled them with clear coarse sugar.  I made about 280 of these and by the time I was finished I had carpal tunnel syndrome in my piping hand.  My children thought it was quite funny that I injured myself baking!

I also made Lemon Coconut Cookies, Macadamia Butterscotch Chip Skor Bar Cookies and  Oatmeal Lace Cookies (sandwiched with chocolate ganache).

I made White Chocolate Dipped Peppermint Cookies.  I loved making these.  Here’s my chocolate dipping fork that I bought many years ago when I was heavily into truffle making.  It holds the flat cookies perfectly.

The crushed candy canes are sprinkled on before the chocolate has set.  I tempered the white chocolate.  I found a great site with step-by-step tempering directions.

A heating pad, set on low, keeps the chocolate at the perfect temperature after tempering.  Don’t forget to cover the heating pad in foil to avoid chocolate stains!

Here are the finished cookies. 

 I also made Double Chocolate Peanut Butter Bark.  I have been making this for about 10 years now and am kind of sick of it but I can’t delete it from the roster as the receptionist at my doctor’s office, my yoga teacher and my hairdresser tell me that they wait for it all year.  So it’s become a staple.  It keeps well in the fridge for several weeks.

The last treat I made was Chocolate Caramel Truffles with Fleur de Sel.


 While cookie baking is my passion, the real creative fun begins when I gather all my packaging material and design the labels.  I use a great graphics program called Print Shop and print out all the labels on glossy labels from www.onlinelabels.com.   Most of my ribbons and bags and boxes I get from www.pritchardpackaging.com, a wholesale outlet here in Ottawa where I live.

 I decided on a pink, black and white theme this year.

Here are the gift boxes all packaged up and ready to go:


 Next week I’m back to the Bread Baker’s Apprentice Challenge, I promise!

SkorBar Cookies


Bagged-and-ready-to-go

This recipe was created by Daphna Rabinovich, a talented baker I worked with at the David Wood Food Shop in Toronto.  She used chocolate chips and walnuts in her version.  I chop up bittersweet chocolate into chunks and omit the nuts.  This is a very fast and easy recipe, great for those times when you want something decadent and homemade but don’t have alot of time.

What you need:

skor-bar-mise-en-place

4 Skor Bars coarsely chopped                                      
1 cup unsalted butter, at room temperature
1 cup sugar
1 teaspoon pure vanilla extract
½ teaspoon salt
2 cups all-purpose flour
1 cup chocolate chips or chunks

What you do:

  1. Preheat oven to 325 degrees F.  Line a 10 x 15 inch cookie sheet (with sides) with parchment paper.  Set aside.

2.  Using an electric mixer, cream the butter and sugar together until light and fluffy, about 5 minutes. 

creaming-butter-and-sugar

2.  Beat in vanilla and salt.  Add flour, Skor Bars and chocolate chunks. Mix briefly until just combined.

3.  Dump dough into prepared pan. 

dump-into-pan

4.  Press dough evenly into prepared pan.  Bake for about 20 – 25 minutes until golden brown.

pressed-into-pan

5.  Remove from oven and while still warm, score dough with a sharp knife.  I usually do 5 rows down and 7 rows across for 35 cookies.  Put pan on a rack to cool. 

baked


 6.  When totally cool, turn out onto a cutting board, peel off parchment and finish cutting into squares.

cut-into-squares-3