Author Archives: saltandserenity

Battle Apple Cider Donuts


I’ve made both baked and fried apple cider donuts before, but never side by side. This fall, I decided it was time for a little friendly competition — purely scientific, of course. I wanted to see which method would win in a head-to-head test: the brown butter–baked version or the classic fried cider donut.

I’ll start by admitting I’m not really a donut person. If I’m choosing dessert, I’ll usually reach for a cookie. But these? These are a whole different story. Both versions encapsulate everything cozy and comforting about fall — apple cider simmering on the stove, the scent of cinnamon and nutmeg wafting through the kitchen, and sugar clinging to warm pastry. Each batch finishes with a quick toss in cinnamon sugar, sealing in flavour and adding just the right amount of crunch. I had several willing taste testers on standby, which only added to the fun.

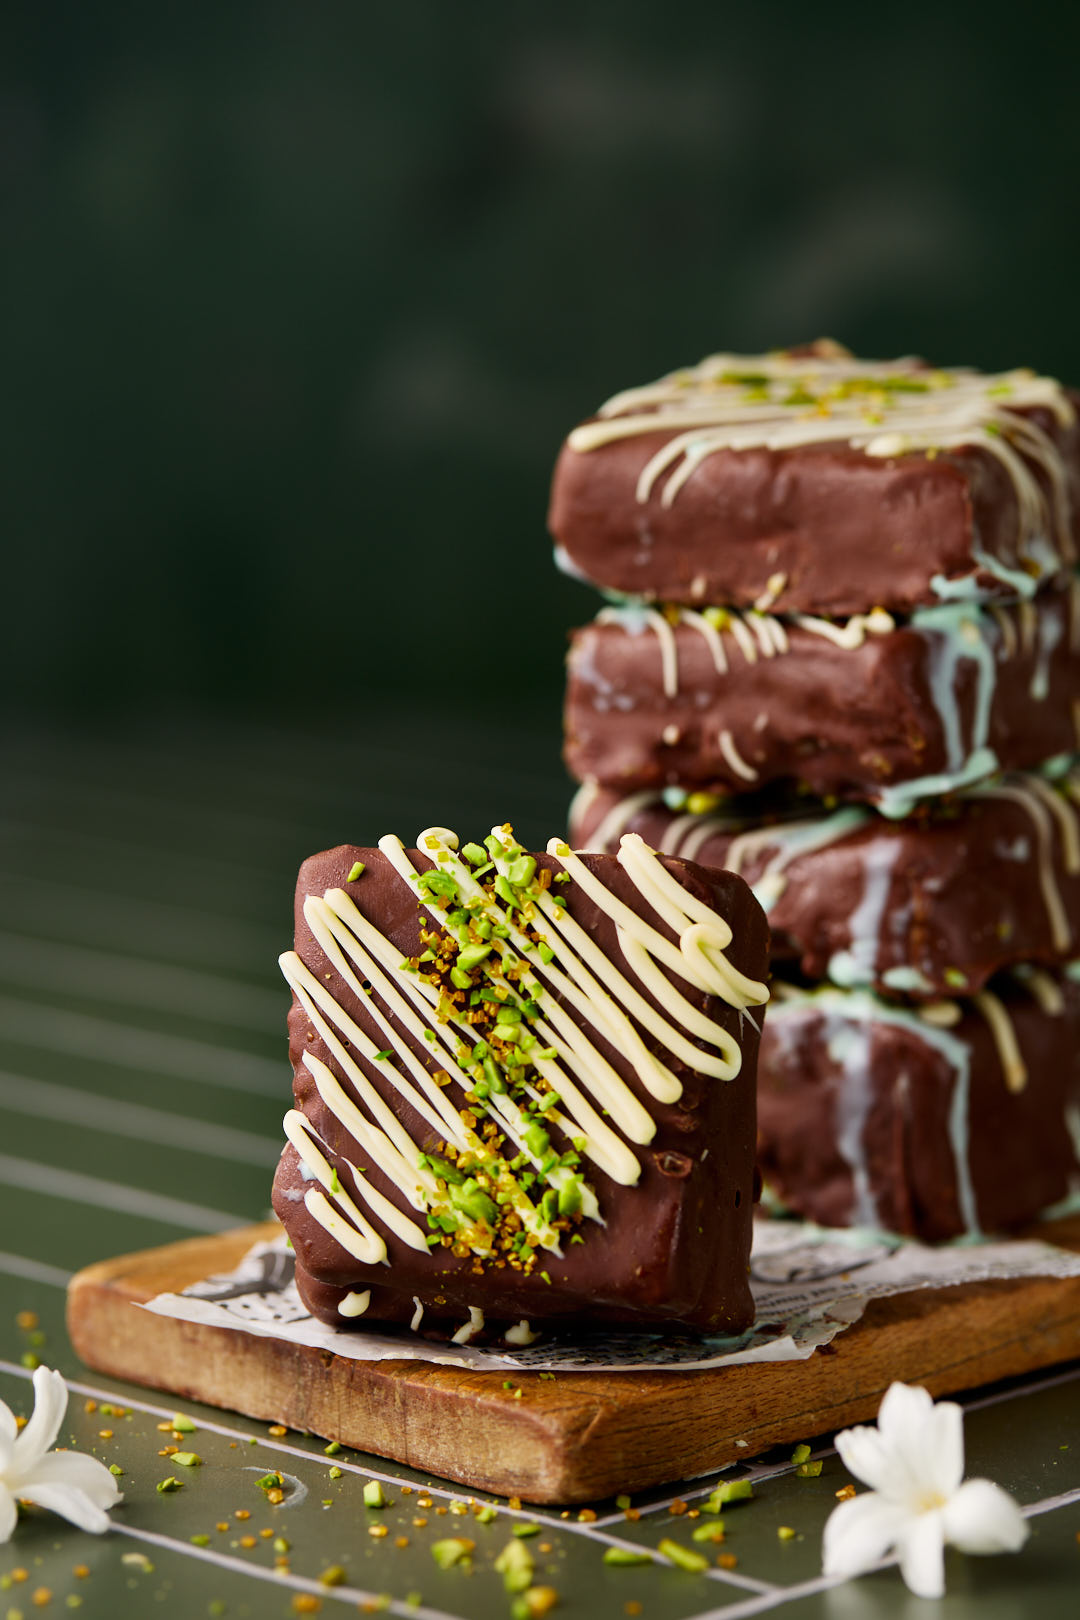
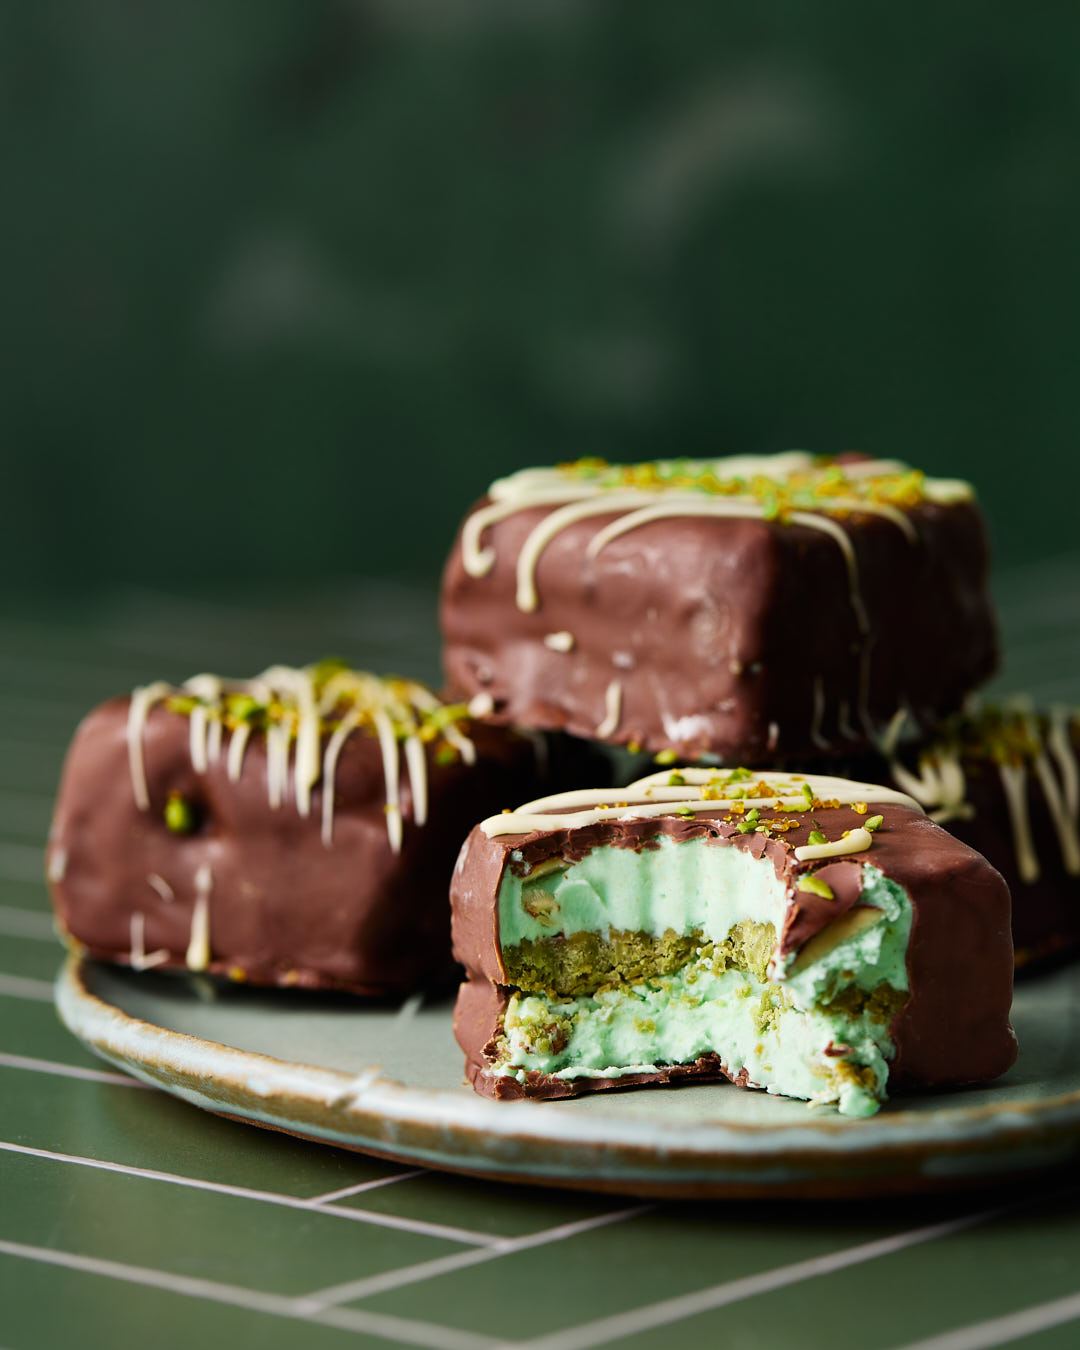
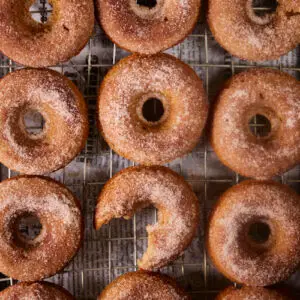
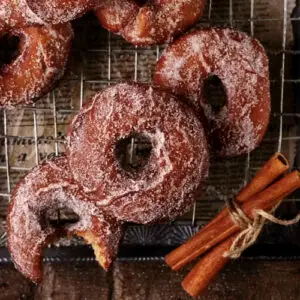
The experiment was simple: same base flavours — apple cider, apple butter, cinnamon, and nutmeg — but two very different paths. One donut gets the brown butter treatment and bakes up golden and tender in the oven. The other takes a fearless dive into hot oil, emerging with a crisp, caramelized shell and a perfectly plush, dense interior.

Baked: Soft and tender, like little fluffy clouds.

Stack of freshly baked Apple Cider Donuts.
Interior crumb of Baked Apple Cider Donut. Light and fluffy.

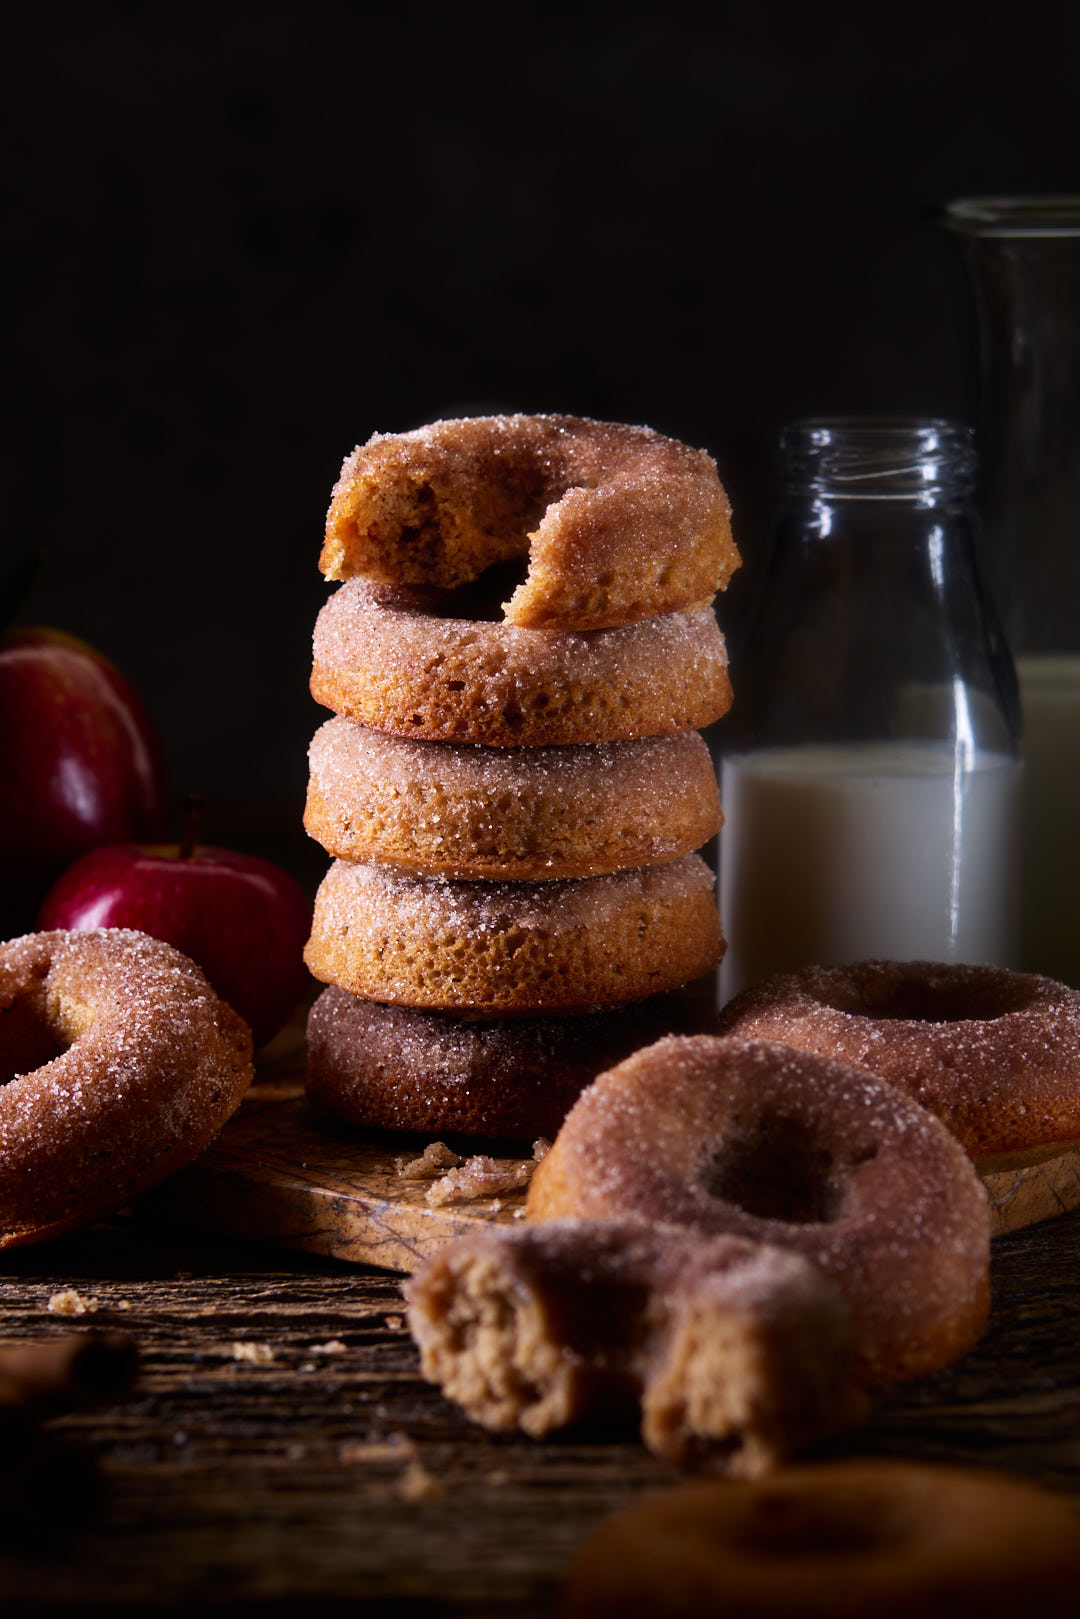
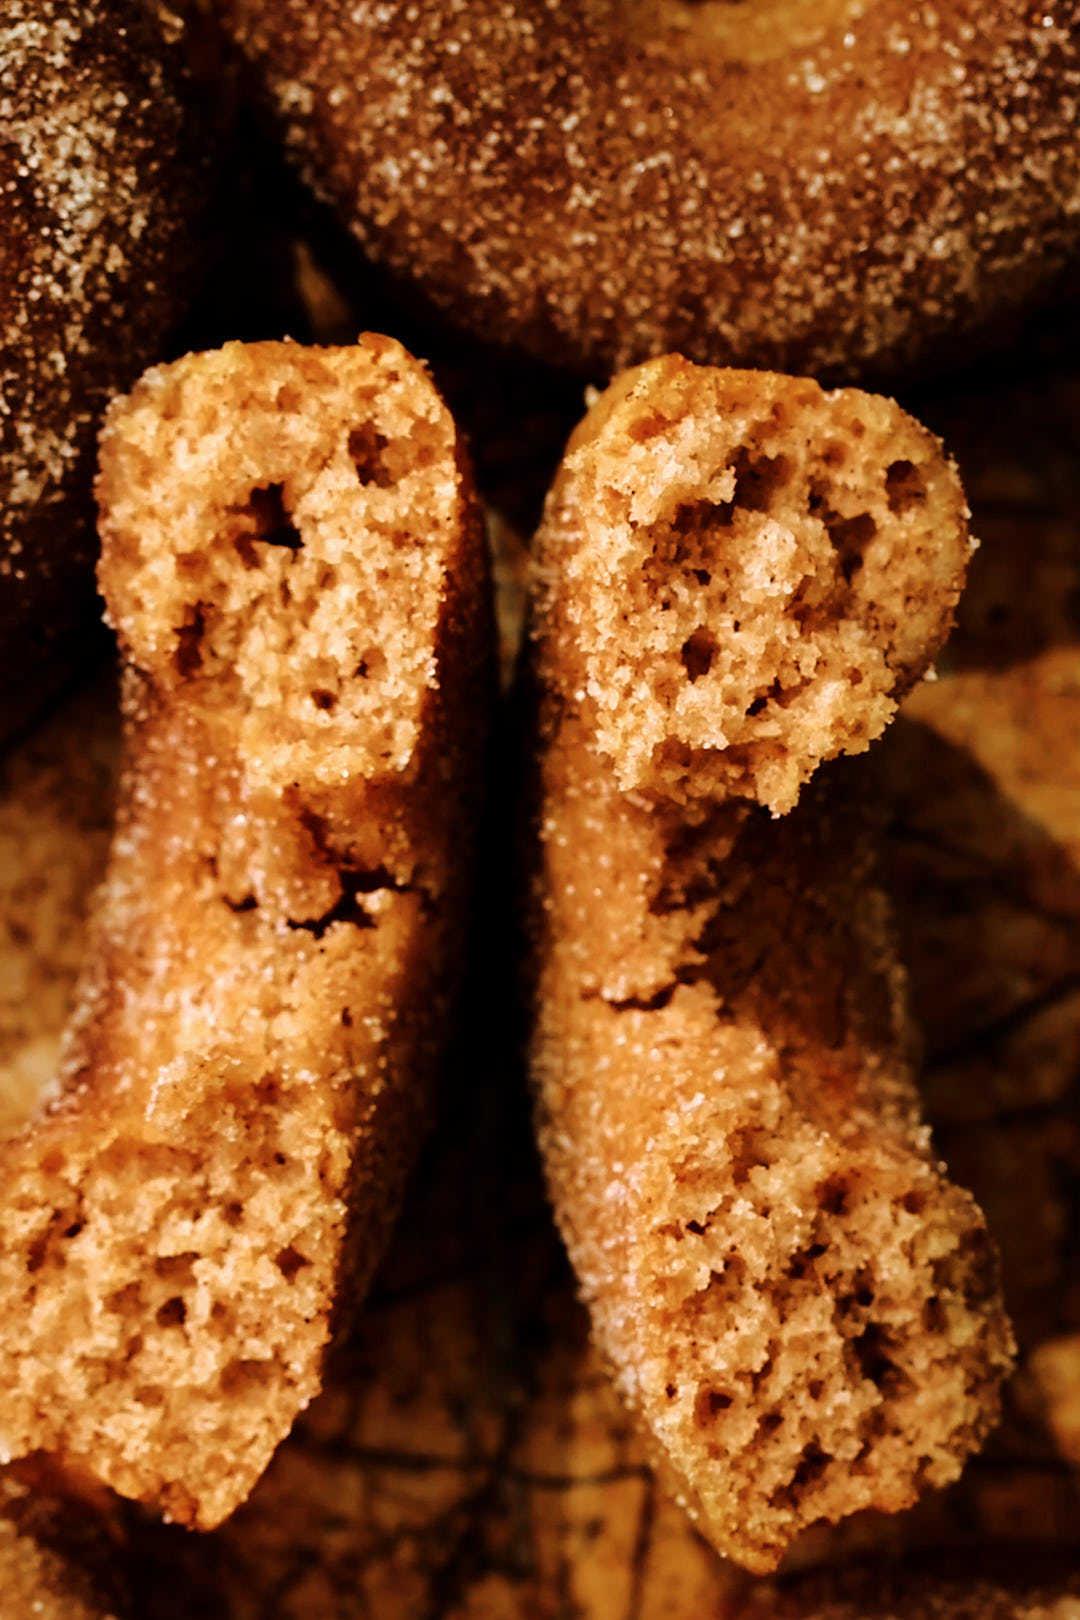
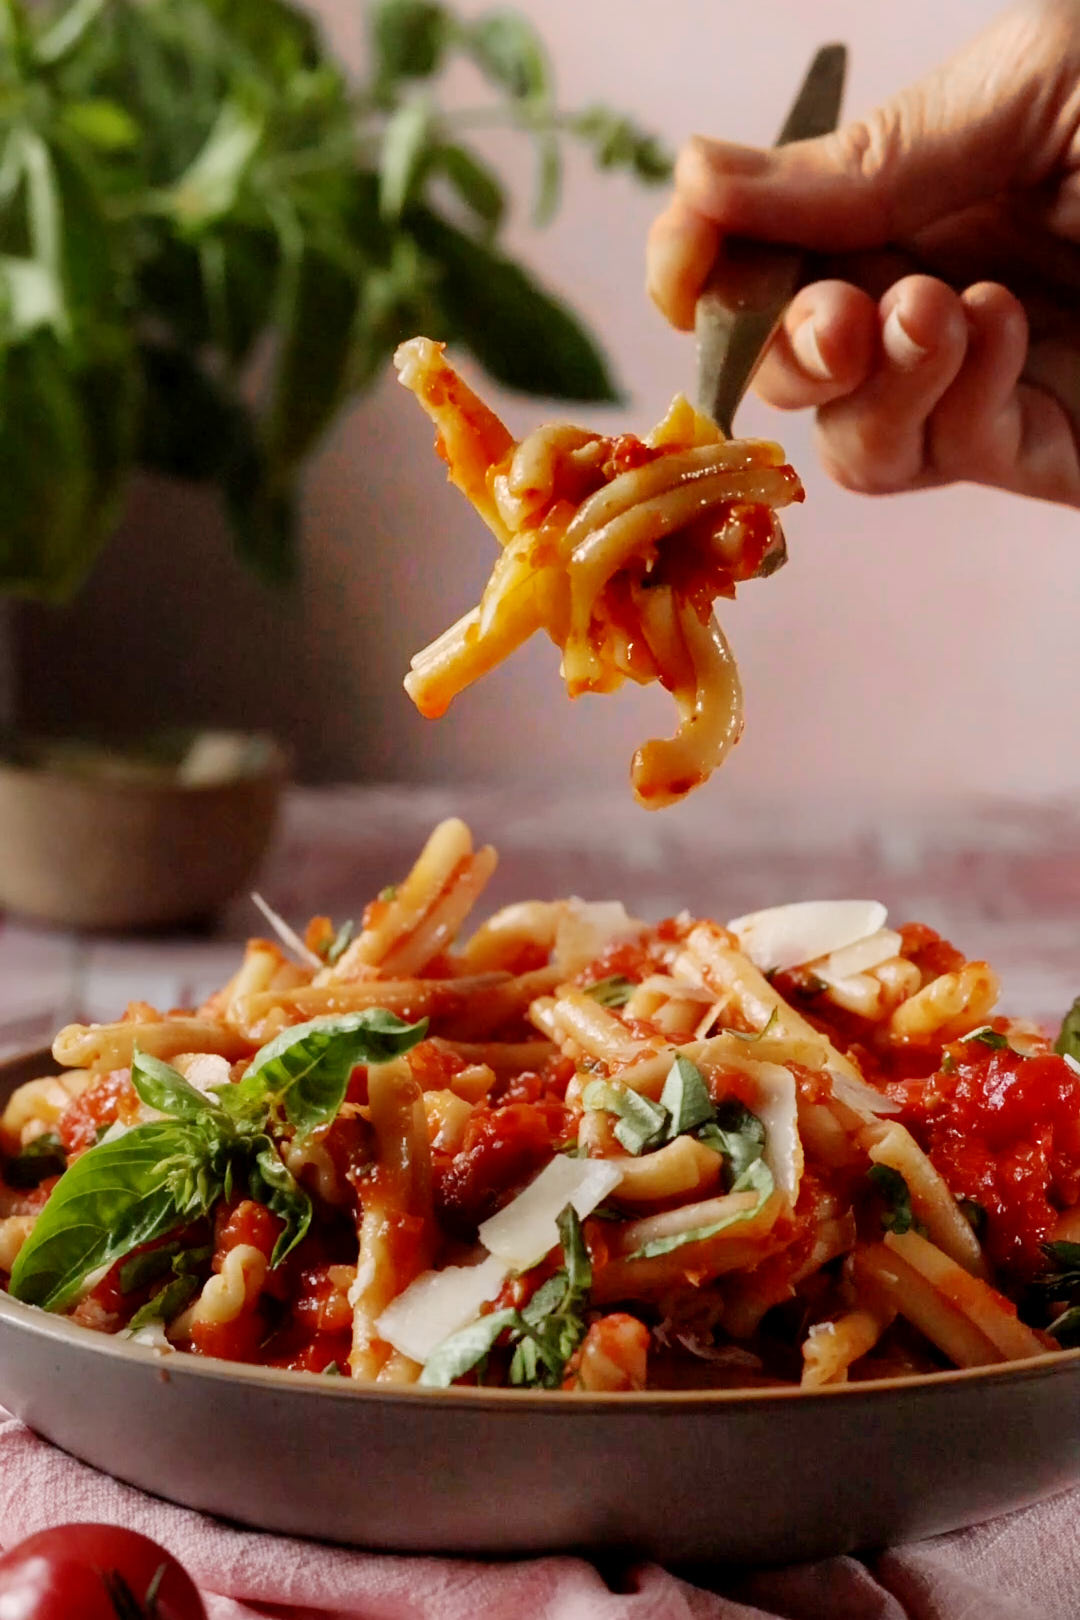
Fried: Crisp shell that gives way to a plush, perfectly dense interior – in the best possible way.

Tray of freshly fried Apple Cider Donuts.
Plush dense interior crumb of fried apple cider donut.

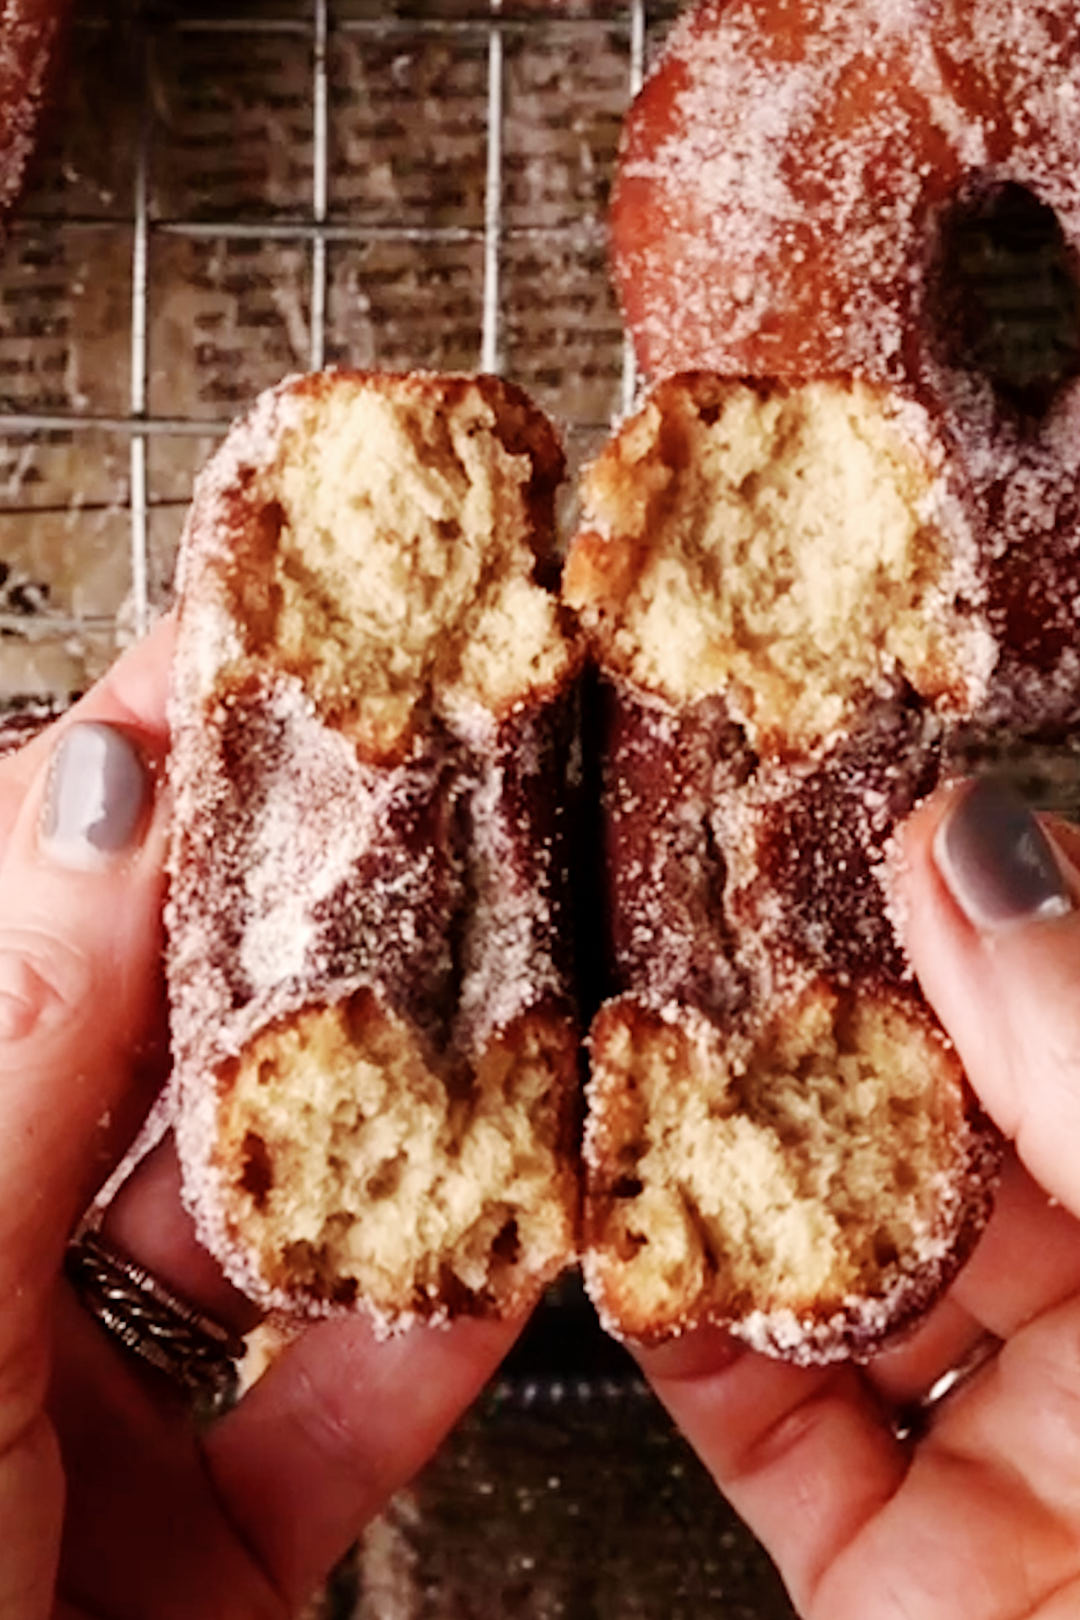
Baking and frying side by side turned out to be the best kind of kitchen challenge. Watching the differences unfold — how each batter behaved, how each one smelled as it cooked — was as fascinating as it was delicious. And while opinions were split among my taste testers (two preferred the baked, three went for the fried), I’m firmly in the fried camp. I adore a dense, satisfying crumb — that texture you really bite into. Light and fluffy gets far too much love and attention, if you ask me.

Keys to Apple Cider Donut success:

  • Reduce the cider for maximum flavour. Boil it down until it’s thick and syrupy — concentrated cider is the heart of these donuts. I saw that America’s Test Kitchen suggested using thawed frozen apple juice concentrate as a shortcut to save time. I tried it, but it just didn’t deliver the same depth or punch of flavour that reduced cider does. It’s worth taking those extra few minutes at the stove — your kitchen will smell incredible.
  • Use the right spice balance. Cinnamon and nutmeg are essential, but don’t overdo it. You want the apple to shine through.
  • Don’t skip the brown butter. For the baked version, this step adds incredible depth and aroma. It’s what takes the flavour from good to irresistible.
  • Mind your temperature. If you’re frying, keep your oil around 350°F. Too hot and they brown before cooking through; too cool and they’ll absorb oil.
  • Handle the dough properly. The fried donut dough is quite sticky — it needs a liberal dusting of flour to handle and shape. Be sure to give it at least 3 hours in the fridge before cutting and frying. This rest time allows the flour to fully hydrate, making the dough easier to work with and ensuring that perfectly plush texture once fried.
  • Use parchment squares for frying. Cut small squares of parchment paper and place each donut on one before frying. This makes transferring the donuts into hot oil so much easier and helps them keep their shape. The parchment slips right off as they fry — just fish it out with tongs.
  • Coat while warm. Whether baked or fried, the cinnamon sugar sticks best when the donuts are still just warm to the touch. Bonus tip: if you can find freeze-dried apple powder, add a touch of it to the cinnamon-sugar mix — it really amps up the apple flavour.
  • Freeze any extras. Both versions freeze beautifully — just rewarm briefly before serving, and they’ll taste freshly made.

Baked Apple Cider Donuts (with a brown butter twist)

Oven-baked cider donuts dipped in brown butter and coated in cinnamon-sugar.
Servings 20 donuts
Calories 303 kcal

Equipment

Ingredients
  

Donuts

  • 339 grams unsalted butter, to be browned, method below
  • 496 grams fresh apple cider, (2 cups) NOT apple cider vinegar
  • 225 grams all-purpose flour
  • 130 grams whole wheat flour
  • 1 1/2 teaspoons baking powder
  • 1/2 teaspoon baking soda
  • 1 teaspoon Diamond Crystal Kosher salt or 1/2 teaspoon Morton's Kosher salt
  • 1 teaspoon ground cinnamon
  • 1/4 teaspoon ground nutmeg
  • 198 grams granulated sugar
  • 105 grams light brown sugar
  • 128 grams apple butter or applesauce
  • 3 large eggs
  • 1 teaspoon vanilla bean paste or vanilla extract

Sugar Coating

  • 132 grams granulated sugar
  • 1 teaspoon ground cinnamon
  • 1/8 teaspoon ground nutmeg
  • 1 Tablespoon freeze dried apple powder, optional

Instructions
 

  • Brown the butter: In a light-coloured, heavy saucepan over medium-low heat, melt the butter. Cook, stirring often, until the foam subsides, it smells nutty, and the milk solids turn deep golden brown, 5–7 minutes. Immediately scrape everything (fat + browned bits) into a heatproof bowl to stop the cooking. Cool 5–10 minutes.
    You’ll use 137 g of this browned butter in the batter; reserve the rest for dipping later.
  • Reduce the cider and enrich: Wipe out the pan. Add 496 g (2 cups) cider and boil over medium-high, stirring occasionally, until reduced by about half (to roughly 1 cup), 10–15 minutes. Off heat, whisk in the 128 g apple butter (or applesauce). Let cool until just warm, not hot
  • Prep pans and oven: Heat oven to 350°F. Lightly spray the cavities of your donut pans; use a pastry brush to coat evenly and avoid pooling. 
  • Dry mix: In a medium bowl, whisk together AP flour, whole-wheat flour, baking powder, baking soda, cinnamon, nutmeg, and salt until well combined
  • Start the batter with browned butter and sugars: Weigh 137 g of the cooled browned butter into a large mixing bowl. Add 198 g granulated sugar and 105 g light brown sugar; whisk until glossy and slightly thick. Whisk in the eggs one at a time, fully incorporating each before adding the next, then whisk in the vanilla. (If anything looks greasy or separated, give it 30–60 seconds of extra whisking.) 
  • Combine wet and dry ingredients: Switch to a spatula. Stir in half the dry mix, then all of the warm (not hot) cider mixture, then the remaining dry mix. Fold just until no dry patches remain. Batter will be thick and scoopable.
  • Fill and bake: Transfer batter to a piping bag (or zip-top bag) and pipe each cavity about ⅔ full (aim for level rims). Tap pan gently on counter to remove any large air bubbles. Bake 8–10 minutes until domed, lightly golden, and the centres spring back when gently pressed; a toothpick should come out clean. Cool 10 minutes in the pan, then turn out onto a rack. Re-grease pans and repeat with remaining batter.  
  • Cinnamon-sugar finish: Stir together the 132 g sugar, cinnamon, nutmeg. and optional freeze-dried apple powder. Gently re-warm the reserved browned butter until fluid. While doughnuts are warm (not hot), dip the tops in butter, let excess drip, then press into the cinnamon-sugar. For a fully coated effect, lightly brush sides with butter and toss in a shallow bowl of sugar mix.
  • To serve and store: Best the day they’re baked. To freeze, skip the sugar coating; cool completely, freeze airtight up to 2 months. Re-warm at 300°F (about 8 minutes), then dip into melted browned butter and sugar just before serving.

Notes

Adapted from Tara O’Brady’s recipe for Apple Cider Donut Cake. to really amp up the apple flavour, I added a bit of freeze dried apple powder to the cinnamon-sugar mixture for dipping finished donuts into. Totally optional if you can’t find it. I order it online. 

Nutrition

Calories: 303kcalCarbohydrates: 41gProtein: 3gFat: 15gSaturated Fat: 9gPolyunsaturated Fat: 1gMonounsaturated Fat: 4gTrans Fat: 1gCholesterol: 64mgSodium: 192mgPotassium: 90mgFiber: 1gSugar: 26gVitamin A: 467IUVitamin C: 0.3mgCalcium: 39mgIron: 1mg
Tried this recipe?Let us know how it was!

Apple Cider Donuts

The orchard classic: hot, fresh, and fried to perfection.
Servings 10 donuts
Calories 449 kcal

Equipment

  • Deep-fry thermometer
  • Doughnut cutter or 3¼-inch round cutter plus 1¼-inch round cutter;

Ingredients
  

Donuts

  • 485 grams apple cider (2 cups), NOT apple cider vinegar
  • 128 grams apple butter (1/2 cup), or applesauce
  • 113 grams sour cream (1/2 cup)
  • 2 teaspoon vanilla bean paste or vanilla extract
  • 455 grams all-purpose flour
  • 1/2 teaspoon baking soda
  • 2 1/2 teaspoons baking powder
  • 1 teaspoon Diamond Crystal Kosher salt, or 1/2 teaspoon Morton's Kosher salt
  • 1 teaspoon ground cinnamon
  • 1/8 teaspoon ground nutmeg
  • 50 grams granulated sugar (1/4 cup)
  • 53 grams light brown sugar (1/4 cup)
  • 2 large eggs
  • 56 grams unsalted butter (4 Tablespoons), melted and slightly cooled

For frying and coating

  • vegetable oil, for frying
  • 45 grams all-purpose flour, for dusting parchment lined baking sheet, (1/3 cup)
  • 198 grams granulated sugar
  • 1 Tablespoon ground cinnamon
  • 1/8 teaspoon ground nutmeg
  • 2 Tablespoons freeze-dried apple powder, optional

Instructions
 

  • Reduce cider: In a medium saucepan, bring the apple cider to a boil over medium-high heat. Cook, stirring occasionally, until syrupy and reduced to about 120 ml / ½ cup, 18–22 minutes. Pour into a medium bowl. Whisk in the apple butter, sour cream, and vanilla. Let cool slightly.
  • Mix dry ingredients: In another medium bowl, whisk together flour, baking powder, salt, baking soda, cinnamon, and nutmeg.
  • Cream eggs and sugars: Using a stand mixer fitted with the paddle or a hand mixer, beat the brown sugar, and eggs on medium-high until light and fluffy, 3–4 minutes. Add the melted, cooled butter and mix until incorporated, about 1 minute.
  • Combine wet and dry ingredients: Reduce mixer speed to low. Add the dry ingredients in two additions, alternating with the cider mixture in two additions, starting and ending with the dry. Mix just until combined. Dough will be very soft and sticky.
  • Shape and chill dough: Thoroughly flour a parchment-lined baking sheet with about ⅓ cup flour. Scrape dough onto it. Dust the top and your hands with more flour and gently pat into a ¾-inch thick rectangle. Lightly flour again, cover tightly with plastic wrap, and chill at least 3 hours or up to overnight.
  • Make cinnamon sugar: Stir together the sugar, cinnamon, nutmeg and freeze dried apple powder (if using) in a wide, shallow bowl. If your apple powder has clumped up, push it through a fine mesh sieve to remove any lumps.
  • Cut doughnuts: Cut 10 squares of parchment, about 4 inches each. Working directly on the floured baking sheet, dip your cutter(s) in flour and punch out rounds. If using two cutters, cut the centre holes. Place each doughnut on its own parchment square. Gather scraps (including holes), gently re-roll once, and cut more rounds—don’t overwork or doughnuts will be tough. You should get about 10 doughnuts plus the bonus (chef's snack!) holes.
  • Set up frying station: Place a wire rack over a paper towel–lined baking sheet. Fit a large heavy pot with a deep-fry thermometer. Add oil to a depth of 3 inches and heat over medium-high to 350°F (177°C).
  • Fry doughnuts: Working in batches, carefully lower donuts (parchment and all) into the hot oil; after a few seconds, peel away parchment with tongs. Fry until deep golden brown, about 3 minutes per side. Transfer to the rack. Repeat with doughnut holes, about 2 minutes per side. Return oil to 350°F between batches.
  • Coat & serve: While still warm, toss doughnuts and holes in the cinnamon sugar. Best enjoyed within a few hours of frying.

Notes

Adapted from Dessert Person by Claire Saffitz. Freeze dried apple powder, an optional ingredient in the recipe, is available online, if you decide to use it. I

Nutrition

Calories: 449kcalCarbohydrates: 71gProtein: 7gFat: 15gSaturated Fat: 6gPolyunsaturated Fat: 5gMonounsaturated Fat: 4gTrans Fat: 0.2gCholesterol: 56mgSodium: 418mgPotassium: 157mgFiber: 2gSugar: 30gVitamin A: 271IUVitamin C: 1mgCalcium: 105mgIron: 3mg
Tried this recipe?Let us know how it was!

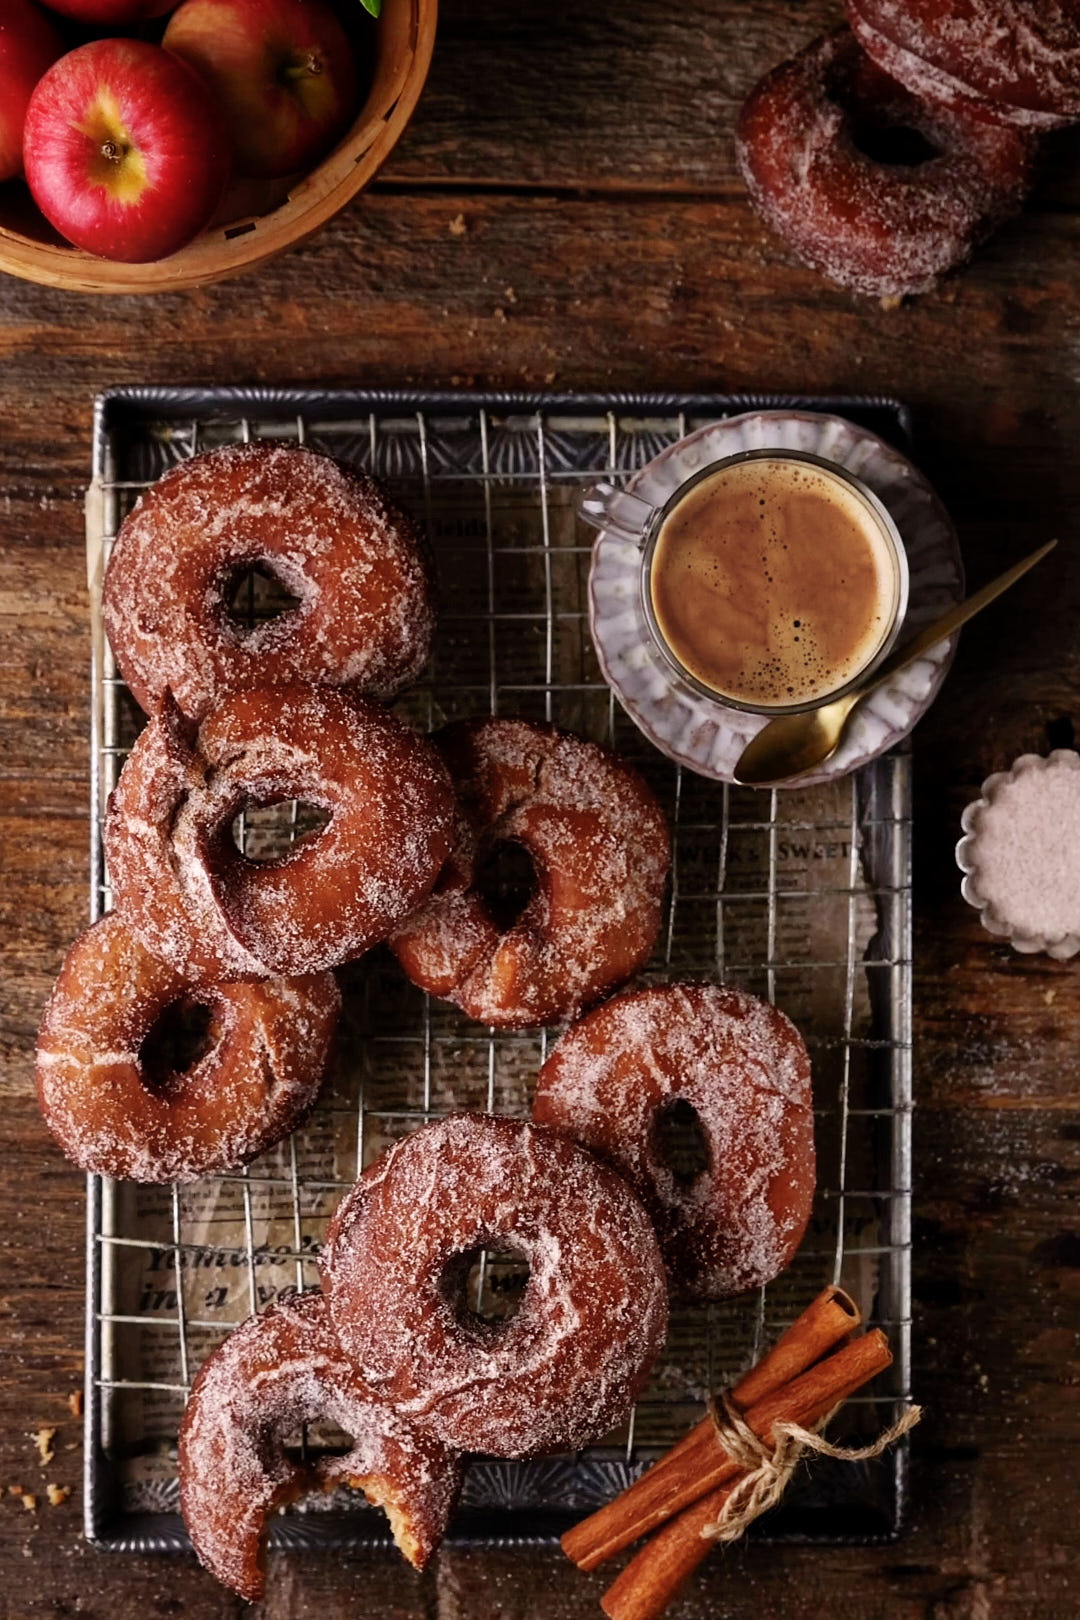
In the end, the fried donuts won my heart — and my taste buds. That crisp shell giving way to a plush, dense interior is everything I love about fall baking: comforting, nostalgic, and deeply satisfying. Still, the baked version has its charm — soft, tender, and laced with brown butter warmth.

So maybe it’s less a battle and more a celebration of two ways to capture the flavour of fall. Whether you’re Team Brown Butter or Team Hot Oil, the smell of cider and cinnamon wafting through the house is pure happiness.

"Grate" Tomato Sauce

“Grate” Tomato Sauce (Easy No-Peel Fresh Tomato Sauce)

pasta with easy no peel tomato sauce

I’ll admit it — I always get a little greedy at the farmer’s market. Faced with baskets of sun-warmed heirlooms and tiny, sweet cherry tomatoes, I inevitably buy far more than we can reasonably eat in a week. That’s when “Grate” Tomato Sauce comes to the rescue. This quick, no-peel sauce is my favourite way to turn a glut of tomatoes into something beautiful. In less than half an hour, I’ve got a big pot of sauce that’s perfect for pasta tonight, with plenty left to freeze for a taste of summer in the colder months.

My secret to skipping the peeling and coring? A box grater. Just cut the tomatoes in half, give them a quick squeeze to release the seeds, and grate the cut side against the large holes until all that’s left is the skin. It’s fast, tidy, and kind of satisfying. Check out the video in this post to see the method in action.

The beauty of this sauce is that it doesn’t take much to make those tomatoes shine. Shallots lend a gentle sweetness, garlic adds depth, and a spoonful of tomato paste boosts the umami, making the sauce taste slow-simmered in just minutes. Fresh basil ties it all together, while the short simmer keeps the flavour bright. It’s unfussy, quick, and exactly the kind of recipe I lean on when I’ve brought home more tomatoes than I know what to do with.

dicing shallots for "grate" tomato sauce

Keys to Success for “Grate” Tomato Sauce

  • Start with ripe tomatoes Slice them in half and gently squeeze out the seeds before grating. This keeps the sauce from getting too watery.
  • Use the big holes on your box grater The trick is to grate the cut side against the large holes. You’ll be left holding only the skins, which you can discard — no peeling required.
  • Boost the umami A spoonful of tomato paste adds depth, but if you happen to have freeze-dried tomato powder in your pantry, it’s an amazing alternative for concentrated flavour.
  • Balance sweet and heat Tomatoes need a little something to round them out. A touch of honey (or sugar) balances the acidity, while a pinch of Aleppo pepper brings gentle warmth without overwhelming.
  • Don’t skip the basil Fresh sprigs infuse the sauce as it simmers, then get removed before serving. They give the sauce its signature brightness.
  • Butter over oil Marcella Hazan’s famous tomato sauce taught us all the magic of butter in tomato sauce — it softens acidity and adds richness. This recipe follows her lead.
  • Freezer-friendly This sauce makes enough for eight portions, so freeze the extra in smaller containers. Future-you will be grateful when you find summer’s bounty waiting in the freezer.

“Grate” Tomato Sauce

This quick fresh tomato sauce is made without peeling or coring—just grate the tomatoes and simmer with shallots, garlic, tomato paste, and chili flakes for a simple, flavour-packed sauce. This recipe makes enough to sauce about 2 pounds pasta, serving 8 people. It freezes beautifully.
Cook Time 30 minutes
Servings 8 servings
Calories 76 kcal

Equipment

  • 1 box grater

Ingredients
  

  • 1 kilogram ripe summer tomatoes (medium or large)
  • 3 Tablespoons unsalted butter
  • 2 shallots, peeled and finely diced
  • 3 garlic cloves, grated or pushed through garlic press
  • 2 Tablespoons Tomato powder, or Tomato paste
  • 2 teasspoons Diamond Crystal Kosher salt, or 1 teaspoon Morton's Kosher salt
  • 2 teaspoons honey
  • 1/4 -1/2 teaspoon Aleppo pepper, or red pepper flakes
  • 2 sprigs fresh basil, about 16 basil leaves
  • 1 Tablespoon sherry or red wine vinegar, optional

Instructions
 

  • Prepare the tomatoes: Slice tomatoes in half and gently squeeze out the seeds. Place a box grater over a large bowl. Using the side with the large holes, grate the cut side of each tomato until only the skin remains in your hand. Discard the skins.
  • Cook the aromatics: In a medium saucepan, melt the butter over low heat. Add the diced shallots and cook, stirring occasionally, for 3–4 minutes until softened. If they begin to brown too quickly, add ¼ cup water to prevent burning. Stir in the garlic and cook for 1 more minute.
  • Build the base: Add the tomato paste (or tomato powder), salt, honey, and Aleppo pepper. Stir to combine and cook for 1 minute to deepen the flavour.
  • Simmer the sauce: Add the grated tomatoes and basil sprigs. Reduce the heat to low and simmer gently for 25–30 minutes, stirring occasionally, until the sauce has thickened.
  • Finish and adjust seasoning: Remove the basil sprigs. Taste the sauce and adjust seasoning as needed—add more salt if desired, or a splash of vinegar if the sauce needs brightness.

Nutrition

Calories: 76kcalCarbohydrates: 9gProtein: 2gFat: 5gSaturated Fat: 3gPolyunsaturated Fat: 0.3gMonounsaturated Fat: 1gTrans Fat: 0.2gCholesterol: 11mgSodium: 138mgPotassium: 368mgFiber: 2gSugar: 6gVitamin A: 1279IUVitamin C: 19mgCalcium: 21mgIron: 1mg
Tried this recipe?Let us know how it was!

Making a big batch of this sauce means you’ll have dinner sorted for more than just one night. Freeze the extras, and when winter comes around, you’ll be glad to have a taste of summer ready to go.”

Golden Gazpacho

Golden Gazpacho is my sunny twist on the classic Andalusian soup—bright, refreshing, and perfect for overflowing late summer markets.

One of my favourite summer soups is the classic Andalusian gazpacho, a chilled tomato-based soup that I’ve already shared on the blog. This new version—Golden Gazpacho—takes that idea in a sunny direction, using up the golden vegetables that flood the markets in late summer: sweet corn, juicy yellow tomatoes, and golden peppers…

Keys to Success for Golden Gazpacho

  • Roast the peppers Raw yellow peppers can taste a little too green and vegetal. A quick roast on the grill or under the broiler softens that edge and adds just enough smoky depth to balance the sweetness of the corn and acidity of the tomatoes.
  • Choose your tomatoes wisely Any mix of yellow tomatoes works here. Large heirlooms bring a mellow, juicy sweetness, while little sun golds add a bright, tangy pop. Use whatever’s best and ripest at the market.
  • Soak the bread Don’t skip this step—it’s essential for the soup’s creamy texture. A quick 30-second soak in water is all you need to soften the bread before blending.
  • Go easy on the garlic Garlic should lift the flavours, not dominate them. Too much can overpower the delicate balance of sweet corn, smoky peppers, and ripe tomatoes.
  • Texture matters Smooth soup alone doesn’t cut it for me—I need crunch. A mix of toppings like raw corn kernels, diced cucumber, and croutons makes each bowl more satisfying. Yes, you can grab a bag of store-bought croutons, but tiny homemade ones are more adorable and delicious.miles better.
  • Don’t skip the straining step Running the blended soup through a sieve is essential. It removes skins and seeds, giving you that silky finish that makes gazpacho so refreshing.
  • Make it ahead This soup only gets better with time. Let it chill in the fridge for at least a few hours before serving, but if you can plan ahead, it’s even more flavourful the next day.


Golden Gazpacho

Golden Gazpacho captures summer in a bowl—sweet corn, sun-ripened yellow tomatoes, and smoky peppers blended into a silky, refreshing soup
Servings 4 servings
Calories 281 kcal

Ingredients
  

Soup ingredients for blender

  • 1 medium yellow pepper, about
  • 4 ears corn, husks and silks removed
  • 1 four inch piece of baguette, crust removed
  • 2 1/2 pounds yellow tomatoes, a mix of large heirloom and small sun gold is fine, whatever you can find.
  • 2 cloves garlic
  • 1 shallot, peeled and halved
  • 2 Tablespoons Sherry or Red Wine Vinegar
  • 1 Tablespoon Diamond Crystal Kosher salt, or 1 1/2 teaspoons Morton's Kosher salt

Soup Ingredient to whisk in by hand:

  • 3 Tablespoons Extra Virgin Olive oil

Homemade Croutons:

  • 1 six inch piece baguette, diced into 1/4 inch cubes
  • 2 Tablespoons olive oil
  • 1 teaspoon Diamond Crystal Kosher salt, or 1/2 teaspoon Morton's Kosher salt

Garnishes:

  • 1 cup reserved corn kernels (from above)
  • 2 small Persian Cucumbers, diced into 1/4 inch pieces
  • 4 cherry tomatoes, sliced
  • 8 leaves fresh basil, cut into julienne
  • 4 teaspoons extra virgin olive oil,

Instructions
 

  • Roast the pepper: Place the oven rack about 6 inches below the broiler and preheat, or preheat an outdoor grill to high. Char the pepper under the broiler, on the grill, or directly over a gas flame (using tongs), turning every 1–2 minutes until the skin is blistered and blackened all over, 5–7 minutes total. Transfer to a bowl, cover, and let steam for 5 minutes. Peel off the skin, then remove the stem and seeds. Steaming helps loosen the skin, making it much easier to peel.
  • Prepare the corn: Lay the cob on its side on a cutting board. Using a sharp knife, slice off the kernels, turning the cob as you go until all the kernels are removed. You will get about 5 cups of corn kernels. After the kernels are off, stand the cob upright in a medium bowl and scrape down the length with the back of your knife to “milk” the cob, releasing the starchy liquid. This corn milk adds extra sweetness and body to the soup.
    Set aside 1 cup of corn kernels for garnish.
  • Soften bread: Place the baguette in a bowl of cold water and soak for about 30 seconds. Remove and squeeze firmly to expel as much water as possible. The softened bread blends into the soup, giving it body and a naturally creamy texture.
  • Blend the base: Place the roasted pepper, corn, corn milk, soaked baguette, tomatoes, garlic, shallot, salt, and vinegar in a blender. If using large heirloom tomatoes, core and quarter them first; small sun golds can go in whole. Depending on the size of your blender, you may need to work in two batches. Blend until completely smooth. Do not add the oil yet—it will be whisked in by hand later to prevent it from turning bitter in the high-speed blender.
  • Strain and finish: Set a large mesh strainer over a bowl and pour the soup through, pressing on the solids to extract as much liquid as possible. Whisk in 3 tablespoons of olive oil by hand—adding it in the blender can make the oil taste bitter. Cover and refrigerate for at least 4 hours, or ideally overnight for the best flavour.
  • Make the croutons: Preheat the oven to 350°F. Toss the bread cubes with a drizzle of olive oil and spread them out on a baking sheet. Sprinkle with kosher salt. Bake for about 8 minutes, stirring once, until golden and crisp.
  • Serve the soup: Pour the chilled soup into bowls. Arrange the garnishes—reserved corn, diced cucumber, fresh basil, homemade croutons, and a drizzle of olive oil—on the side and let everyone add their own.

Notes

Sunshine in a bowl, this golden gazpacho takes the classic chilled Andalusian Spanish soup in a brighter direction. Sweet raw corn and smoky roasted yellow pepper add depth to juicy yellow tomatoes, while a splash of sherry vinegar keeps it lively. Blended until silky, strained for smoothness, and finished with a drizzle of olive oil, it’s the ultimate make-ahead summer soup. Serve with a handful of garnishes—reserved corn, cucumber, herbs, and crunchy croutons—so everyone can dress their own bowl.

Nutrition

Calories: 281kcalCarbohydrates: 19gProtein: 5gFat: 23gSaturated Fat: 3gPolyunsaturated Fat: 3gMonounsaturated Fat: 16gSodium: 2484mgPotassium: 941mgFiber: 3gSugar: 3gVitamin A: 244IUVitamin C: 86mgCalcium: 49mgIron: 2mg
Tried this recipe?Let us know how it was!

Golden Gazpacho is summer in its brightest form—silky, refreshing, and full of sun-ripened flavour. I love bringing it to the table in a glass pitcher with all the toppings on the side. Guests can have fun making their own bowls, and you get the joy of watching everyone turn it into something uniquely theirs.

Savoury Brunch Galette

Flaky AF crust. Creamy ricotta. Sweet corn. Wilted kale. A golden yolk on top. This is the ultimate savoury brunch galette.


If pie is the perfectionist’s dessert, galettes are its chill, effortlessly stylish cousin. I like to think of them as lazy-ass pies, but in the very best way. No pie dish. No crimping. Just flaky, golden pastry folded casually over whatever filling you’re in the mood for.

And if there’s only one recipe you try from my blog, make it this galette dough. It delivers maximum results for minimal effort. Made in seconds in the food processor, it’s flaky AF thanks to cold butter, sour cream, and a touch of cornmeal. I can’t overstate how special this dough is, it’s foolproof, flexible, and bakes up like a dream.

Sweet or savoury, galettes are endlessly versatile, and this one leans fully into brunch territory. Sautéed kale and onions meet sweet corn and creamy ricotta, all nestled into that golden crust. A runny yolk on top seals the deal.

Keys to Success:

  • Cold butter + cold water = flaky crust. Chill everything before you start.
  • Roll the dough while it’s still soft—between two sheets of parchment. Then chill the rounds before assembling for easy handling.
  • Par-cook your veg. Raw vegetables release water. Sautéed greens and onions are flavourful and galette-friendly.
  • Use a hot oven. 400°F ensures the bottom crust sets while the edges brown.
  • Add the egg later. Crack it on when the galette is nearly done so the white sets and the yolk stays runny.
  • Don’t skimp on seasoning. Salt the filling. Salt the crust. Add a hit of hot sauce if you like.
Savoury Brunch Galette

Savoury Brunch Galette

Makes four 8-inch galettes
Servings 4 servings
Calories 1479 kcal

Ingredients
  

Galette Dough

  • 80 grams sour cream, full fat or light but not fat free
  • 150 grams ice cold water
  • 360 grams all-purpose flour
  • 70 grams cornmeal
  • 5 grams sugar
  • 1 teaspoon Diamond Crystal Kosher salt, or 1/2 teaspoon Morton's Kosher salt
  • 200 grams unsalted butter, cold cut into 1/2 inch pieces

Galette Filling

  • 1 bunch Lacinato Kale, also called Tuscan kale, black kale, dinosaur kale
  • 1 Tablespoon olive oil
  • 1 small onion, finely diced
  • 1/2 teaspoon Diamond Crystal Kosher salt, or 1/4 teaspoon Morton's Kosher salt
  • 170 grams whole milk ricotta cheese
  • 2 Tablespoons milk (1 % or 2% is fine, whatever you have on hand)
  • 120 grams fontina cheese, grated
  • 175 grams Monterey Jack cheese, grated
  • 1/2 teaspoon Diamond Crystal Kosher salt, or 1/4 teaspoon Morton's Kosher salt
  • 4 large ears of corn, shucked and corn cut off the cob or 3 cups frozen corn, thawed
  • 4 large eggs

Assembly

  • 1 large egg, beaten with 1 Tablespoon water

Garnish

  • 2 Tablespoons Everything Bagel Spice

Instructions
 

Galette Dough

  • Whisk sour cream and ice water together in a small bowl; set aside. In a food processor fitted with the metal blade, combine flour, cornmeal, sugar, and salt. Pulse to mix.
  • Add the cold butter and pulse 8 to 10 times, until the mixture resembles coarse crumbs with butter pieces ranging from breadcrumbs to small peas.
  • With the machine running, slowly pour in the sour cream mixture. Process just until the dough comes together in soft, moist curds. Turn the dough out of the food processor onto the counter. Divide dough in 4 equal pieces and shape each piece into a round disc.
  • Lightly dust one disc with flour, and roll between 2 sheets of parchment paper, into a 10 inch circle. No need for a perfect circle—just aim for a rough 10-inch round. Repeat with the other 3 discs. Chill dough rounds in fridge, still between their sheets of parchment paper, for about 30 minutes.
  • To freeze, wrap each rolled dough round tightly in plastic and store flat for up to 1 month.

Cheese filling

  • Wash the kale leaves and strip them from the stems. (Tip: The tip of a paring knife works great for this.) Discard the stems. Stack the leaves and slice across them into ¼-inch ribbons using a sharp chef’s knife.
  • Heat a large sauté pan over medium heat. Add olive oil and diced onions. Sauté for 4–5 minutes, until onions are soft and translucent. If they begin to brown too quickly, add about ¼ cup water to slow things down.
  • Add the kale and toss for 1–2 minutes, just until wilted. Stir in the corn and remove the pan from the heat. Let the mixture cool slightly.
  • Reserve 1/4 cup each of fontina and Monterey Jack cheeses. In a large mixing bowl, stir together the ricotta, milk, remaining fontina, and Monterey Jack, and salt until well combined.

Assemble galette

  • Arrange two racks in the oven—one in the top-middle position, the other in the bottom-middle. Preheat the oven to 400°F.
  • Remove the chilled dough rounds from the fridge. Peel off the top sheet of parchment from each one. Flip the dough over onto the counter or a baking sheet, then peel off the second sheet. Line two rimmed baking sheets with some of the parchment you just removed. Place two dough rounds on each sheet.
  • Spread each dough round with about 1/4 of the cheese mixture, leaving a 1-inch border around the edges. Top each with 1/4 of the kale–onion–corn mixture.
  • Fold the border of dough up and over the filling, pleating gently as you work your way around each galette.
  • Brush the dough border with egg wash. Sprinkle with Everything Bagel spice (or another topping of your choice).
  • Bake for 15 minutes. Then switch the trays—move the one from the bottom rack to the top, and vice versa. Bake for another 15 minutes.
  • Remove the pans from the oven and sprinkle each galette with the reserved fontina and Monterey Jack. Use a spoon to create a small well in the centre of each galette, then carefully crack an egg into each one. Return the pans to the oven and bake for 5–8 minutes more, until the whites are set but the yolks remain soft.
  • Just before serving, sprinkle each galette with salt, pepper, and a few dashes of hot sauce if desired.

Nutrition

Calories: 1479kcalCarbohydrates: 117gProtein: 53gFat: 91gSaturated Fat: 50gPolyunsaturated Fat: 8gMonounsaturated Fat: 27gTrans Fat: 2gCholesterol: 541mgSodium: 2198mgPotassium: 958mgFiber: 10gSugar: 11gVitamin A: 9713IUVitamin C: 71mgCalcium: 904mgIron: 9mg
Tried this recipe?Let us know how it was!

What makes this galette crust so good?

This dough is flaky, but it’s not just because of the butter (though yes, there’s a lot of that too).

  • Cornmeal adds a delicate but rustic crunch. It gives the crust a bit more structure and texture, so it feels hearty without being heavy.
  • Sour cream brings subtle tang and helps tenderize the dough. It keeps the crust soft enough to bite through, even at the thick, pleated edges.

Together, these ingredients strike that perfect balance: crisp, tender, golden, and just a little bit special. It’s the kind of dough you’ll want to keep in your freezer at all times, for sweet and savoury galettes alike.

More Galette Inspiration

If this is your first foray into galette life, welcome. If it’s not—welcome back.

Here’s a roundup of all the galettes I’ve made over the years—sweet, savoury, and in between:

Israeli Salad with Punchy Lemon Garlic Vinaigrette

This vinaigrette has a secret weapon—and it’s not what you think.

I’m really excited about this salad. Israeli Salad with Punchy Lemon Garlic Vinaigrette is one of those dishes that looks simple—but the flavour kind of sneaks up on you. It’s crisp, juicy, herby, and bright, with a vinaigrette that’s lemony, garlicky, and just… next level. There’s a secret ingredient in there that gives it that savoury “wow” factor. (Spoiler: it’s anchovies. But trust me—even if you think you hate them, you won’t taste them the way you expect.)

I test a lot of salads in my kitchen, and most of the time my husband politely eats them, says “that’s good,” and moves on. But this one? He actually stopped mid-bite, looked at me, and said, “This salad is amazing.” I knew then it was blog-worthy.

Anchovies: The Umami You Didn’t Know You Needed

What gives this vinaigrette its magic isn’t just the lemon or garlic—it’s the anchovies. They dissolve right into the dressing, leaving behind zero fishiness and all the savoury depth you didn’t know you needed. They add that elusive, can’t-put-your-finger-on-it flavour that makes everything else shine. Even if you’ve sworn off anchovies in the past, I really think this dressing will change your mind.

What Makes This Salad So Good

What I love most about this salad—besides the vinaigrette I want to put on literally everything—is how easy it is to make and how versatile it is. At its core, it’s just chopped tomatoes and cucumbers, but here I’ve loosened things up a bit. I use sweet cherry tomatoes, crunchy Persian or Lebanese cucumbers, lots of fresh herbs, and a handful of briny olives. It’s bright and crunchy and just so satisfying. You can serve it with grilled fish or falafel, pile it onto toast with a swipe of whipped feta, or just eat it straight from the bowl like I do. It’s the kind of salad you make once… and then again two days later because you’re still thinking about it.

Keys to Salad Success

  • 1. Trust the anchovies.
    I know. But hear me out—anchovies aren’t the enemy. They melt right into the vinaigrette, leaving behind zero fishiness and all the savoury magic. You won’t even know they’re there… until you realize the dressing tastes like something from your favourite restaurant. That’s the anchovy power.
    2. Use the best tomatoes you can find.
    This salad is raw and fresh, so every ingredient matters—especially the tomatoes. Sweet, ripe cherry tomatoes are perfect. If yours are a little bland (it happens!), a pinch of salt or a sprinkle of freeze-dried tomato powder can really boost their flavour.
    3. Give the shallots a little soak.
    Toss them in a spoonful of the dressing while you prep the rest. It takes the edge off their sharp bite and turns them into something silky and tangy and delicious. Don’t skip this—it’s a tiny step that makes the salad way better.
    4. Don’t be shy with the herbs.
    The fresh dill and basil are more than just a garnish—they bring a ton of brightness and personality. Use a good handful of each. It’s what makes the whole thing feel alive.
    5. Save the croutons for last.
    Wait until you’re ready to serve, then shower the top with crushed croutons. They add the crunch this salad needs. Yes, it’s a healthy salad—but we’re not monsters. Crunch is essential. #teamtexture

Let’s Talk Texture

Between the juicy tomatoes, crisp cucumbers, and crunchy crouton topping, this salad has all the texture I crave. The vinaigrette brings it all together, coating every bite without weighing anything down. It’s the kind of salad you actually want to eat—not because you should, but because it’s just that good.

Israeli Salad with Punchy Lemon Garlic Vinaigrette

Servings 4 servings
Calories 221 kcal

Equipment

  • 1 blender

Ingredients
  

Anchovy Garlic Dressing

  • 6 anchovies, packed in olive oil, drained and coarsely chopped
  • 2 small garlic cloves, grated on microplane or pressed through garlic press
  • 2 Tablespoons white wine vinegar
  • 2 Tablespoons lemon juice, freshly squeezed
  • 1 Tablespoon honey
  • 1/2 teaspoon Diamond Crystal Kosher salt, or 1/4 teaspoon Morton's Kosher salt
  • 1/2 cup extra virgin olive oil

Salad

  • 2 small shallots, peeled and thinly sliced
  • 2 cups cherry tomatoes,
  • 1 Tablespoon freeze dried tomato powder, optional
  • 1/2 teaspoon Diamond Crystal Kosher salt, or 1/4 teaspoon Morton's Kosher salt
  • 6 small Israeli or Lebanese cucumbers,
  • 1/3 cup Kalalmata olives,
  • 1/4 cup fresh dill, loosely packed
  • 1/4 cup fresh basil, loosely packed
  • 1/2 cup croutons

Instructions
 

Anchovy Garlic Dressing

  • Place chopped anchovies, grated garlic, vinegar, lemon juice, honey and salt into blender jar. Blend on high speed until the anchovies are fully pureed and the mixture is smooth. Stop and scrape down the sides of the blender as needed.
  • With the blender running, slowly drizzle in the olive oil, until thick and fully emulsified. Transfer to small jar. Dressing can be made in advance and stored in the fridge for about a week.

Salad

  • Peel and thinly slice shallots into rings. Place in a small bowl and toss with 2 tablespoons of the dressing. Let them sit and marinate while you prepare the rest of the salad—this step softens their sharpness and adds flavour.
  • Place croutons in a zip-top bag and crush them with a rolling pin or the bottom of a heavy pan until coarsely crumbled. Set aside to sprinkle just before serving for maximum crunch.
  • While the shallots are marinating, halve the cherry tomatoes and place into a large mixing bowl.
  • Quarter the cucumbers lengthwise and cut into 1/4 inch slices. Add to mixing bowl with tomatoes.
  • Place Kalamata olives on a cutting board and use the flat side of a large knife to gently press until they split. Remove pits and coarsely chop. Add to mixing bowl.
  • Coarsely chop dill and basil and add to mixing bowl. Add the marinated shallots to the bowl. Drizzle with 2-3 more tablespoons of dressing and toss to combine. Taste and adjust seasonings. Add more salt and pepper if needed. Salad can be made ahead and left at room temperature for 1-2 hours before serving.
  • Just before serving, sprinkle crushed croutons over salad.

Notes

The recipe makes more dressing than you will need. It keeps well in the fridge for about 2 weeks. It makes a delicious dip for crudités.

Nutrition

Calories: 221kcalCarbohydrates: 17gProtein: 4gFat: 16gSaturated Fat: 2gPolyunsaturated Fat: 2gMonounsaturated Fat: 12gCholesterol: 5mgSodium: 727mgPotassium: 415mgFiber: 2gSugar: 9gVitamin A: 806IUVitamin C: 27mgCalcium: 62mgIron: 2mg
Tried this recipe?Let us know how it was!

Ready to Make It?

If you’ve made it this far, I hope I’ve convinced you to give this salad a shot—anchovies and all. It’s the kind of dish that feels fresh and effortless, but still delivers serious flavour. Whether you’re serving it alongside something grilled, piling it onto toast, or just digging in with a fork straight from the bowl, I think you’re going to love it. And if someone at your table stops mid-bite and says, “This salad is amazing”? Well, now you know why.

Coffee Crunch Ice Cream Bars

Coffee Crunch Ice Cream Bars

Fun fact about me: I’ve always loved coffee-flavoured foods (hello, Coffee Crisp—one of the many perks of being Canadian!). But I didn’t actually start drinking coffee until I was almost 40.

These Coffee Crunch Ice Cream Bars are layered with flavour and texture—chocolate-covered espresso beans, toasted almonds, and crushed cookies form a crackly center, nestled between layers of smooth coffee ice cream. Dipped in chocolate and finished with a sprinkle of almonds and crushed chocolate covered espresso beans, they’re chilled, crunchy, and fully caffeinated.

The crunch layer consists of almonds, chocolate covered espresso beans and Digestive biscuits. Melted butter holds it all together.

We start with store-bought coffee ice cream—I used Haagen-Dazs, but any rich, smooth brand will do. If shaping bars feels like too much effort, you can absolutely skip the molding and just sprinkle the crunch layer over a scoop of ice cream. Still decadent. Still delicious.

But if you’re up for a little layering magic, the payoff is so worth it.

Keys to Success for Coffee Crunch Ice Cream Bars

  • Start with good ice cream. Use a high-quality store-bought coffee ice cream. You want something ultra-creamy with bold flavour—Haagen-Dazs is my go-to.
  • Don’t over-process the crunch layer. Pulse just until the mixture holds together. You want distinct bits of almond and cookie in every bite—not dust. Texture is the goal here.
  • Press firmly. Once you’ve added the crunch layer over the first ice cream layer, press it down firmly so it sticks. I like to use the bottom of a measuring cup to compact it evenly.
  • Smooth the layers. For clean, defined bars, take the time to smooth each ice cream layer evenly. Cover the pan with parchment and press gently with the back of that same measuring cup to level things out.
  • Freeze fully before cutting. Patience pays off. Give the bars plenty of time to firm up—at least 4 hours, ideally overnight—before unmolding and slicing.
  • Use a deep container for dipping. Pour your melted chocolate into a narrow, deep vessel like a 4.5” x 2.5” deli container. It makes for a clean, even dip with minimal waste.
  • Keep bars frozen until dipping. Work quickly. If the bars start to soften while dipping, just return them to the freezer for 10–15 minutes before continuing.
  • Make it fancy. A drizzle of milk chocolate, a sprinkle of chopped almonds, and a few crushed chocolate-covered espresso beans take these from homemade to heroic. Don’t skip the final flair.
A sprinkle of toasted almonds and crushed chocolate covered espresso beans takes these Coffee Crunch Ice Cream Bars from simple to sublime.

Storage & Make-Ahead Tips

These bars are freezer-friendly and ideal for making ahead. Once dipped and fully set, wrap each bar in plastic wrap and then transfer them to an airtight container or ziploc freezer bag. They’ll keep beautifully in the freezer for up to 4 weeks.

For best texture, let them sit at room temperature for 2–3 minutes before serving—just long enough to soften slightly for that perfect bite: creamy, crunchy, and snappy all at once.

Coffee Crunch Ice Cream Bars

These Coffee Crunch Ice Cream Bars are layered with flavour and texture—chocolate-covered espresso beans, toasted almonds, and crushed cookies form a crackly center, nestled between layers of smooth coffee ice cream. Dipped in chocolate and finished with a sprinkle of almonds and chocolate covered espresso beans, they’re chilled, crunchy, and fully caffeinated.
Servings 9 bars
Calories 827 kcal

Equipment

  • 1 8 inch square baking pan
  • 1 disposable piping bag
  • 1 digital thermometer
  • 1 offset spatula

Ingredients
  

For Coffee Crunch Filling

  • 130 grams Digestive biscuits
  • 20 grams roasted salted almonds
  • 20 grams chocolate covered espresso beans
  • 25 grams malted milk powder, such as Ovaltine
  • 1/4 teaspoon Diamond Crystal Kosher salt
  • 15 grams granulated sugar
  • 75 grams unsalted butter, melted

For Ice Cream Bars

  • 2 pints coffee ice cream, I used Haagen Dazs

For Dipping

  • 200 grams milk chocolate, finely chopped
  • 200 grams bittersweet or semi sweet chocolate, finely chopped
  • 100 grams refined coconut oil
  • 55 grams roasted salted almonds, coarsely chopped

For Decorating (optional)

  • 56 grams milk chocolate finely chopped
  • 30 grams roasted salted almonds toasted and coarsely chopped
  • 30 grams chocolate covered espresso beans coarsely chopped

Instructions
 

Coffee Crunch Layer

  • Preheat oven to 300°F. Line a rimmed baking sheet with parchment paper and set aside. Place Digestive cookies, chocolate covered espresso beans and almonds in food processor. Pulse 3-4 times. Add malted milk powder, sugar and salt and pulse a few more times to combine everything. Add melted butter and pulse 3-4 times until clumps form. Scatter clumps on baking sheet in a single layer. Bake for about 12-14 minutes, until fragrant and browned. Let cool completely. Break up into small clusters.

Ice Cream Bars

  • Line an 8-inch square baking pan with two 8×14-inch sheets of parchment, leaving excess on all sides to help lift the bars later. Avoid using wax paper or foil.
  • Scoop 1 pint of ice cream into the pan. Use an off-set spatula to start spreading it into an even layer. Cover with a square of parchment and use the back of a measuring cup to finish smoothing it into an even layer. Freeze until firm, about 1 hour.
  • Remove the pan from the freezer and spread coffee crunch mixture evenly over the ice cream. Press gently with a spatula. Return to freezer for 30 minutes.
  • Spread the remaining pint of ice cream over the coffee crunch layer. Cover with a square of parchment and use the back of a measuring cup to finish smoothing it into an even layer. Cover with plastic wrap, and freeze until completely firm — at least 4 hours, preferably overnight.
  • Place a cutting board in the freezer to chill. Once the ice cream is frozen, line the chilled board with parchment. Use parchment flaps to lift the slab out of the pan. Invert onto cutting board, peel off parchment, and cut into 9 squares using a large, sharp knife. Wipe the blade clean between slices. Return bars to freezer, wrapped in plastic if freezing for more than 1 hour.

For Coating Ice Cream Bars

  • Melt milk chocolate and bittersweet chocolate in a microwave-safe bowl at 50% power for 60 seconds. Stir, then continue in 30-second bursts at 50% power until smooth. Add coconut oil and stir to combine. If needed, rewarm briefly to smooth. Mix in chopped almonds.
  • Pour about one-third of the chocolate mixture into a bowl or container measuring approximately 4½" wide x 2½"deep, and let cool to 80°F.
  • Line a baking sheet with parchment paper. Remove ice cream bars from freezer. Working one at a time, loosen a bar with a spatula, dip in chocolate, let excess drip off, and place on the parchment.
  • Continue until all bars are dipped, adding reserved chocolate as needed. Pause to return bars to freezer if they begin to soften.
  • Freeze the bars until the chocolate coating has fully set, about 15 minutes.

Decorate Coated Bars

  • Melt milk chocolate in microwave safe container at 50% power for 1 minute. Stir well until smooth. Transfer to disposable piping bag.
  • Drizzle frozen bars with chocolate and sprinkle with chopped almonds and chopped chocolate covered espresso beans, Return to freezer until firm. Wrap each bar in plastic and store in a zip-top freezer bag for longer storage.

Nutrition

Calories: 827kcalCarbohydrates: 75gProtein: 11gFat: 57gSaturated Fat: 33gPolyunsaturated Fat: 4gMonounsaturated Fat: 15gTrans Fat: 0.3gCholesterol: 67mgSodium: 244mgPotassium: 574mgFiber: 7gSugar: 55gVitamin A: 669IUVitamin C: 1mgCalcium: 215mgIron: 3mg
Tried this recipe?Let us know how it was!


If you’re looking for a frozen summer treat that’s as satisfying to make as it is to eat, these Coffee Crunch Ice Cream Bars deliver. They’re simple, textural, and wildly delicious—no ice cream machine required. Whether you go all in with the layers or just sprinkle that crunch on top, this recipe is pure summer magic. Share them with friends… or keep the stash hidden in the back of your freezer. No judgement here.

Salami Babka

Sweet babkas seem to get all the love — but savoury babka absolutely deserves its moment in the spotlight. This one takes inspiration from the best kind of salami sandwich — only better, because it’s all wrapped up in tender, pillowy challah dough. The filling layers sweet fig jam with spicy salami and a brush of Dijon mustard for tang, twisted into a loaf that bakes up bronzed and glossy, with those irresistible crispy edges of salami peeking through.

The inspiration for this babka goes back to when I first started dating my husband. He brought me to Ottawa to meet his family, and one night, we ended up at his youngest uncle’s place for a backyard BBQ. As an appetizer, he sliced up salami, threw it straight on the grill, and served it sizzling and crispy, ready to dunk into yellow mustard. I was blown away. At the time, I thought this was the absolute height of culinary sophistication. Grilled salami? With mustard? I’d never seen anything like it — and I was thoroughly impressed. Crispy, salty, greasy in the best way… it totally hit the spot.

That memory stuck with me, and years later it became the inspiration for this Salami Babka — a more refined, but no less delicious, tribute to that backyard bite.

Think of it as the ultimate salami sandwich — all dressed up.

Keys to Success to Salami Babka Perfection

  • Chill the logs before slicing. After shaping, freezing the filled logs for 10–15 minutes makes slicing and twisting much easier — the firm dough holds its shape cleanly.
  • Don’t skip the egg wash and bagel spice. Brushing with egg wash gives the babka a beautiful sheen, while Everything Bagel spice adds a crunchy, savoury finish that complements the filling perfectly.
  • Use an instant-read thermometer. For best texture, bake until the internal temperature reaches 195°F (91°C). This ensures the centre is fully cooked without overbaking the crust.
  • Play with flavour. Once you’ve tried this give my Fig, Olive and Halloiumi Babka a try.
    Harissa and olives or sun-dried tomato and za’atar would also be stellar combos.

Serving and Storage Tips

Salami Babka is at its best slightly warm or at room temperature. Serve it as a savoury alternative to traditional challah on a Friday night Shabbat table — it’s sure to spark conversation. It also makes an excellent snack with a glass of wine and a bowl of spiced olives as an aperitivo.

Wrap cooled loaves tightly in foil or an airtight container and store at room temperature for up to 2 days.

For longer storage, you can freeze the shaped, unbaked babka logs after the chilling step — wrap well in plastic and foil, and freeze for up to 1 month. When ready to bake, thaw overnight in the refrigerator, then proceed with final rise and baking.

Baked loaves also freeze beautifully. Wrap tightly and freeze for up to 1 month. Reheat slices in a 300°F (150°C) oven for 5–10 minutes to refresh.

Salami Babka

A savoury twist on babka! This Salami Babka is made with soft challah dough layered with fig jam and spicy salami. Perfect for a Shabbat table, brunch, or as an impressive appetizer loaf. Freezer-friendly too!
Servings 16 slices
Calories 255 kcal

Ingredients
  

Challah Babka Dough

  • 4 grams sugar
  • 1 cup warm water, 115°-120°F
  • 8 grams traditional yeast, (also called active dry yeast)
  • 360 grams all-purpose flour
  • 113 grams honey
  • 6 grams Diamond Crystal Kosher salt
  • 1 large egg, lightly beaten
  • 49 grams vegetable oil
  • 120 grams whole wheat flour

Babka Filling

  • 1/2 cup fig jam
  • 2 Tablespoons Dijon mustard
  • 240 grams thinly sliced salami

Babka Topping

  • 1 large egg, lightly beaten
  • 2 Tablespoons everything bagel spice

Instructions
 

Challah Babka Dough

  • In a 2-cup liquid measuring cup, dissolve 1 teaspoon sugar in 1 cup warm (115° -120°F) water. Sprinkle yeast on top and let stand for about 5 minutes, until yeast gets all bubbly.
  • Make the dough in a stand mixer: Place all-purpose flour, honey and salt in the stand mixer bowl, fitted with the paddle attachment.  Mix briefly to combine.  Pour dissolved yeast mixture into machine and mix for about 1 minute.  Add egg and oil and mix again for about 30 seconds.  Add whole wheat flour and mix on medium-low speed for about 1 minute. Remove paddle attachment and switch to the dough hook. Mix on lowest speed for 10 minutes, until dough is smooth and satiny.
  • Turn dough out onto a lightly floured surface. Knead for a minute and then form the dough into a ball and transfer it to a large oiled mixing bowl. Turn dough until all sides are coated. Cover the bowl with plastic wrap and set aside. Let rise at room temperature for about 60-90 minutes, or until doubled in bulk.  A good test to see if the dough has risen enough is to insert your lightly floured finger to a depth of 1 inch into the dough and see how it springs back. If it springs back quickly and almost entirely the dough is underproofed and needs more time. If the indentation holds its shape the dough is likely overproofed. What you're aiming for is an indentation that springs back slowly and not all of the way.
  • Spray two 8×4 inch loaf pans with cooking spray. Line pans with parchment paper. If you are unsure of the best way to do this, check out this video:

Shape and Bake the Babkas

  • Turn the risen dough out onto a lightly floured counter and divide it in half. Work with one piece of dough at a time; keep the other half loosely covered.
  • Roll out one piece of dough into a 10 x 16 inch rectangle. Spread half of the fig jam evenly over the surface, leaving a 1-inch border along the long edges. Layer half of the salami slices over the jam, overlapping slightly. Spread half the Dijon mustard over the salami slices.
  • Starting with the short edge closest to you, roll the dough into a tight log, pressing gently as you go. Use both hands to even out the roll into a perfect thick cigar. Place the rolled log on a parchment-lined baking sheet, seam side down, and transfer to the freezer for 10–15 minutes to firm up.
  • Repeat the rolling filling and freezing process with the second piece of dough, using the remaining fig jam, salami and mustard.
  • Working with one chilled log at a time, use a sharp knife to cut the log in half lengthwise. With the cut sides facing up, twist the two halves together to form a braid. Carefully transfer the twisted dough to a parchment-lined 8×4 inch loaf pan. Repeat the cutting, twisting, and shaping process with the second chilled log. Cover both pans loosely and let rise until puffy, about 45–60 minutes.
  • Preheat the oven to 350°F (180°C). Brush the tops of the loaves with beaten egg and sprinkle generously with Everything Bagel spice. Bake for 20 minutes minutes and check to see how quickly the top is browning. If it is getting too dark, cover loosely with foil until the loaves are deep golden brown and the internal temperature reaches 195°-200°F. (91°-93°C) Cool in the pans for 15 minutes, then transfer to a wire rack to cool completely before slicing.

Notes

I like to bake these in a smaller loaf pan, measuring 8×4 inches. If you only have 9×5 inch pans, that will also work, but your loaves will not rise as high.
Salami Babka is at its best slightly warm or at room temperature. 
Wrap cooled loaves tightly in foil or an airtight container and store at room temperature for up to 2 days.
For longer storage, you can freeze the shaped, unbaked babka logs after the chilling step — wrap well in plastic and foil, and freeze for up to 1 month. When ready to bake, thaw overnight in the refrigerator, then proceed with final rise and baking.
Baked loaves also freeze beautifully. Wrap tightly and freeze for up to 1 month. Reheat slices in a 300°F (150°C) oven for 5–10 minutes to refresh.

Nutrition

Calories: 255kcalCarbohydrates: 34gProtein: 8gFat: 10gSaturated Fat: 3gPolyunsaturated Fat: 3gMonounsaturated Fat: 4gTrans Fat: 0.02gCholesterol: 35mgSodium: 518mgPotassium: 138mgFiber: 2gSugar: 10gVitamin A: 36IUVitamin C: 1mgCalcium: 25mgIron: 2mg
Tried this recipe?Let us know how it was!

And here’s a little bonus I discovered: leftover slices of Salami Babka are absolutely incredible toasted. Just pop a slice into the toaster or throw it on the grill for a minute or two. The edges get crispy, the fig jam caramelizes a little, and the salami takes on that same irresistible sizzle I first fell in love with. It’s the ultimate snack upgrade — and proof that this babka is just as good the next day (if you’re lucky enough to have leftovers).

Maple Aleppo Glazed Salmon & Crispy Sheet Pan Rice

I’ve watched enough episodes of Beat Bobby Flay to know one thing: if he adds crispy rice to a dish, he wins. Every. Time. There’s just something irresistible about those golden, crunchy bits that steal the spotlight. I’ve always been firmly on Team Potato, but crispy rice has always held a certain magic. The only problem? Making it on the stovetop means babysitting it—carefully adjusting the heat, listening for the sizzle, hoping you don’t burn it.

Enter this Maple Aleppo Glazed Salmon with Crispy Sheet Pan Rice. The oven does the work, and the result is pure sheet pan sorcery. Sweet and spicy maple Aleppo glazed salmon, cooked until tender and flaky, nestled into a bed of crispy, golden rice. No stirring. No stress.

Why You’ll Love This Recipe

Weeknight-friendly, but elegant enough for guests

Sweet-spicy glaze with mellow heat from Aleppo pepper

Golden crispy rice, no stovetop required

One pan = easy cleanup

Keys to Crispy Rice Success

  • Use medium or short grain rice. Sushi rice or Calrose work beautifully. Long grain tends to separate and dry out too much.
    Start with cold, cooked rice. Fresh rice is too wet and will steam instead of crisp. Leftover rice from the fridge is ideal.
  • Balance the flavours in the rice. A little soy sauce adds salt, lime juice brings brightness, and green onions add a fresh bite. Seasoned rice = crave-worthy rice.
  • Heat your sheet pan in the oven until it’s smoking hot. This jumpstarts the crisping process as soon as the rice hits the pan.
  • Crisp the rice before adding salmon. The rice needs about 15–20 minutes to get golden and crunchy. Add the salmon after that for perfect timing.
  • Don’t let the glaze hit the pan. Maple syrup burns easily, so spoon the glaze directly onto the salmon, not the rice or pan.

Sticky Maple. Slow Heat. Crispy Rice.

This isn’t just salmon—it’s sheet pan sorcery. The kind of dinner that feels like a spell: no stovetop, no stress, just golden crackle and sweet heat. The kind of dinner that lingers—quietly impressive and deeply satisfying.

Grab the full printable recipe below.

Maple Aleppo Glazed Salmon and Crispy Sheet Pan Rice

Sticky maple, slow heat, and golden, crispy rice—this sweet and spicy sheet pan salmon is simple to make, yet quietly spectacular.
Servings 4
Calories 541 kcal

Equipment

  • 1 9×13 inch sheet pan

Ingredients
  

For the Crispy Rice

  • 1 Tablespoon avocado or vegetable oil, for pan
  • 3 cups cold, cooked short grain rice, like sushi rice
  • 1 Tablespoon avocado or vegetable oil, for rice
  • 2 Tablespoons soy sauce
  • 2 Tablespoons fresh lime juice
  • 3 green onions

For the Salmon

  • 780 grams skin on salmon fillet, cut into 4 portions
  • 2 Tablespoons soy sauce
  • 4 Tablespoons maple syrup
  • 1 teaspoon Aleppo pepper

For Garnish

  • 2 wedges fresh lime
  • 2 Tablespoons cilantro, chopped
  • reserved sliced dark green onion tops
  • 1 Tablespoon toasted sesame seeds

Instructions
 

For Crispy Rice

  • Pour 1 Tablespoon of avocado oil onto a 9×13 rimmed sheet pan and place on lower rack of your oven. Preheat oven to 425°F.
  • Thinly slice green onions, separating the dark green tops for garnish.
  • In a large bowl, combine the cooked rice, white and light green onion parts, 1 tablespoon avocado oil, soy sauce, and lime juice. Wet hands with cold water and mix until well combined.
  • Once oven is preheated, remove sheet pan and spread rice mixture into an even layer. Return pan to oven and bake for 15–20 minutes, until rice begins to crisp and turn golden around the edges.

For the Salmon

  • In a small skillet, combine soy sauce, maple syrup, and Aleppo pepper. Cook over medium heat for 2–3 minutes, until mixture thickens slightly. Remove from heat.
  • After rice has baked for 15–20 minutes, remove sheet pan from oven. Place salmon fillets, skin-side down, on top of the rice. Spoon glaze over the salmon.
  • Return sheet pan to oven and bake for another 10–12 minutes, until salmon is cooked through.
  • Garnish with lime wedges, chopped cilantro, reserved sliced green onion tops and toasted sesame seeds.

Notes

It is important to start with cold, cooked rice for this recipe as it has had time to dry out and will resist clumping .It will crisp up perfectly  on the hot sheet pan.
Sushi, or any short grain rice, works best for this recipe as long grain rice can dry out more quickly than it’s short grained sister. For 3 cups cooked leftover cold rice, you will need to start with 1.5 cups of dry rice. 

Nutrition

Calories: 541kcalCarbohydrates: 42gProtein: 43gFat: 21gSaturated Fat: 3gPolyunsaturated Fat: 7gMonounsaturated Fat: 9gTrans Fat: 0.03gCholesterol: 107mgSodium: 601mgPotassium: 1084mgFiber: 1gSugar: 6gVitamin A: 330IUVitamin C: 2mgCalcium: 76mgIron: 3mg
Tried this recipe?Let us know how it was!

More Easy Weeknight Dinners to Love

I’d love to hear from you if you try this!

Pistachio Crunch Ice Cream Bars

Pistachio Crunch Ice Cream Bars.


If you’re as obsessed with pistachio desserts as I am, you’re in for a treat. These Pistachio Crunch Ice Cream Bars are inspired by the luxurious flavours and textures of the viral Dubai Pistachio chocolate bar — but reimagined as a frozen summer dessert. Two layers of creamy pistachio ice cream sandwich a crunchy, buttery kataifi-pistachio filling, all enrobed in a thick shell of chocolate and topped with a white chocolate drizzle, toasted pistachios and gold sprinkles. They look extra (and taste like it), but they’re surprisingly easy to make — no churning required. Most of the time is hands-off while everything chills and sets. Trust me: this is the kind of dessert you’ll want to keep stashed in your freezer all summer long.

Watch me make them:

Keys to Success when making Pistachio Crunch Ice Cream Bars

  • 1. Use store-bought ice cream — but let it soften first. You don’t need an ice cream maker for this recipe. Just use your favourite pistachio ice cream, but let it soften in the fridge for about 30 minutes before spreading. It’ll glide into the pan much more easily and create smooth, even layers.
  • 2.Start with good quality ice cream. I bought Baskin Robbins Pistachio- Almond ice cream.
  • 3. Toast the kataifi gently. Kataifi is shredded phyllo and burns quickly. Keep the heat at medium and stir constantly until it’s evenly golden and crisp. You’re aiming for toasty, not smoky.
  • 4. Press the filling firmly and evenly. After toasting the kataifi and mixing in the pistachio paste, spread it gently over the first ice cream layer and press it down. This helps the layers stay neat when slicing later. Use the back of a measuring cup to help get everything smooth.
  • 5. Freeze in stages. Let each layer freeze before adding the next — this helps keep them distinct and prevents melting during assembly. The final freeze (at least 4 hours or overnight) is essential for clean slicing and smooth dipping.
  • 6. Use a deep container for dipping. Pour your melted chocolate into a narrow, deep container (a 4.5” x 2.5” deli container works well). It gives you a clean, even dip and minimizes waste.
  • 7. Work quickly when dipping. Keep your bars frozen until just before dipping. If they start to soften, pop them back in the freezer for 10–15 minutes before continuing.
  • 8. Make it fancy. A drizzle of white chocolate, a sprinkle of pistachios (and maybe a touch of edible gold) elevates these from simple frozen treats to showstoppers.
  • 9. Pistachio Paste vs. Pistachio Butter vs. Pistachio Cream.
    This recipe calls for pistachio cream. Pistachio paste, pistachio butter, and pistachio cream may sound similar, but they’re quite different. Pistachio paste is made from finely ground pistachios, often roasted, with no added sugar—just pure, intense pistachio flavour. Pistachio butter is also made from ground pistachios but is usually raw or lightly roasted and may be slightly looser in texture; like other nut butters, it’s meant for spreading and eating on its own. Pistachio cream, on the other hand, is a sweet spread made with pistachios, sugar, and often milk or white chocolate. It has a smooth, dessert-like consistency—think of it as pistachio’s answer to Nutella.

Pistachio Crunch Ice Cream Bars

Servings 9 bars
Calories 754 kcal

Equipment

  • 1 8 inch square baking pan
  • 1 disposable piping bag
  • 1 digital thermometer
  • 1 offset spatula

Ingredients
  

For Ice Cream Bars

  • 2 pints pistachio ice cream
  • 112 grams unsalted butter
  • 140 grams kataifi if frozen, thaw overnight in fridge before starting recipe
  • 224 grams pistachio cream
  • 1/4 teaspoon Diamond Crystal Kosher salt

For Dipping

  • 100 grams milk chocolate, finely chopped
  • 100 grams bittersweet or semi sweet chocolate, finely chopped
  • 100 grams refined coconut oil

For Decorating (optional)

  • 56 grams white chocolate, finely chopped
  • 30 grams shelled pistachios, toasted and finely chopped toasted and coarsely chopped
  • 10 grams gold sprinkles, optional

Instructions
 

For Ice Cream Bars

  • Place 1 pint of pistachio ice cream in the fridge for 30 minutes to soften for easier scooping and spreading
  • Line an 8-inch square baking pan with two 8×14-inch sheets of parchment, leaving excess on all sides to help lift the bars later. Avoid using wax paper or foil.
  • Scoop the softened ice cream into the pan. Use an off-set spatula to start spreading it into an even layer. Cover with a square of parchment and use the back of a measuring cup to finish smoothing it into an even layer. Freeze until firm, about 1 hour.
  • Finely chop thawed kataifi with a serrated knife. In a large skillet, melt butter over medium heat. Add kataifi and cook, stirring frequently, for about 8 minutes, until golden and crisp. Avoid high heat—kataifi burns easily.
  • Transfer kataifi to bowl and let cool for a few minutes. Stir in pistachio cream.
  • Remove the pan from the freezer and spread kataifi mixture evenly over the ice cream. Press gently with a spatula. Return to freezer for 30 minutes. Place second pint of ice cream in fridge to soften.
  • Spread the remaining softened ice cream over the kataifi layer. Cover with a square of parchment and use the back of a measuring cup to finish smoothing it into an even layer. Cover with plastic wrap, and freeze until completely firm — at least 4 hours, preferably overnight.
  • Place a cutting board in the freezer to chill. Once the ice cream is frozen, line the chilled board with parchment. Use parchment flaps to lift the slab out of the pan. Invert onto cutting board, peel off parchment, and cut into 9 squares using a large, sharp knife. Wipe the blade clean between slices. Return bars to freezer, wrapped in plastic if freezing for more than 1 hour.

For Coating Ice Cream Bars

  • Melt chocolate in a microwave-safe bowl at 50% power for 60 seconds. Stir, then continue in 30-second bursts at 50% power until smooth. Add coconut oil and stir to combine. If needed, rewarm briefly to smooth.
  • Pour about two-thirds of the chocolate mixture into a bowl or container measuring approximately 4½" wide x 2½"deep, and let cool to 80°F.
  • Line a baking sheet with parchment paper. Remove ice cream bars from freezer. Working one at a time, loosen a bar with a spatula, dip in chocolate, let excess drip off, and place on the parchment.
  • Continue until all bars are dipped, adding reserved chocolate as needed. Pause to return bars to freezer if they begin to soften.
  • Freeze the bars until the chocolate coating has fully set, about 15 minutes.

Decorate Coated Bars

  • Melt white chocolate in microwave safe container at 50% power for 1 minute. Stir well until smooth. Transfer to disposable piping bag.
  • Drizzle frozen bars with white chocolate and sprinkle with chopped pistachios and gold sprinkles (if using). Return to freezer until firm. Wrap each bar in plastic and store in a zip-top freezer bag for longer storage.

Notes

Pistachio Paste vs. Pistachio Butter vs. Pistachio Cream.
This recipe calls for pistachio cream. Pistachio paste, pistachio butter, and pistachio cream may sound similar, but they’re quite different. Pistachio paste is made from finely ground pistachios, often roasted, with no added sugar—just pure, intense pistachio flavour. Pistachio butter is also made from ground pistachios but is usually raw or lightly roasted and may be slightly looser in texture; like other nut butters, it’s meant for spreading and eating on its own. Pistachio cream, on the other hand, is a sweet spread made with pistachios, sugar, and often milk or white chocolate. It has a smooth, dessert-like consistency—think of it as pistachio’s answer to Nutella.
Frozen kataifi is the most affordable option. A 454g package is  about $2.79 — thaw overnight in the fridge before using. Dried kataifi is available online (e.g., $24 for 500g on Amazon), but much pricier.
The coating recipe and procedure were developed by Stella Parks over at Serious Eats. 

Nutrition

Calories: 754kcalCarbohydrates: 62gProtein: 12gFat: 55gSaturated Fat: 30gPolyunsaturated Fat: 5gMonounsaturated Fat: 16gTrans Fat: 0.4gCholesterol: 64mgSodium: 230mgPotassium: 644mgFiber: 6gSugar: 43gVitamin A: 859IUVitamin C: 2mgCalcium: 168mgIron: 3mg
Tried this recipe?Let us know how it was!

Nibble Board

A board built for slow sips and small bites. Nothing rushed here.

There’s something quietly magical about building a board—one tiny bite at a time. This isn’t your usual cheese board. It’s a nibble board: slower, more tactile, and filled with small surprises that invite your guests to pause and play. One of my favourites? A nest of tiny, hard-boiled quail eggs to peel and dip in fleur de sel. Paired with unexpected flavour combinations—like cheddar or manchego cheese, honey, and coffee—it’s an experience that’s as thoughtful as it is delicious.

Watch me assemble the board.

KEYS TO SUCCESS (HARD-BOILED QUAIL EGGS)

I was inspired by an episode of The Lost Kitchen to add Quail Eggs to my nibble board. They may look delicate, but they’re surprisingly easy to prep with the right method:

  • Skip the boiling. Boiling often cracks the shells. Instead, steam them in a steamer basket.
  • Steam for 3 minutes for hard-boiled perfection.
  • Immediately plunge into an ice water bath to stop the cooking and make peeling easier.
  • Unpeeled, hard-boiled quail eggs will last up to a week in the fridge.
  • I found mine locally at Farm Boy, but you can often spot them at specialty or Asian grocers.

The result is a gently firm, creamy little egg—perfect for serving in a soft nest of straw with a pinch bowl of salt nearby.

Cheddar meets honey and coffee. Strange? Maybe. Surprising? Absolutely.

UNEXPECTED PAIRING FOR YOUR NIBBLR BOARD: CHEESE, HONEY & COFFEE

If cheddar or manchego cheese and coffee sound like strange bedfellows, you’re not alone. The first time I saw Jamie Oliver dip cheese into honey and coffee, my brain said: “Wait—what?” But curiosity won out—and I’ve never looked back.

Here’s why it works:

  • The sweetness of the honey balances the bitterness of the coffee.
  • Together, they soften the sharp, astringent edge of hard cheeses like aged cheddar or manchego.
  • It’s layered, earthy, and a little bit wild—especially when paired with something nutty or a glass of wine.

A nibble board like this isn’t just about the food—it’s about the experience. The small, curious moments. The sound of a quail egg cracking, the surprise of honey and coffee on a slice of cheese. It’s an invitation to gather slowly, eat thoughtfully, and linger a little longer around the table. Whether you’re hosting friends or simply treating yourself, building a board this way adds warmth and wonder to even the simplest evening.

Layering slow. Every piece an invitation to pause.