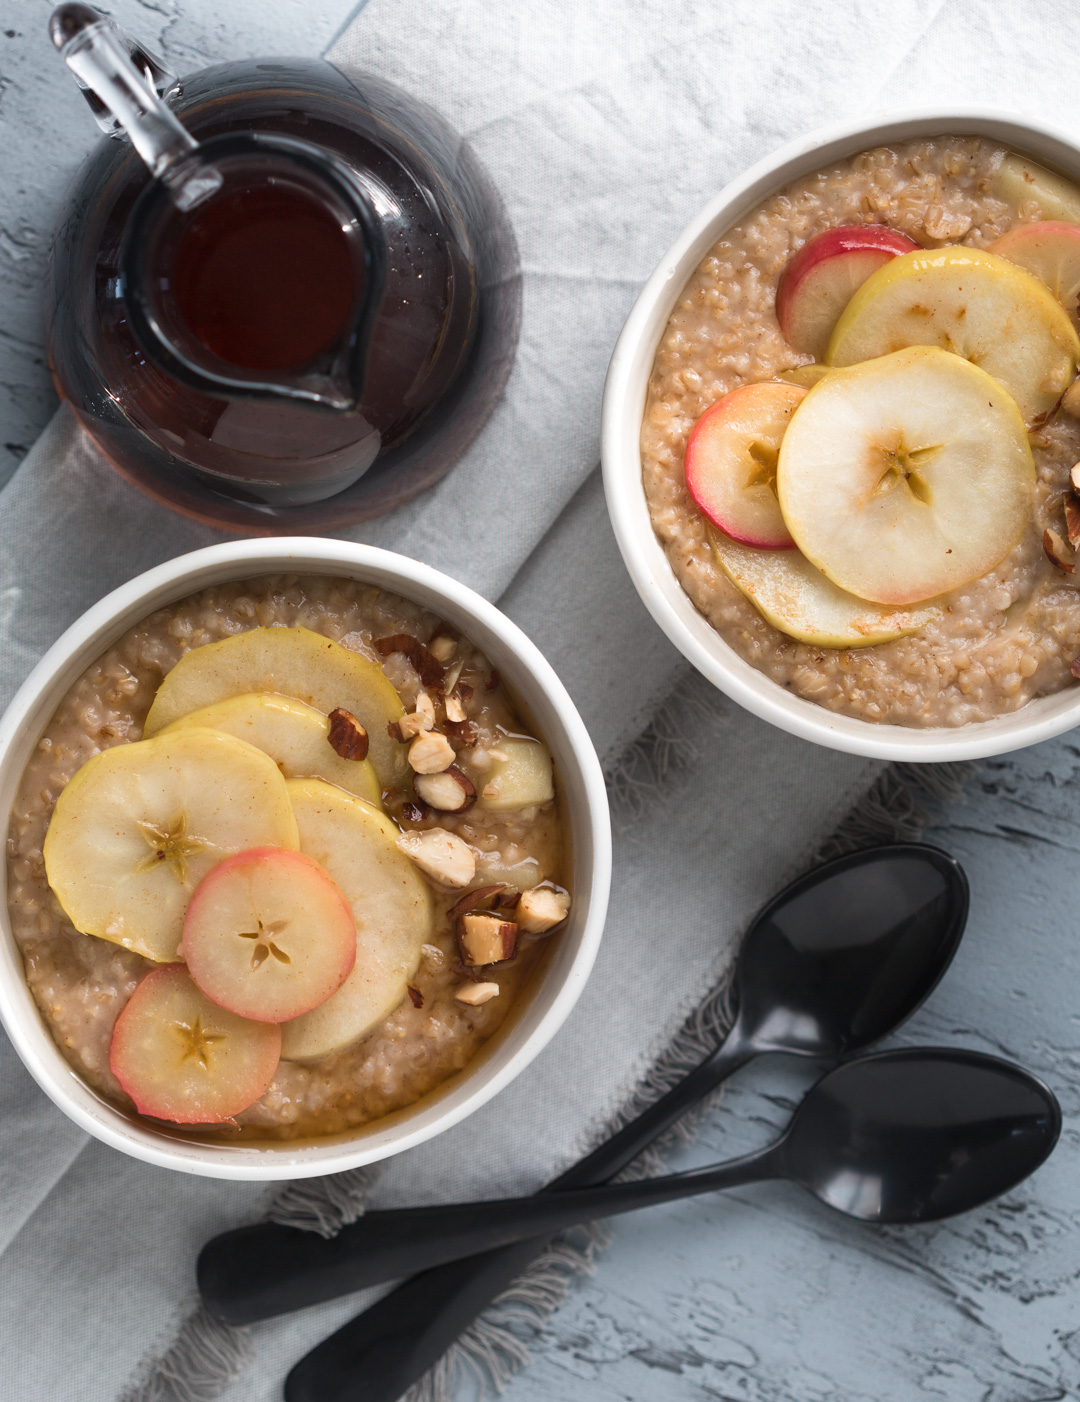
We have been eating overnight oats for breakfast, lunch and dinner this week, as I have been testing different variations. So far, no one has complained. This version is adapted from a Cook’s Illustrated recipe. They sweetened the oats with brown sugar but I switched it for maple syrup. I also added chopped apples to the oats while they were cooking. Their recipe used shredded apples but I found that I liked the texture better with little bites of diced apple.
The final change I made to their recipe was to sautee some apple slices in a bit of butter and maple syrup, because, well… butter and maple syrup on apples! It’s a fancier version, and those sliced apples look so pretty on top, but feel free to leave it out if that’s not how you roll. No judgement here. The night before, bring 3 cups of water and a good pinch of salt to a boil. Remove from heat and add 1 cup steel cut oats. Cover pot and let it sit on the counter all night. In the morning , add apple cider or juice, milk, cinnamon and some diced peeled apples. Cook for 5 minutes. Let sit for a further 5 minutes. Top with sauteed maple apples and some toasted almonds or pecans.
Drizzle with extra maple syrup because you deserve it.
When I was growing up, oatmeal meant Quaker Oats Instant Oatmeal in the package. We had an instant hot water tap, (the water never really got all that hot) so there wasn’t even any cooking involved. My mom would buy the variety pack, but my sisters and I only liked the maple and brown sugar, and I think we probably added extra maple syrup and brown sugar. My poor dad got stuck eating the unwanted apple cinnamon flavour. I recall that the dried apples always got stuck in your throat.
Fast forward a whole bunch of years and, “We’ve come a long way baby.”Now I’m eating oatmeal made with steel cut oats that you actually have to cook!
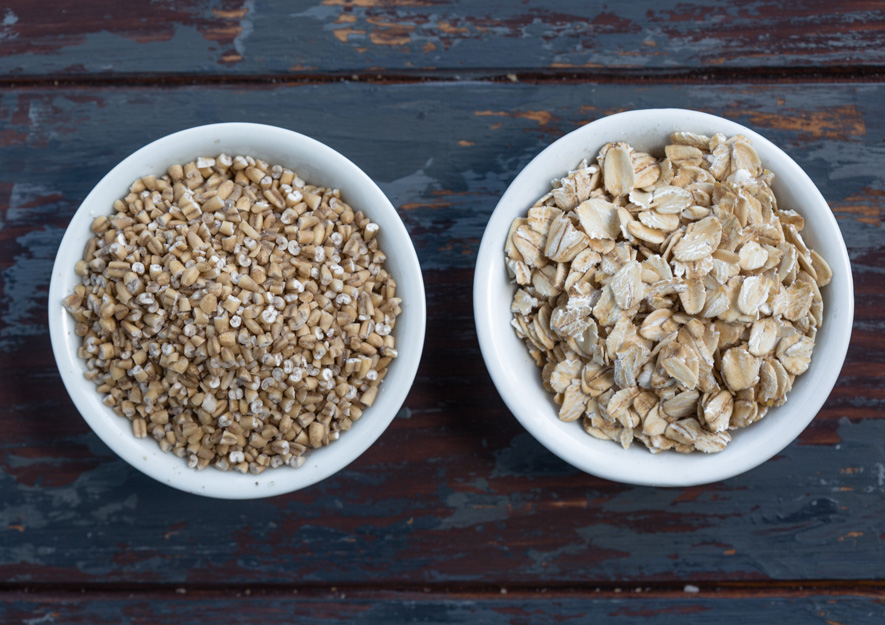
So, a little oats primer here. Whole oats, that have been cleaned and hulled, are called groats. They are a little too coarse for oatmeal. Groats that have been coarsely chopped are known as steel-cut oats (bowl on the left). Groats that are steamed and pressed are called rolled oats or old-fashioned oats (bowl on the right). Instant oats are pre-cooked, dried, and then rolled and pressed slightly thinner than rolled oats.Steel-cut oats have a wonderful nutty taste and chewy texture, but they take 40 minutes to cook, and who has time for that? Enter the overnight method. I learned how to make these from those clever folks over at Cook’s Illustrated.
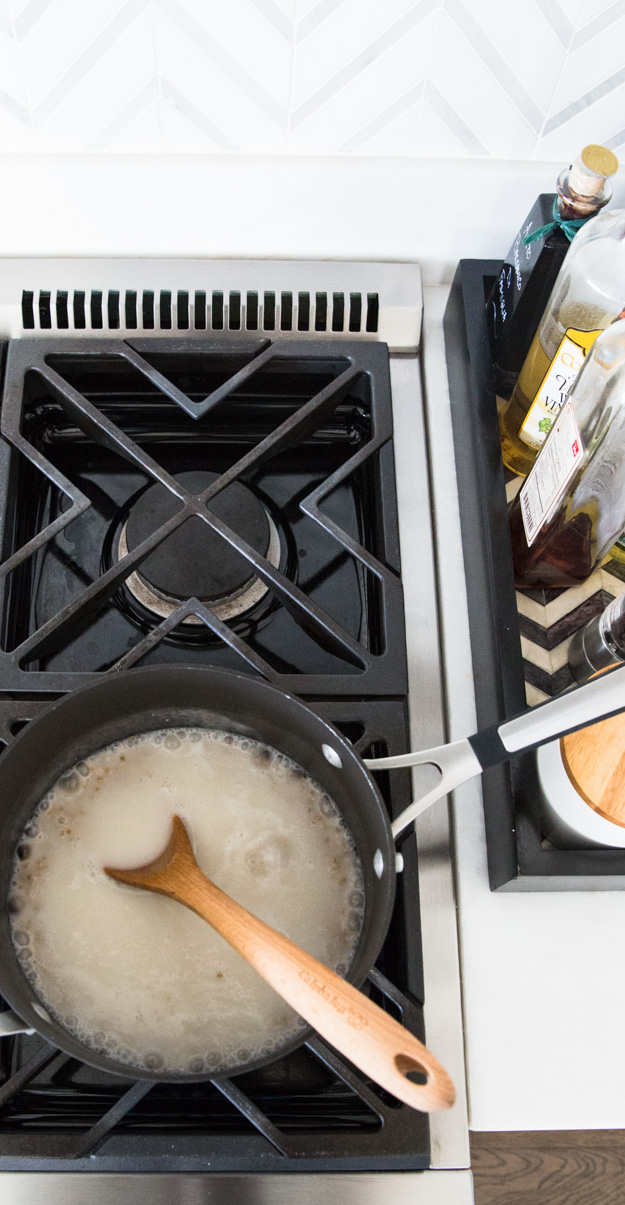
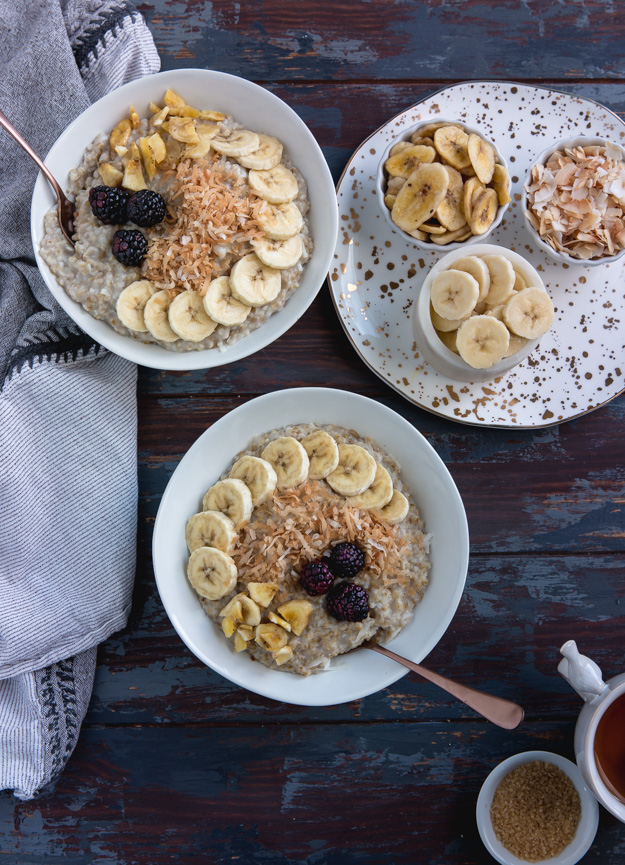
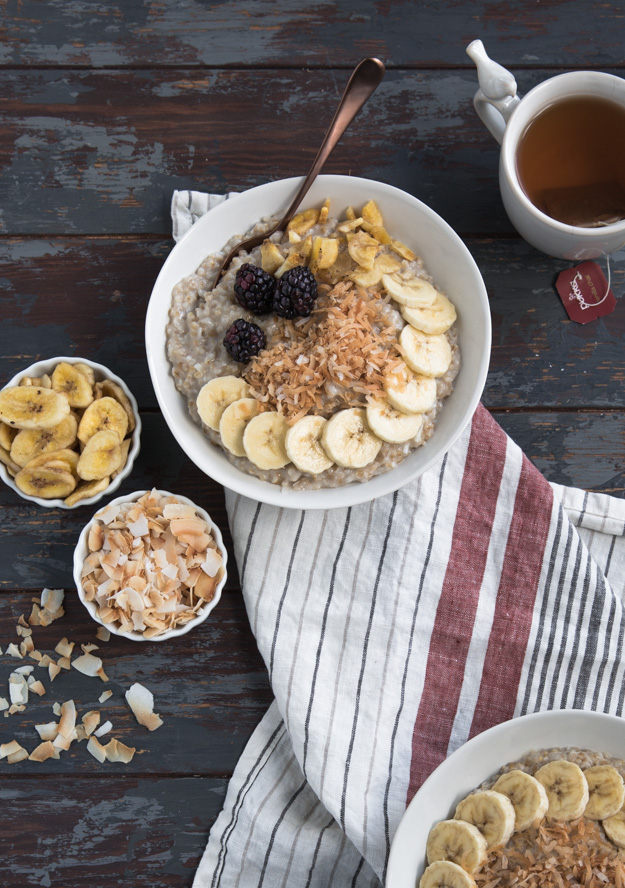
Bring 3 cups of water and a teaspoon of salt to boil. Please don’t omit the salt. Your oatmeal will taste flat and lifeless. Take pot off heat, stir in 1 cup of steel-cut oats , cover pot and let sit overnight while you sleep. In the morning add 1 cup of coconut milk, bring to boil, reduce heat to medium and cook, stirring occasionally, until oats are softened but still retain some chew and the mixture thickens slightly. This will take about 5 minutes. Cover the pot and let sit for 5 more minutes. The oatmeal will continue to thicken as it rests.
Mix in sliced bananas, shredded coconut and vanilla extract. Top with banana chips for some added crunch.
Mornings got a whole lot better around here. Stay tuned for an apple-cinnamon version with maple syrup!
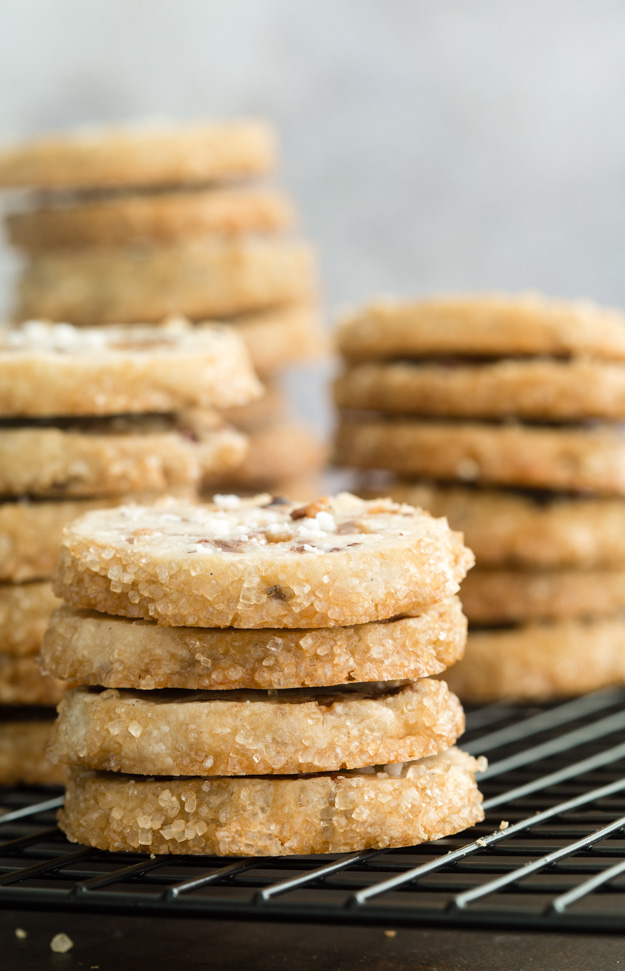
Alison Roman’s Salted Butter and Chocolate Chunk Shortbread has been popping up all over social media during the past two months. These cookies have been monopolizing my instagram and twitter feeds. My favourite tweet was from @hyphenpfeifer, “Fake news that the Salted Butter and Chocolate Chunk Shortbread recipe makes 24 cookies bc you’ll eat a log-worth of dough.” I needed to see what all the fuss was about. The first time I made them was New Year’s Eve. We had friends visiting and I baked them that afternoon to serve for dessert. They didn’t quite make it to the dessert table. We snacked on them all afternoon. I tucked the few leftover ones into the freezer and we had them for breakfast the next day. We all loved them even more, frozen.
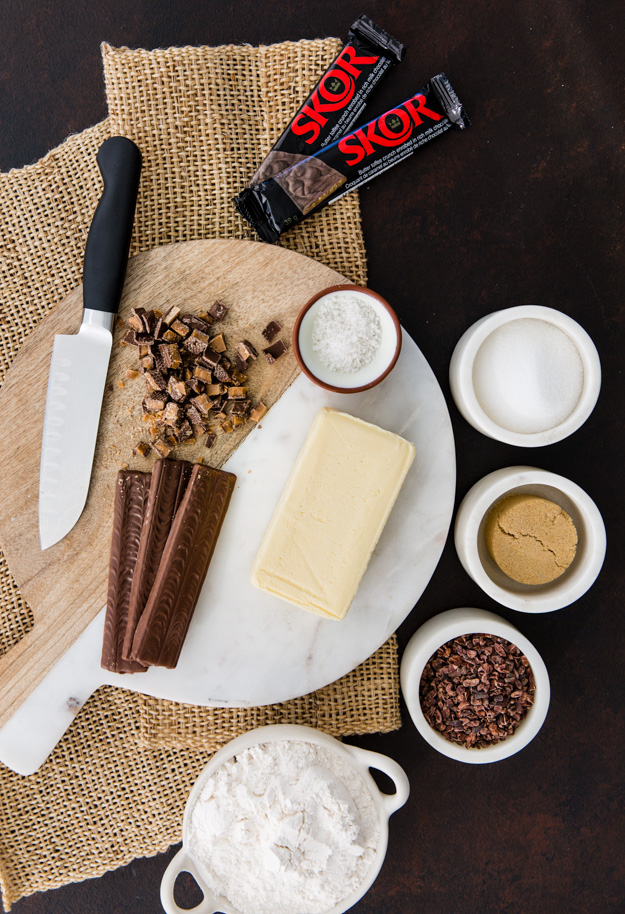
These cookies are made with salted butter. It has long been thought that unsalted butter was the preferred butter for baking. The reasoning behind this had to do with the fact that salt is a preservative, and so unsalted butter was often fresher. This is not the case anymore and blind taste tests have shown that salted butter tastes more buttery, and has a riper, more full-blown flavour than unsalted butter. When butter is a key ingredient, as it is in shortbread, we want to really enhance its flavour, and salted butter does that. You can’t get the same effect from using unsalted butter and adding more salt to the recipe.
This is my twist on Alison’s cookie. I decided to swap out the chocolate chunks for chopped up Skor bars (Heath bars is you’re American). I thought the addition of toffee would take these cookies to a different place, for me, a very happy place! Because Skor Bars are covered in milk chocolate, I also added a handful of cocoa nibs to the dough. Their bitter note would work as a perfect counterbalance to the sweet Skor bars. Both the toffee and the cocoa nibs added a fantastic little crunch to these cookies. I was thrilled with the results.
These are an extremely versatile cookie, perfect for all occasions. I am a firm believer that what you put out into the universe will come back to you. If you share these cookies you will reap all sorts of unexpected rewards.
Gift a bag to the staff at your hairdressing salon and sit back and luxuriate in the most amazing head massage during your shampoo.
Gift a bag to your noisy neighbour and listen as this,
is soon followed by blissful silence once they go into a sugar/carb coma from ingesting the cookies.
Mail off a package of these to your adult children and sit back and wait for the phone call, or at least a text telling you that they love you and that you’re the best mom ever. (I’m mailing these tomorrow morning so I’ll let you know if it works).
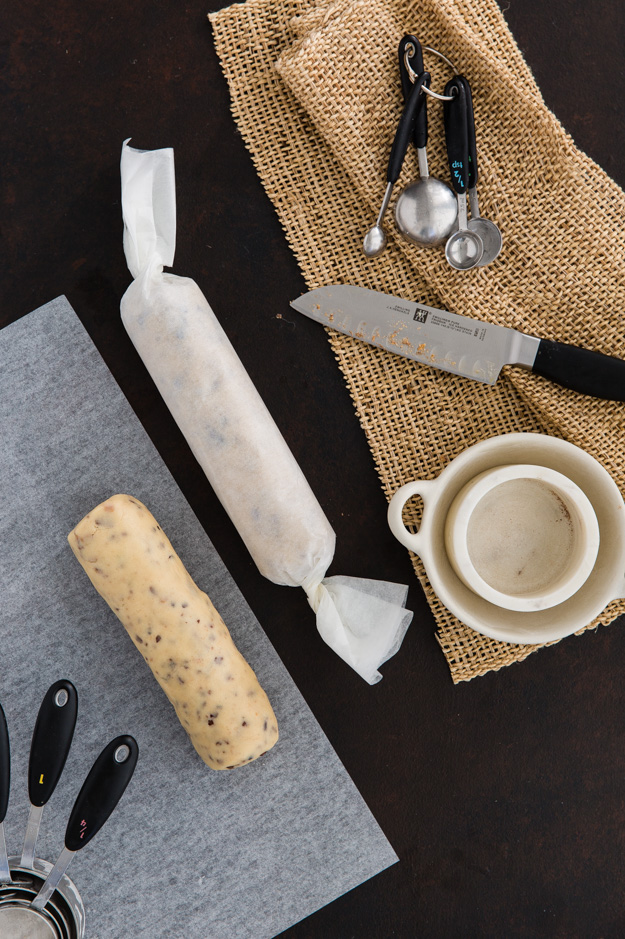
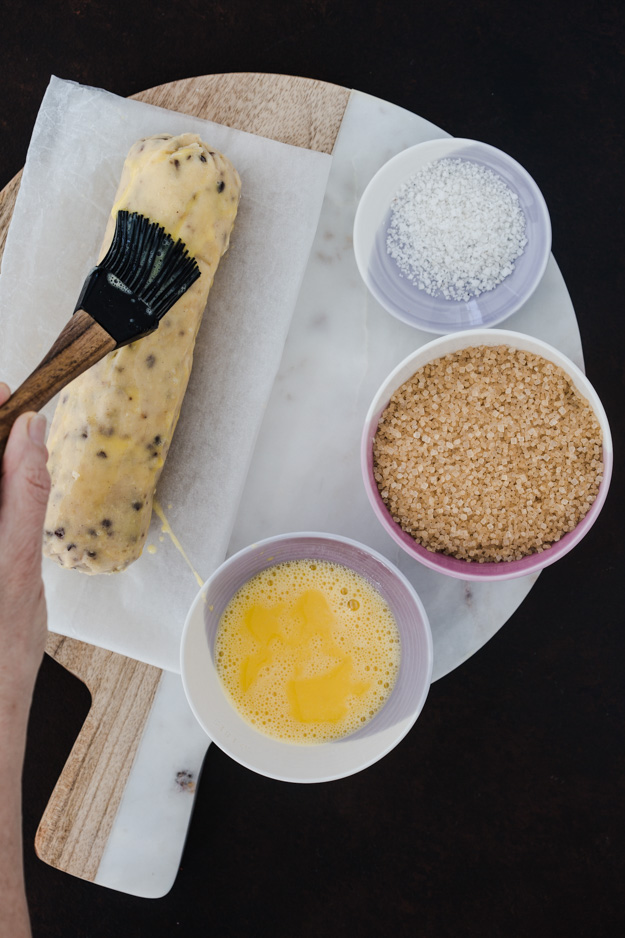
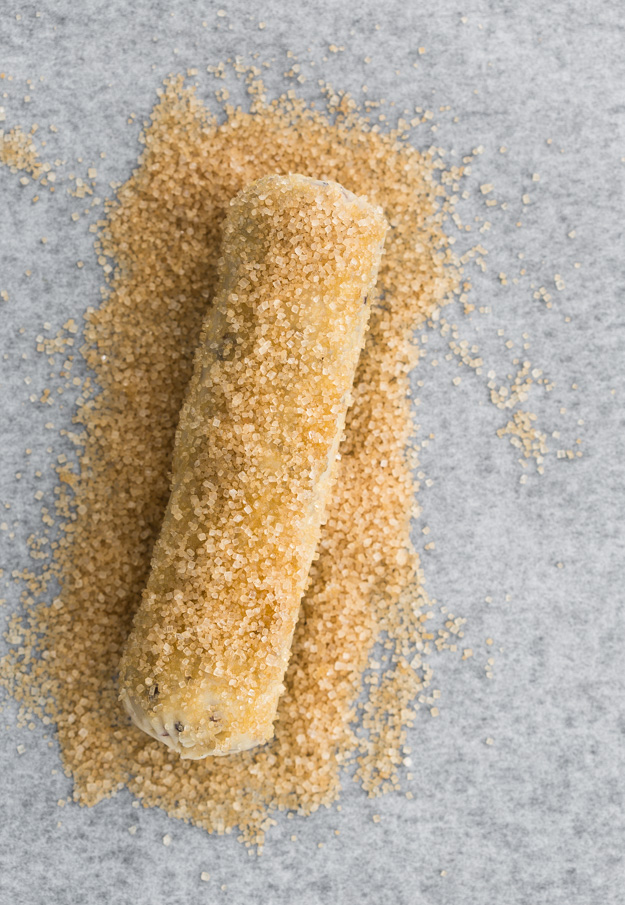
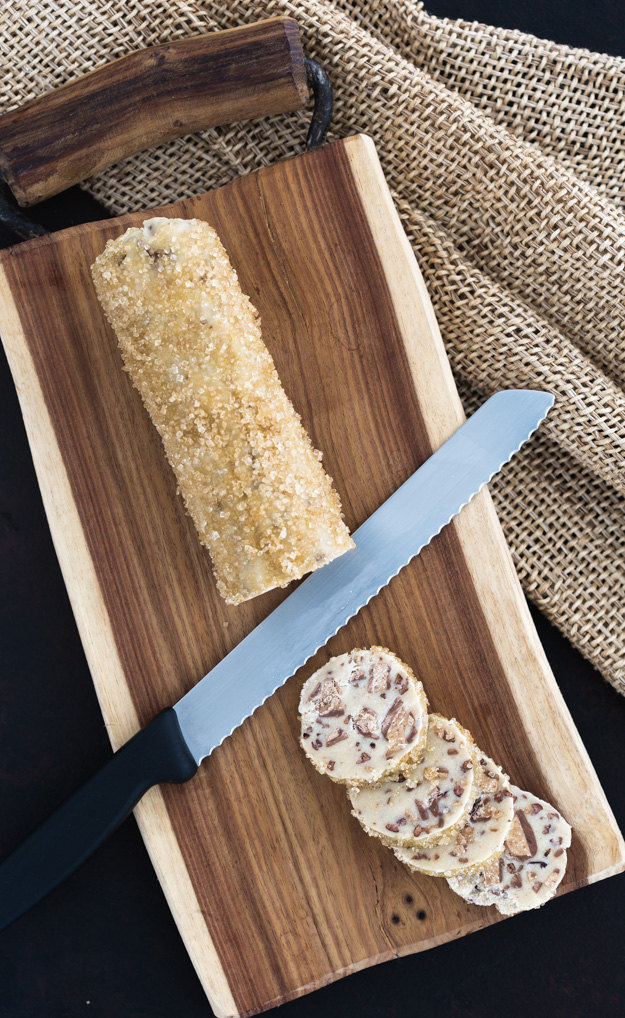
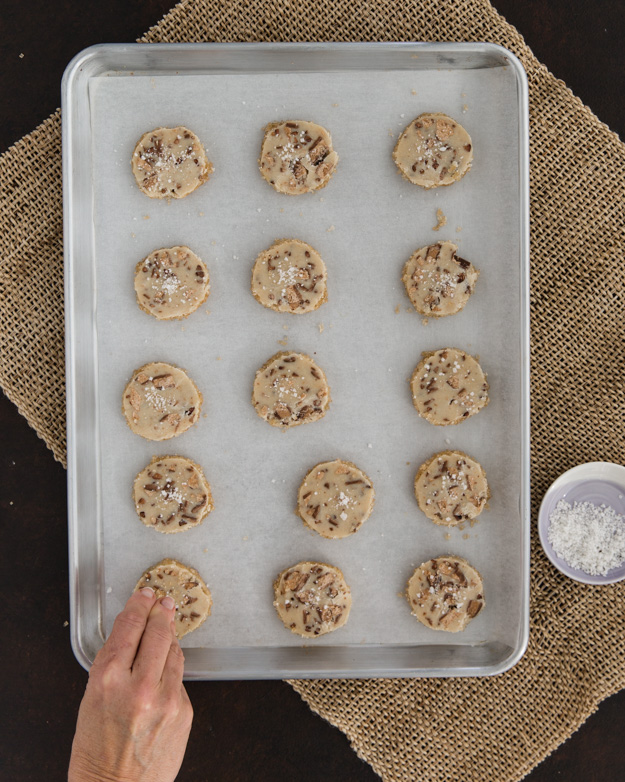
The hardest part about making these cookies is getting the dough to compact into a tight roll. I had to hand knead it, on the counter, for a few minutes before it came together. Divide the dough into 2 and roll each piece into a 2 inch diameter log. Wrap well in waxed paper and chill for several hours or even a few days. Brush logs with beaten egg and coat the logs in turbinado or demerara sugar. Then slice them into cookies. A final tiny sprinkle of some coarse sea salt. Yes, more salt. Don’t be afraid.
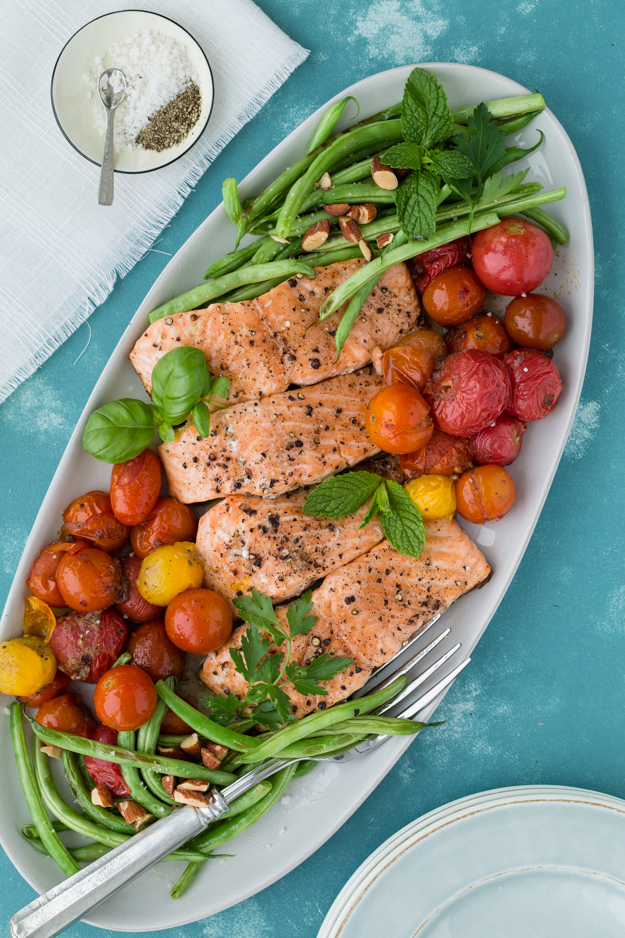
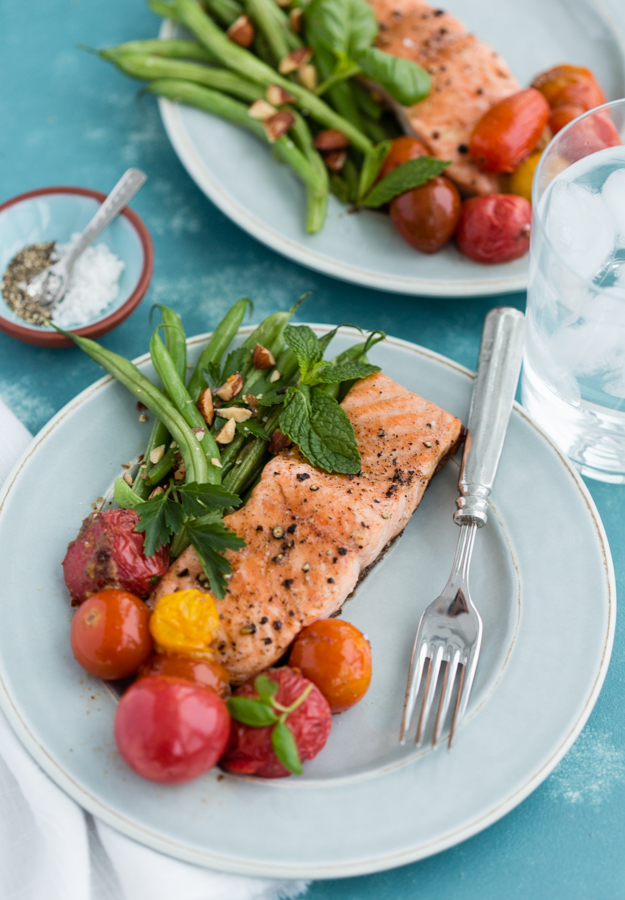
Shortly after telling my husband I was working on a recipe for Falafel Spiced Tomatoes and Salmon, I served him the above dish. He poked around the plate and looked at me with a sad face. “Where are the falafels?” he asked. I explained that “falafel spiced” was a qualifying adjective for the roasted tomatoes. There are no actual falafels in this recipe. The tomatoes are roasted in the same spices that are used in the making of falafels. He was pretty impressed with the fact that I was able to name the correct part of speech.
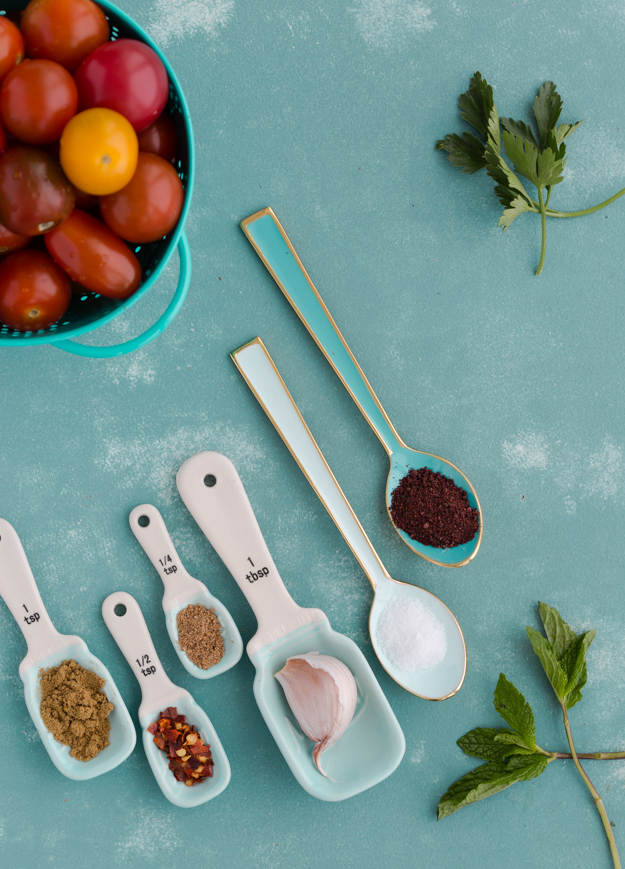
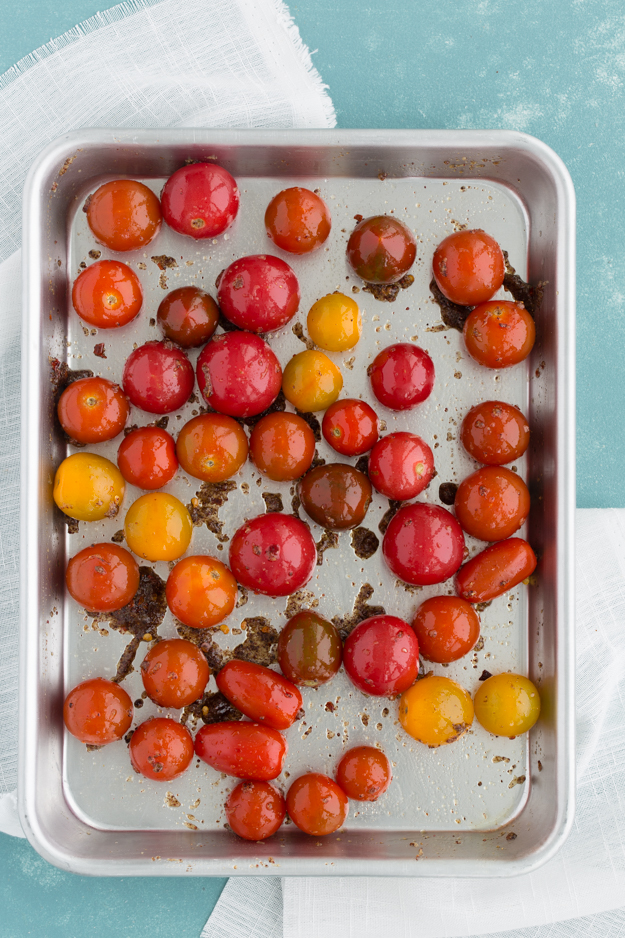
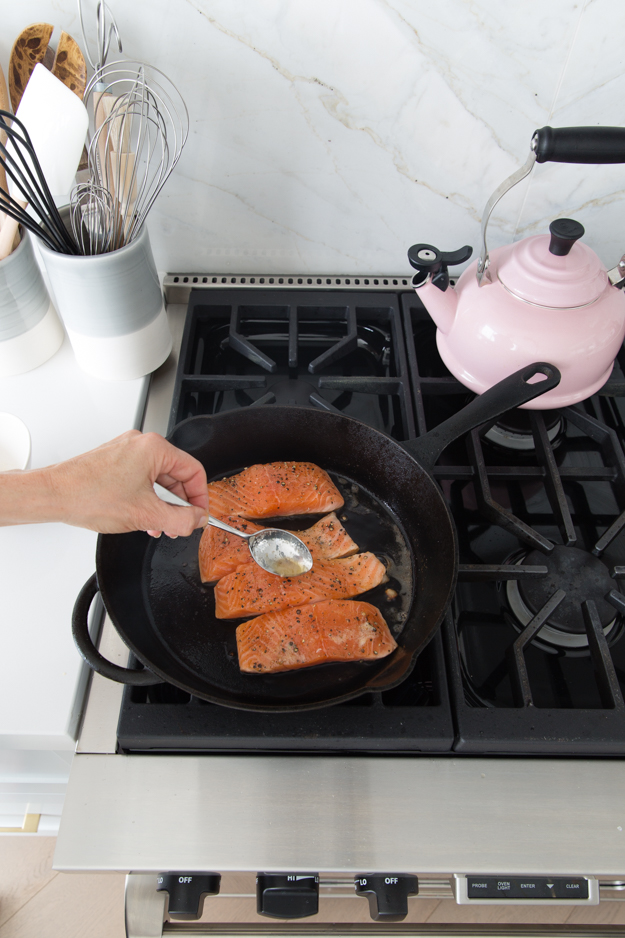
This recipe is inspired by a Joshua McFadden recipe for Falafel Spiced Tomatoes and Chickpeas on Flatbread, that I bookmarked in August of 2015 and have been meaning to make for the past 3 Septembers when heirloom tomatoes are at their most glorious. Given that we are smack in the middle of January, I decided to use rainbow grape tomatoes and just roast them with the falafel spices (garlic, sumac, ground cumin and corriander and red pepper flakes). I started the salmon fillets, skin side down in a hot pan with melted butter, to get the skin really crispy. Baste the flesh with the melted butter once or twice, then transfer pan to hot oven to finish cooking. The tomatoes are so flavourful, that I kept the seasoning on the salmon simple, just salt and pepper. Something green on the plate will make you feel virtuous! I went with sauteed green beans and some toasted salted almonds. Some chopped mint, parsley and cilantro, if you like it, are also welcome.
Apologies to all who tried to access my blog over the last few days and were unable to connect. I’ve had some technological issues, something about exceeding the allowable CPU’s and plugins not properly updated. Sadly, my skill-set does not extend to understanding the issues much less fixing them. I turned my problem over to the talented Hillary Little, and put my talents to work on problems I can solve.
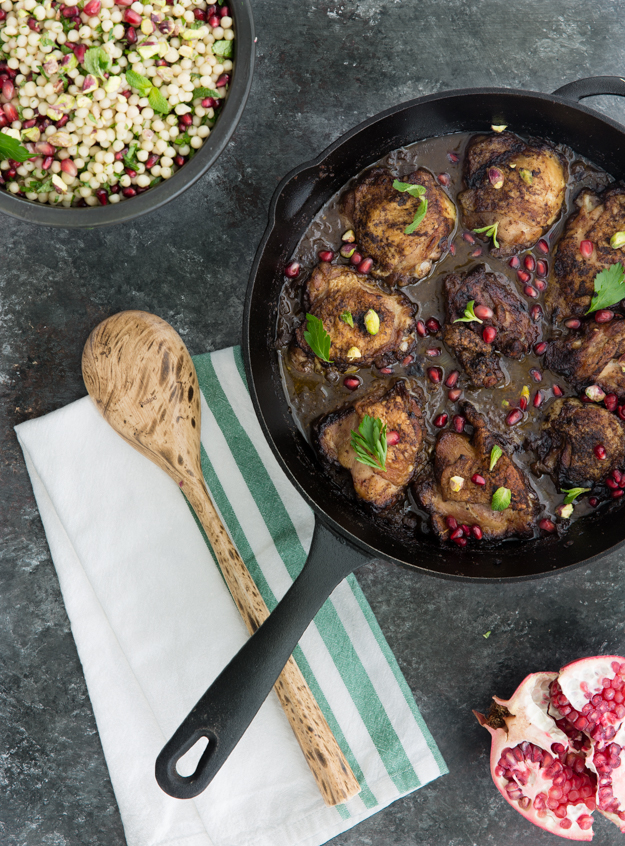
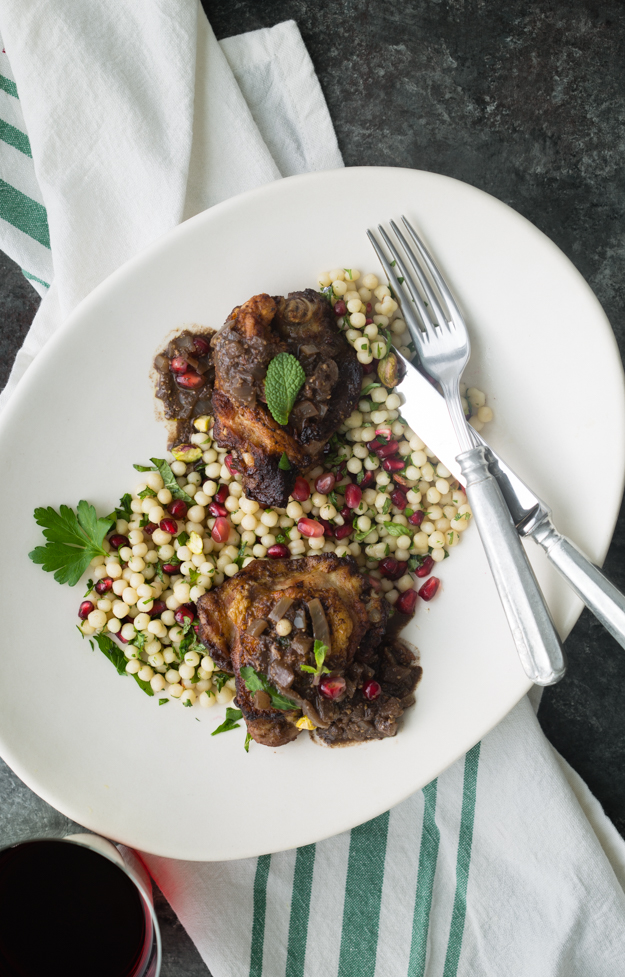
I spent the better part of the week perfecting pomegranate braised chicken. I already have one pomegranate chicken recipe on the blog, and while it’s very delicious, it’s been in my weekly dinner rotation for over 7 years now and I’m bored with it. The chicken is braised in a tomato based sauce, enhanced with some pomegranate molasses. I really wanted a more vibrant, pronounced pomegranate flavour.
In my quest to perfect pomegranate chicken, I made it several times this week. In round one, I loaded up on pomegranate molasses in the braising liquid. The finished sauce was way too bitter. Strike one. I also had the brilliant idea of making it a one pan dish and added the uncooked Israeli couscous to the pan, with the browned chicken and braising liquid. By the time the chicken was done, the couscous was too mushy. Strike two.
In round three, I used less pomegranate molasses and added some white wine and chicken stock to round out the braising liquid. It was better than round one, but the pomegranate flavour was really muted. Strike three.
A quick web search revealed an epicurious.com recipe that cleverly used pomegranate juice as the braising liquid. Wish I’d thought of that! As the chicken braisedin the oven, the juice reduced down to a thick, rich, sweet-tart sauce. Exactly what I was trying to achieve.
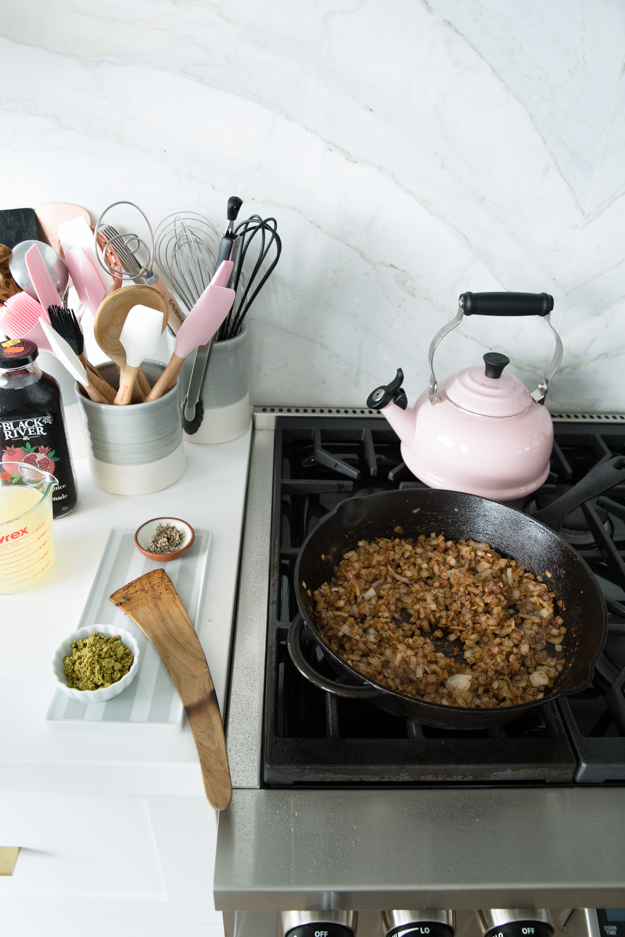
I started with bone-in, skin-on chicken thighs. I really wanted the extra flavour that braising on the bone would bring. Season the chicken liberally with salt and paprika and put it in the skillet on high heat, skin side down. Leave it alone for a good 5-8 minutes to give it a chance to really get brown. There’s flavour in the brown. Remove the chicken and pour off some of that rendered fat. Saute the onions until light brown. Cumin and cinnamon add great depth of flavour and ground pistachios add body and texture to the sauce. I used a combination of pomegranate juiceand chicken stock for the braising liquid. Vegetable stock or water would also be fine.
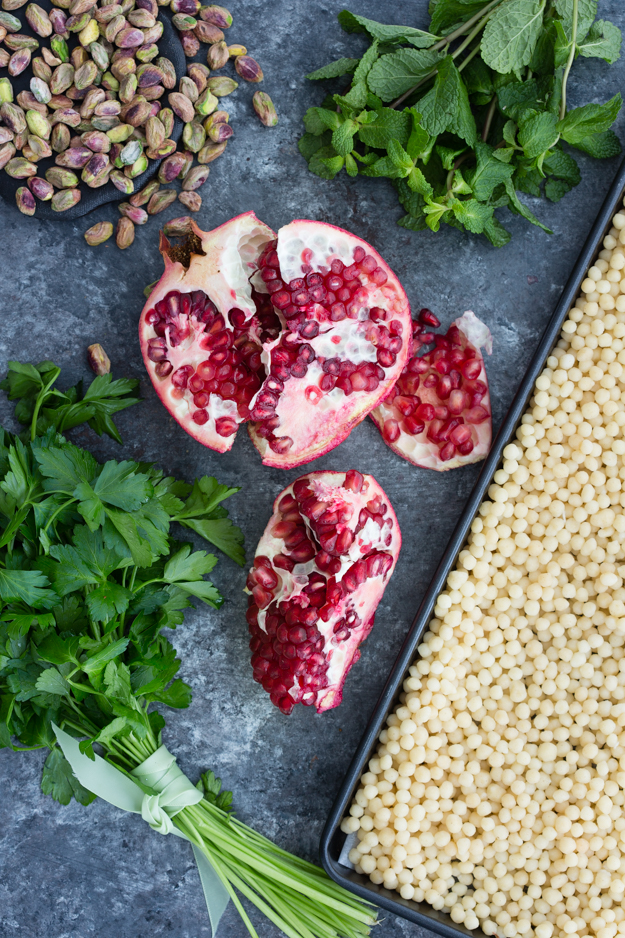
Israeli couscous is the perfect starch to sop up all that braising liquid. I added tons of fresh mint and Italian parsley to give it a lively herbal note. Toasted chopped pistachios and pomegranate seeds added crunch. A squirt of lemon juice and big glug of extra virgin olive oil brought it all together.
We’re not really a big game-playing family. The one and only time I ever played a board game with my husband was early on in our relationship. We were on the same team for a friendly game of Trivial Pursuit. The category was sports and leisure and it was a baseball question, the only sport I know anything about. I got so excited that I knew the answer, I shouted it out. Unfortunately, it was the other team’s question. My husband declared a moratorium on game playing with me after that.
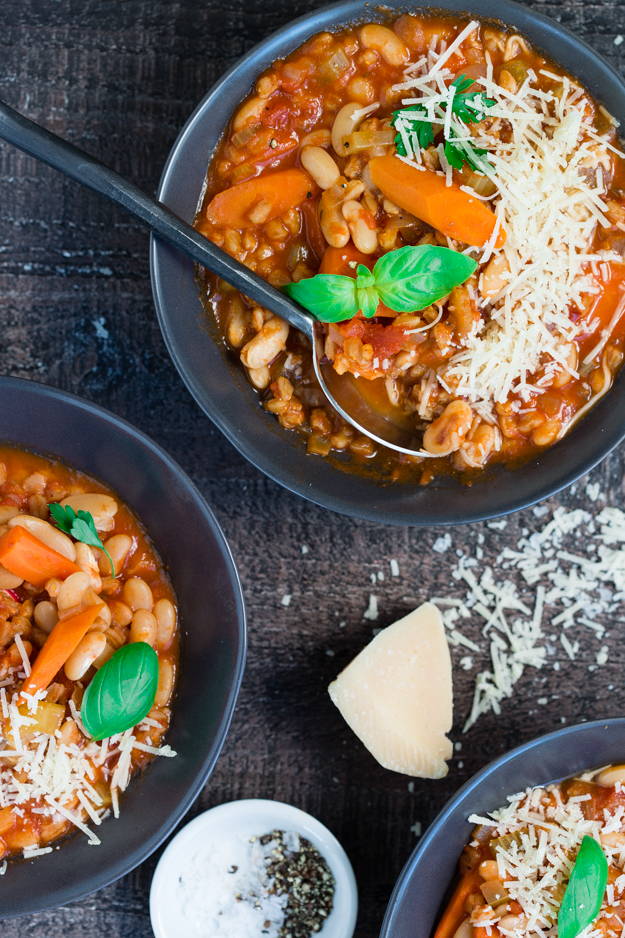
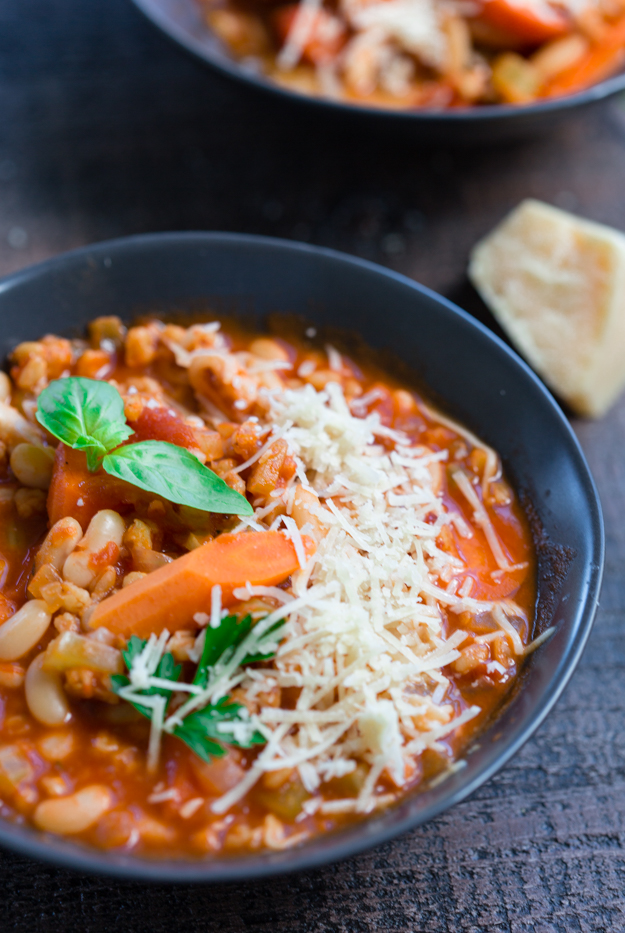
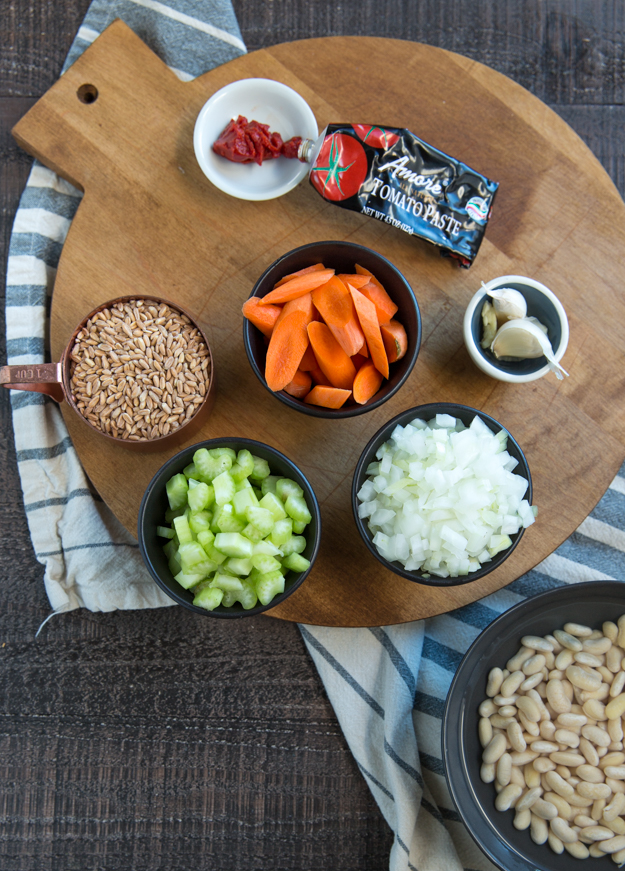
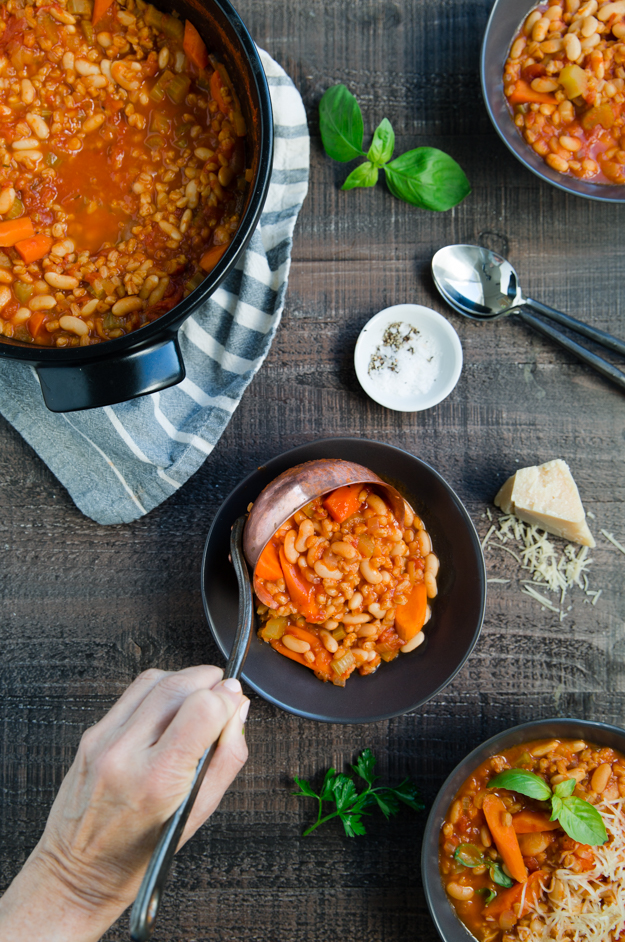
But, on a visit to see us in December, my youngest son started a game of tag, and it’s still going on. Sadly, he was playing tag with a wicked cold. He caught it first, passed it on to my husband, and now I am “it”, sneezing and coughing my way through January. Normally, when I’m sick, I lose my appetite, so I sort of got excited about being sick at the beginning of January. I figured this would be the perfect way to lose my December cookie weight. But this cold left me feeling ravenous. I couldn’t seem to eat enough to make me feel satisfied. I was craving carbs.Soup seemed like the perfect remedy. Hot enough to soothe my sore throat and packed with lots of starchy things to make me feel full. This is my take on the classic Tuscan soup, Minestra di Faro Lucchese. (Farro soup in the style of Lucca). I used Mark Bittman’s New York Times recipe as my starting point and adapted slightly from there. I added a heaping tablespoon of tomato paste to the sauteed onions and celery, to really deepen the flavour of this soup. I also slipped in a big pinch of red pepper flakes. While spicy heat is not a typical addition to the classic recipe, my tastebuds were so dulled by my cold that I wanted the soup to really pack a punch of flavour. Plus, spicy food makes my nose run, so I figured that the soup would work to cleanse my sinuses. The final adaptation I made was the addition of a rind of Parmesan cheese to the simmering soup. I always save my rinds and keep them in the freezer in a zip-loc bag to add to soups and stews. This soup does not fall under the “fast food” category. You need to soak the beans the night before. You could use canned beans, but I think that the texture would not be the same. The original recipe called for adding the farro and beans at the same time. I found that the beans needed at least 90 minutes of simmering to get tender, so I added the farro during the last 30 minutes of cooking, so that it would still retain some chew, the way I like it. I also waited and added the carrots at the end of the cooking time, rather than at the beginning with the celery and onions, so that they would not be too mushy.
Serve with lots of chopped Italian parsley and fresh basil for a hit of verdant freshness. Don’t forget the Parmesan cheese.
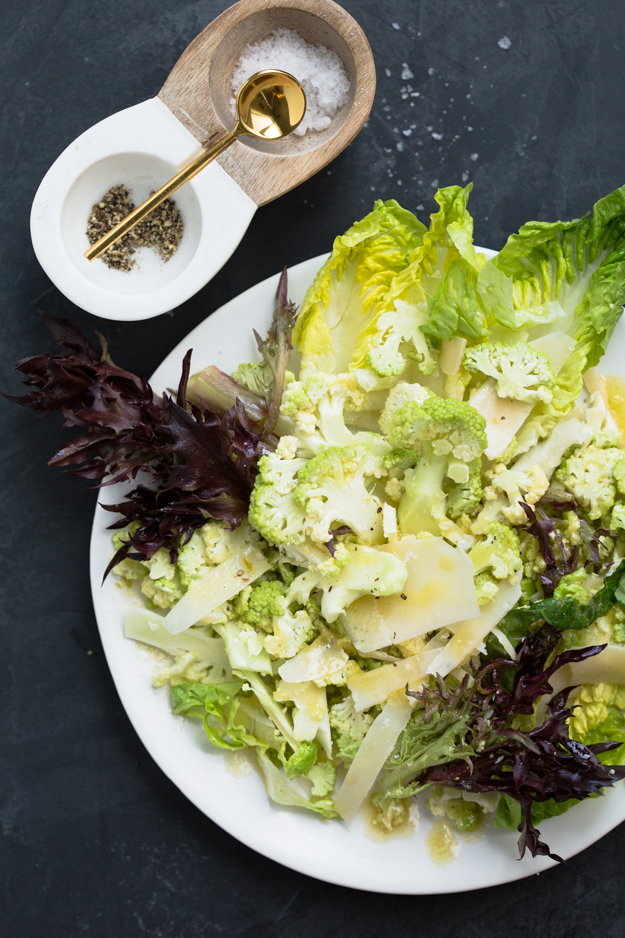
Anybody else out there taking a break from cookies this week? Yeah, I thought so. We are too. Personally, I don’t like to use the “D” word (diet). I just prefer to take a break from certain foods for a while if my eating habits have been unbalanced. December has a way of unbalancing us. I don’t normally make New Year’s resolutions but this year I have promised myself to begin each day facing the bathroom mirror, flexing my arms and uttering the affirmation, “Damn, look at those chiseled arms!”
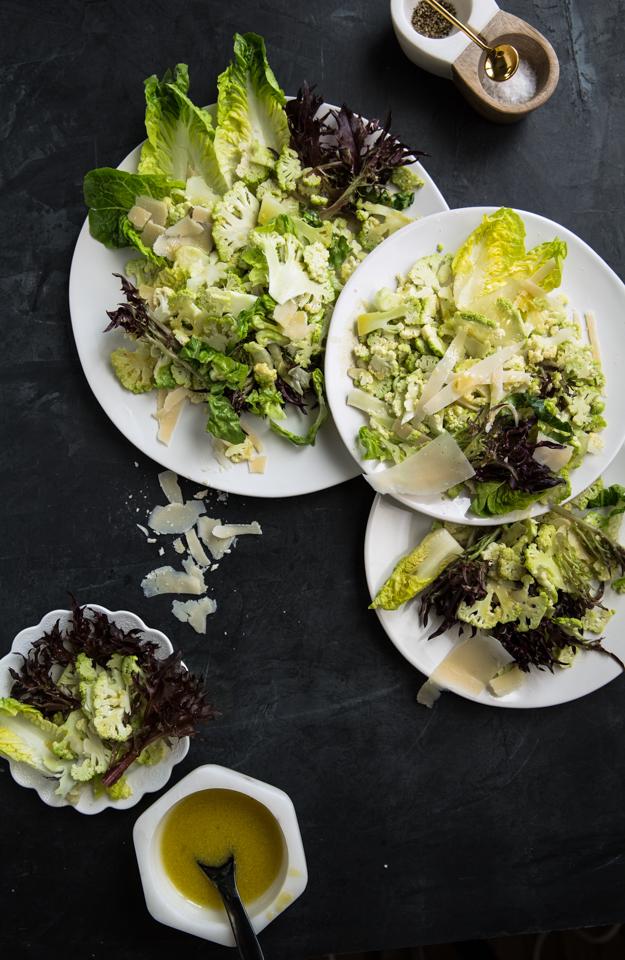
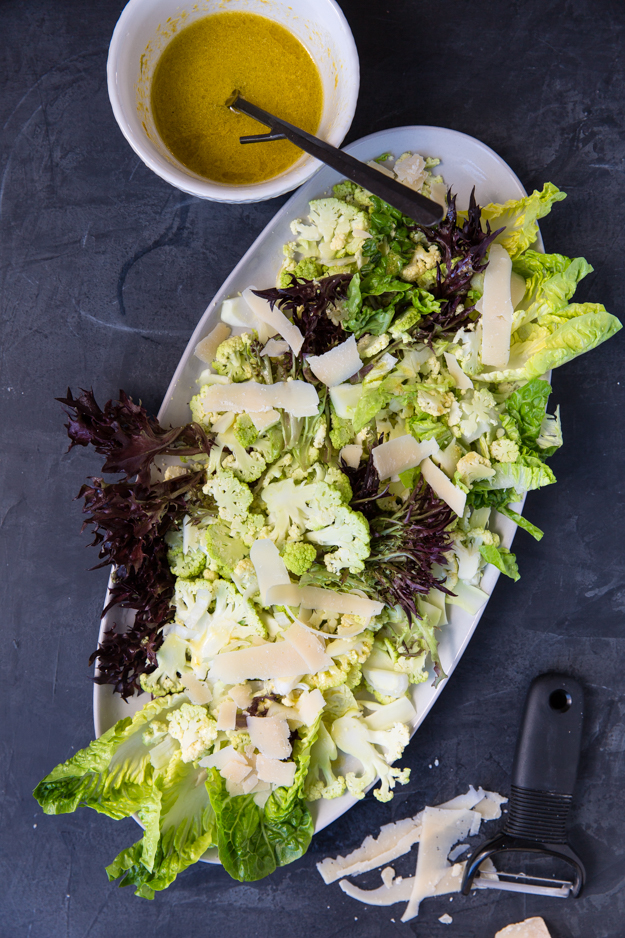
This salad is sure to bring some balance back into your life. It is extremely flavourful and satisfying. The dressing is an umami bomb, containing both nutritional yeast and Parmesan. Nutritional yeast is not just for vegans. It adds a cheesy, nutty, savory flavour that can give any dish a zesty boost.
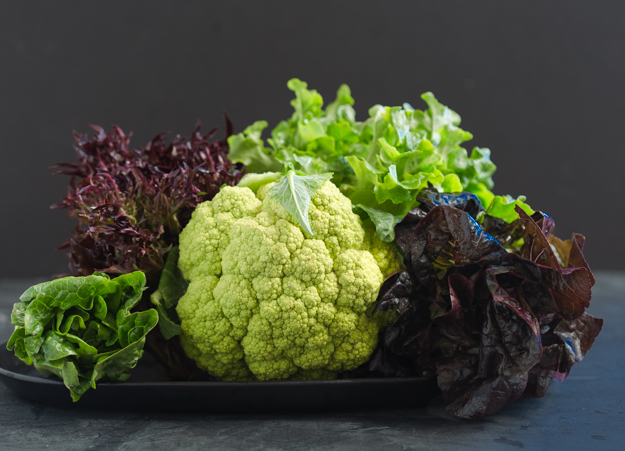
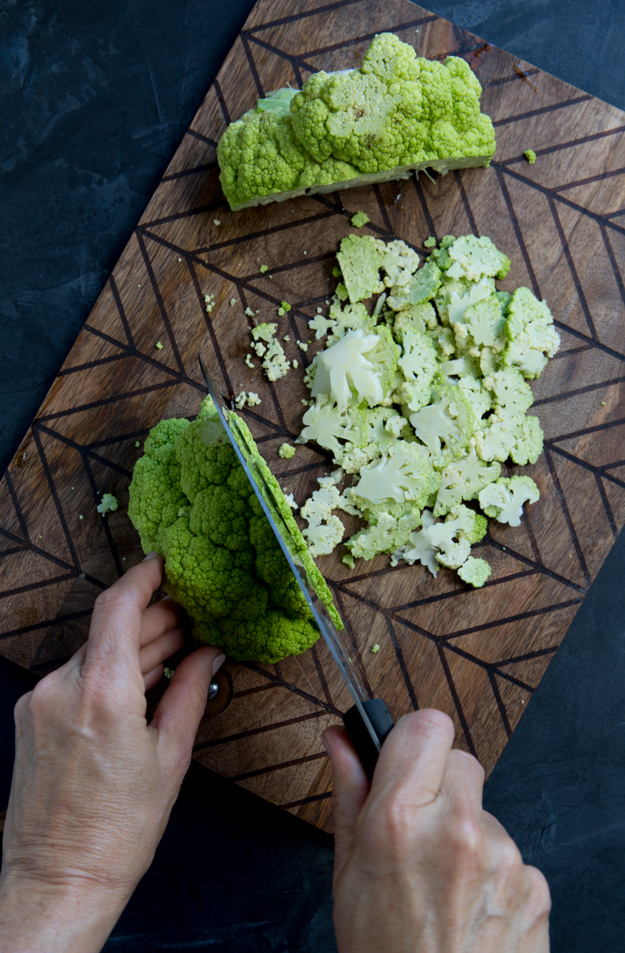
Now is the time to splurge on the green or orange cauliflower and those pretty artisan lettuces you see at the grocery store.I bought a 4 pack of Artisanal lettuces. The box contained sweet, crisp green little gem lettuce (the one that looks like mini romaine), mild and nutty red oak leaf lettuce and a zesty red tango lettuce. Arugula and some romaine hearts would be a fine substitute if that’s all you can find.
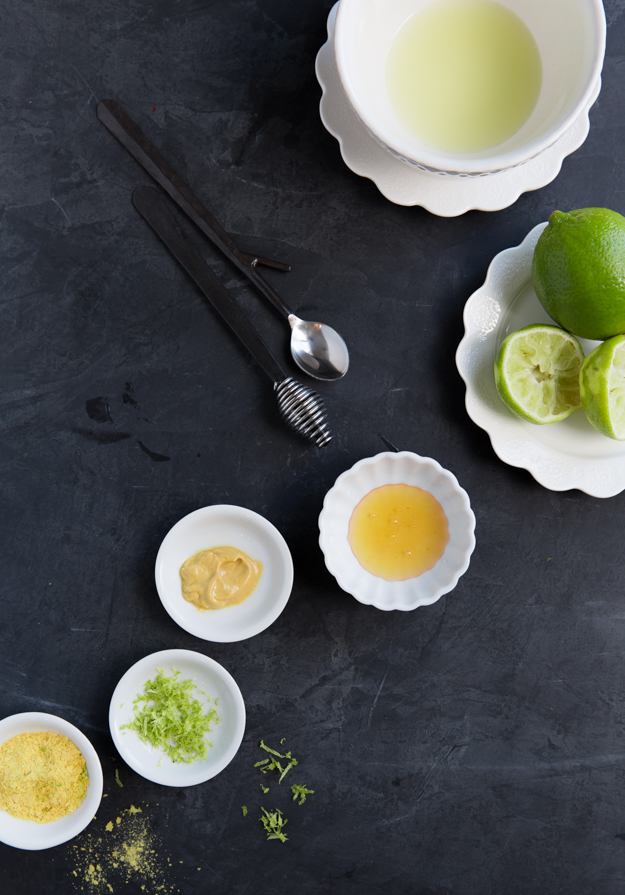
Whisk together some lime zest, lime juice, honey, dijon, nutritional yeast, parmesan and olive oil. Cut your cauliflower into quarters, remove the hard core and thinly shave it. Use a mandoline or just a sharp knife and use this as a chance to work on your knife skills. I love my little knife sharpener. It’s so easy to use.
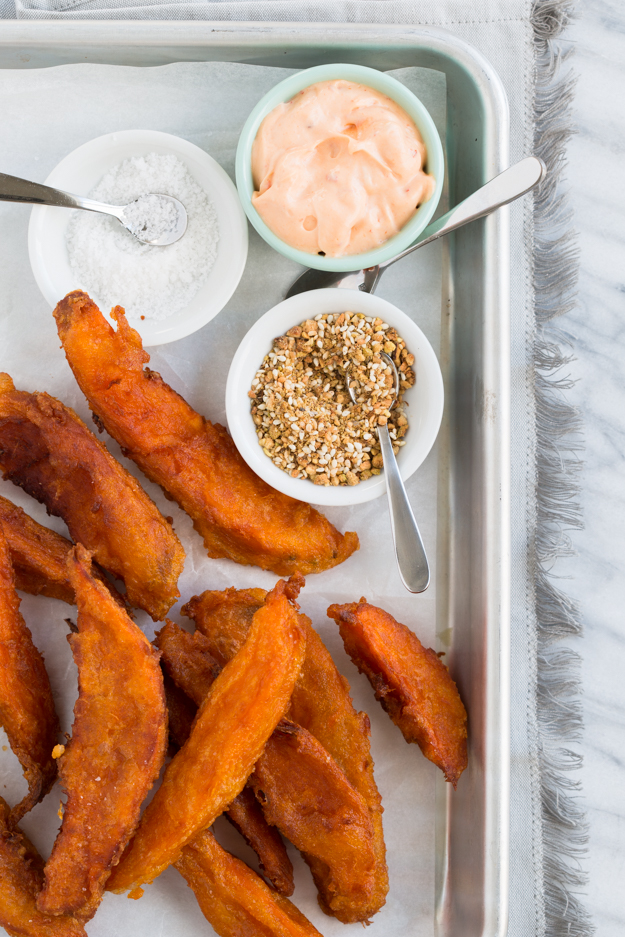
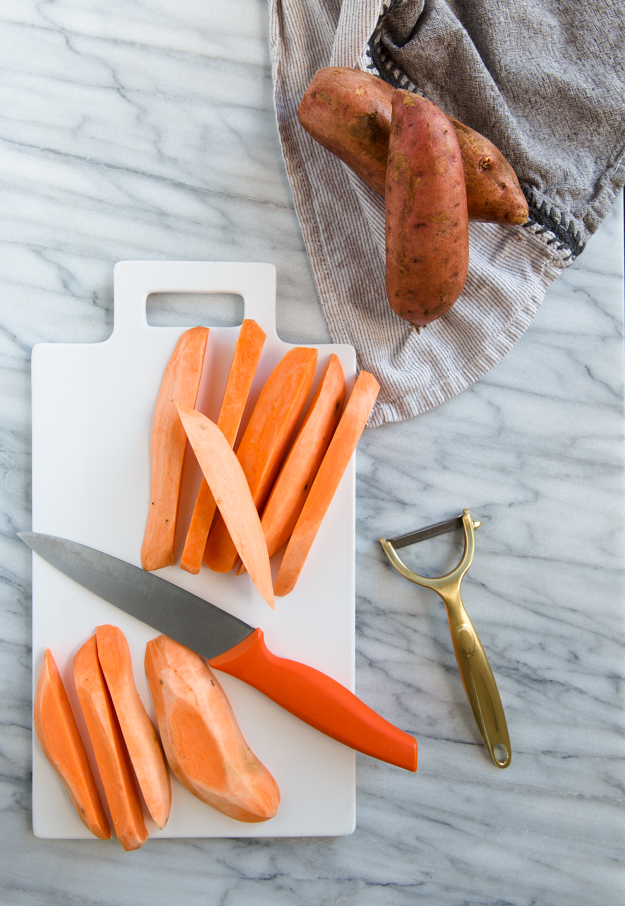
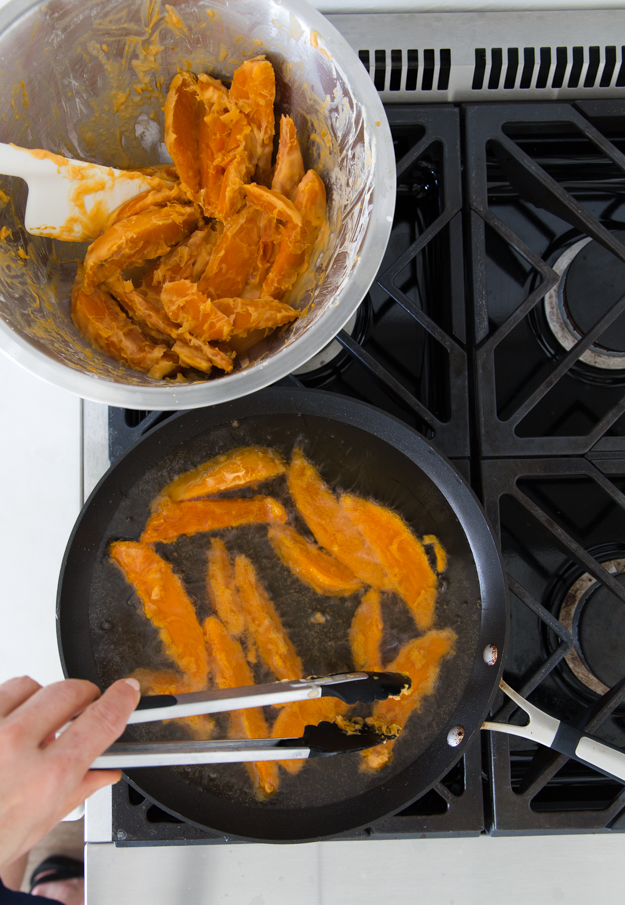
Cracking the code on making crispy sweet potato fries has been an elusive goal of mine for a while now. (Yes, I know I have lofty goals!) I have mastered regular fries, but sweet potato fries are a real challenge. Even when deep-fried, they only remain crispy for about a minute before they go limp. The issue, I have discovered, is that sweet potatoes are higher in sugar and lower in starch than Russett potatoes (the best potato for french fries, by the way).
Leave it to Cook’s Illustrated to figure out how to do it. Cornstarch is the secret ingredient. To counterbalance the low starch content, the sweet potatoes, are given a bath in a cornstarch-water slurry.
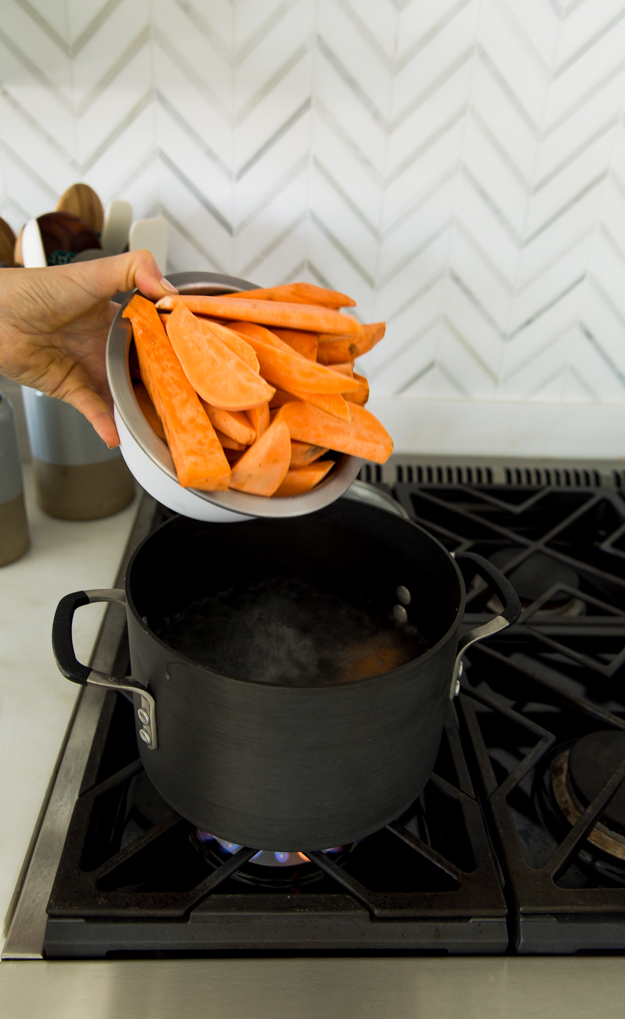
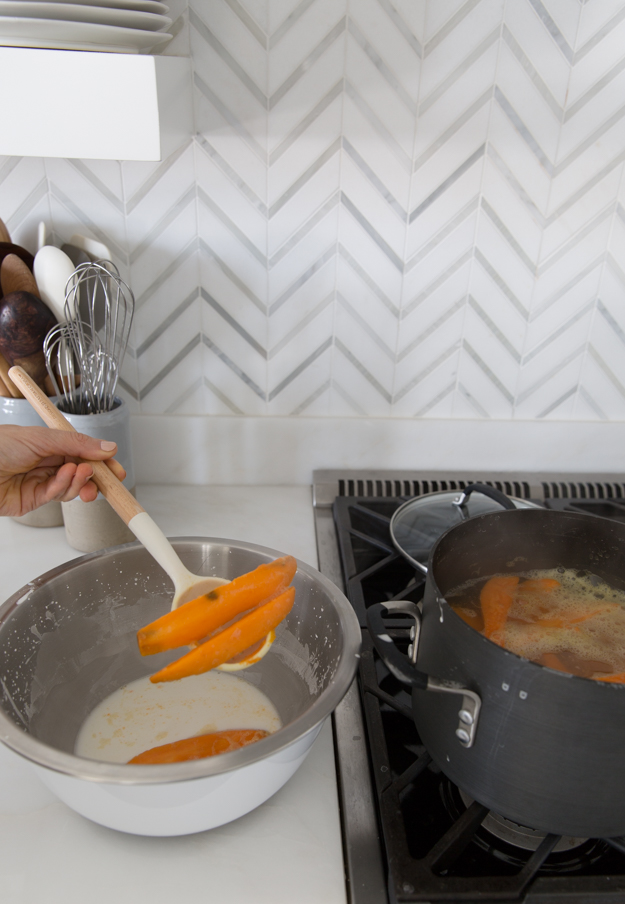
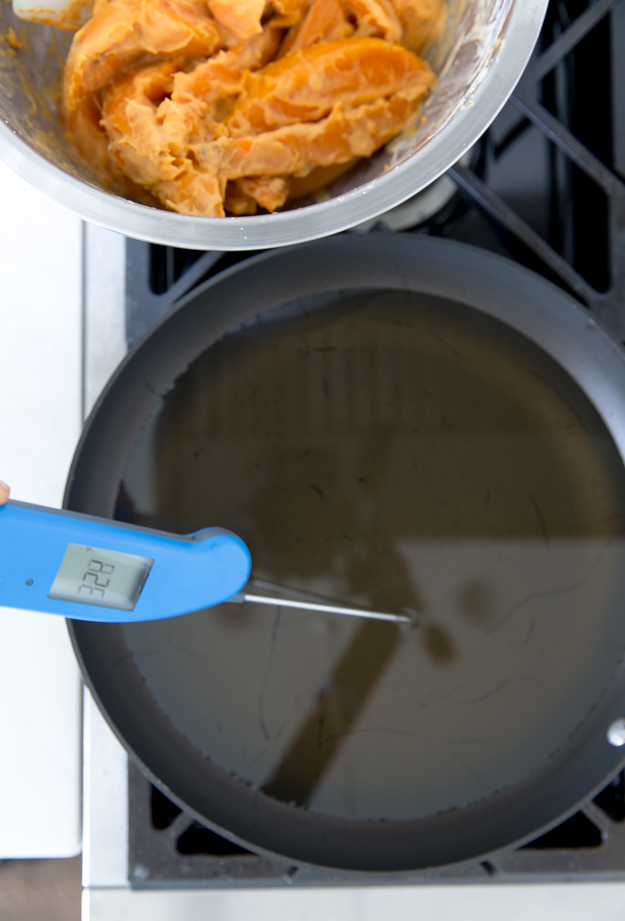
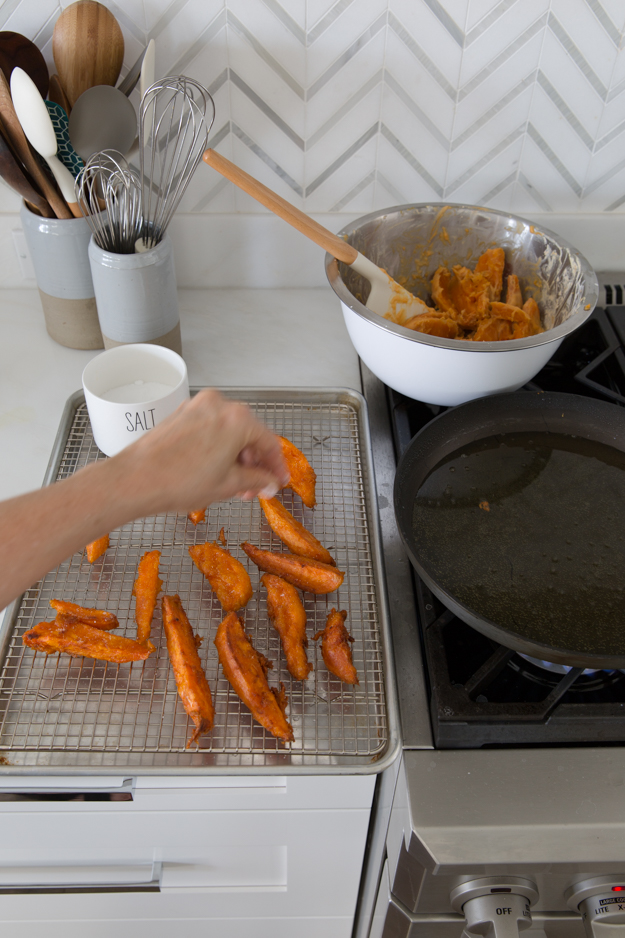
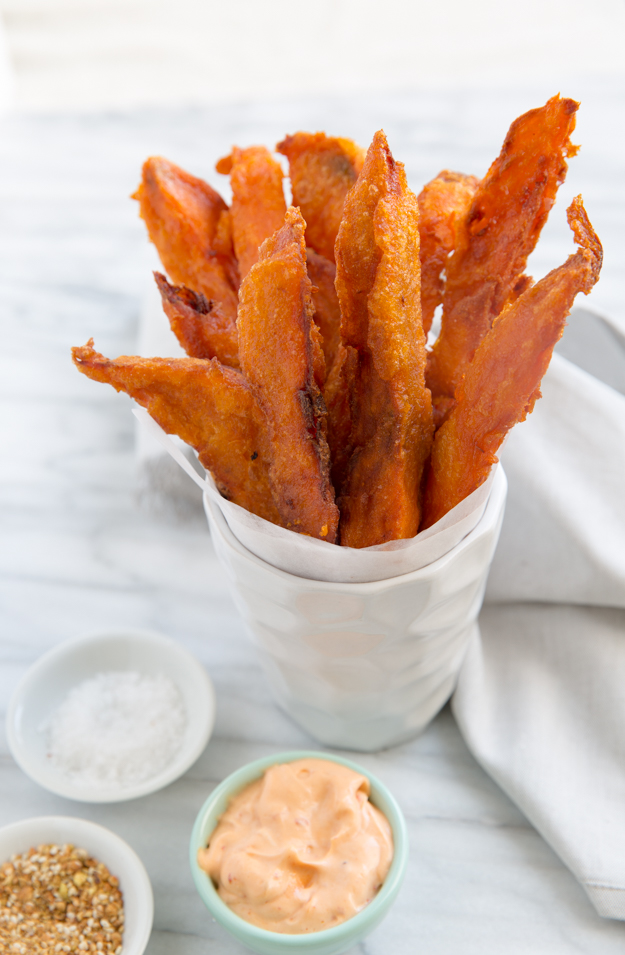
Start with peeled sweet potatoes cut in half lengthwise, and then into 3/4 inch wedges. In order to ensure that the interior of the sweet potatoes become tender, they are blanched in salted boiling water with a teaspoon of baking soda. The baking soda makes the surface of the potatoes a bit sticky so that the cornstarch has something to grab on to. Initially, the cornstarch mixture will be quite thin. Keep stirring gently and the heat of the sweet potatoes will thicken the water-cornstarch mixture and coat the sweet potato wedges perfectly. That unsightly orange sludge coating the wedges will be converted into a shatteringly crispy exterior once fried.Heat oil to 325°F for perfect frying. You’ll have to fry them in batches. Salt them as soon as they come out of the oil. The first batch can stay warm on a rack in a 200°F oven while you fry the rest. Admittedly, these sweet potato fries take some work to prepare. Creamy and soft on the inside, and audibly crunchy on the surface, they are worth both the effort and the calories. These aren’t something you’ll prepare on a weekly basis, but for a special occasion, please reward yourself. They will be making an appearance on our new year’s eve table.
My photo shoot took over an hour and when I tasted the fries at the end, and they were still crunchy. I like to serve the fries with a chipotle mayo dipping sauce and a sprinkle of dukkah. Take 1-2 chipotle chiles in adobo, remove the seeds and puree. I mix this into 1/2 a cup of Hellman’s mayo (light is perfectly fine, just don’t use the fat-free).
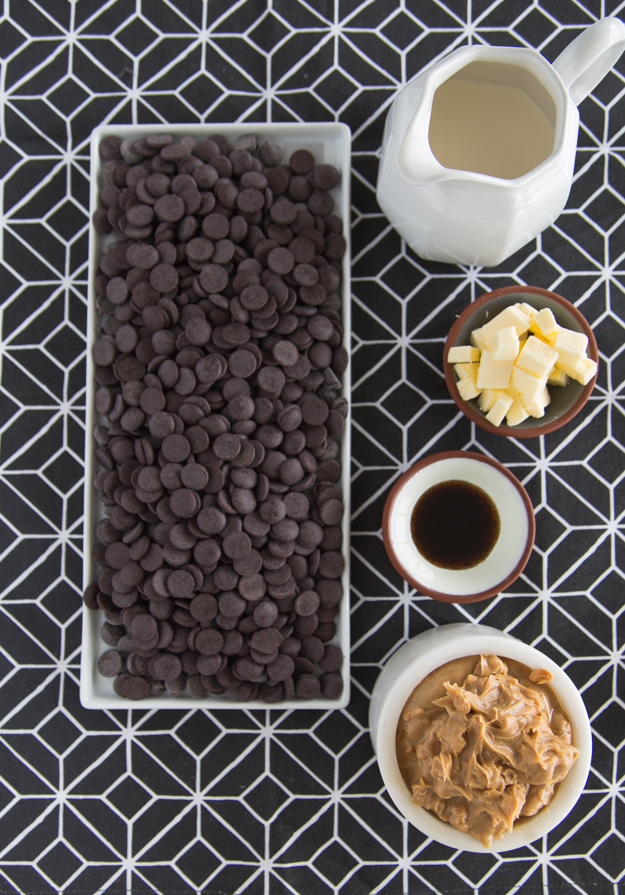
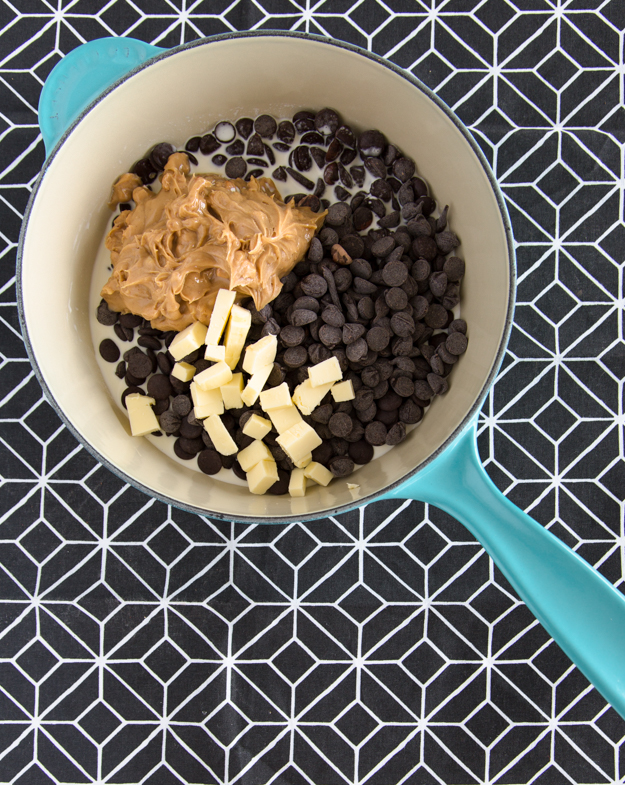
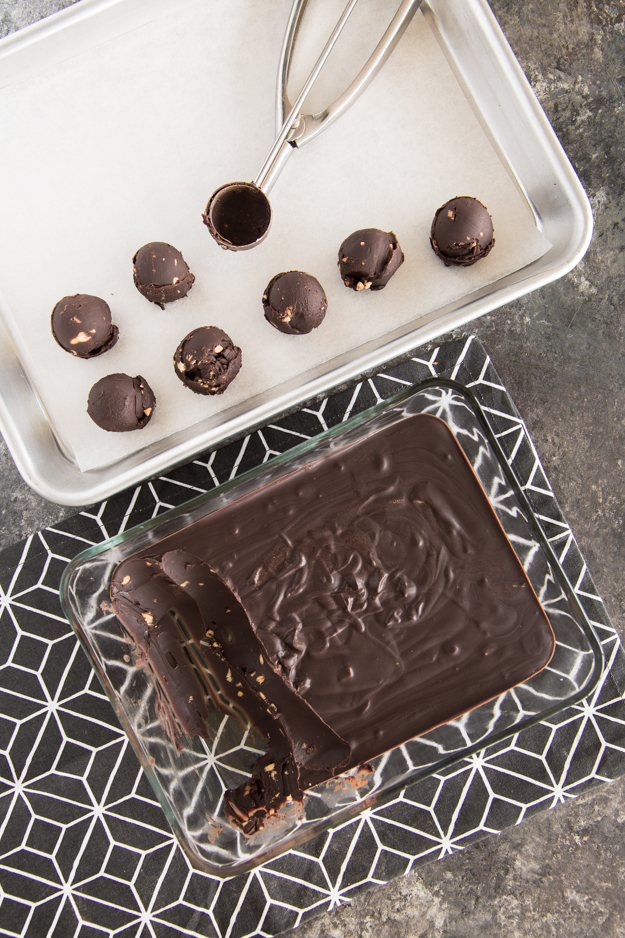
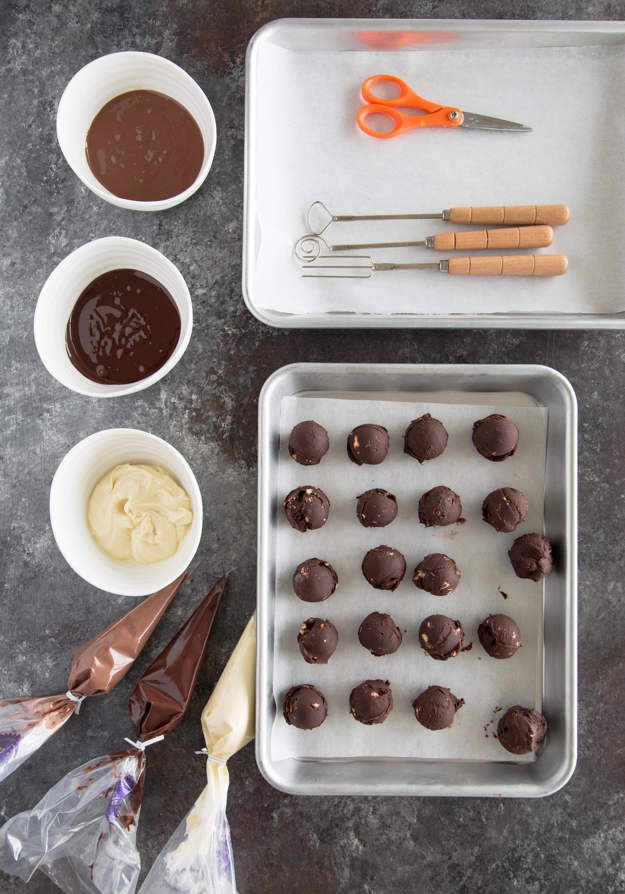
Just in case you haven’t had enough chocolate or sugar by this point in December, I’m bringing you Marbled Peanut Butter Truffles. You’re welcome! This is an old recipe, from the December 1988 issue of Gourmet Magazine. It has stood the test of time. My girlfriend Marla and I would spend a weekend in my kitchen every December creating hundreds of these truffles for gifts. We kept it simple and just rolled them in cocoa powder. I have updated the recipe slightly, by dipping them in a mixture of bittersweet, milk and white chocolate to create a marbled coating.
Bittersweet chocolate, peanut butter, cream, and butter are melted together. Chill for about 3-4 hours and then use a small scoop to form truffles. Melt bittersweet, milk and white chocolate. Get organized and set up the dipping station. Once you start, the dipping goes fairly quickly. Check it out in this video I created.
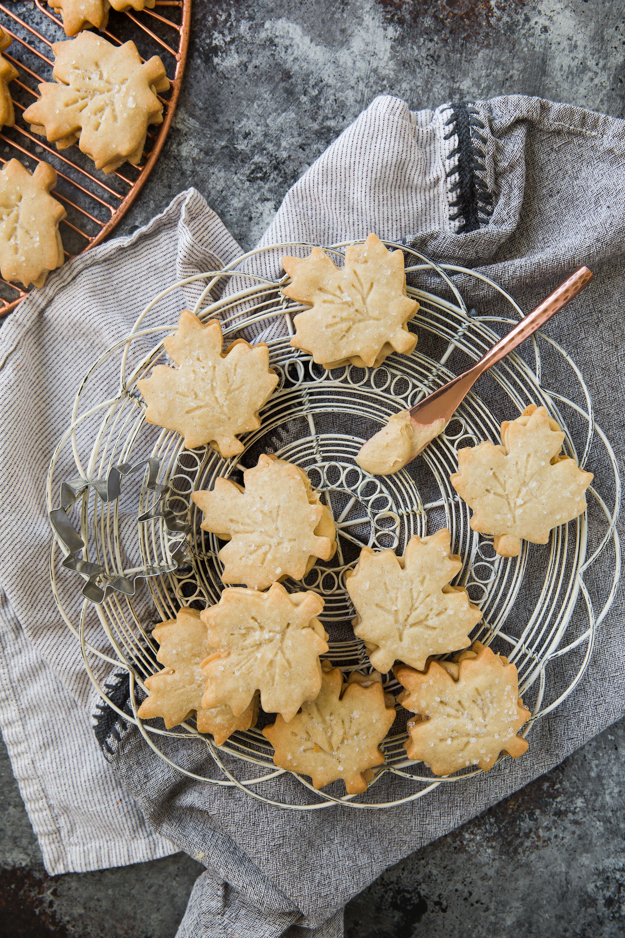
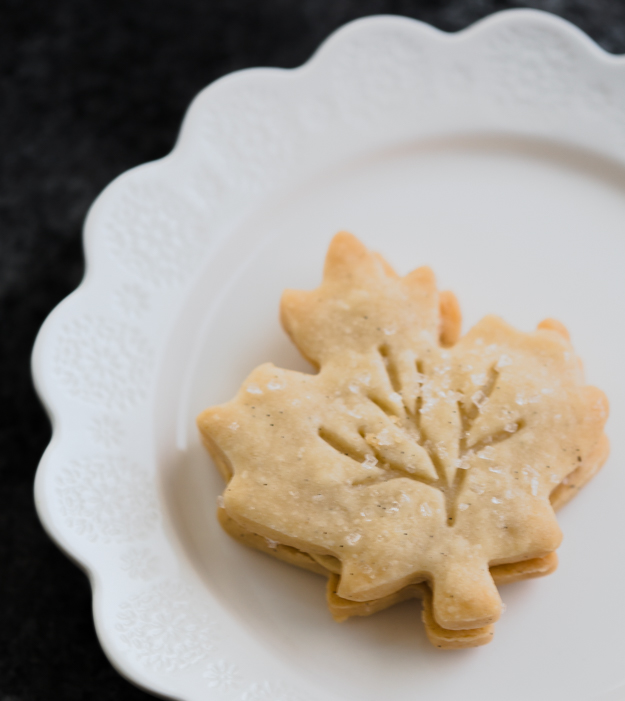
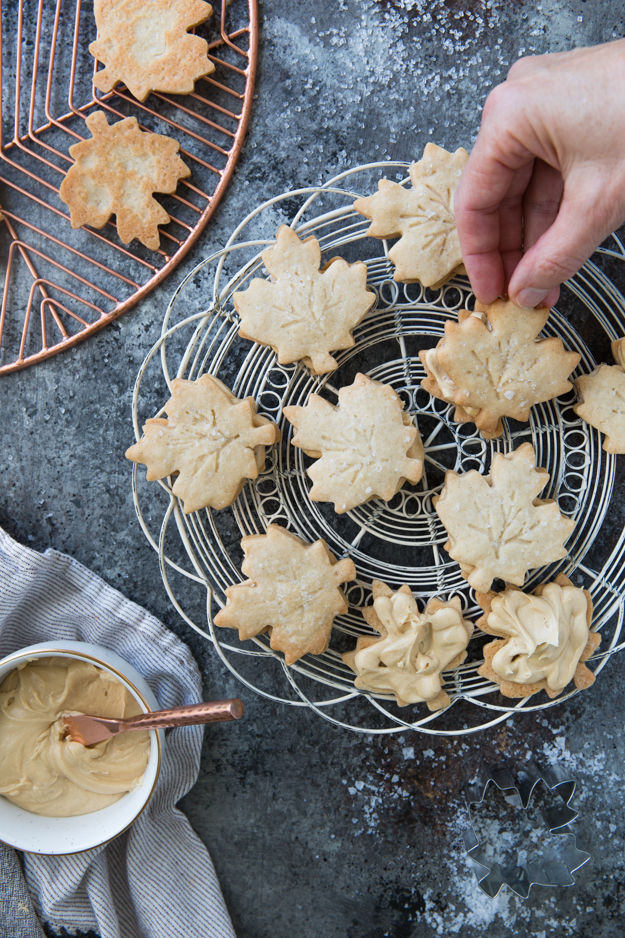
While maple might not be the first flavour that leaps to mind for holiday baking, these cookies might change your mind. Like many Canadians, I grew up eating maple sandwich cookies, so I have a certain nostalgic fondness for them. One of these and a paper cup filled with apple juice takes me right back to nursery school!It’s been a while since I’ve snacked on a maple sandwich cookie, but as soon as I saw them being made on The Great Canadian Baking Show, I couldn’t stop craving them. While Canada’s version of the British original is a bit staid, at least we weren’t pulled from the air after the first 2 episodes for inappropriate behavior from one of our judges. Another fallen culinary hero. Mostly, I feel sad for all the contestants on the U.S. show that never got to showcase their talent.
Just reread that last paragraph and realized that my guilty pleasure for reality TV has been exposed. Not all reality TV though. Only shows that showcase actual skill or talent, such as Top Chef and Project Runway. The less drama and conflict between the contestants, the more I love it. Have any of you caught Masterchef Australia? Completely addictive.
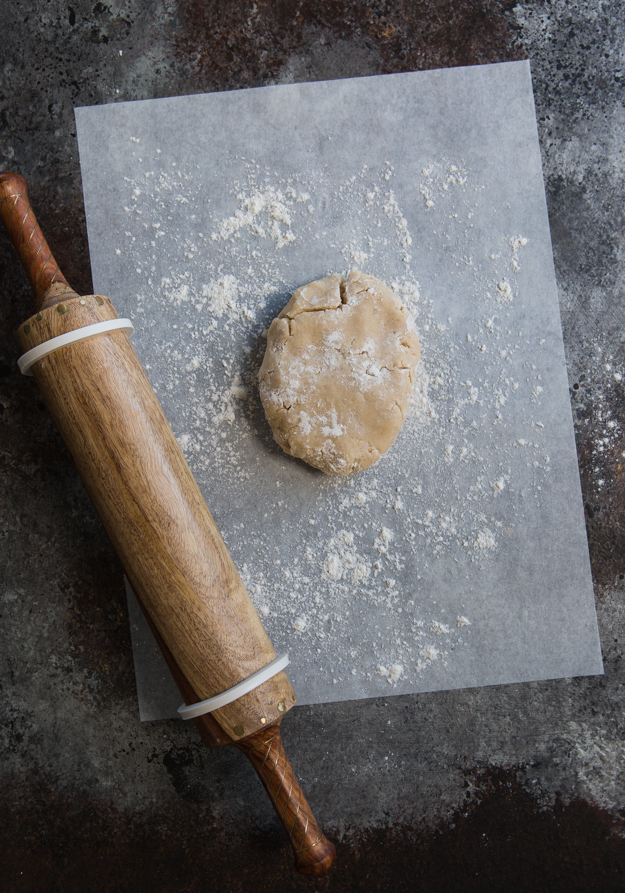
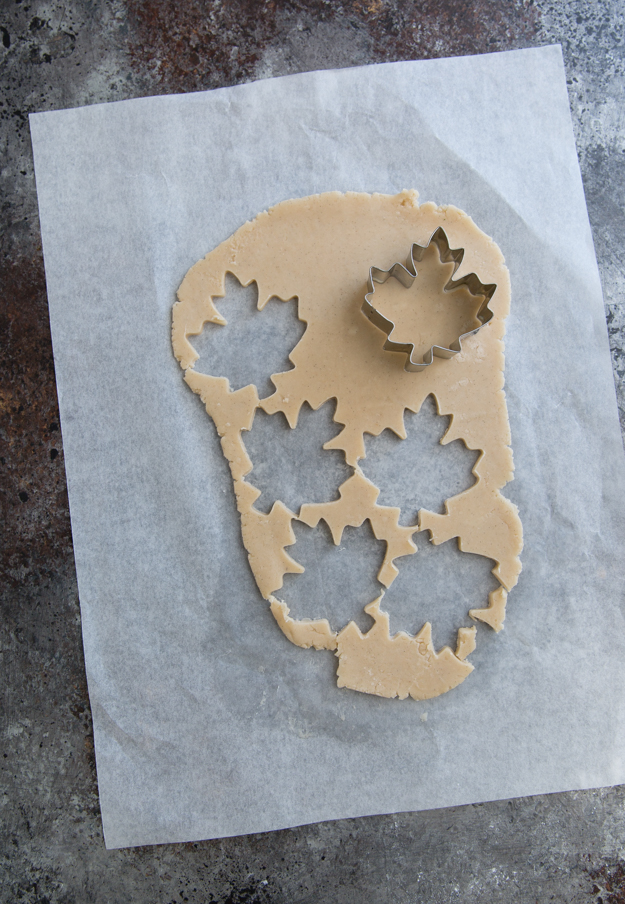
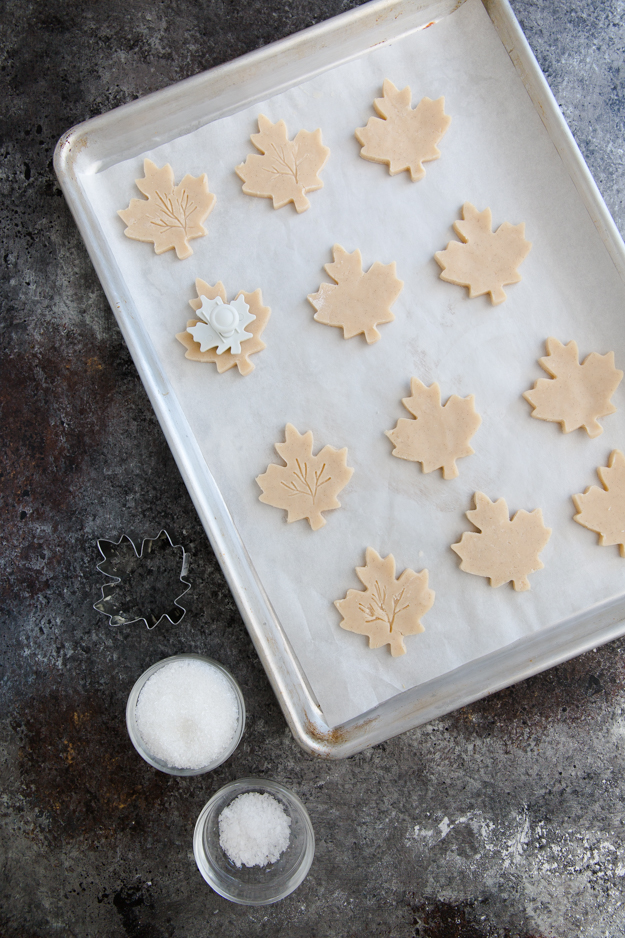
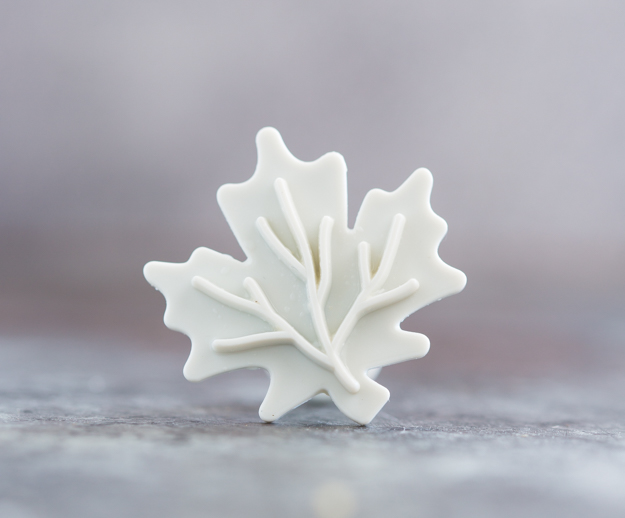
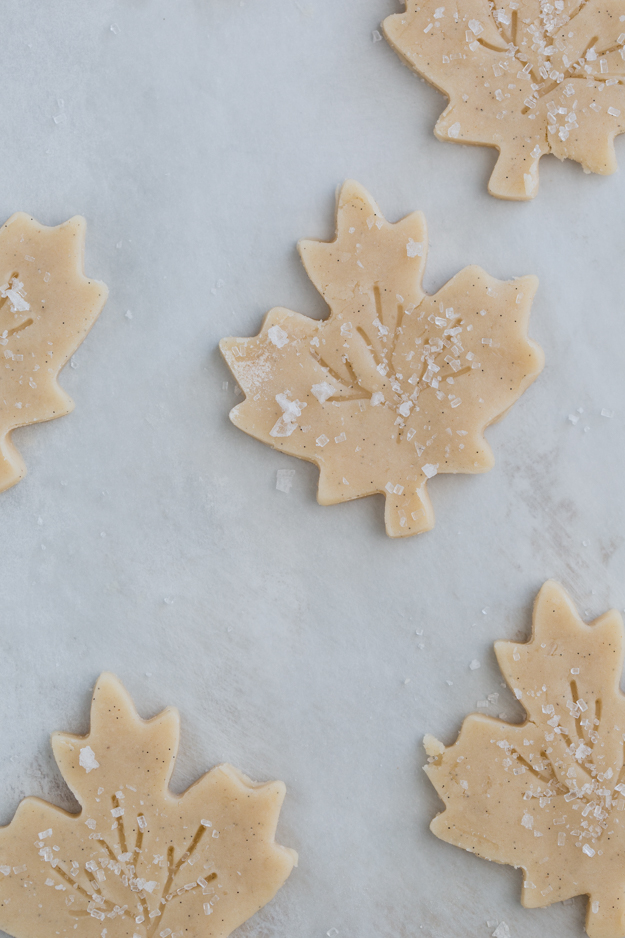
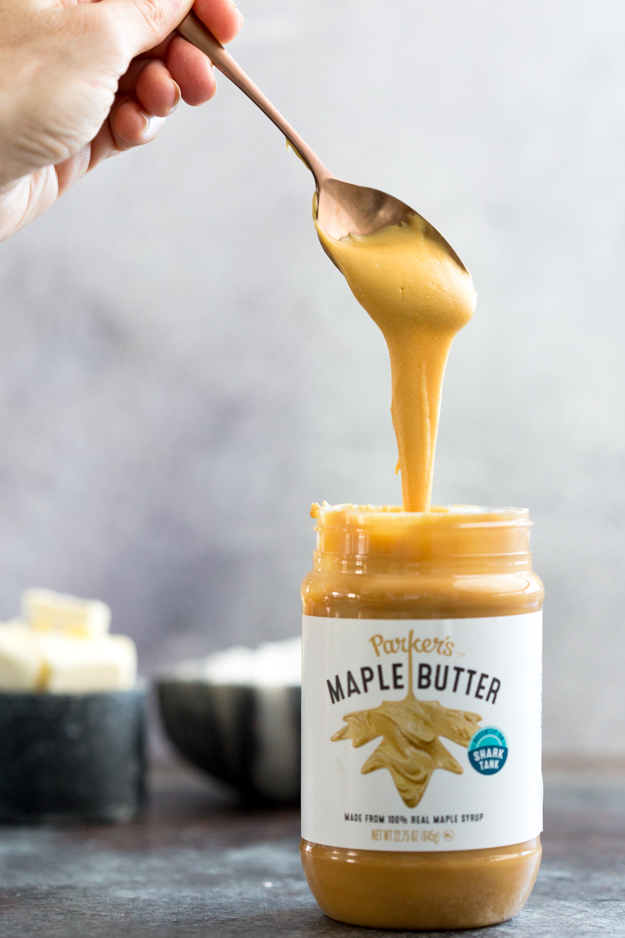
The cookies are a simple shortbread dough, using unsalted butter, icing sugar, all-purpose flour, salt and a bit of maple extract. Do yourself a favour and roll out the dough between 2 sheets of parchment paper as soon as you make it. Then chill the sheet of dough.Cut out shapes from chilled dough. If you want to get really fancy, you can draw the veining of the leaf with the tip of a paring knife. Or, if like me, your drawing talents suck, invest in one of these fondant cutters. It works best if you let the dough soften up a bit before you try to stamp the vein imprint on the cookie. Before baking, I sprinkled each cookie with coarse sanding sugar and just a touch of flaky sea salt. The filling for the sandwich cookies is made from unsalted butter, icing sugar and maple butter. I have tried a few different brands of maple butter and they were all pretty amazing. This one is from Vermont, this one is from Quebec. If maple is your jam, these cookies are for you. The maple flavour is intense and rich. They are the perfect accompaniment to a cup of tea.

 We have been eating overnight oats for breakfast, lunch and dinner this week, as I have been testing different variations. So far, no one has complained. This version is adapted from a Cook’s Illustrated recipe. They sweetened the oats with brown sugar but I switched it for maple syrup. I also added chopped apples to the oats while they were cooking. Their recipe used shredded apples but I found that I liked the texture better with little bites of diced apple.
 The night before, bring 3 cups of water and a good pinch of salt to a boil. Remove from heat and add 1 cup steel cut oats. Cover pot and let it sit on the counter all night. In the morning , add apple cider or juice, milk, cinnamon and some diced peeled apples. Cook for 5 minutes. Let sit for a further 5 minutes.
  Top with sauteed maple apples and some toasted almonds or pecans.