Anyone else need a bit of a reset to their digestive system this month? My consumption of cookies in December was a bit over the top. Well, more than a bit, but never mind. Let’s look forward, to this Split Pea, Barley and Spinach Soup.
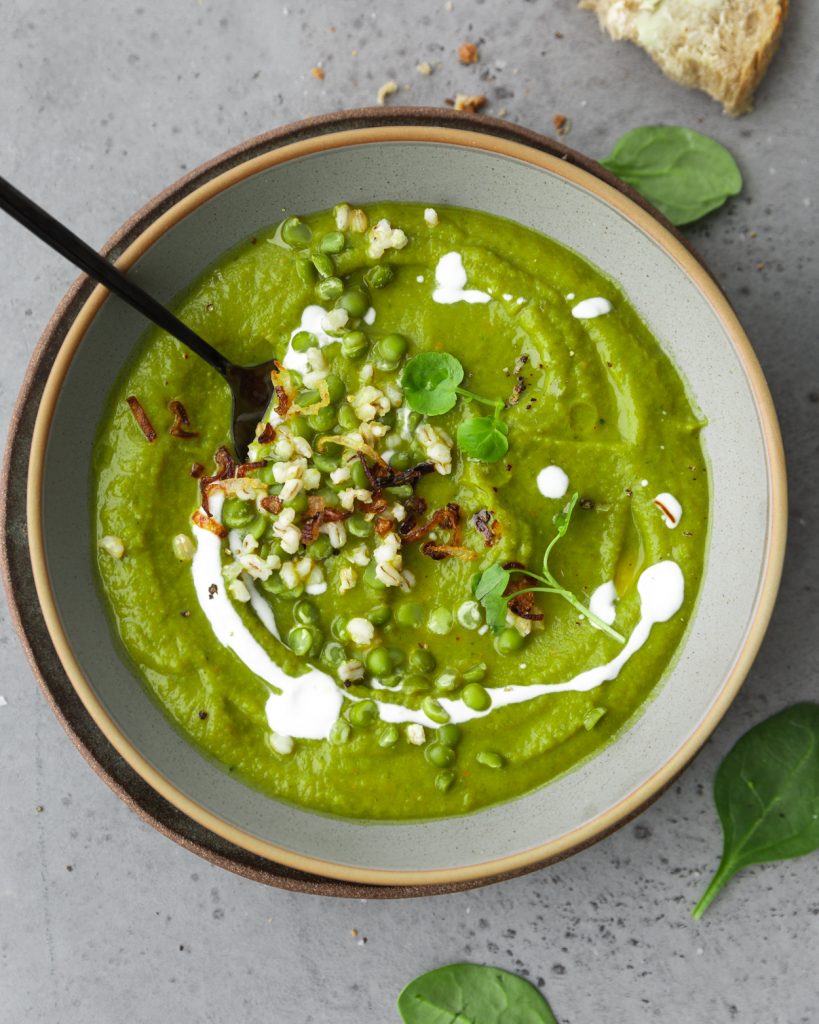
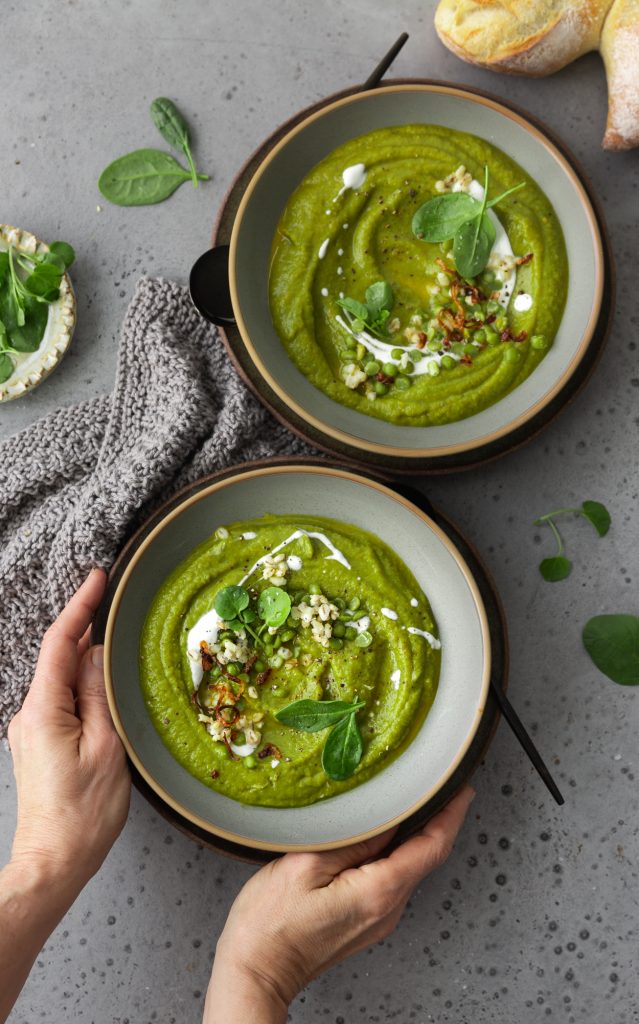
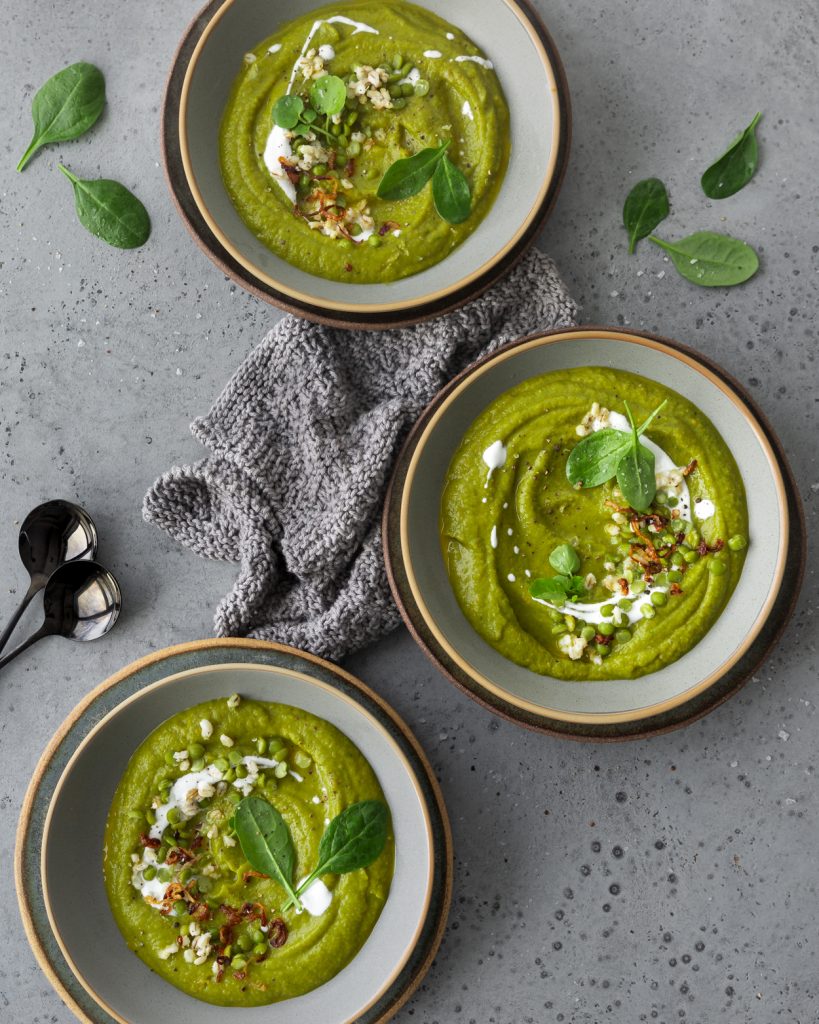
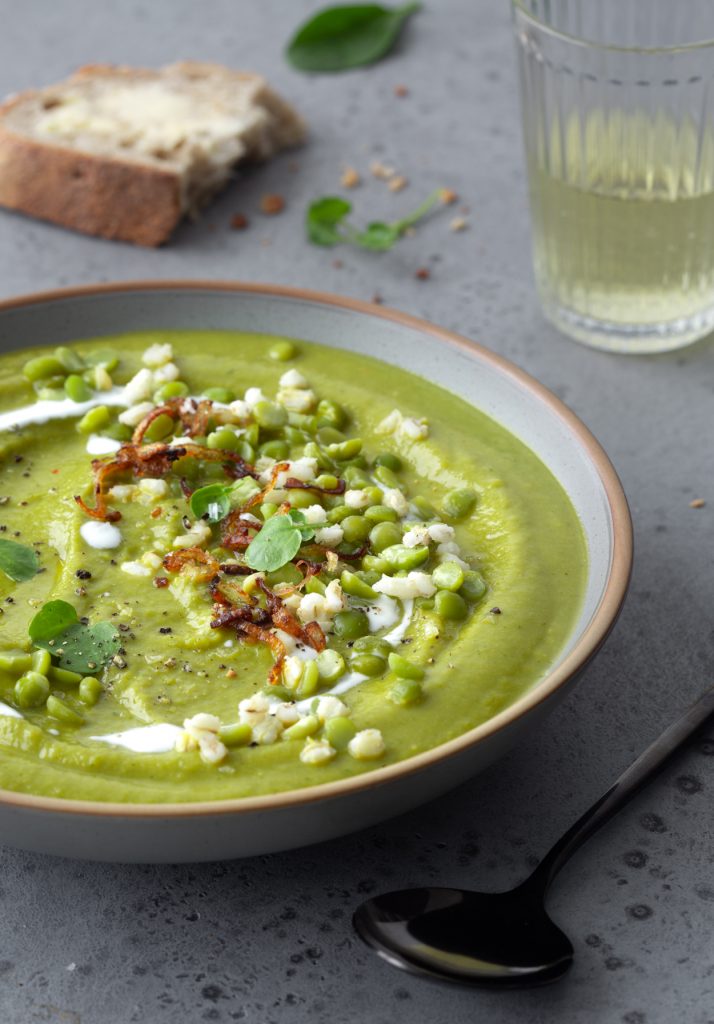
This soup is a body-cleansing powerhouse. A mere 1/4 cup of green split peas contains 12 grams of both fibre and protein. Barley rings in at 8 grams of fibre and 6 grams of protein per 1/4 cup. Make sure you buy pot barley and not pearl barley. Pot barley is not hulled, meaning it still has the outer layer and is considered a whole grain. I suggest cooking the barley separate from the soup, and mixing it in at the end, so that it does not overcook. You want a bit of chew to your barley.
This soup also contains an entire 5-ounce box of spinach. In addition to the nutrients spinach provides, it also helps the split pea soup have a prettier green colour. Although, I will admit to a bit of editing to the green colour of this soup.
Leeks, carrots and celery form the base of this soup. I used vegetable broth, but chicken stock could also be used. I spiced things up a bit with some red pepper flakes, thyme and bay leaves. I like to finish the soup with a drizzle of yogurt and a sprinkle of crispy fried shallots, entirely optional, but very delicious.
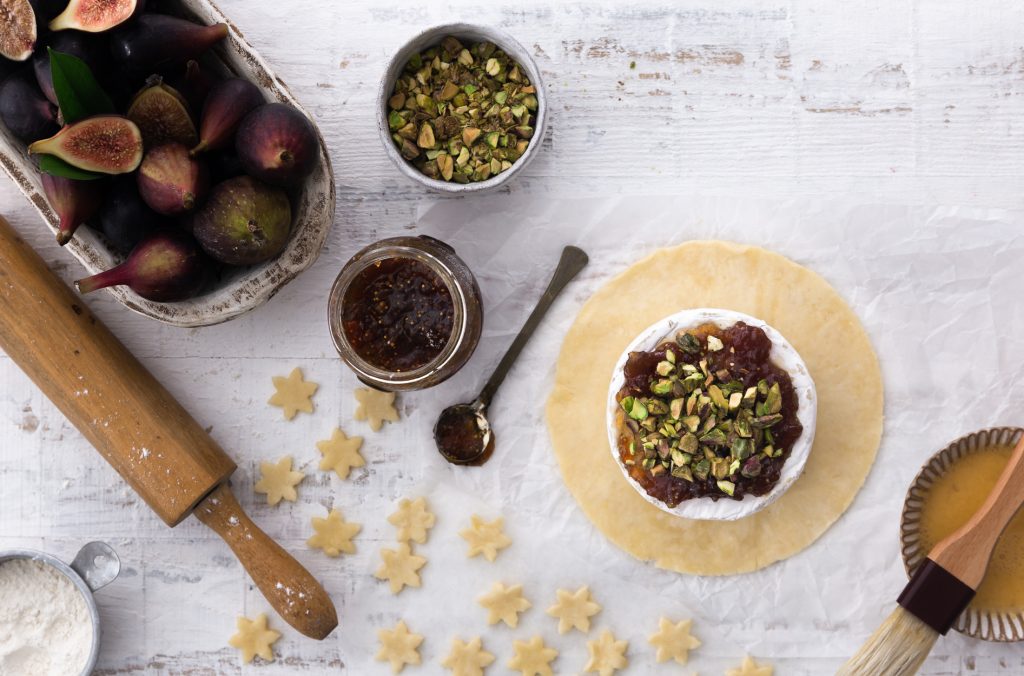
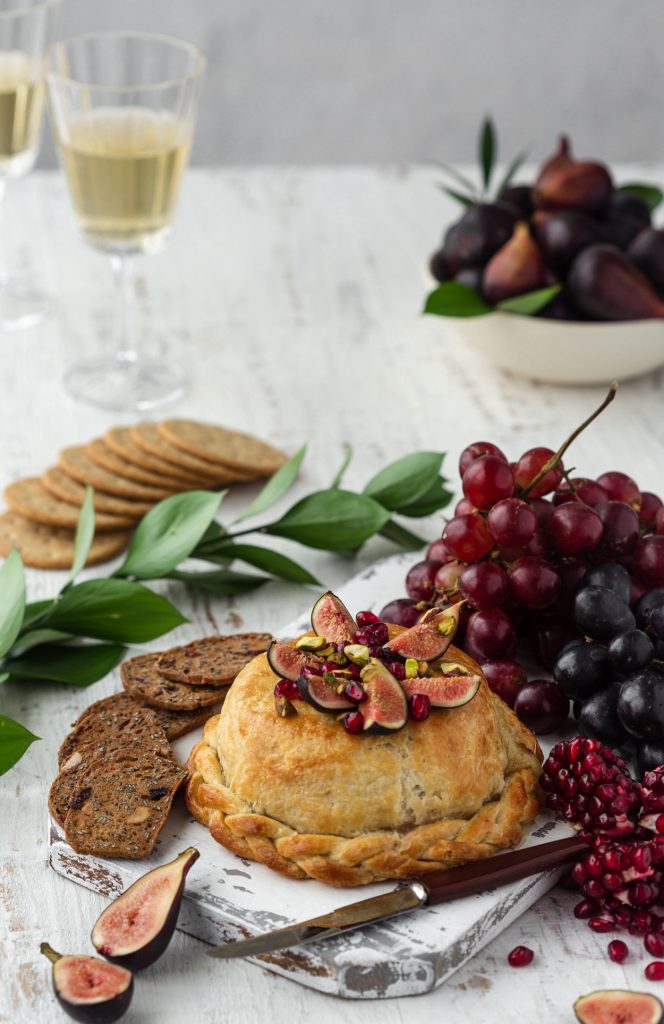
Most of the baked brie recipes out there rely on ready-made puff pastry. Not that there’s anything wrong with that, but I’d like to offer an alternative. Wine pastry. Yes, you read that correctly. There is actual wine in the dough. It comes together quickly in the food processor, rolls out beautifully, and results in a supremely flaky pastry. The wine adds acidity to the dough, which provides a perfect counterbalance to the rich brie.
I learned how to make this dough many years ago when I worked in catering at Dinah’s Kitchen in Toronto. One of our most popular party items was a huge wheel of brie, topped with brown sugar and mixed nuts, and then enrobed in wine pastry. Once baked, the melty brie with the sugared nuts was an addictive combo.
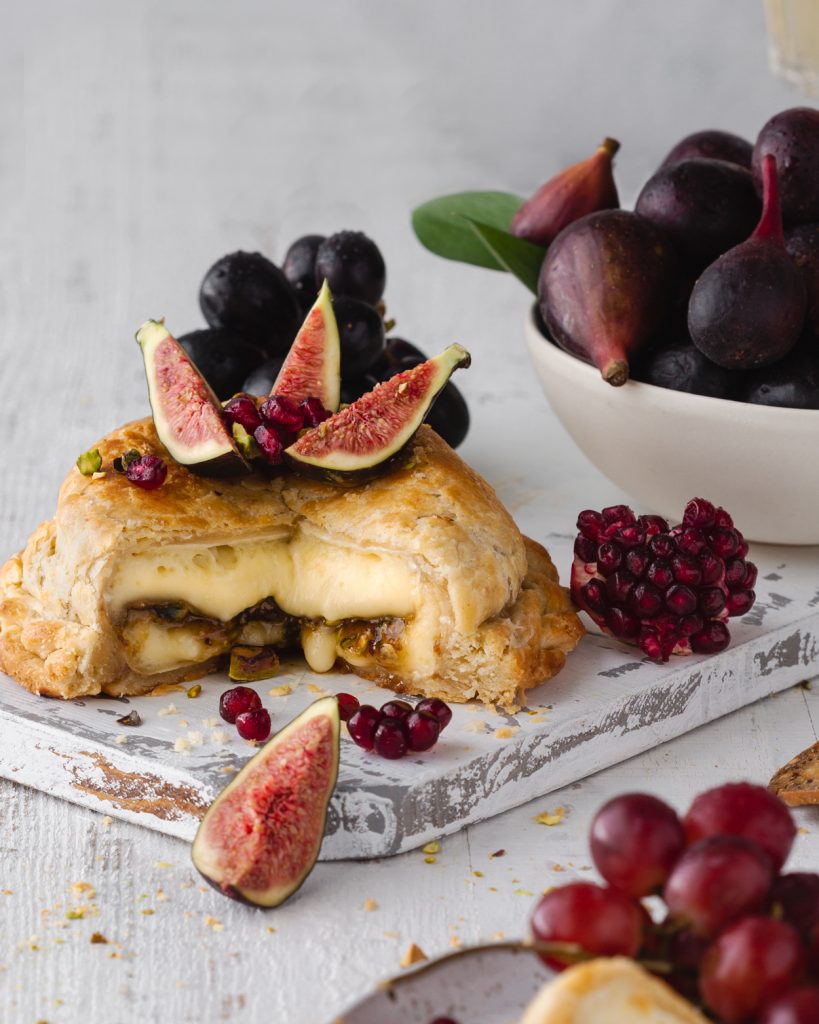
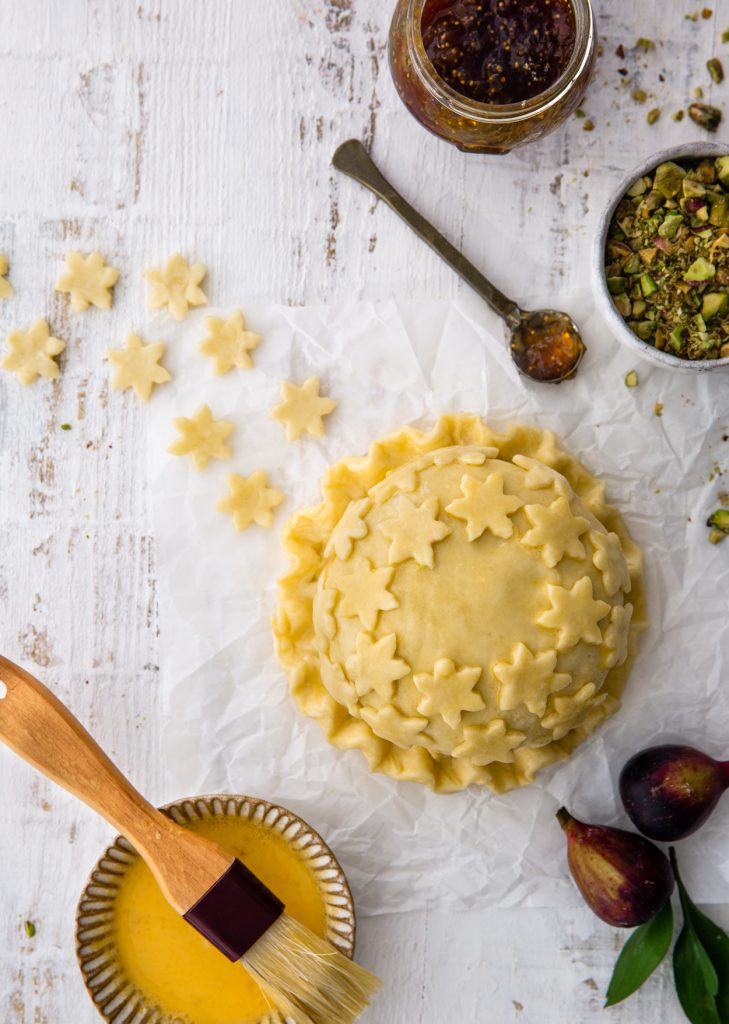
Since nobody is having huge parties this year, I updated it using a mini 4 inch wheel of brie. I used fig jam and pistachios to flavour mine.
You can wrap the brie, brush it with egg and put it in the fridge up one day ahead if you like. Once baked, you must let it rest for at least an hour, or you will have molten brie running everywhere. You want it soft and melty, but not running like hot lava.
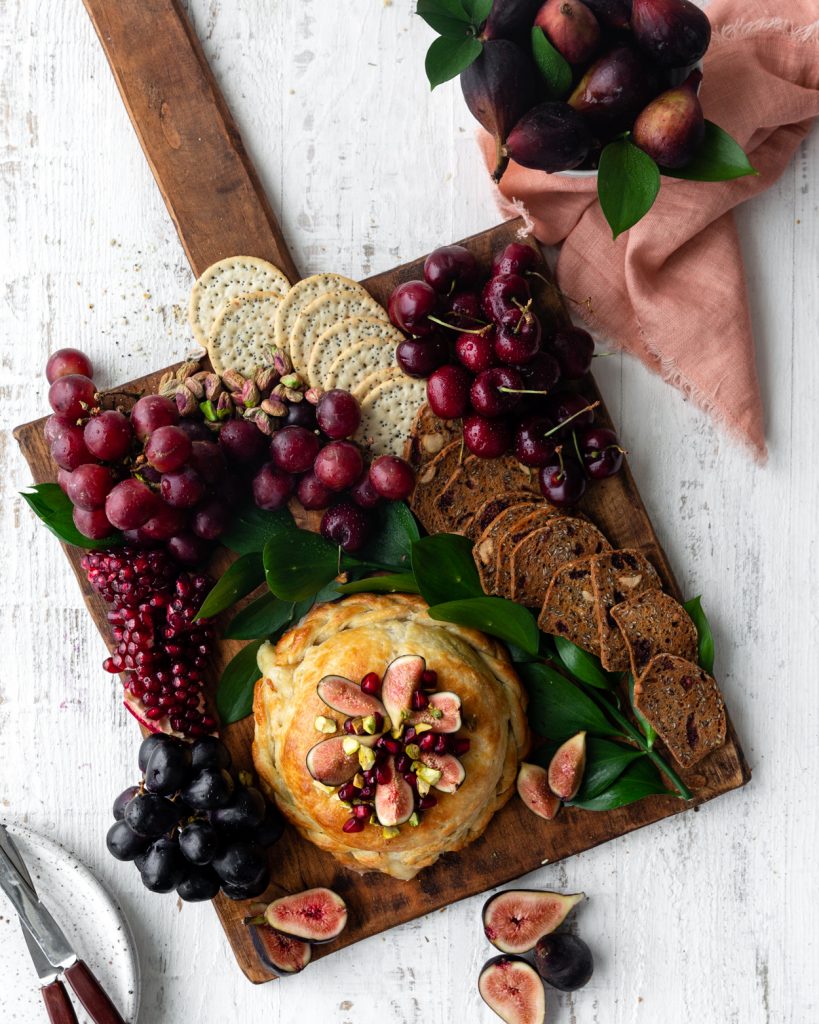
I went full-out cheese board and I just love how it turned out with all the red fruits I surrounded the gorgeous brie with. I topped the pastry with fig wedges, chopped toasted pistachios and some pomegranate seeds. Don’t they look like little jewels?
Any leftover will keep in the fridge for 2-3 days. Just reheat in a hot oven for a few minutes, until the pastry recrisps and the brie starts to melt.
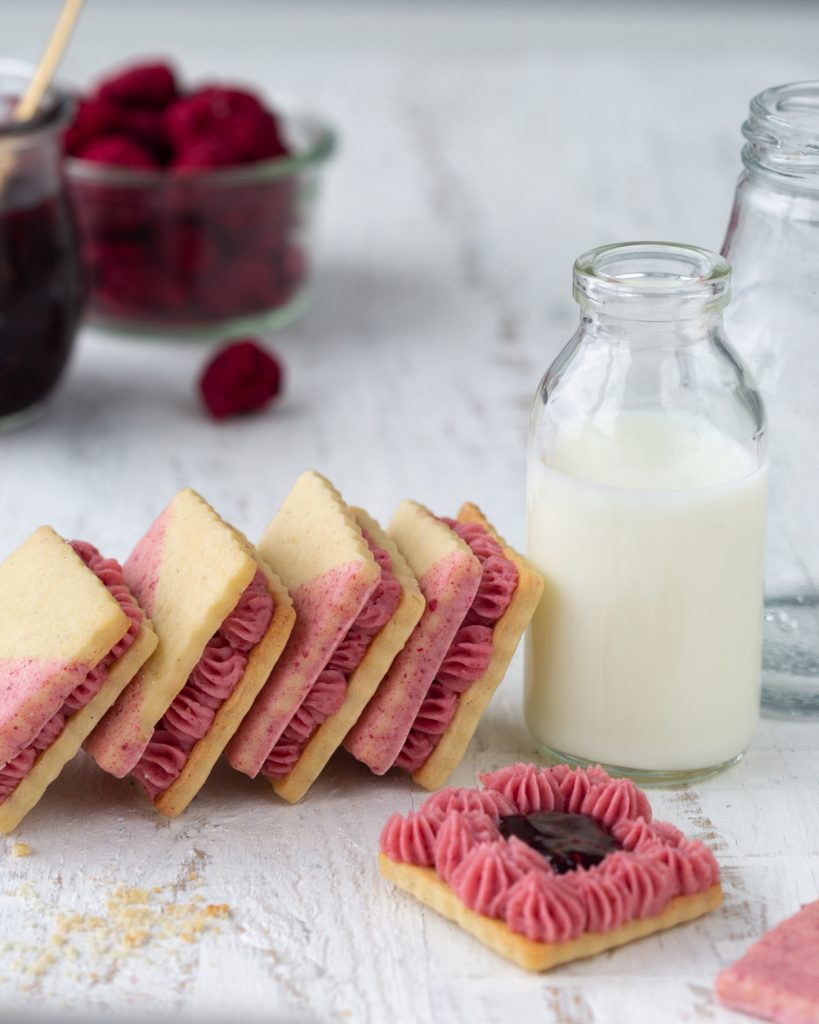
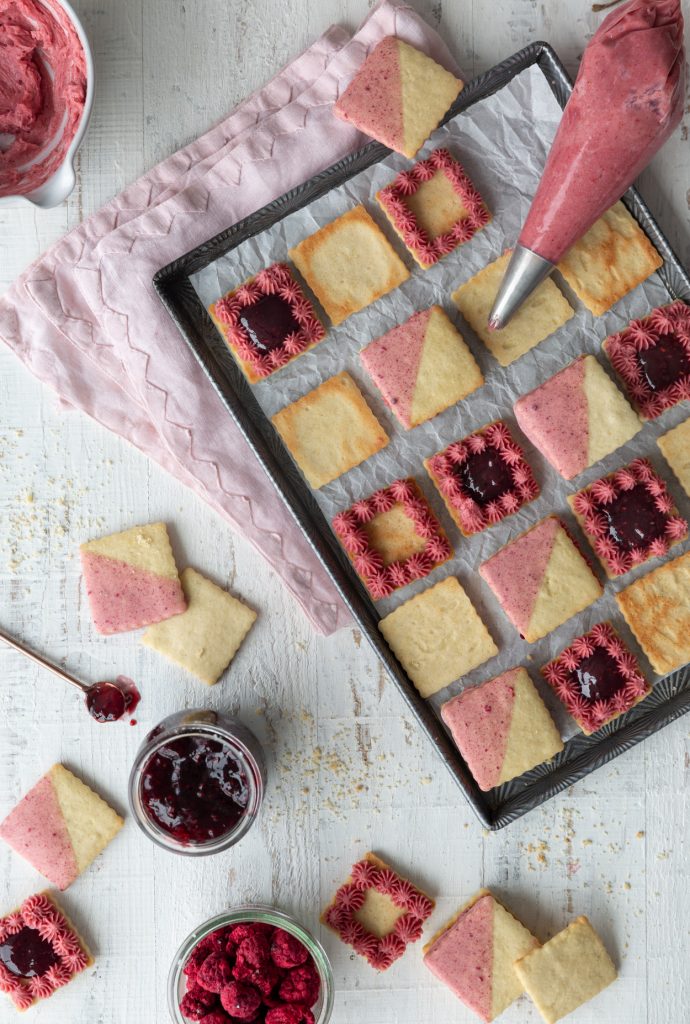
These are one of the most beautiful cookies I have ever baked. But physical beauty aside, they are also very delicious. Sometimes beautifully decorated cookies end up disappointing in taste. Too sweet and lacking in flavour complexity.
If you’re looking for fast holiday cookies, these are not for you. These take time, but you will be rewarded with intensely flavoured and beautiful cookies. These cookies were inspired by a recipe from the November/December Holiday issue of Chatelaine magazine. In the original recipe, the top of the sandwich cookies were dipped in melted white chocolate, dyed pink with food colouring. They were filled with raspberry jam. When my husband tasted them he said that they were good, but they needed more raspberry flavour.
I needed to figure out how to boost the raspberry flavour. Sandwiching more jam in the middle would not work. It would just ooze out. Adding a border of buttercream would act as a dam, holding in more jam.
I made a batch of Swiss meringue buttercream and flavoured and coloured it with freeze-dried raspberries, ground up into a powder. Freeze dried fruits are a great way to flavour buttercream. I used about 3/4 cup of freeze dried raspberries to the buttercream. If I added 3/4 cup fresh berries to the buttercream, it would be way too wet.
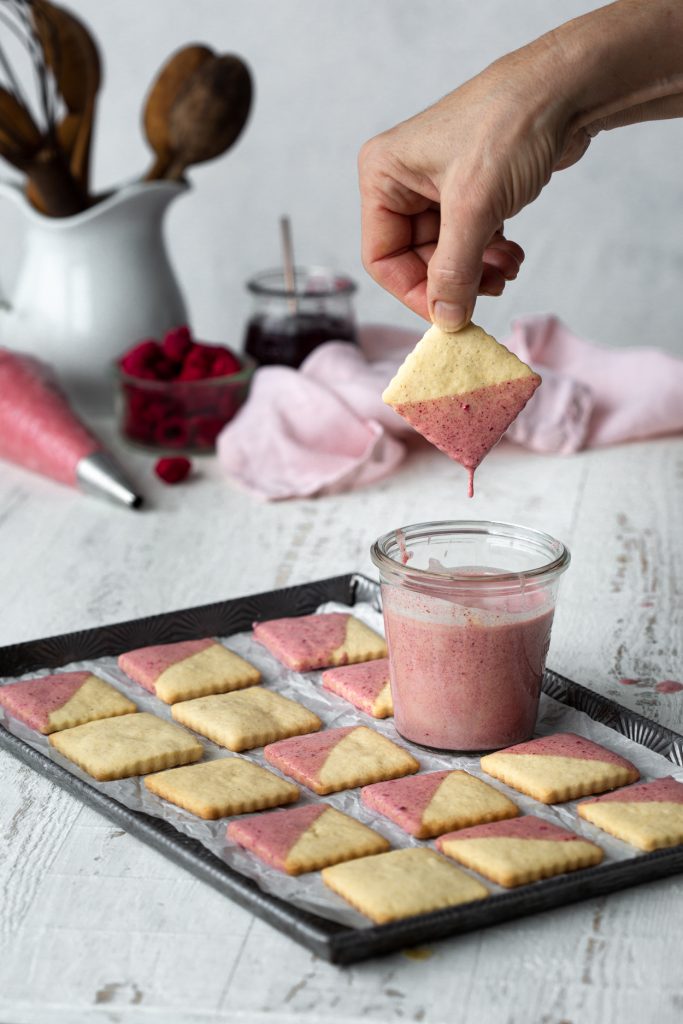
The second way I boosted the raspberry flavour was to mix some freeze dried raspberry powder into the melted white chocolate, for dipping the top of the sandwich cookies into. Natural food colouring with flavour!
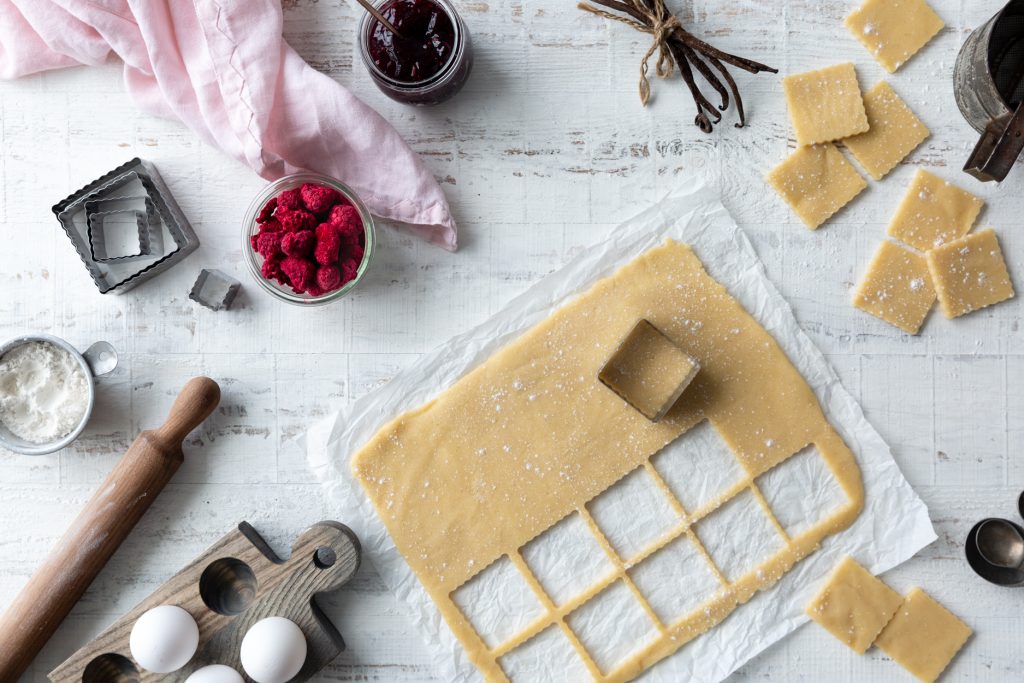
Start with a vanilla sugar cookie dough. I like to roll the dough out between two sheets of parchment paper as soon as I make it, rather than chilling first and then rolling. I find it very difficult to roll cold dough. After rolling the dough, chill for at least an hour.
Once the dough has chilled, cut out your shapes. A fluted square cutter is very pretty for these.
Dip half the baked cookies into the raspberry white chocolate and pipe the other half with a border of raspberry buttercream. I used a small French star tip to pipe the buttercream. Fill in the centre of the buttercream with jam. Top each sandwich cookie with a chocolate dipped lid.
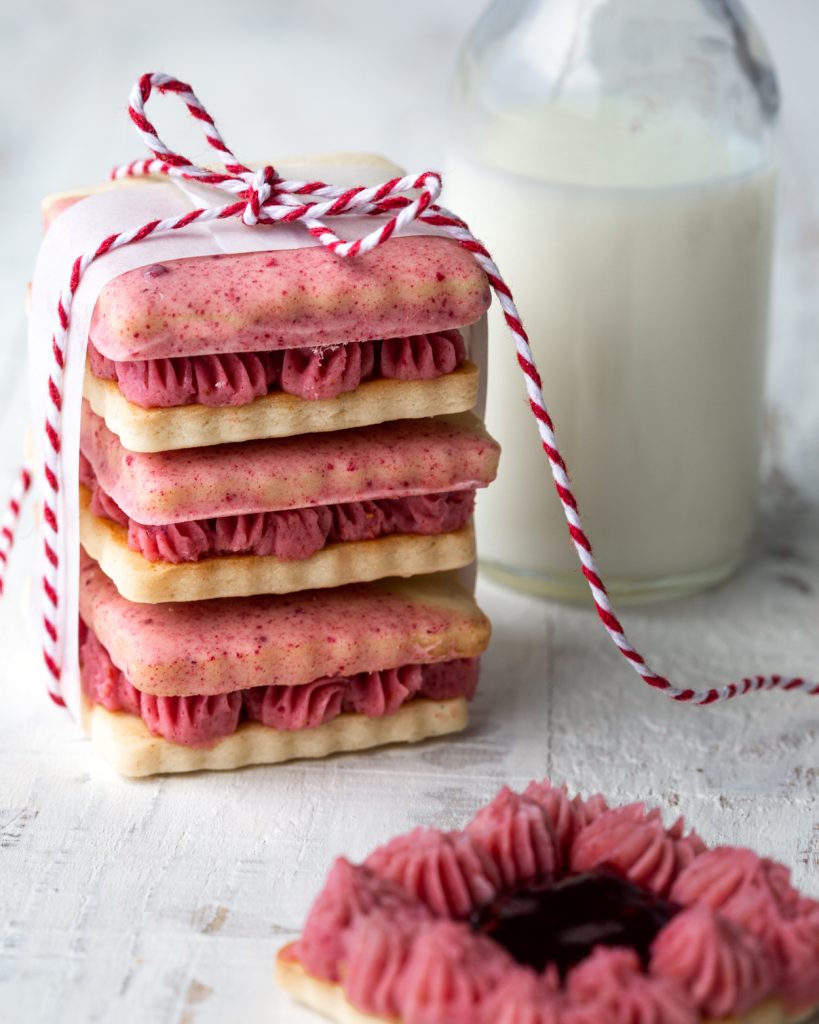
Store cookies in an airtight container in the fridge. They should be fine for 4-5 days. Let come to room temperature before serving. You could also freeze them for several weeks. A little box of these gems would make a beautiful holiday gift.
It has been almost 9 months since the Pandemic threw us into lockdown on March 14. I suppose I could have gestated a baby in that time. Instead, I put my energy into learning how to co-exist with my husband while he switched gears from working in an office to working at home. It was a bit of transition.
He is an intelligent man and learned, after 4 days, to stop asking “What’s for lunch?” We eventually settled into a routine and he spends most of the day, locked up in his office working. I spend my days in the kitchen, cooking, shooting and writing. He emerges every now and again to make coffee or open a can of sardines and baked beans for lunch. One of the nicest things about having him home with me is that when he does appear for a break, if the counter is strewn with dirty bowls and dishes, as it often is on shoot days, he happily washes them all.
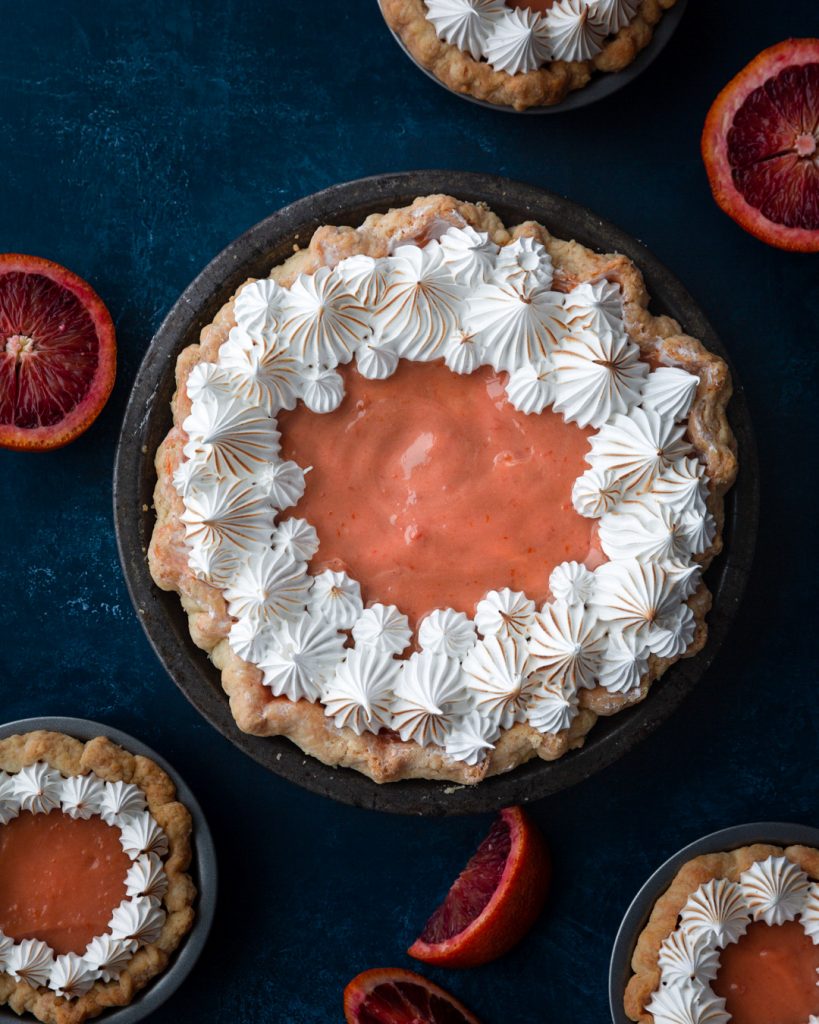
A few weeks ago I was putting the finishing touches on my blood orange meringue pie. I was walking across the kitchen to put the pie on my setup by the window to start taking photos. My husband was at the sink. Unfortunately, he had the dishwasher door open as he was loading the dirty dishes. I did not see the open door. I tripped on it, and the pie and I went flying. It was very sad. I quietly left the kitchen to tend to my wounds and left him to clean up the pie. He asked if the 5 second rule applied. I did not answer him.
Luckily, the only thing broken was the pie. I had a nasty bruise on my thigh and a sore knee for a few days, but was otherwise unharmed. I quickly got to work on pie #2.
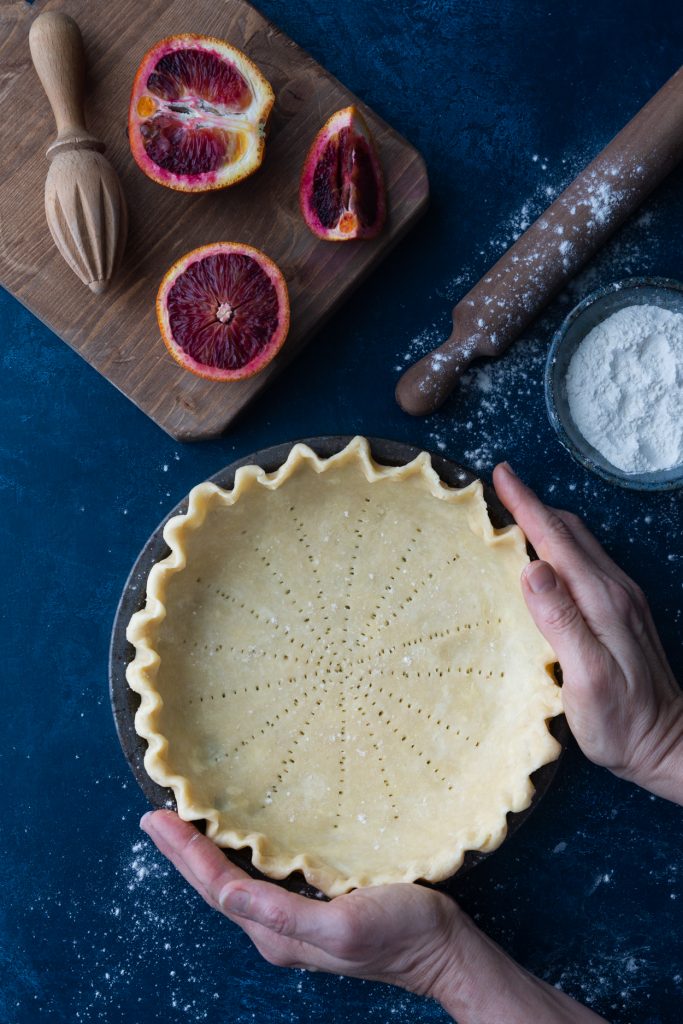
The pie crust needs to be baked without the filling. Dock it well (poke holes with a fork) and line the pie shell with parchment paper and some dried beans to act as weights so the dough does not puff up.
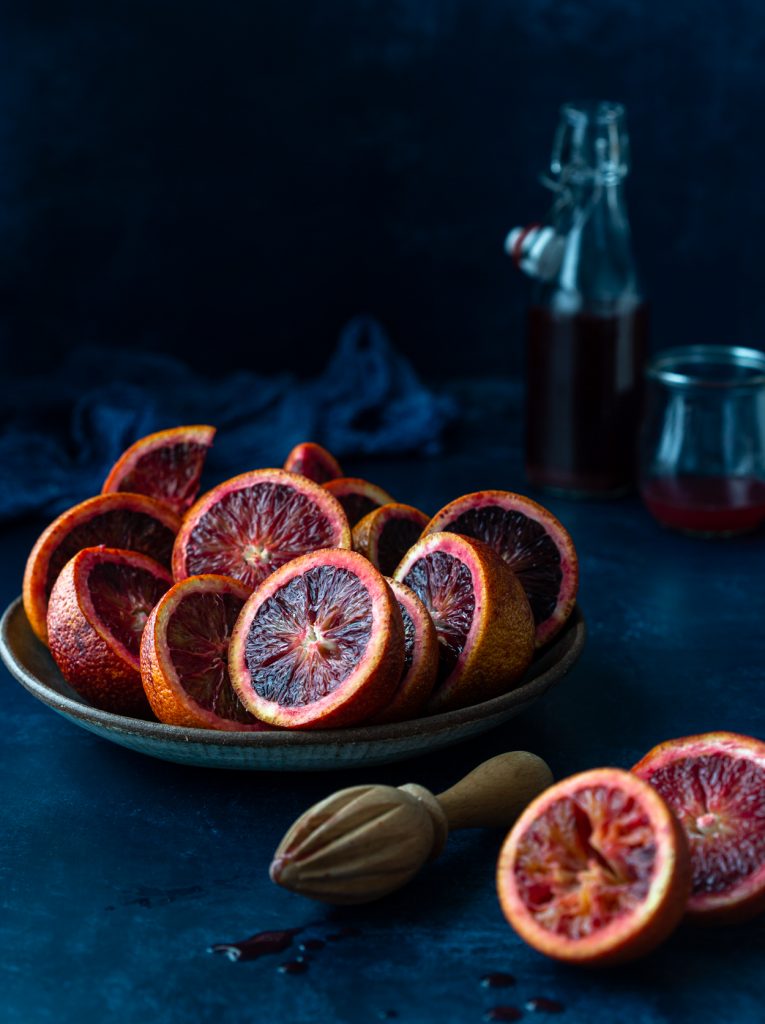
Once the pie is baked, start in on the filling. I love working with blood oranges because slicing into one is always a surprise. You never know what shade of orange/red will be revealed. This year, I seemed to have happened on a particularly bloody batch. Every single one was deep red on the inside.
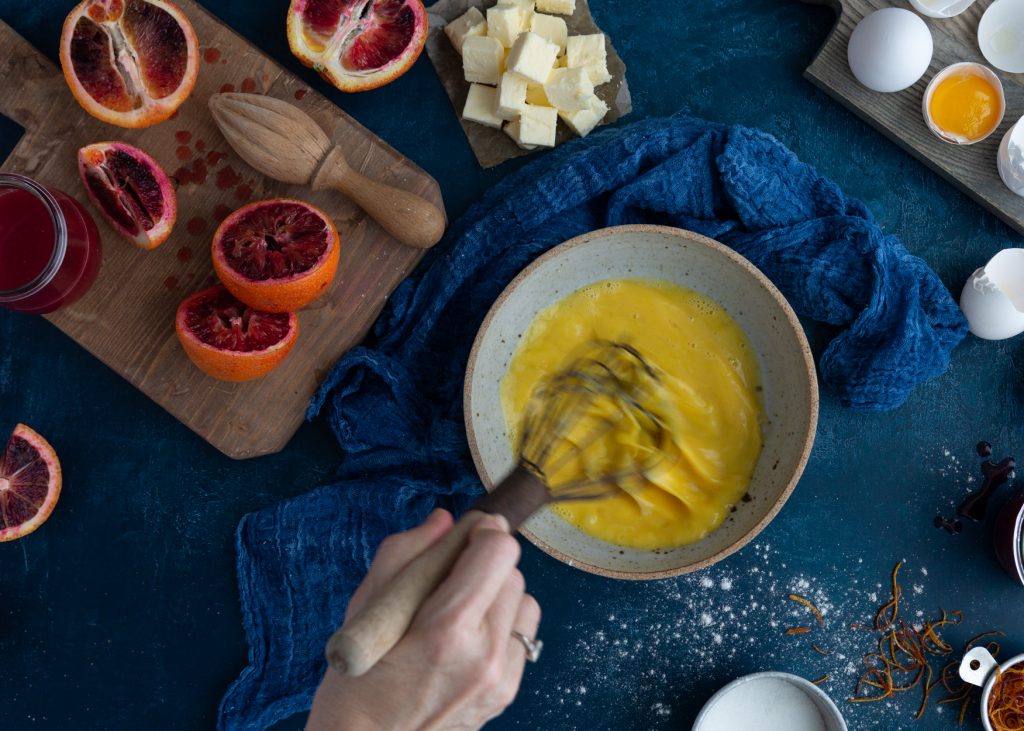
While the pie crust is cooling, get to work on the filling. Lots of eggs, butter, blood orange juice, zest and some cornstarch for thickening. Strain the hot filling into the cooled crust. Chill for at least 6-8 hours.
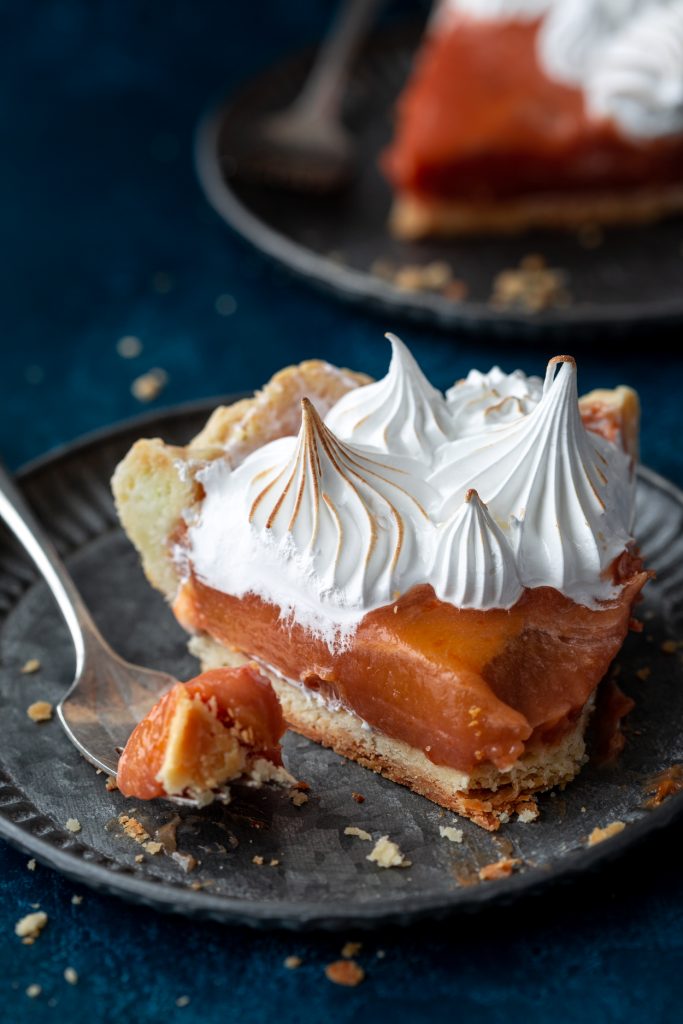
For the meringue topping, I recommended a Swiss meringue as opposed to an simple French meringue. It is more stable. For a Swiss meringue, you heat the egg whites and sugar over a bowl of simmering water until they reach a temperature of 150°F. Then you whip the whites and sugar until stiff peaks form. In a French meringue, the egg whites and sugar are not heated first.
I decided to pipe the meringue onto the pie because I wanted to have some of the pretty blood orange showing.
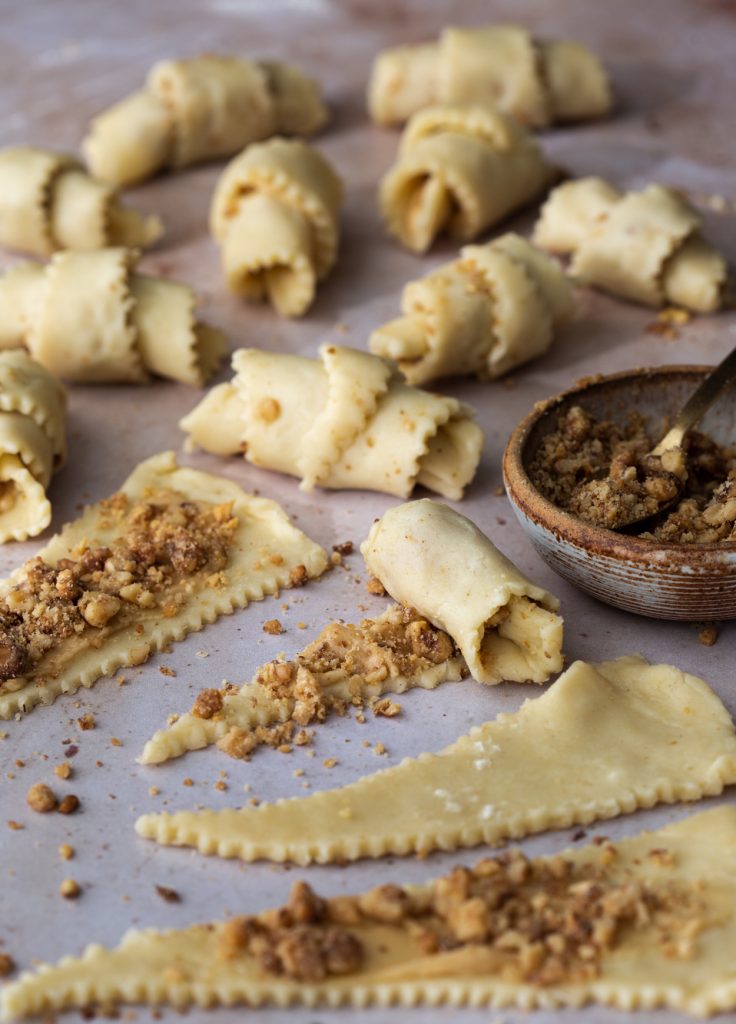
My appreciation for walnuts has come to me relatively late in life. I used to hate them. Biting into a walnut always sent a shiver up and down my spine. But, as I have aged, I have come to appreciate the bitter nature of walnuts. That astringent note in walnuts comes from the tannins found in the paper-thin skin that covers the walnut.
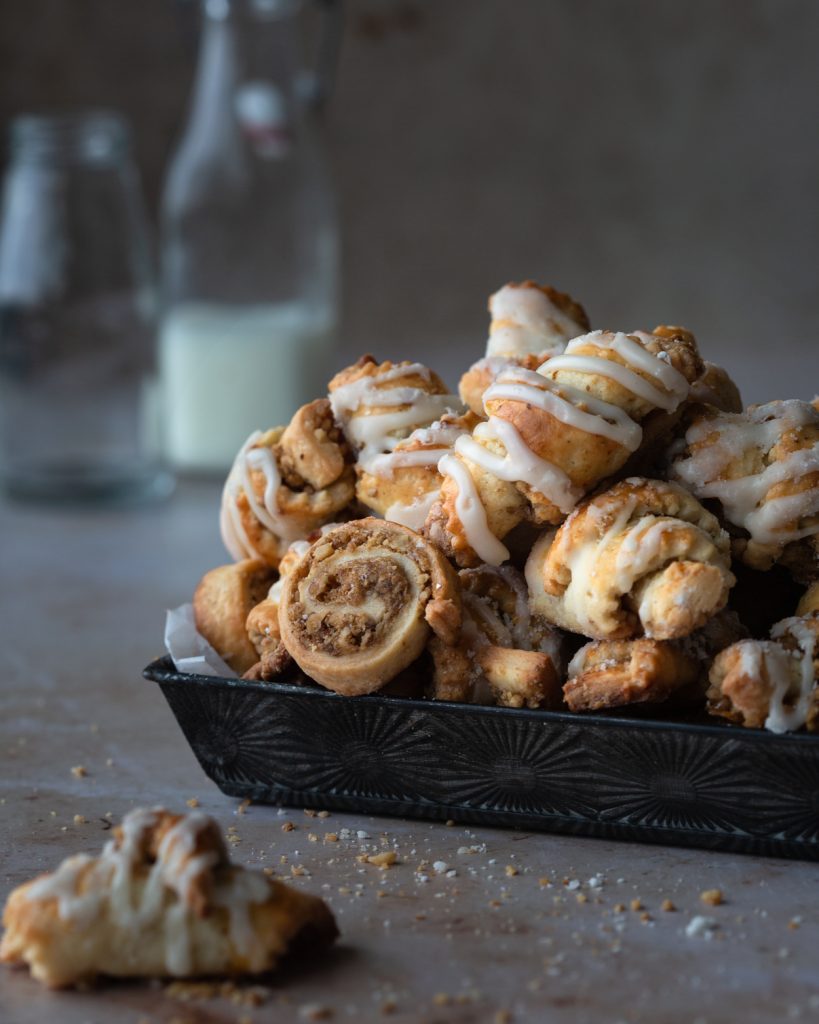
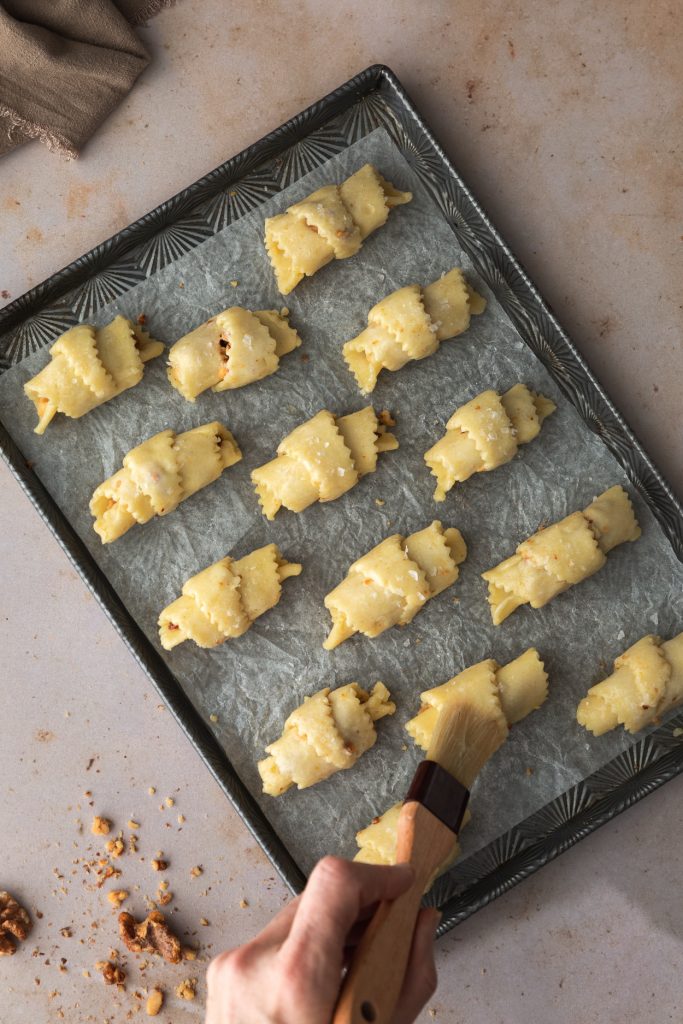
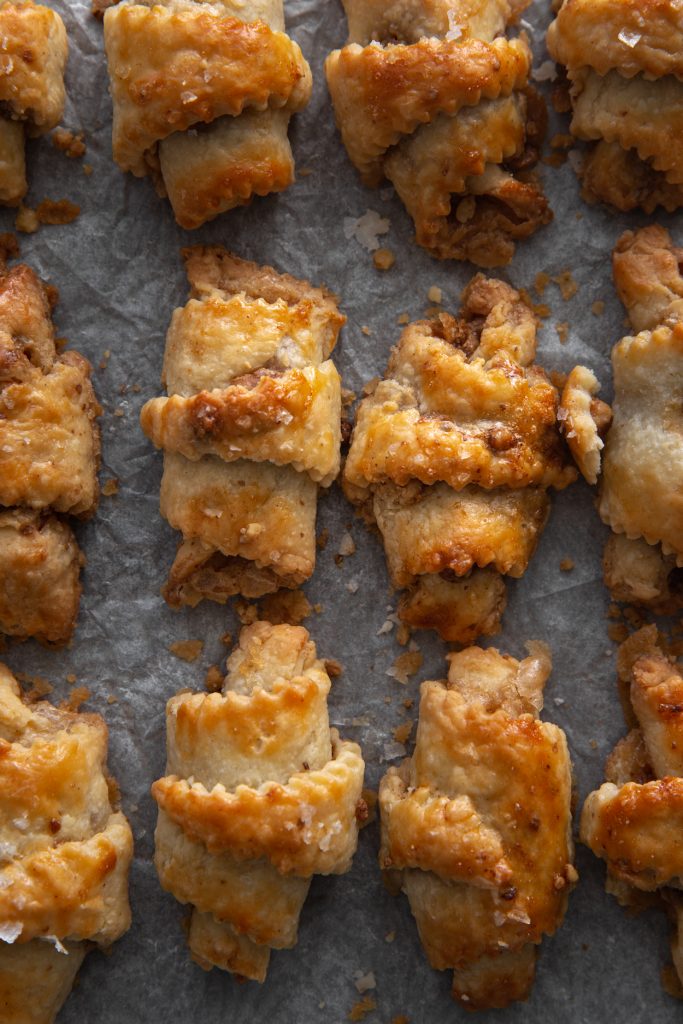
That bitterness is a perfect counterpoint to all the sweet notes in these rugelach. The dough is tender and flaky, thanks to the addition of cream cheese. And, it rolls out so easily, no cracking. You can roll the dough into a circle and cut it into wedges for a crescent shaped rugelach, or you can roll it into a rectangle and roll it up into a log for circular cookies. Your choice. The video below shows both variations. I show you a neat little trick for getting your rugelach all exactly the same size.
The dough is spread with maple butter. Maple butter actually contains no butter. It is just maple syrup boiled until very thick and then whipped to a creamy spreadable consistency. Many supermarkets cary it or you can buy it online. Sometimes it is called maple cream.
The walnuts in the filling are candied first in maple syrup which is easily done in the oven. Complete directions are in the recipe. Brush them with egg white before they hit the oven.
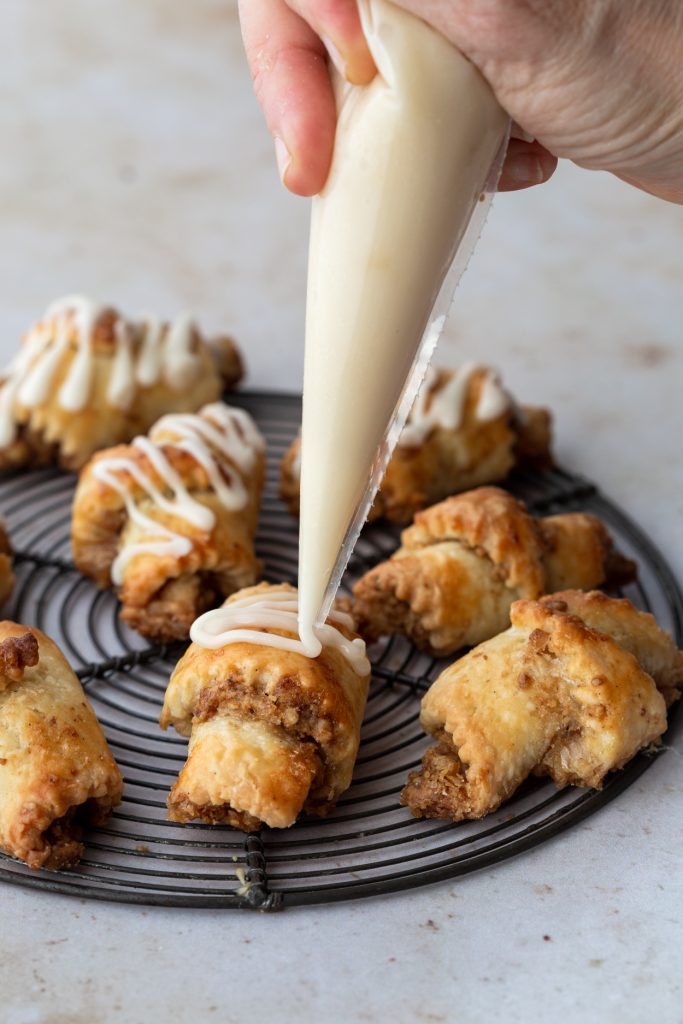
And because we’re fancy around here, I glazed the finished rugelach with a maple-lemon glaze.
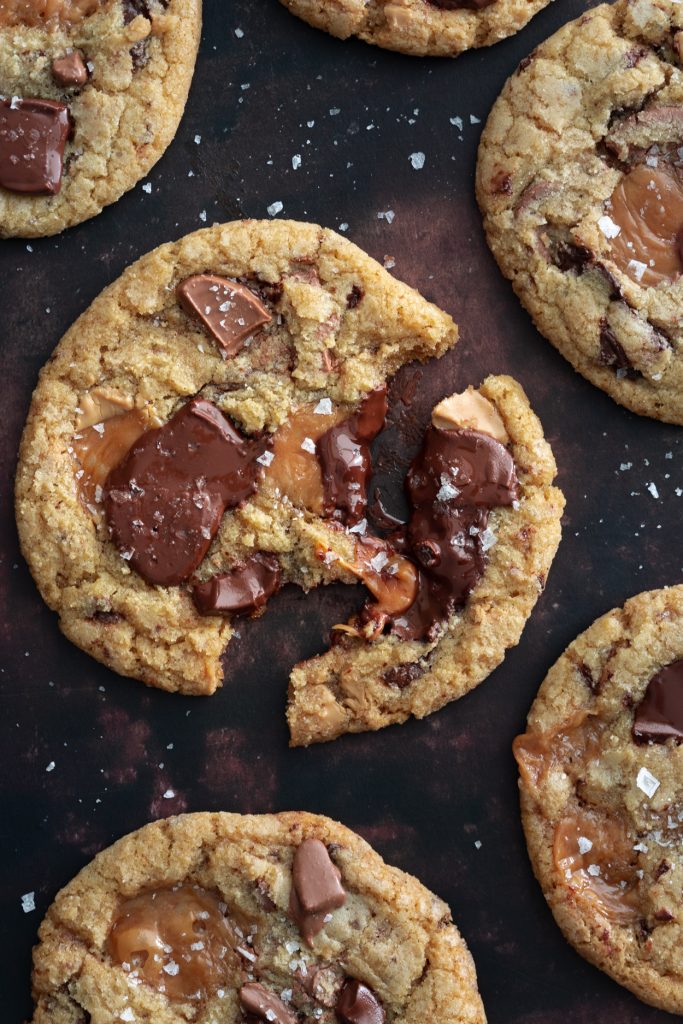
Sometimes you need a simple little cookie, like these or these. And then there are times that require something outrageous and over the top, like these Triple Chocolate Chunk and Caramel Cookies.
These cookies call for three kinds of chocolate, bittersweet, milk and blonde (caramelized white chocolate). This is not a sponsored post, but I highly recommend using Valrhona chocolate. I used Dark Bittersweet 70% Guanaja, Milk 40% Jivara and Blonde (White) 32% Dulcey. I order my chocolate online from The Vanilla Food Company. The quality is outstanding and it really does make a difference what kind of chocolate you use in these cookies. Supermarket chocolate chips just won’t give you the same results.
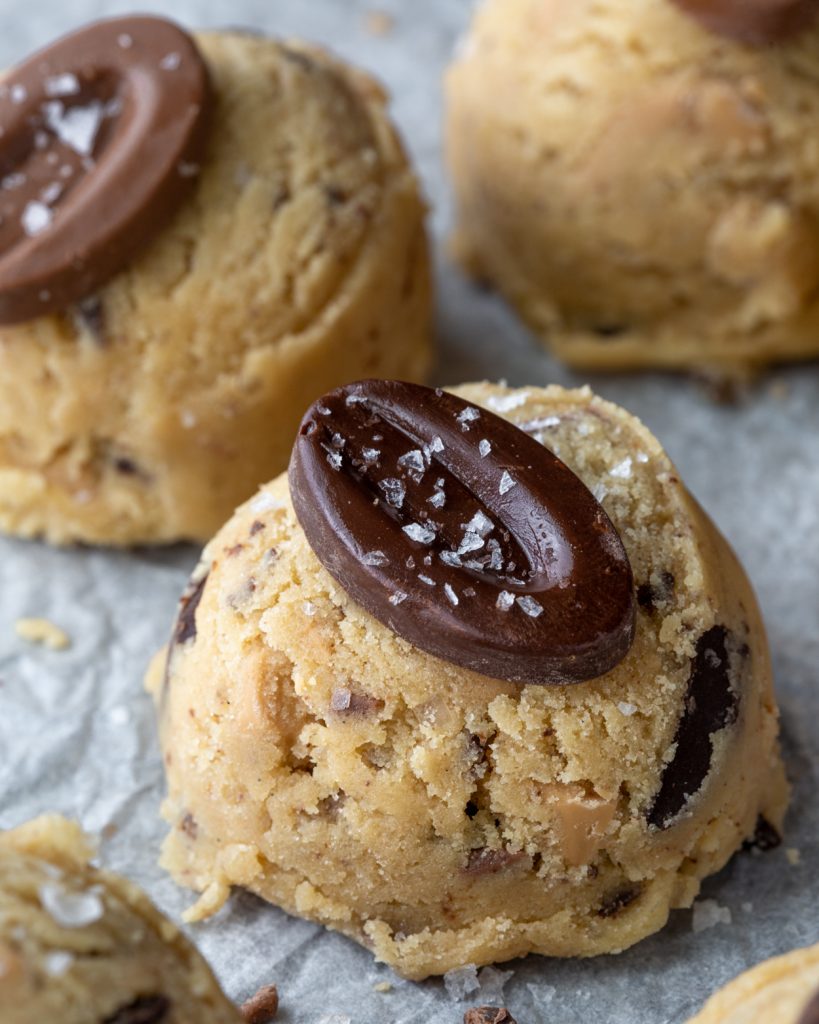
For the caramels, I just used vanilla caramels from Bulk Barn. Werther’s chewy caramels or Kraft caramels would also work well here. In the video I made, you see me mixing the caramels right into the dough. DO NOT DO THAT! The caramel oozes out of the cookies and makes a huge mess. Trust me. I made over 8 dozen of these cookies, figuring out the best way to do it.
To prevent the ooze, set the caramels aside. Scoop your cookie dough, and while the dough is in the scoop, stuff one whole caramel into the centre of the scoop. The surrounding dough insulates it. I also found it best to freeze the scooped dough for at least 2 hours before baking. That also helped to prevent the caramel from escaping.
For picture-perfect cookies, hold back about 3 Tablespoons of each of the three kinds of chocolate, coarsely chop them and top the cookies with these bits of chocolate about halfway through the baking time. This will give you pretty pools of melted chocolate on top of your cookies. You can also cut a few extra caramels into quarters and top the half baked cookies with one or two additional pieces if you like.
These cookies also use three types of sugar, white, brown and turbinado (raw sugar). The addition of the turbinado adds a bit of crunch to the cookies. I learned about this from Ashley, on her blog, Not Without Salt.
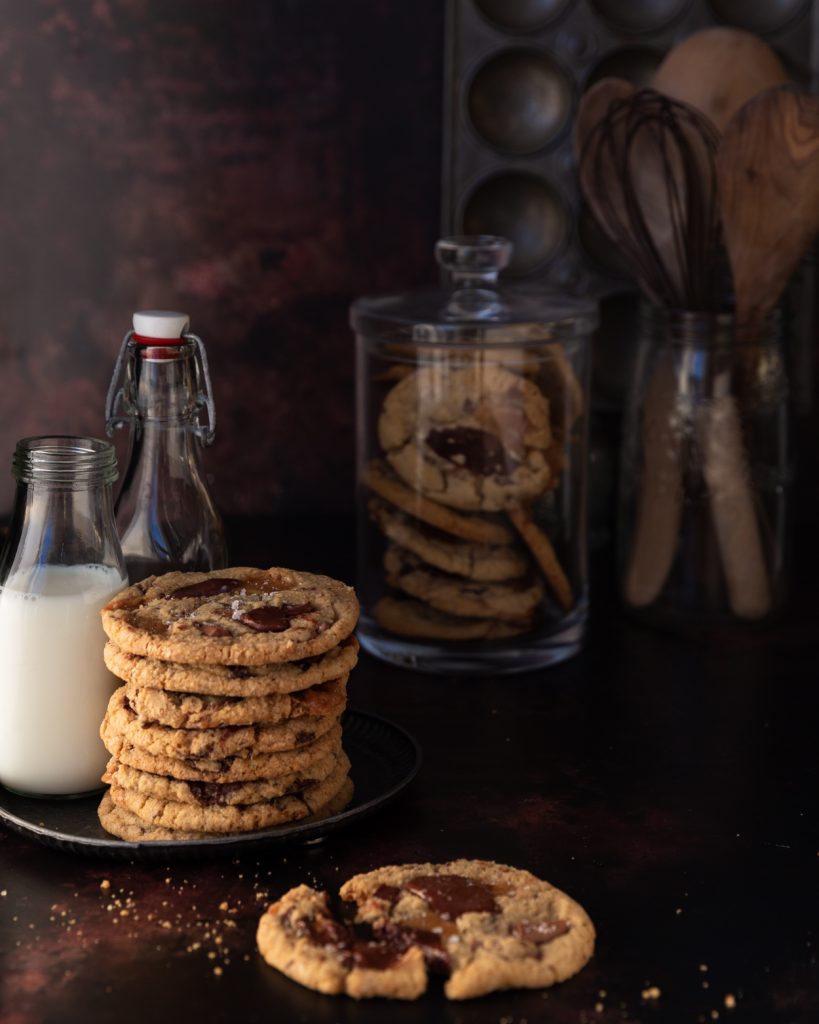
These cookies would make an excellent addition to a cookie box for holiday giving, or just stash them away in your freezer for those days that call for extravagance. I won’t judge.
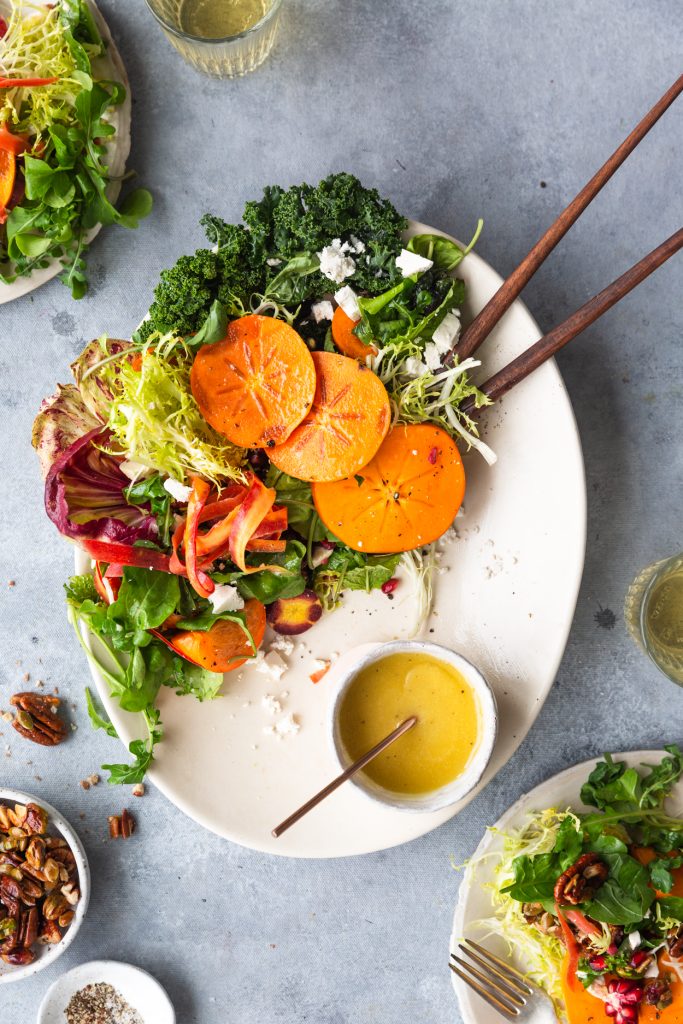
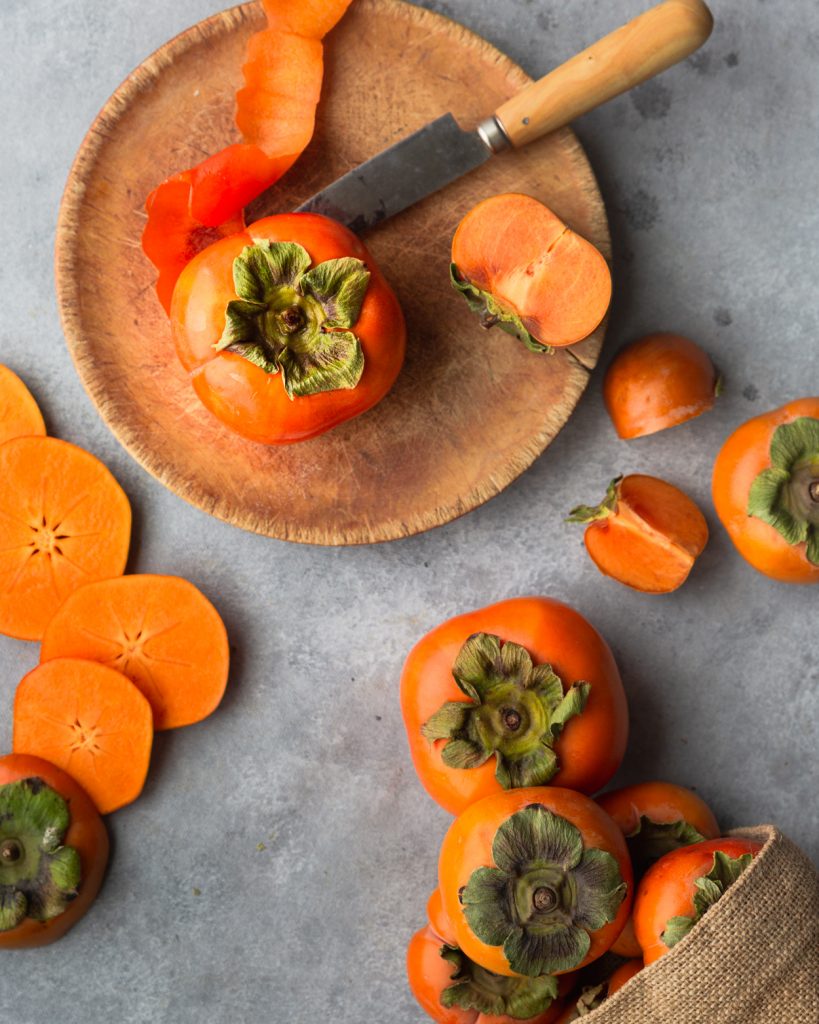
I have long been an admirer of persimmons. Each fall I’d see them at the market and marvel at their vibrant orange hue and smooth shiny skin. Yet, until a few weeks ago, I never actually bought them. I had no clue what to do with them.
Because 2020 hasn’t presented enough challenges already😉, I decided to confront my ignorance and brought a bagful home with me. I’ll share with you what I learned. There are two main varieties of persimmons. The first are known as Fuyu. They are the squat tomato shaped ones you see in the picture above. The second variety, Hachiya, are oblong shaped with a pointed base, like a large acorn.
The Fuyu variety is non-astringent. These can be eaten when firm and crisp, just like you would an apple. The skin is tough, but edible, so I prefer to peel them. They are quite sweet, with an almost vanilla-custard flavour. They are best eaten raw, in salads.
The Hachiya variety is astringent, and a completely different story! If you bite into an unripe persimmon you will be sorry. Loaded with tannins, it will make your mouth pucker and go dry. These need to be ripened completely, until they are soft. Inside they will be creamy, almost pudding like. They are great to use in baking, much like bananas for breads and cake.
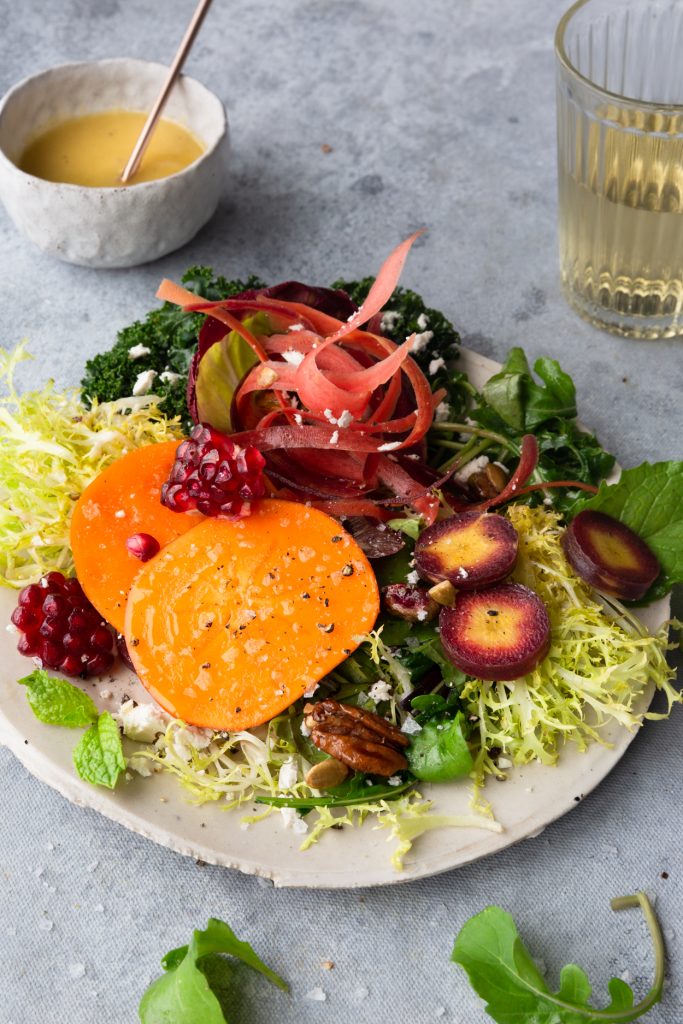
Because they are so sweet, I though that I’d pair them with hardy, bitter lettuces. I used kale, arugula, radicchio and frisée. I found some beautiful red carrots so I made carrot ribbons with a vegetable peeler with one carrot, and sliced a second carrot into coins for a variety of shape and texture. Pomegranate seeds added a pop of crunch and shine.
For additional texture, I candied some nuts and seeds with maple syrup. My mix included pistachios, pecans and pumpkin seeds. I finished the salad with some crumbled ricotta salata cheese. Salty feta would also be great.
If you’re anything like me, you fall into a salad rut, making the same bowl every night. I think that’s why salad always tastes so good when someone else makes it. It’s different than yours and your tastebuds crave change. This salad was certainly new and exciting in our house! Let me know if you try this and that you think.
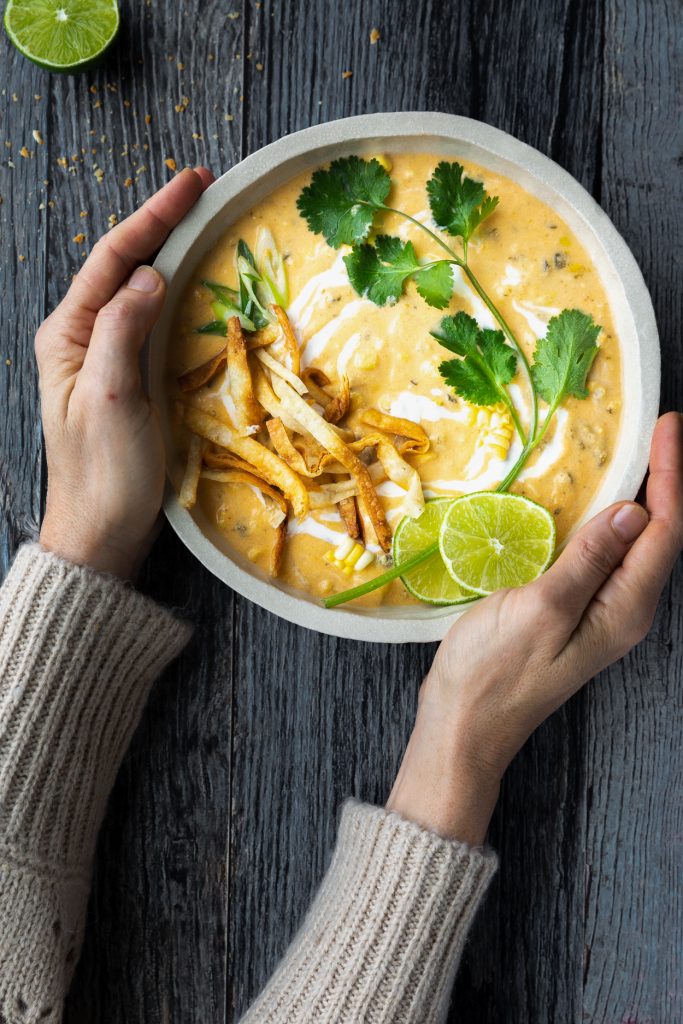
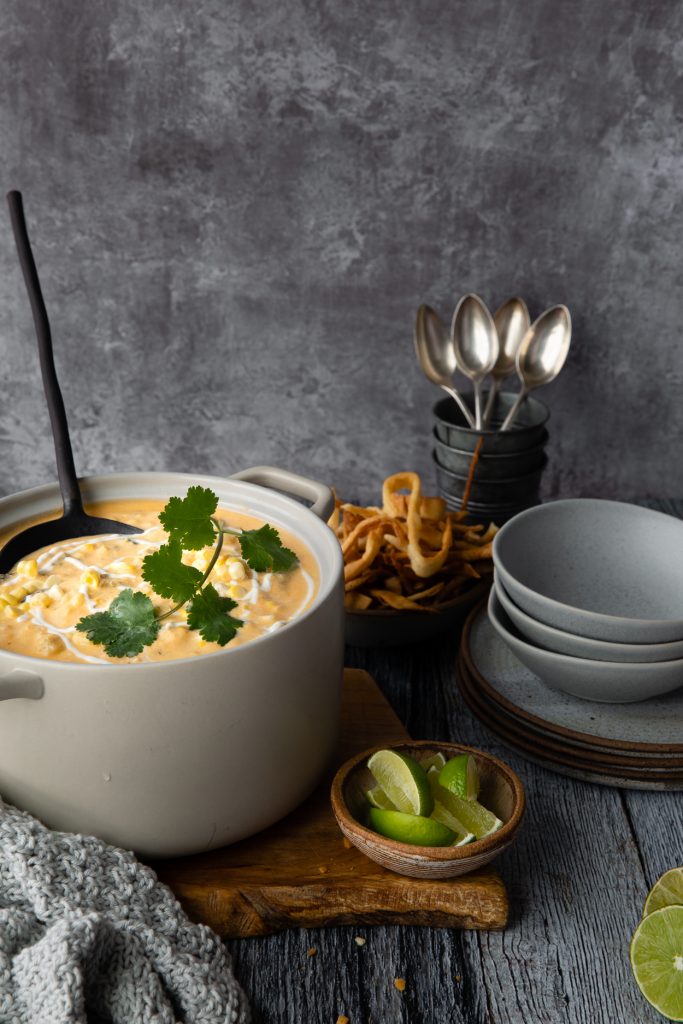
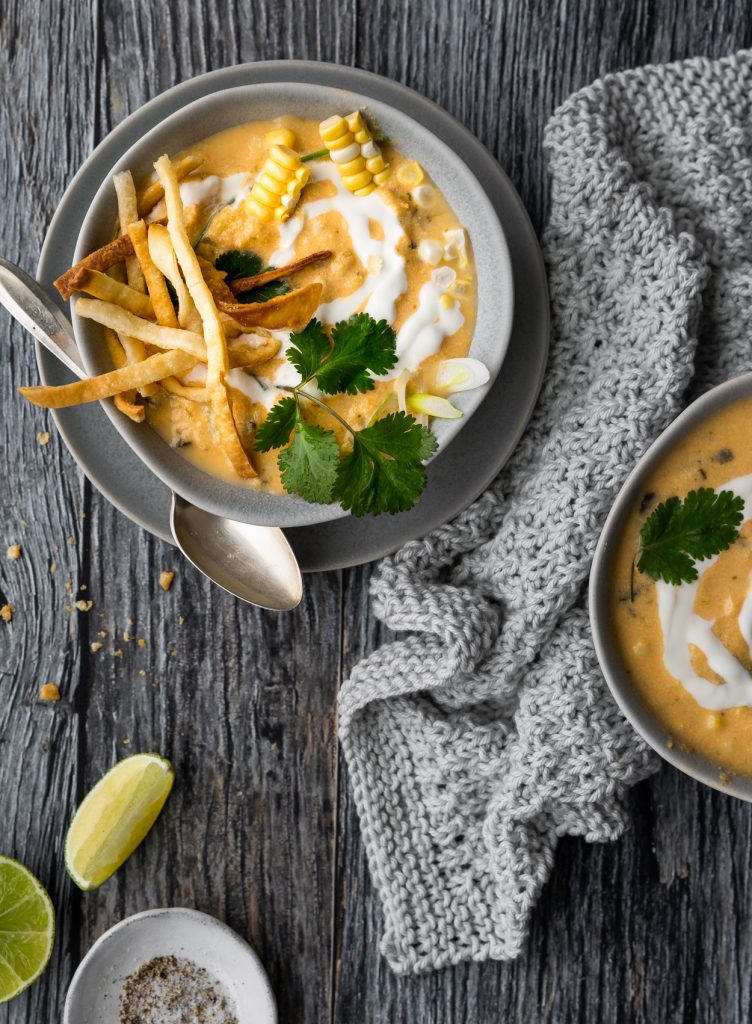
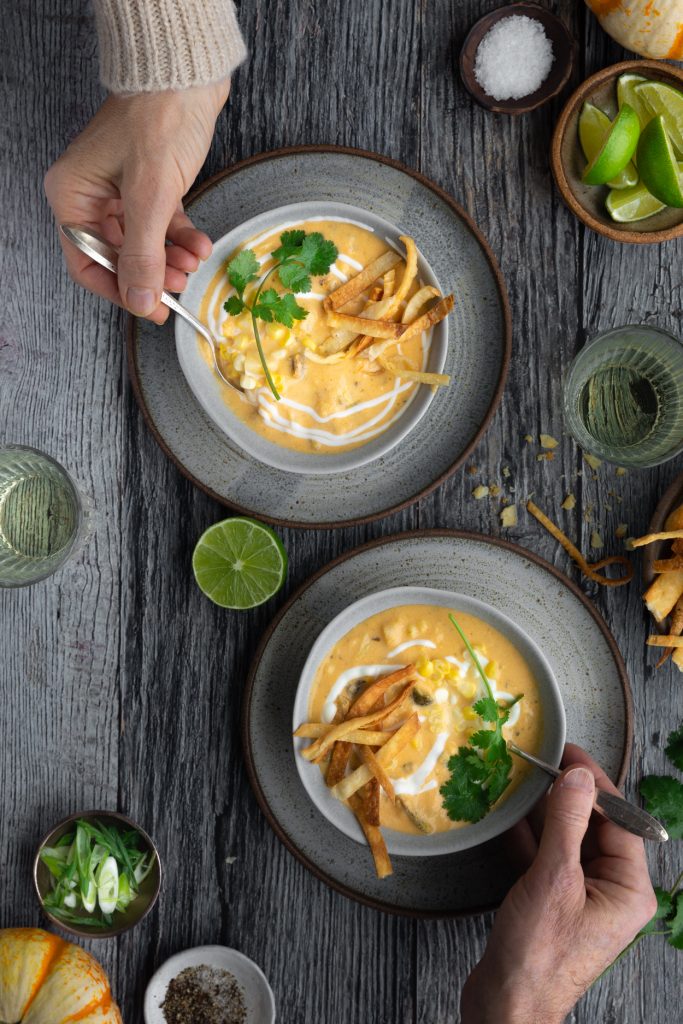
Corn chowder isn’t just a summer soup. I love it year round. At this time of year, feel free to use frozen corn. The addition of poblano peppers makes it perfect for a winter soup. The gentle heat of the poblano peppers really warms you up from the inside-out! If you are not familiar with poblano peppers, they look like a green pepper but are skinnier and pointy at the bottom. They are a mildly spicy pepper, measuring about 1000-2000 SHU (Scoville heat units) on the Scoville Scale. For reference, a jalapeño measures around 8000 SHU.
I was inspired by Diana Kennedy’s recipe for Corn and Poblano Soup, from her classic book, The Essential Cuisines of Mexico. Sometimes corn chowder can be a bit bland. Not this version. Poblano peppers and plum tomatoes are roasted in the oven and then peeled. The poblanos add a gentle heat and the tomatoes add a welcome acidity. I also added some diced potatoes to the recipe to give the soup bit more body.
Because I’m all about texture, I cut some soft white corn tortillas into strips and shallow fried them in vegetable oil, until crispy. A bit of sour cream or whipping cream tames the heat and cilantro adds a fresh verdant note.
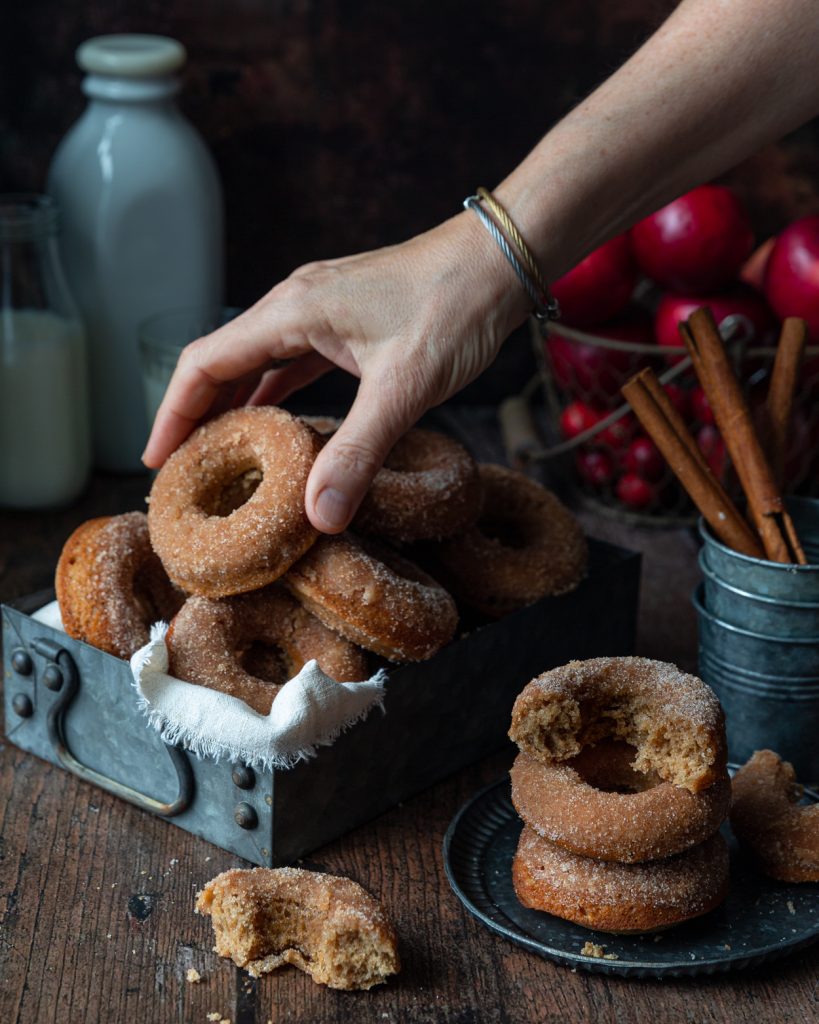
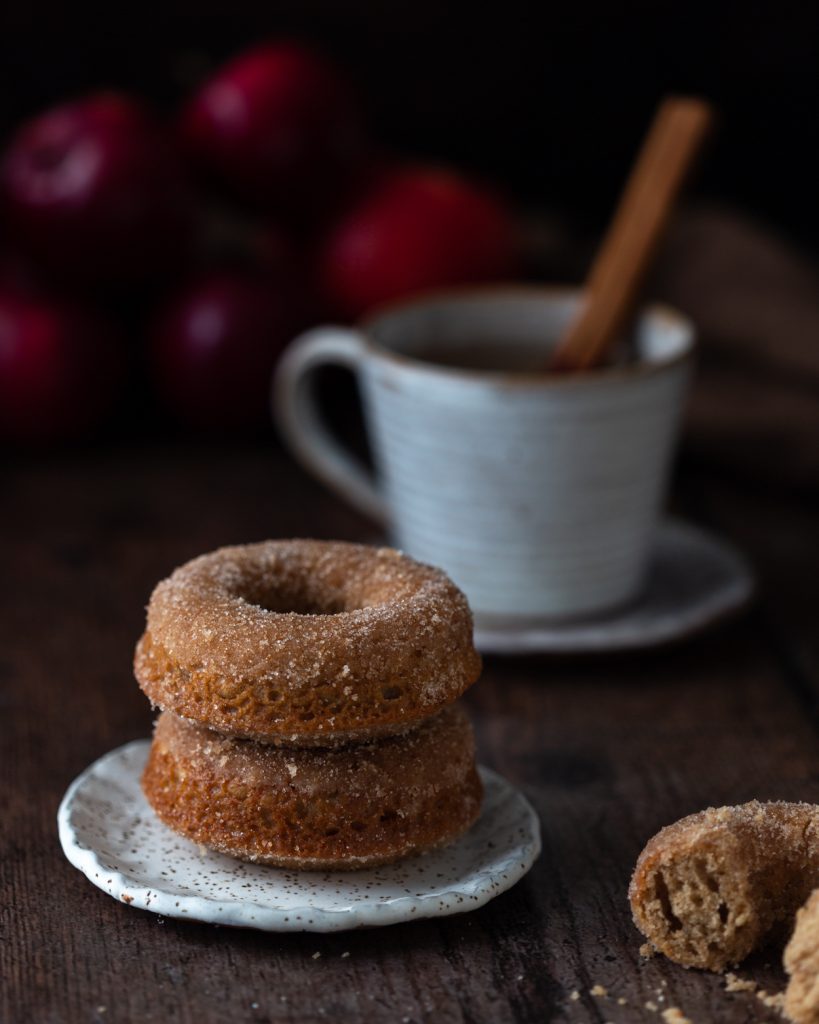
These Apple Cider Browned Butter Doughnuts are the best thing I have baked all year. Yes, I realize that’s a bold statement, given the number of things I have baked in 2020. (It’s been a heavy baking year… we all deal with stress in our own way, don’t judge!)
Granted, these doughnuts are not as pretty as my black and white ones from a few weeks ago, but OMG, the taste and texture of these is off-the-charts fantastic. I was inspired to bake these after seeing a recipe for Apple Cider Doughnut Cake from food writer Tara O’Brady. I subscribe to her newsletter and every week I get a charming, informative and beautifully crafted email.
Tara baked the batter in a loaf pan. Her description of this loaf is so lyrical. I want to write like this when I grow up.😉 “Out of the oven the texture is almost spongy; jaunty and open. As the cake sits, it settles, relaxing into a sturdiness that is exactly right and as it should be. The crust establishes itself with a gentle crunch as it meets the teeth, while the centre fluff gives way with a velvet weight.“
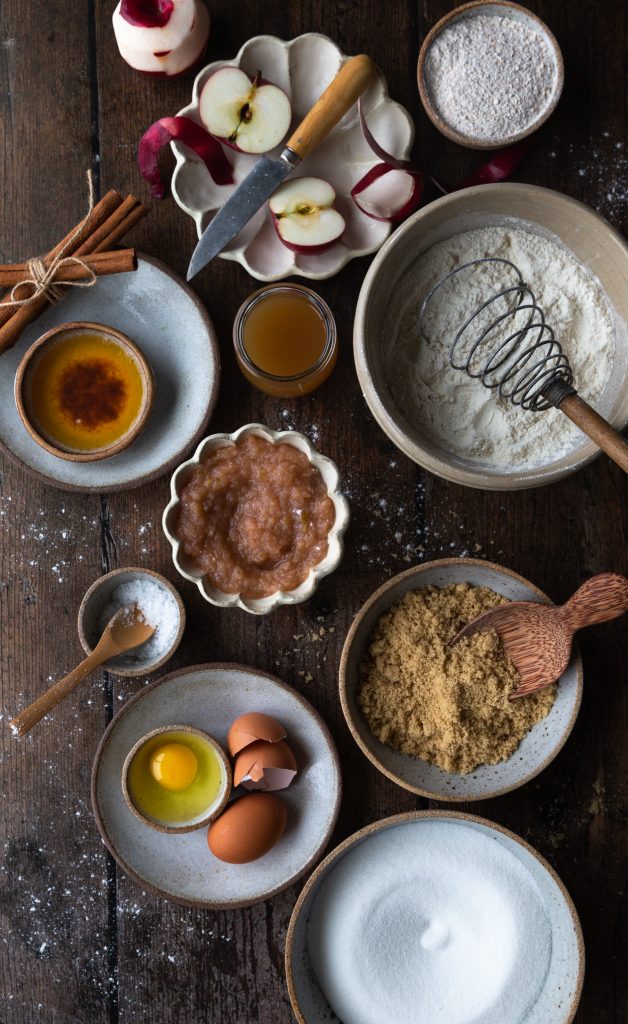
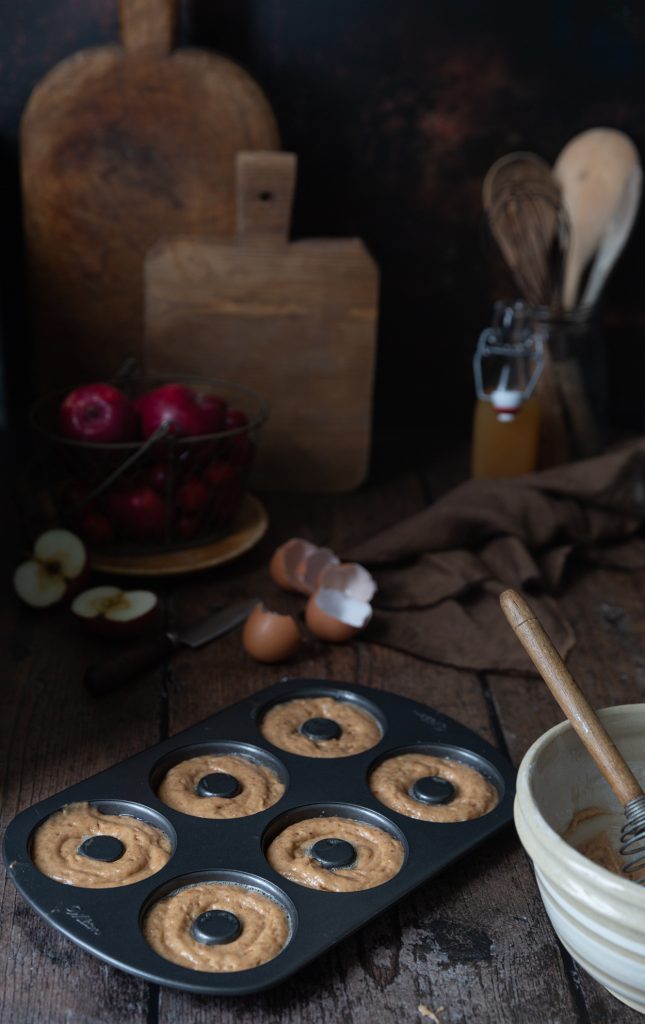
I made the loaves and fell in love with her recipe. Apples are featured prominently. The batter calls for reduced apple cider and applesauce. I wondered what would happen if I baked the batter in doughnut pans. You could also bake them in muffin tins, but they will take a few minutes longer to bake.
As I was assembling the ingredients, I realized I had run out of applesauce, but I had a jar of apple butter leftover from baking this.
There is no actual butter in apple butter. Apple butter is basically concentrated applesauce, or as I like to describe it, “applesauce on steroids“. Alex Delaney wrote a brilliant article explaining the difference.
The doughnuts come together fairly quickly. You will need to reduce the apple cider and brown the butter in advance.
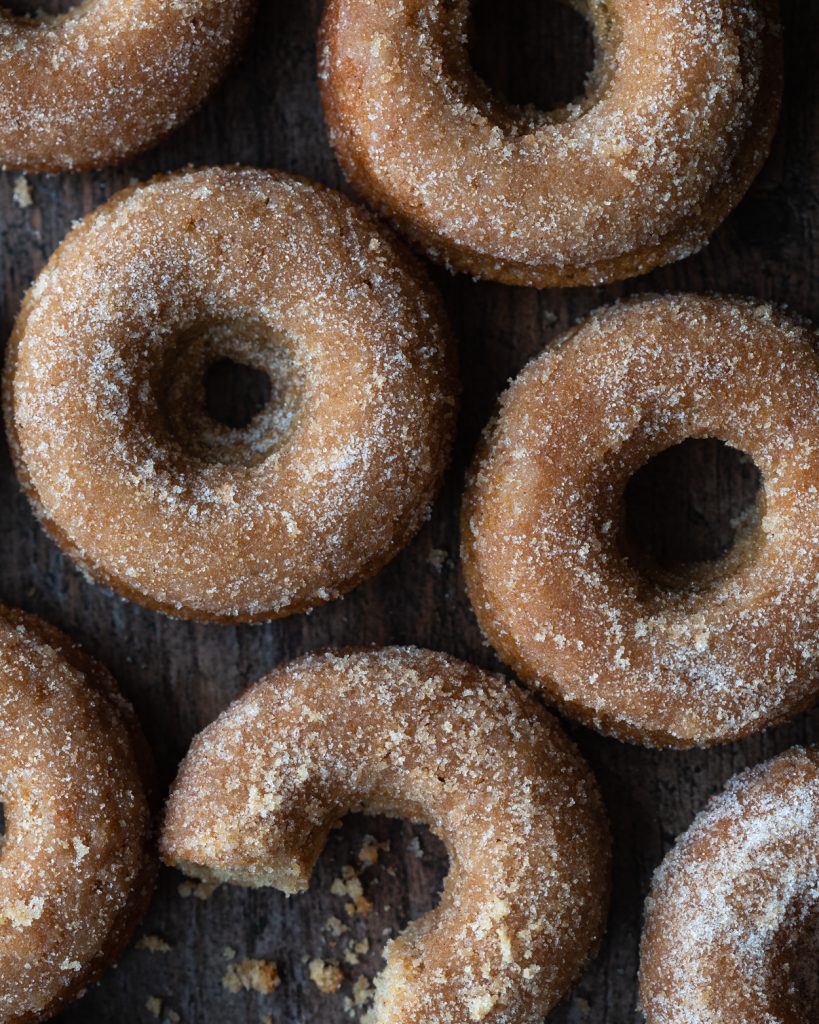
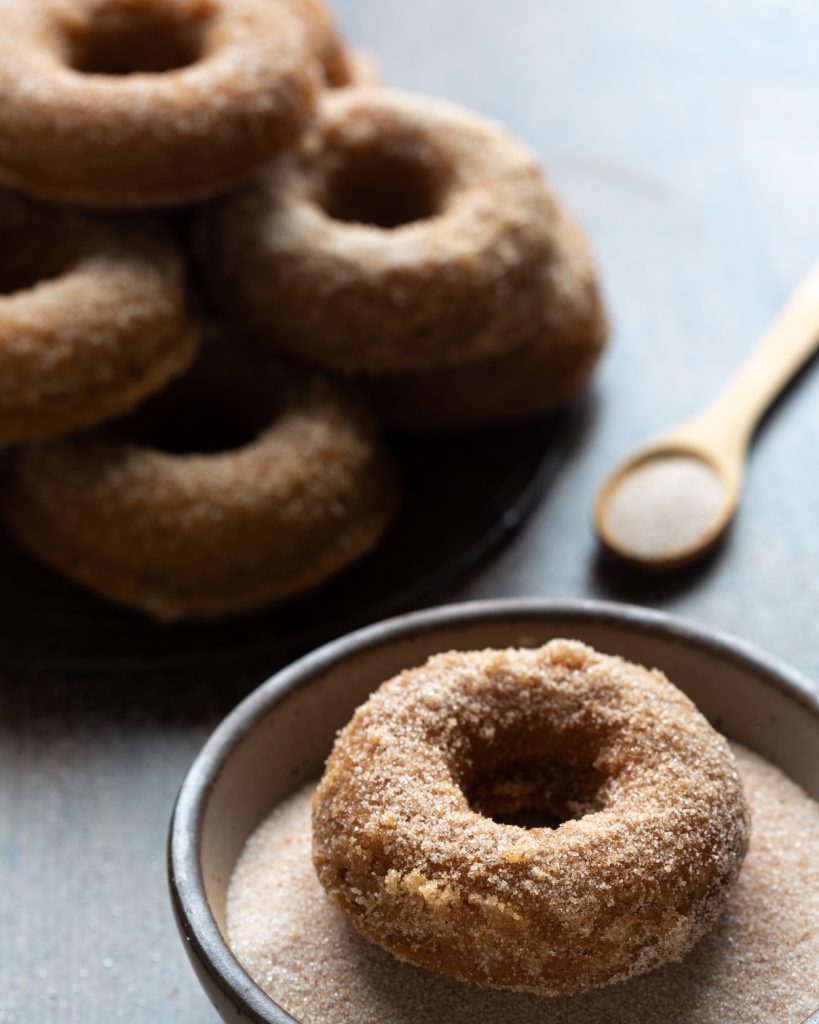
While the doughnuts are delicious plain, dipping them in browned butter and then rolling them in cinnamon-sugar takes them over the top, so don’t skip this step!
I baked these doughnuts several times, the first time to just test the recipe, the second time to shoot the photos and the third time to shoot the video. Luckily I live in a condo and have several neighbours who happily take the leftovers. I also discovered that they freeze beautifully. Wrap individual doughnuts in plastic wrap and place them all in a freezer bag. They will thaw at room temperature in about 45 minutes.
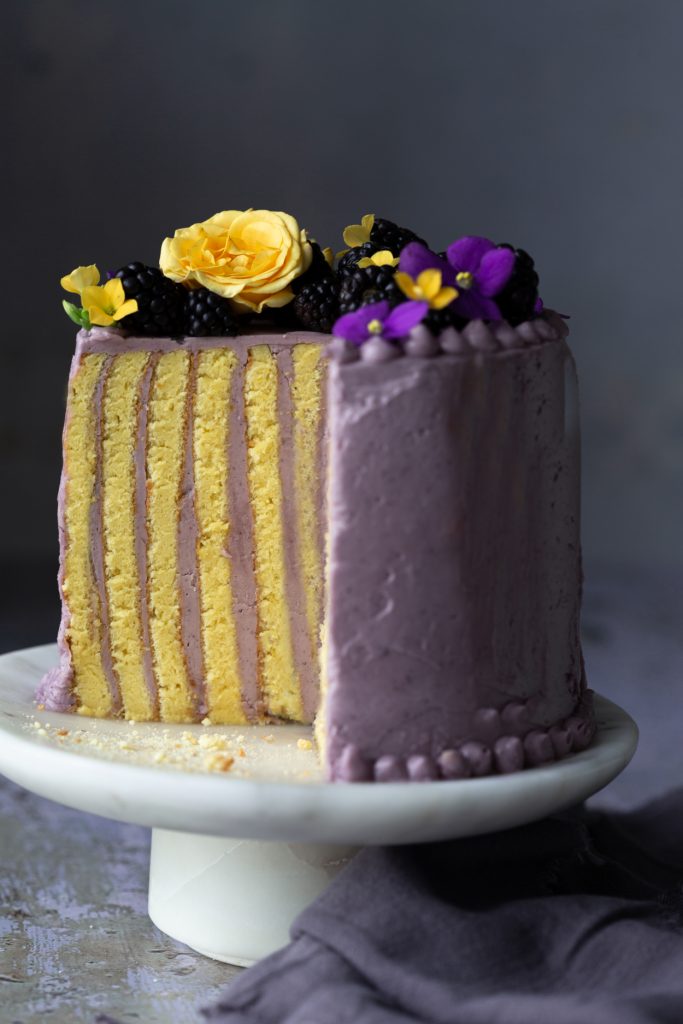
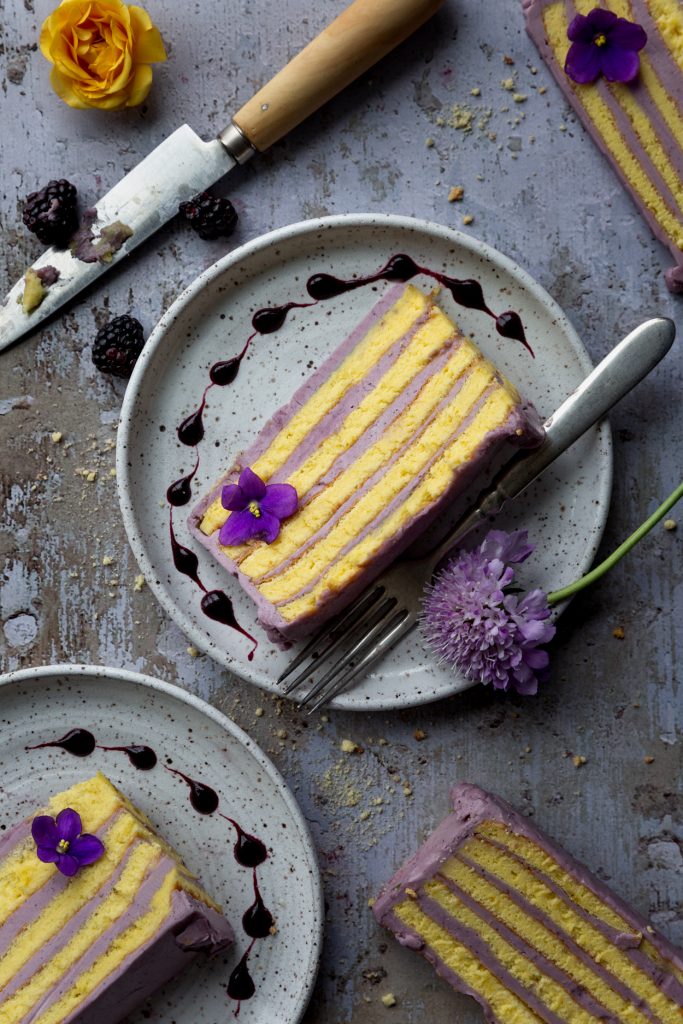
Baking is my happy place and I love to challenge myself with advanced techniques to create something I have never done before. This vertical stripe cake has been on my list of “must bake” for quite a while now. Cutting into a cake and revealing vertical layers of cake and icing, instead of the usual horizontal, is such an unexpected delight and surprise. There are so few good surprises left in life anymore.
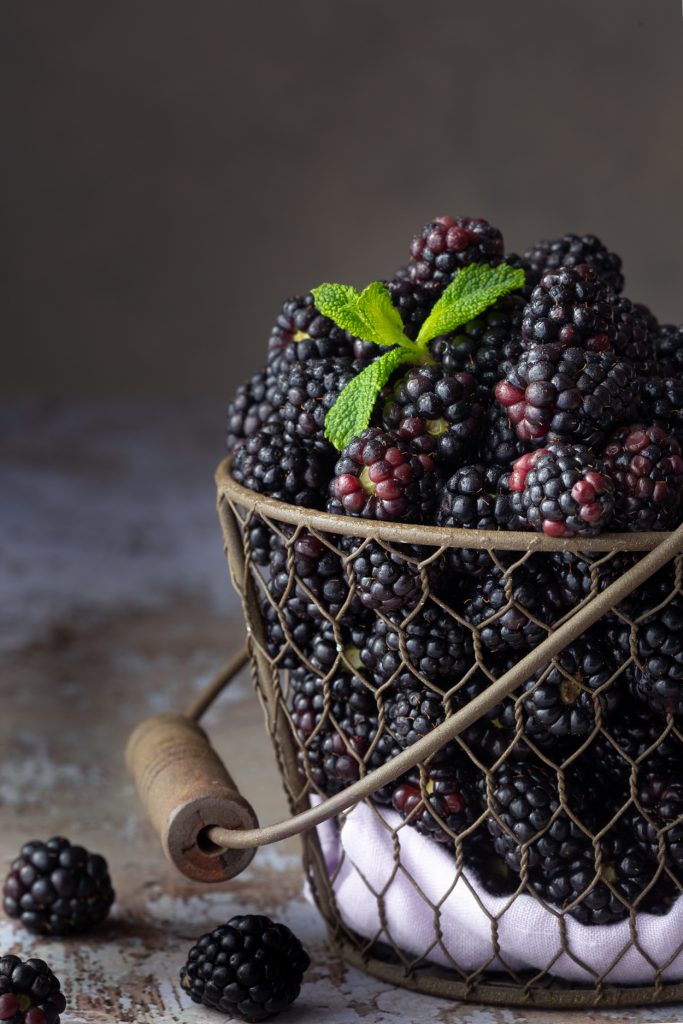
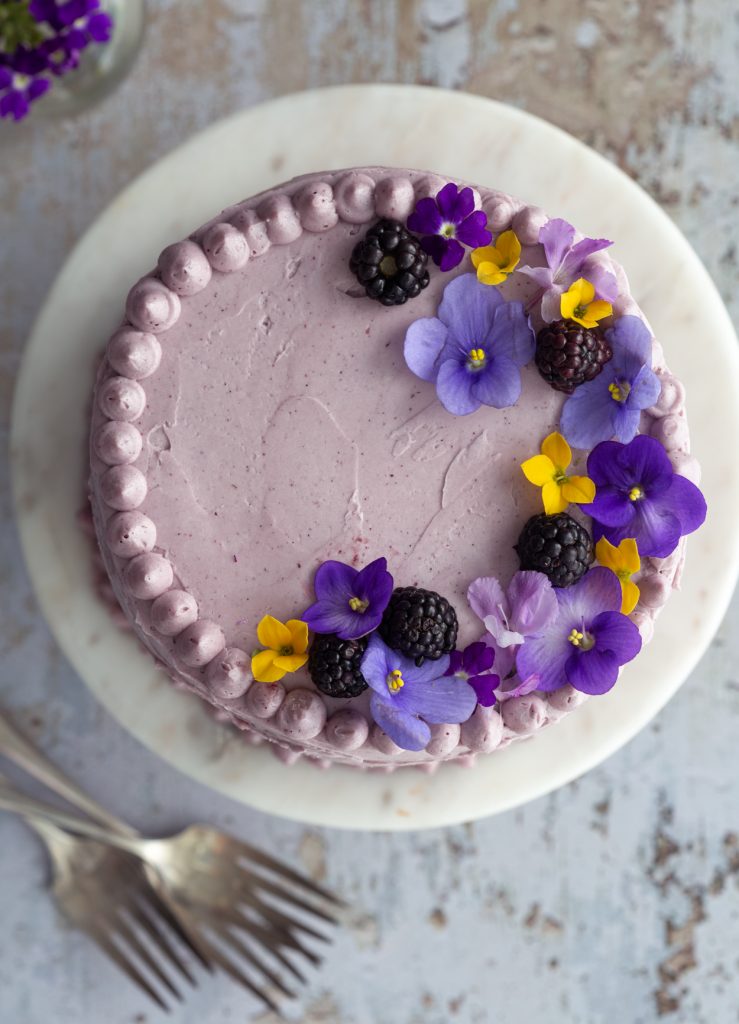
This cake is inspired by the Lemon and Blackcurrant Stripe Cake in Sweet. I could not find black currants, so I used blackberries instead. The berries are used to make a sauce to flavour the buttercream. In the original recipe, they used some of the sauce to create a “drip cake”, but I have never been successful in getting the sauce to drip artistically down the sides. I always make a bloody mess. I decided to just top it with some berries and flowers and use the extra sauce to serve on the side.
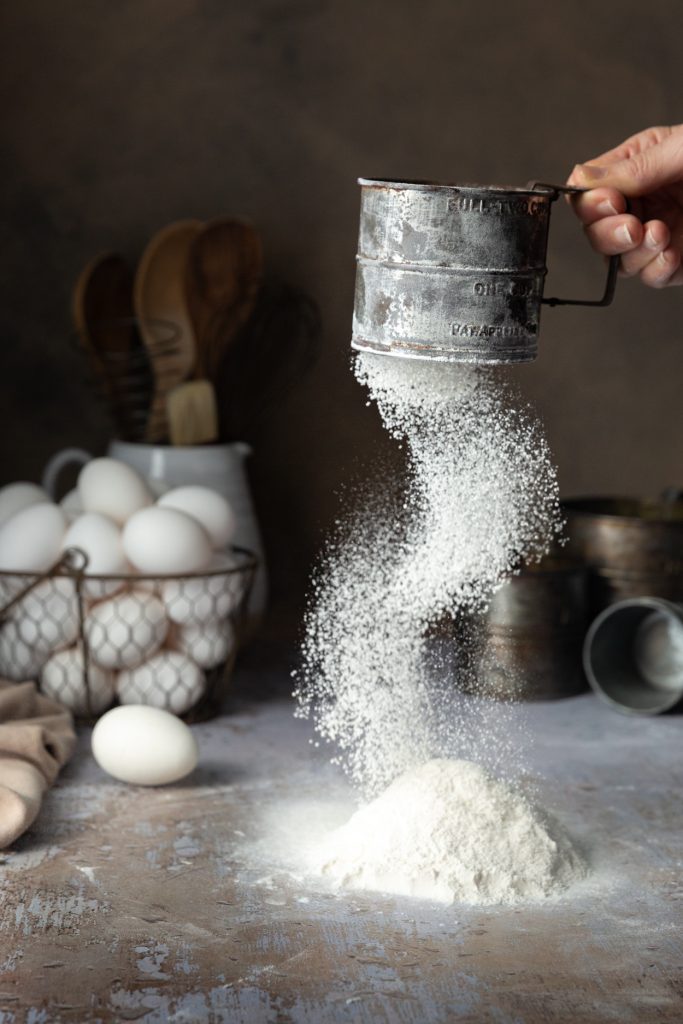
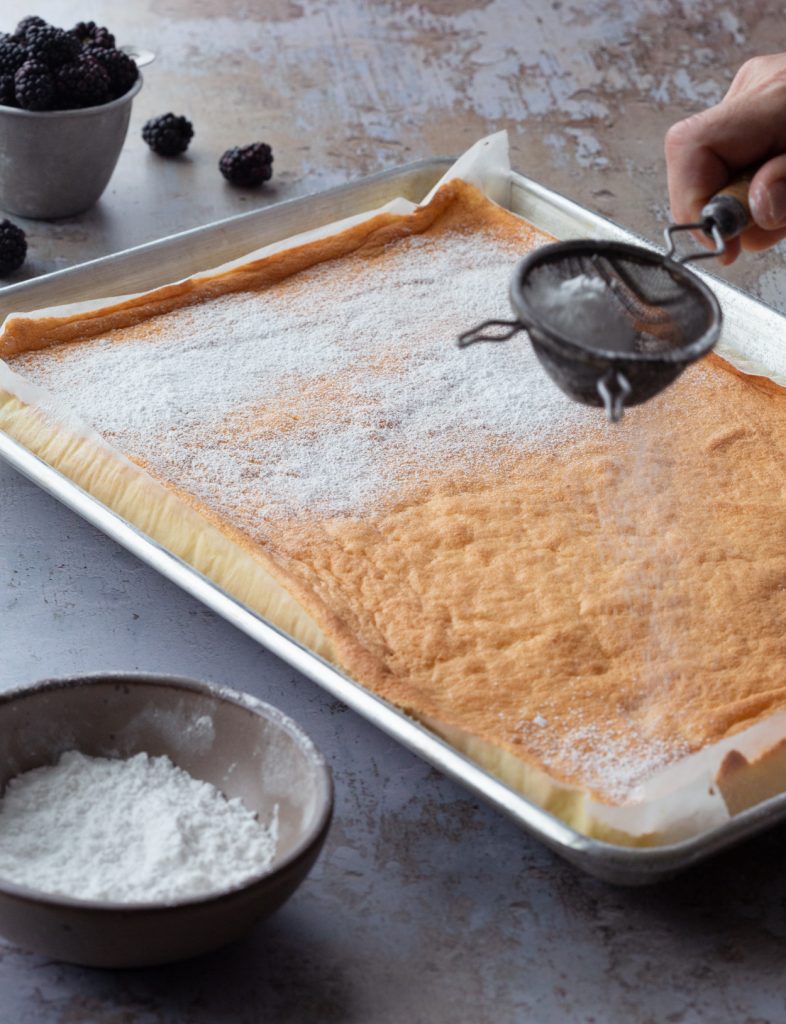
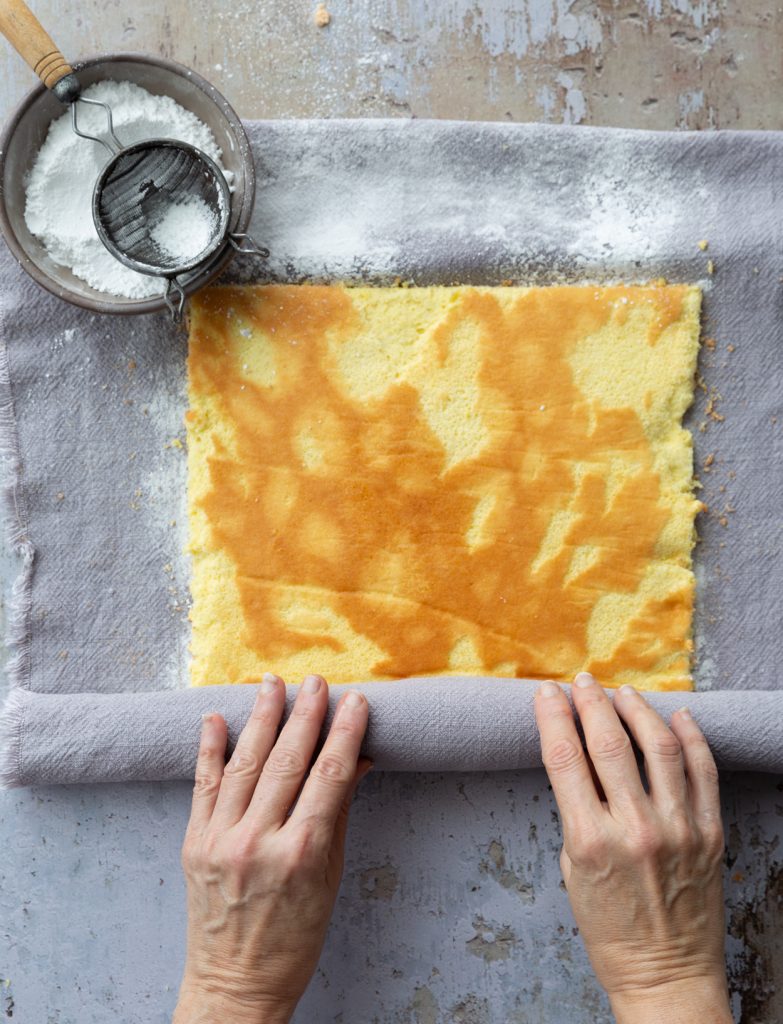
The batter for the cake is a light lemon sponge. It’s baked in a jellyroll pan.
Once the cake is baked, let it cool for 5 minutes. Then dust with icing sugar, and cover with a clean towel. Flip the whole thing over, peel off the baking sheet and parchment paper and roll up the warm cake in the towel.
This step “trains” the cake to roll up later without cracking. Once cooled, unroll and cut into three long rectangles.
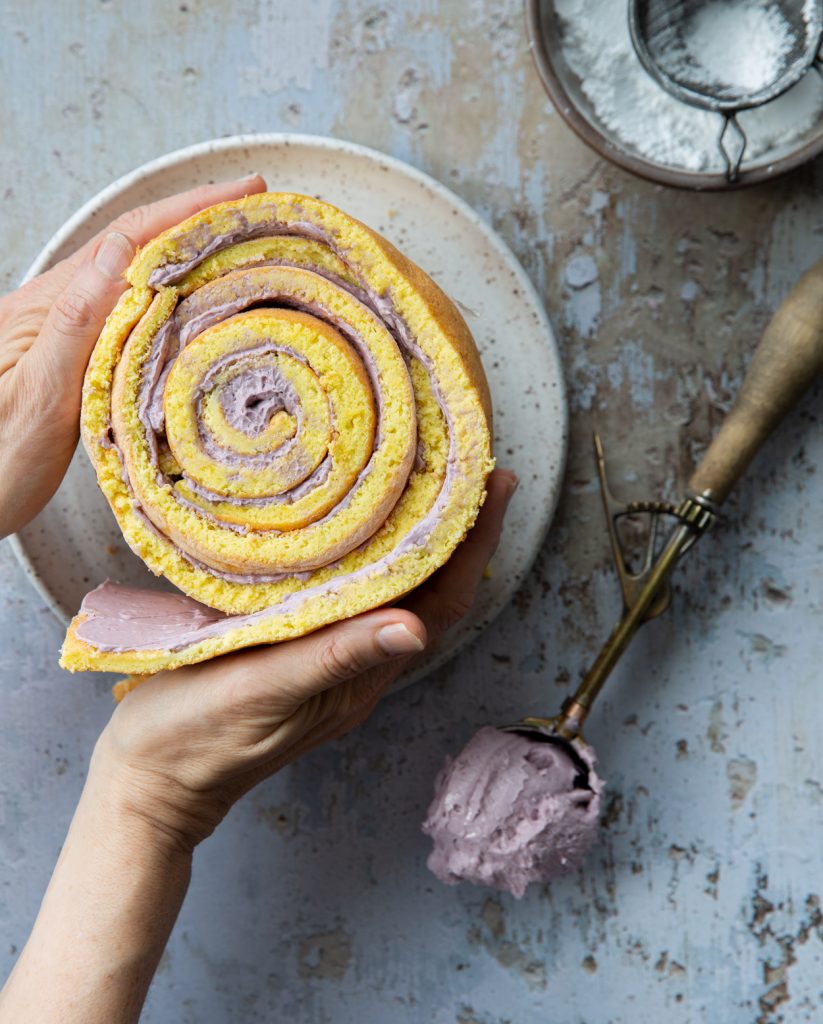
Spread each rectangle with some of the buttercream. The original recipe called for a French buttercream. This type of buttercream uses egg yolks. I find it a bit too rich for this cake, so I went with a Swiss Meringue Buttercream, which uses just the egg whites.
The three strips of cake are rolled up into one wide barrel. Stand it on its end and you have a vertical stripe cake. You can see in the photo below, where the strips have been joined. Then cover the entire cake in more buttercream.
I created a simple decoration of flowers and blackberries.