

To say that I have been doing a lot of travelling lately would be an understatement. Over the course of 8 days, in the later half of October I was on 6 airline flights. I was in Philadelphia to help my aunt celebrate her 80th birthday. From there I flew to Tel Aviv to help my brother-in-law celebrate his 50th birthday (and what a celebration that was!) and then went to Boston to visit my daughter for “Family Weekend” at her college.
This is all a long winded way of telling you that now I am sick! I’m not surprised. Breathing in everyone else’s germs on all those flights was bound to lead to this. My throat is sore, I have a headache and I am coughing something fierce. I was lying in bed feeling sorry for myself and wishing for some of my mom’s chicken soup. Since I live in Ottawa and she lives in Toronto, that wish wasn’t about to come true. So I hauled my sad self out of bed and made my own. Of course I had to share with you.
Making good chicken soup is a lot like making good bread. It takes time. But it is unattended time. You can be busy doing other things (like coughing and sneezing and napping) while the soup cooks. There are only two things you need to know to make good chicken soup. The first is that you must use chicken stock, not water, as the liquid. The second is that you must allow enough time to chill the soup, after cooking, so that all the fat can be removed. If you follow these two rules, you will have wonderful chicken soup.
Chicken stock is a mystery to many people. Exactly what is it and how is it made? Stock is simply chicken bones, simmered, in water, with aromatic vegetables (typically, carrots, onion and celery) until the bones have given every ounce of their flavour to the liquid. This usually takes about 2-3 hours.
In every good restaurant you will find a pot of stock simmering on the back burner. Throughout the day, chicken bones and vegetable scraps are thrown into the pot. At the end of the day the pot is strained and the liquid is chilled overnight. The next day the hardened fat is skimmed from the pot and the remaining liquid is used in soups and sauces. It can be used in place of water for cooking rice and other grains. Good stock is the foundation for great tasting soups. Chicken bones are easily purchased from the butcher . (what did you think they did with the bones after deboning all those chicken breasts?)
Exact recipes for chicken stock and chicken soup can be found at the end of this post, but here is a pictoral version.
Begin by making a big pot of chicken stock. Fill a large pot with about 8 pounds of chicken bones and fill with cold water, just covering the bones. Bring to a boil and then remove the foam from the top layer.


Add some carrots, celery, onions, bay leaves, peppercorns and parsley stems. Simmer for 2 hours.


Now your chicken stock is done. Just strain the liquid and discard all the solids. (I like to save the carrots. Although they have no nutritional value whatsoever after being cooked for 2 hours, they are delicious and I add them to my finished soup) Pour the strained stock over fresh chicken bones and a whole chicken. Bring to a boil, remove foam from top, add fresh carrots, celery, onions. bay leaf, peppercorns and parsley stems. Simmer for 2 more hours.


After the bones and chicken have given all their flavour (about 2 hours) strain the soup. I save these carrots as well, to add to my finished soup. Using 2 forks, remove skin and bones from whole chicken and shred the meat into bite sized pieces. Put reserved carrots and shredded chicken into fridge. Let pot of strained soup sit on the counter until cooled a little bit. Cover pot and chill in fridge overnight. The next day, remove layer of hardened fat off the top.


Bring soup to a boil, add salt and pepper to season. Add carrots, chicken and some boiled wide egg noodles. Serve. Sigh!

Then make a wish to feel better so you can travel somewhere warm to escape the snow! (yes it snowed last night in Ottawa!)

Chicken Soup
Click here to print recipe
Serves 6
1 whole chicken
7 pounds chicken bones
12 cups chicken stock (recipe below)
2 medium onions, peeled and quartered
4 large carrots, peeled and cut into 2 inch lengths
2 celery stalks (with leaves), cut into 2 inch lengths
2 parsley stems (not the leaves)
10 black whole peppercorns
1 dried bay leaf
salt and black pepper to taste
chopped parsley and/or dill
cooked egg noodles or white rice, if desired
- Pour chicken stock into a large stockpot. Add chicken bones and whole chicken and bring to a boil. Turn the heat down to low and, using a slotted spoon, skim off the foam that has risen to the top. Add vegetables, bay leaf, parsley stems and whole peppercorns. Let simmer for about 2 hours.
- Strain the soup and transfer it to a clean pot. I love the flavour of the cooked carrots, so I always save them to serve in the soup. Using 2 forks, remove skin and bones from whole chicken and shred the meat into bite sized pieces. Discard all bones and other vegetables.
- Put reserved carrots and shredded chicken into fridge. Let pot of strained soup sit on the counter until cooled a little bit. Cover pot and chill in fridge overnight. The next day, remove layer of hardened fat off the top.
- Bring cold soup to a boil. Turn down heat and add cooked egg noodles or rice, reserved carrots and chicken and simmer for about 5 minutes, Add salt and pepper to taste. Sprinkle with fresh parsley and/or dill.
Chicken Stock
Makes 12 cups
8 pounds chicken bones
12 cups cold water
2 onions, peeled and quartered
2 carrots , peeled and cut into 2 inch lengths
2 celery stalks (with leaves), cut into 2 inch lengths
2 dried bay leaves
2 parsley stems (not the leaves)
10 whole black peppercorns
- Place bones and water in a stockpot and bring to a boil.
- Reduce heat to a simmer and using a slotted spoon, skim off any foam on the surface. Add remaining ingredients and simmer, uncovered, for 3 hours.
- Strain liquid and discard all the vegetables and bones.
- Refrigerate stock and remove layer of fat from the top. Use stock as needed, or freeze in small containers for a later use. Stock keeps well in the freezer for 4 months.
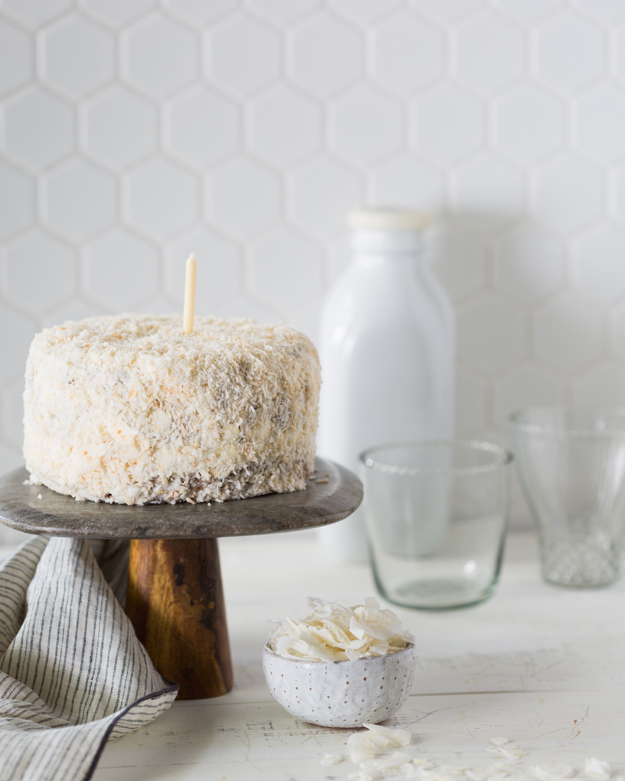
 Yesterday was my birthday and I began the day by baking my own cake. Now don’t go feeling sorry for me. I have been baking my own cake for many years now. When I was younger, my sister had a friend who worked at a bakery. Every year she would bake and decorate her own birthday cake. We always thought it was the saddest thing. However, now that I’m grown up, I think that baking your own birthday cake is a joyous thing to do. Think about it. No having to be gracious and pretending to be thrilled when someone brings you a chocolate cake, when what you really wanted was carrot cake.
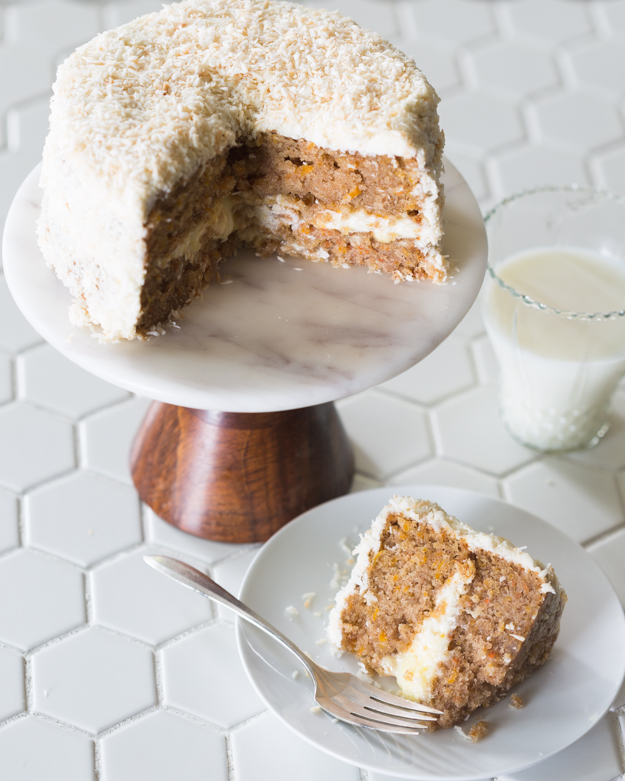


